

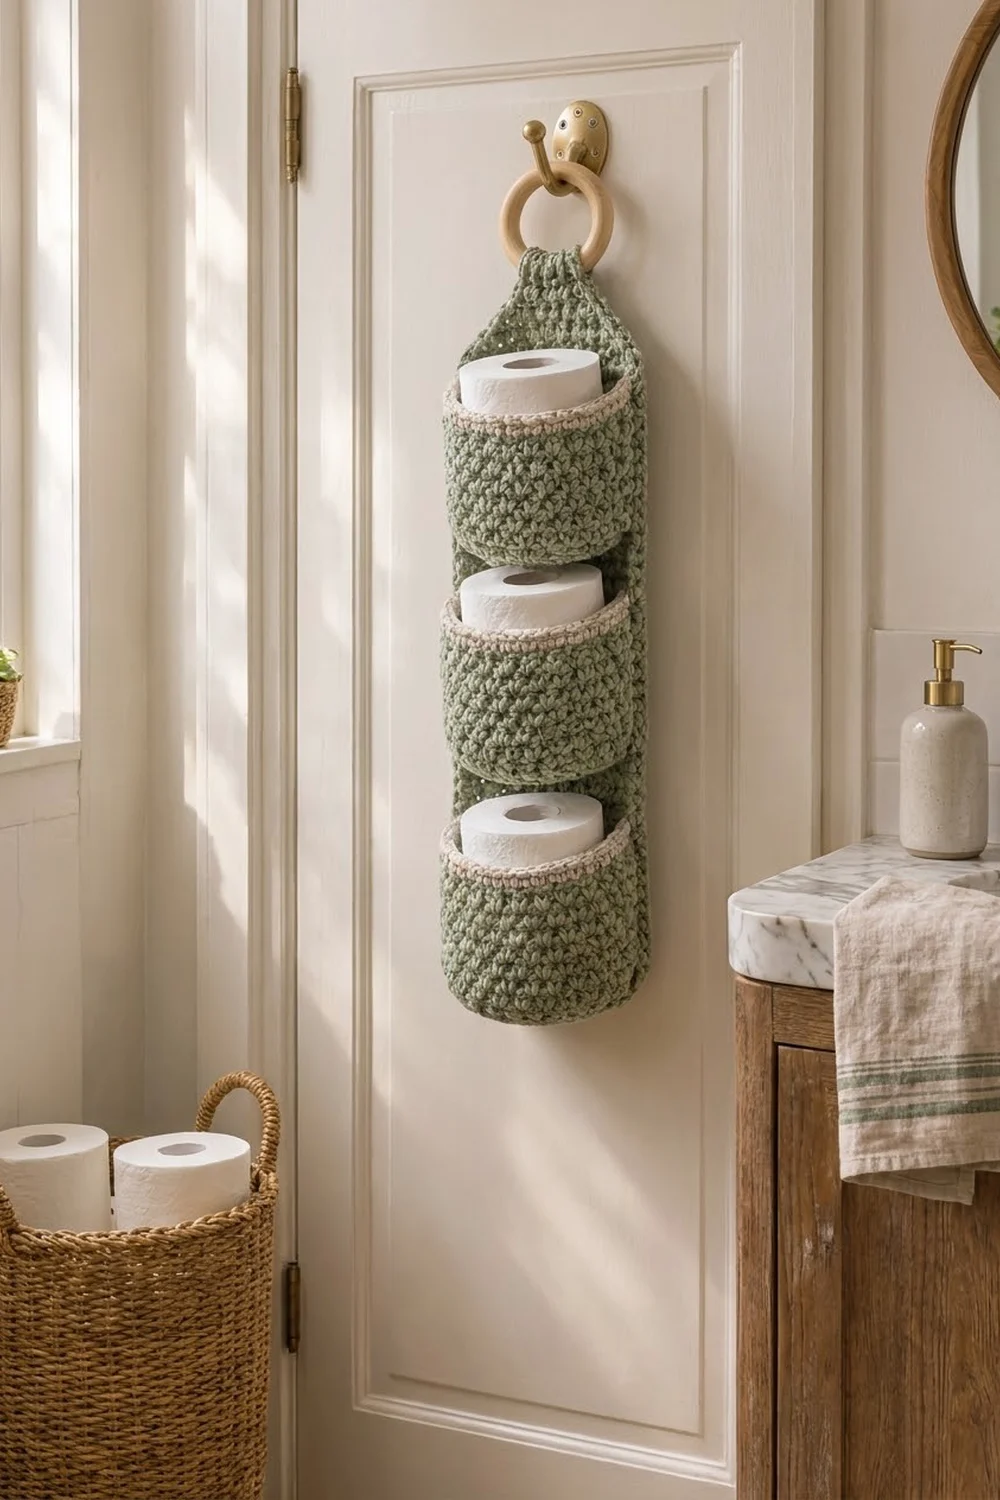
The Sage Stack is a hanging toilet paper organizer that holds three spare rolls on the back of a door, a wall hook, or a towel bar. It has a long back panel in soft sage green and three round pockets, each with a crisp cream rim.
The fabric is griddle stitch, which simply alternates single crochet and double crochet. It gives a dense, pebbly texture that holds its shape, so the pockets stand open and do not sag. The look is calm and modern and suits a neutral bathroom.
This pattern uses US crochet terms. The finished organizer is 6 in (15.2 cm) wide and about 22 1/2 in (57.2 cm) long from the bottom edge to the fold of the hanging strap, not counting the 2 1/2 in (6.4 cm) wooden ring.
You make one back panel flat in rows, with a tapered top and a narrow strap. Then you make three pockets in the round: a flat circular base, griddle-stitch walls, and a cream rim. Finally you add a single crochet border to the panel, sew the pockets on, and fold the strap over the ring.
Finished Size and Construction
- Finished size: 6 in (15.2 cm) wide x 22 1/2 in (57.2 cm) long, hanging
- Skill level: Easy / advanced beginner
- Terminology: US
- Yarn weight: Worsted (#4)
- Hook: 5 mm (H-8)
- Number of pieces: 4 (1 back panel, 3 pockets) plus 1 wooden ring
- Layout: 3 pockets stacked in a single vertical column
- Pocket size: 4 3/4 in (12.1 cm) base diameter, 3 3/4 in (9.5 cm) wall height
- Panel before border: 5 1/2 in (14.0 cm) wide x 24 1/3 in (61.8 cm) long, laid flat with the strap unfolded
- Border depth: 1/4 in (0.6 cm), 1 round of sc
Materials
Choose a smooth worsted-weight yarn. A cotton-acrylic blend is ideal: it is firm enough to hold the pockets open and handles bathroom humidity. Avoid very fuzzy yarn, which hides the griddle texture.
- Sage green (Color A): 130 g / 260 m (284 yd)
- Cream (Color B): 20 g / 40 m (44 yd)
These amounts assume about 200 m per 100 g and include a margin of roughly 20 percent.
Tools:
- 5 mm (H-8) crochet hook
- Wooden ring, 2 1/2 in (6.4 cm) outer diameter
- Tapestry needle
- 4 locking stitch markers
- Scissors
- Tape measure
- Blocking mat and pins
Abbreviations (US Terms)
- ch – chain
- sc – single crochet
- dc – double crochet
- sl st – slip stitch
- st(s) – stitch(es)
- MR – magic ring
- BLO – back loop only
- sc2tog – single crochet 2 together
- RS – right side
Griddle stitch (special stitch): Work over an even number of sts. Alternate sc and dc across. On every row or round after that, work a sc into each dc and a dc into each sc. This staggers the stitches and creates the pebbly texture.
Gauge and Checkpoints
Gauge: 16 sts and 12 rows = 4 in (10.2 cm) in griddle stitch. In single crochet, 16 sts = 4 in (10.2 cm). That means 4 sts and 3 rows per inch.
Make one pocket first. It uses the same hook, both stitches, and both colors, so it is the best way to test your gauge before you start the long panel.
Checkpoints:
- Pocket base, Rnd 5 (30 sts): 2 3/8 in (6.0 cm) diameter
- Pocket base, Rnd 10 (60 sts): 4 3/4 in (12.1 cm) diameter
- Pocket wall after Rnd 20: 3 1/4 in (8.3 cm) tall
- Panel, Row 12: 22 sts measure 5 1/2 in (14.0 cm) wide and the work is 4 in (10.2 cm) tall
- Panel, Row 54: 18 in (45.7 cm) tall
If your work is too big, go down half a hook size. If it is too small, go up half a hook size. A base that ruffles means your tension is loose. A base that cups means it is tight.

Pocket (Make 3)
The pocket is worked in joined rounds with RS facing throughout. Keep the round joins in a straight line. This line becomes the back center of the pocket and is hidden against the panel.
Base (Color A):
- Rnd 1: 6 sc in MR, join with sl st to first sc. (6 sts)
- Rnd 2: Ch 1, 2 sc in each st around, join. (12 sts)
- Rnd 3: Ch 1, sc in next st, 2 sc in next st; rep from * around, join. (18 sts)
- Rnd 4: Ch 1, sc in next 2 sts, 2 sc in next st; rep around, join. (24 sts)
- Rnd 5: Ch 1, sc in next 3 sts, 2 sc in next st; rep around, join. (30 sts)
- Rnd 6: Ch 1, sc in next 4 sts, 2 sc in next st; rep around, join. (36 sts)
- Rnd 7: Ch 1, sc in next 5 sts, 2 sc in next st; rep around, join. (42 sts)
- Rnd 8: Ch 1, sc in next 6 sts, 2 sc in next st; rep around, join. (48 sts)
- Rnd 9: Ch 1, sc in next 7 sts, 2 sc in next st; rep around, join. (54 sts)
- Rnd 10: Ch 1, sc in next 8 sts, 2 sc in next st; rep around, join. (60 sts)
The base should lie flat and measure 4 3/4 in (12.1 cm) across.
Walls (Color A):
- Rnd 11 (turning round): Ch 1, sc in BLO of each st around, join. (60 sc worked 1 per existing st + 0 added = 60 sts.) The unused front loops form a ridge that turns the work upward.
- Rnd 12: Ch 1, sc in next st, dc in next st; rep around, join to first sc. (60 sts: 30 sc, 30 dc)
- Rnd 13: Ch 2 (does not count as a st), dc in next sc, sc in next dc; rep around, join to first dc. (60 sts)
- Rnds 14–20: Repeat Rnds 12 and 13 alternately, ending with a Rnd 12. (60 sts each round)
Fasten off Color A. The wall now measures 3 1/4 in (8.3 cm) from the ridge.
Rim (Color B):
- Rnd 21: Join Color B at the back-center join. Ch 1, sc in each st around, join. (60 sc worked 1 per existing st + 0 added = 60 sts)
- Rnd 22: Ch 1, sc in each st around, join. (60 sts)
Fasten off and weave in. Join a 24 in (61.0 cm) length of Color A at the base for sewing later. The finished pocket is 4 3/4 in (12.1 cm) across and 3 3/4 in (9.5 cm) tall.
Back Panel
The panel is worked flat in rows with Color A. Each row begins with ch 1, which does not count as a stitch, and always starts with a sc.
Body:
- Row 1: Ch 23. Sc in 2nd ch from hook, dc in next ch, sc in next ch, dc in next ch; rep from * across. (22 sts: 11 sc, 11 dc)
- Row 2: Ch 1, turn. Sc in next dc, dc in next sc; rep across. (22 sts)
- Rows 3–54: Repeat Row 2. (22 sts each row)
The body measures 5 1/2 in (14.0 cm) wide and 18 in (45.7 cm) tall.
Taper: Each taper row loses 1 st at each end. The count shown is that row’s complete count.
- Row 55: Ch 1, turn. Sc2tog, dc in next st, sc in next st 9 times, sc2tog. (20 sts)
- Row 56: Ch 1, turn. Sc2tog, dc, sc 8 times, sc2tog. (18 sts)
- Row 57: Ch 1, turn. Sc2tog, dc, sc 7 times, sc2tog. (16 sts)
- Row 58: Ch 1, turn. Sc2tog, dc, sc 6 times, sc2tog. (14 sts)
- Row 59: Ch 1, turn. Sc2tog, dc, sc 5 times, sc2tog. (12 sts)
- Row 60: Ch 1, turn. Sc2tog, dc, sc 4 times, sc2tog. (10 sts)
- Row 61: Ch 1, turn. Sc2tog, dc, sc 3 times, sc2tog. (8 sts)
Each row uses 2 + (pairs x 2) + 2 sts from the row below, which always equals the previous row’s count. The texture shifts slightly in the taper. This is normal and not visible once the piece hangs. The taper adds 2 1/3 in (5.9 cm).
Strap:
- Rows 62–73: Ch 1, turn. Work griddle stitch across, starting with a sc in the first st. (8 sts each row)
The strap is 2 in (5.1 cm) wide and 4 in (10.2 cm) long. Do not fasten off. Continue straight into the border.
Make All Pieces
- Color A: 1 back panel (22 sts x 54 rows body, taper to 8 sts, 12-row strap) and the bases and walls of 3 pockets
- Color B: the 2-round rims of 3 pockets
Layout (front view, top to bottom):
      [ wooden ring ]
         [strap]
        / taper \
| gap: Rows 48–54        |
| Pocket 3: from Row 37  |
| gap                    |
| Pocket 2: from Row 19  |
| gap                    |
| Pocket 1: from Row 1   |
The pockets are spaced 18 rows apart, or 6 in (15.2 cm) from base to base.
Border
Border gauge: 4 sc per inch, which matches the griddle stitch width. The panel has 3 rows per inch, so work 4 sc for every 3 row ends along the straight sides.
Use Color A. With RS facing and the last strap row just finished, work one round. Each corner is made with 3 sc in the corner st.
- Strap top (8 sts): 3 sc in first st, sc in next 6 sts, 3 sc in last st. (12 sc)
- Left strap side (12 rows): 4 sc per 3 row ends. (16 sc)
- Left taper (7 rows): 2 sc in each of the first 5 row ends, 1 sc in each of the last 2. (12 sc)
- Left body side (54 rows): 4 sc per 3 row ends. (72 sc)
- Bottom edge (22 sts, worked into the foundation ch): 3 sc in first st, sc in next 20 sts, 3 sc in last st. (26 sc)
- Right body side: 72 sc, worked like the left side.
- Right taper: 12 sc, the left taper in reverse order (1 sc in each of the first 2 row ends, then 2 sc in each of the last 5).
- Right strap side: 16 sc.
Join with a sl st to the first sc. Total: 12 + 16 + 12 + 72 + 26 + 72 + 12 + 16 = 238 sc. Fasten off and weave in.
Why the math works: Each body side has 54 rows, or 18 groups of 3 rows. 18 groups x 4 sc = 72 sc, and 72 sc at 4 per inch equals 18 in (45.7 cm), the exact body length. The bottom has 22 sts plus 2 extra at each corner (26 sc), so the corners turn flat without pulling. The border adds 1/4 in (0.6 cm) on each side, bringing the width from 5 1/2 in (14.0 cm) to 6 in (15.2 cm).
Joining
Sew the pockets on after the border, using Color A and a whipstitch.
- Mark the panel. Place markers in Rows 1, 19 and 37. Find the 2nd and 21st body sts from the edge. These two stitch columns are 20 sts, or 5 in (12.7 cm), apart.
- Mark the pocket. The round join is the back center. Count 10 sts to each side of it on Rnd 11 and mark them. These 20 sts form the flat back of the pocket.
- Sew the base. Lay the pocket on the panel with the base’s front-loop ridge along the marked row. Whipstitch each of the 20 back sts of Rnd 11 to one panel st between columns 2 and 21. That is 20 pocket sts to 20 panel sts, stitch for stitch.
- Sew the sides. From each end of that seam, whipstitch the wall straight up the marked panel column. Match one wall round to one panel row through Rnd 20, since both work up at 3 rows per inch. For the two cream rounds, take 2 stitches into about 1 1/2 panel rows.
- Leave the front free. The other 40 wall sts curve forward to form the open cup.
Keep your tension even and firm, but don’t pull the seams so tight that the panel puckers. After each pocket, check that the panel still lies flat and measures 6 in (15.2 cm) wide.
Repeat for Pockets 2 and 3. Size checkpoint: each pocket rim should sit about 3 3/4 in (9.5 cm) above its base row. The top rim should end about 2 1/4 in (5.7 cm) below the start of the taper.
Attach the ring: Fold the strap over the wooden ring to the back. Sew the strap’s top edge to the back of the panel just above the taper, at Row 62. The folded loop rises about 2 in (5.1 cm) above the taper.
Final Blocking
- Before you attach the ring, wet-block the panel only.
- Soak it in lukewarm water for 10 minutes, then press out the water in a towel without wringing.
- Pin it flat to 6 in (15.2 cm) wide and 24 1/3 in (61.8 cm) long plus border, with the strap straight.
- Let it dry completely.
- For the pockets, put a toilet roll wrapped in a plastic bag inside each one, mist lightly, and let them dry in shape.
- Sew on the pockets and attach the ring once everything is dry.
Final Quality-Control Checklist
- Panel is 6 in (15.2 cm) wide along the full body length
- Border has 238 sc and the corners lie flat
- Each pocket base has 60 sts and measures 4 3/4 in (12.1 cm)
- All round joins are hidden against the panel
- Pocket bases sit at Rows 1, 19 and 37, 6 in (15.2 cm) apart
- Each pocket holds a roll without stretching the seams
- Strap is sewn securely and the ring turns freely
- All ends are woven in on the back
Troubleshooting
- Pocket base cups: Your increases are too tight. Go up half a hook size for the base only.
- Base ruffles: Your tension is loose. Go down half a hook size or tighten your sc.
- Griddle texture looks like plain stripes: You are working sc into sc. Always put sc into dc and dc into sc.
- Panel edges wave: You are working more than 4 sc per 3 row ends. Undo and recount.
- Panel sags under weight: Your fabric is too loose. Use a smaller hook and a firmer yarn.
- Pocket leans sideways: The 20 back sts are not centered on the join. Unpick the seam and re-mark.
Care
Hand wash in cool water and lay flat to dry. Remove the ring before washing if it is untreated wood.
Final Notes
The measurement chain is simple: 4 sts and 3 rows per inch. That gives a pocket base of 60 sts at 4 3/4 in (12.1 cm) and a panel body of 22 sts x 54 rows at 5 1/2 in x 18 in (14.0 cm x 45.7 cm). The 238-sc border then brings the width to 6 in (15.2 cm). Check your gauge on the first pocket and every other number will follow.
Happy crocheting!