

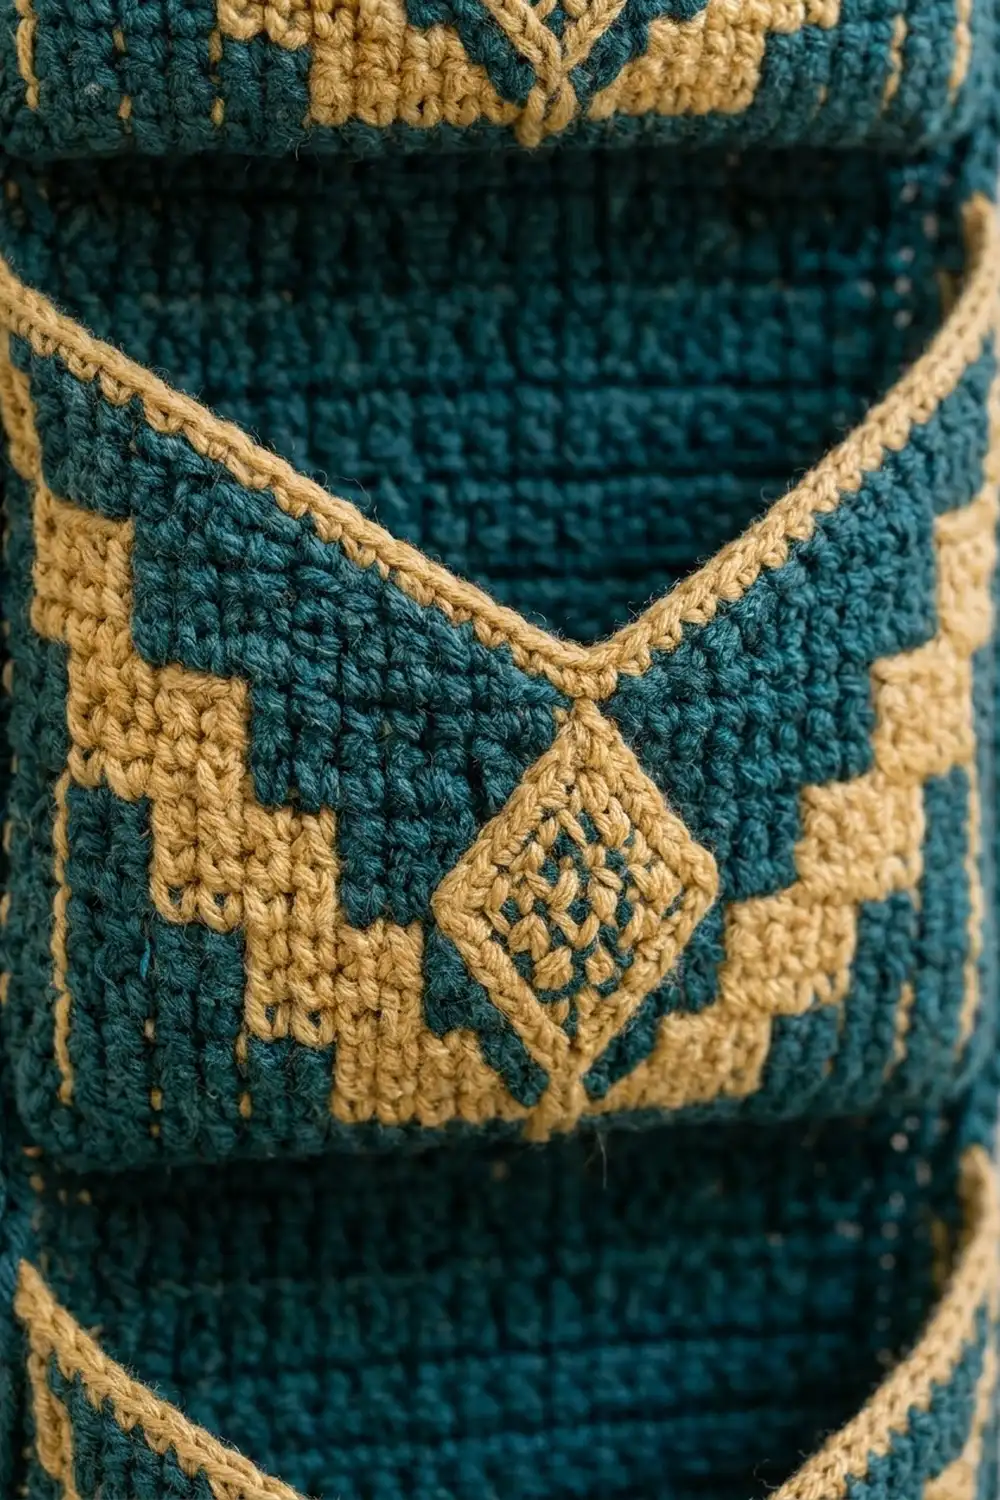
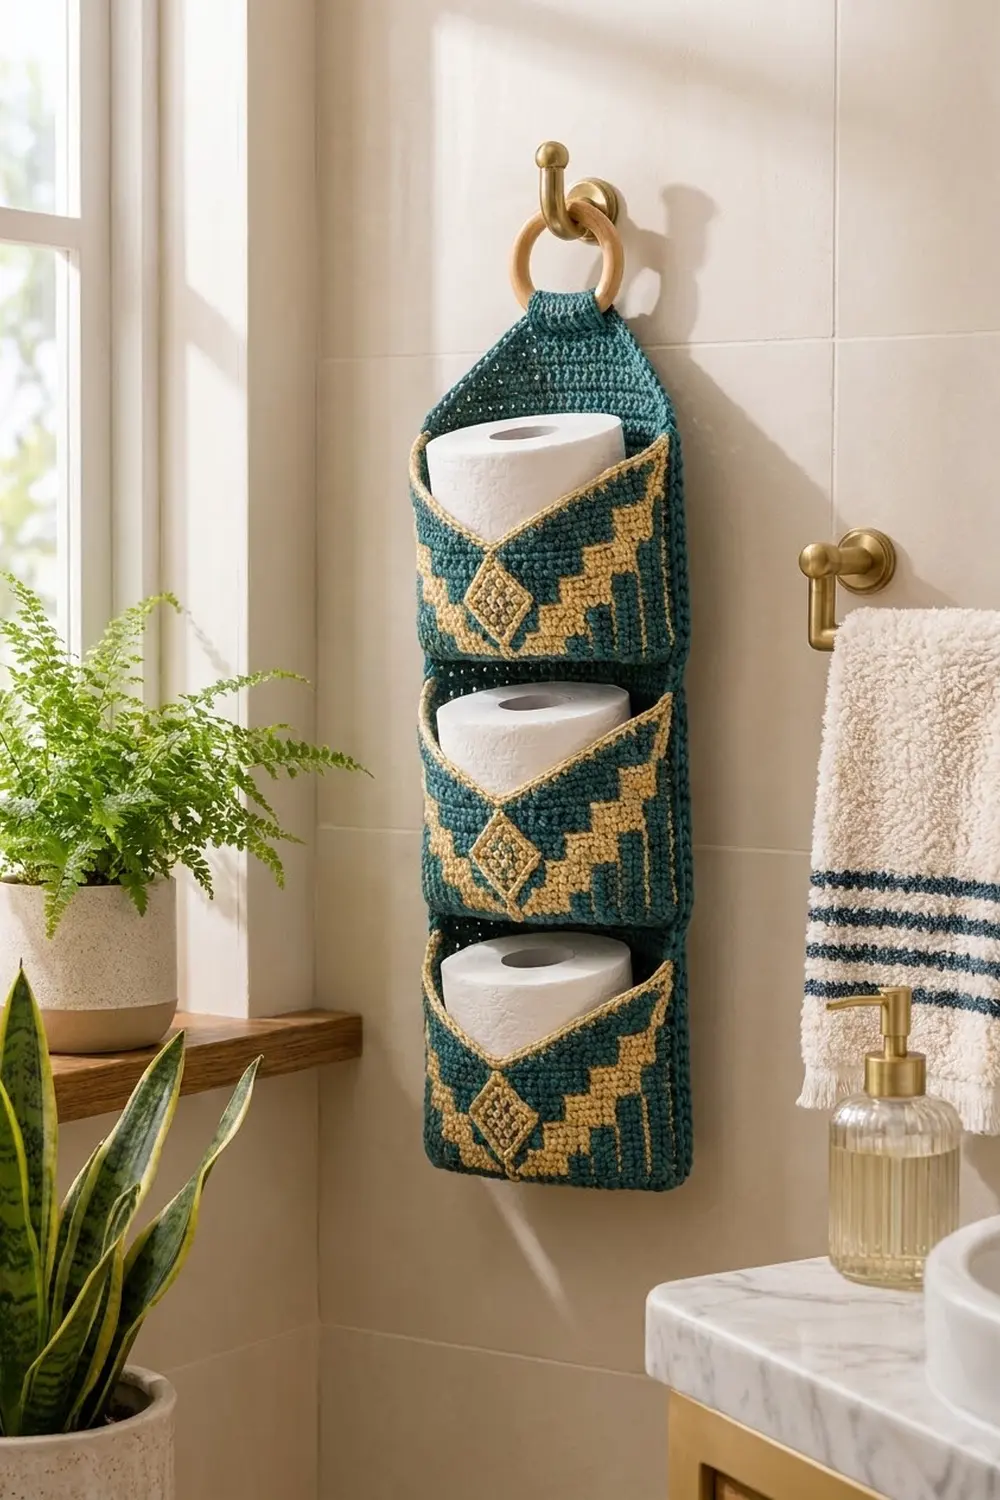
The Golden Mesa holder is a bathroom organizer that hangs on the wall. It has three stacked pockets, and each one holds a standard roll. A deep teal back panel rises to a pointed top that hangs from a natural wooden ring. Each pocket front has a gold stepped chevron with a small lattice diamond at the center.
The palette uses only two colors: deep teal and warm golden tan. The style is southwestern-modern, with crisp tapestry crochet steps and a V-shaped pocket opening. Every pocket seam and rim has a gold outline. This pattern uses US crochet terms throughout.
The finished holder measures 6.5 in (16.5 cm) wide. It is 19 in (48.3 cm) tall from the bottom edge to the top of the point, plus a 1.5 in (3.8 cm) strap loop. Each pocket stands 4 in (10.2 cm) out from the wall.
Construction is simple and flat. You crochet one back panel, three tapestry pocket fronts, and three plain gusset strips. Each front is joined to its gusset with a gold single crochet seam. The gussets are then sewn to the back panel, and a gold border finishes every pocket opening.
Finished Size and Construction
- Finished size: 6.5 in (16.5 cm) wide x 19 in (48.3 cm) tall, plus a 1.5 in (3.8 cm) strap loop
- Skill level: Intermediate (tapestry crochet, simple shaping, seaming)
- Terminology: US crochet terms
- Yarn weight: Worsted weight (#4)
- Hook: 5.0 mm (H-8)
- Number of pieces: 7 (1 back panel, 3 pocket fronts, 3 gussets)
- Layout: 3 pockets stacked in 1 column
- Back panel before edging: 6 in (15.2 cm) wide x 18.5 in (47.0 cm) tall to the point
- Pocket front: 6 in (15.2 cm) wide; 5 in (12.7 cm) tall at the sides and 3.5 in (8.9 cm) at the center of the V
- Gusset: 4 in (10.2 cm) wide x 16 in (40.6 cm) long
- Border depth: 1 round of sc, 0.25 in (0.6 cm), on every edge
Materials
Choose a smooth, firm worsted weight cotton or cotton blend. Cotton holds the pocket shape and doesn’t stretch much under the weight of the rolls. It also copes well with bathroom humidity. Avoid fuzzy yarns, which blur the chevron steps.
- Color T (deep teal): 150 g, about 285 m
- Color G (golden tan): 50 g, about 95 m
These amounts assume yarn with about 190 m per 100 g. They include a safety margin of about 15%. In tapestry crochet you carry both colors through every pocket front row, so it uses more yarn than plain single crochet.
Tools:
- 5.0 mm (H-8) crochet hook
- 1 wooden ring, 2.75 in (7.0 cm) in diameter
- Tapestry needle
- 8 locking stitch markers
- Sewing pins
- Scissors and a measuring tape
- Blocking mat, rustproof pins, and a spray bottle
Abbreviations (US Terms)
- ch – chain
- sc – single crochet
- sc2tog – single crochet 2 together
- sl st – slip stitch
- st(s) – stitch(es)
- sp – space
- T – teal
- G – golden tan
- T8, G4 – work 8 sc in T, then 4 sc in G
Special stitch – tapestry color change: Work the last sc before the change until 2 loops remain on the hook. Yarn over with the new color and pull through. Lay the unused color along the tops of the stitches and work over it so it hides inside the fabric. Keep the carried strand relaxed.
Start every row with ch 1 and turn. The ch 1 never counts as a stitch.
Gauge and Checkpoints
Gauge: 16 sc and 16 rows = 4 in (10.2 cm) in sc worked flat. That is 4 sts and 4 rows per inch.
Your stitch gauge and row gauge must match. That lets row-ends join to stitches one-to-one. Make one pocket front first and measure it before you start anything else.
Checkpoints:
- Pocket front after Row 14: 6 in (15.2 cm) wide x 3.5 in (8.9 cm) tall
- Pocket front after Row 20: 5 in (12.7 cm) tall at each side
- Gusset after Row 20: 4 in (10.2 cm) wide x 5 in (12.7 cm) long
- Back panel after Row 64: 6 in (15.2 cm) x 16 in (40.6 cm)
If your piece is too big, go down 0.5 mm in hook size. If it is too small, go up 0.5 mm. If the width is right but the rows are too short, loosen your final pull-through a little. In the fronts, also hold the carried strand more loosely.
Back Panel (make 1)
With T, ch 25.
Row 1: Sc in the 2nd ch from hook and in each ch across. (24 sts)
Rows 2–64: Ch 1, turn, sc in each st across. (24 sts)
Checkpoint: 6 in (15.2 cm) x 16 in (40.6 cm). Place markers on the side edges at Rows 20, 40 and 60.
Pointed top:
Row 65: Ch 1, turn, sc2tog, sc in each st to the last 2 sts, sc2tog. (22 sts)
Rows 66–74: Repeat Row 65. The stitch counts are 20, 18, 16, 14, 12, 10, 8, 6 and 4 sts.
The point is 2.5 in (6.4 cm) tall. Each decrease moves in 0.25 in (0.6 cm) and rises 0.25 in (0.6 cm), so the slope is 45 degrees. Don’t fasten off; go straight on to the edging.
Edging round: Ch 1 and turn the panel to work down the side.
- 14 sc down the left diagonal: (10 row-ends x 1) + 4 extra = 14. Work 2 sc in row-ends 2, 4, 7 and 9.
- 64 sc down the left side, 1 in each row-end.
- Ch 1 for the corner.
- 24 sc across the foundation, 1 in each st.
- Ch 1 for the corner.
- 64 sc up the right side, 1 in each row-end.
- 14 sc up the right diagonal, worked the same way.
- 4 sc across Row 74.
Sl st to the first sc. (184 sc + 2 ch-1 corner sps)
Total check: 14 + 64 + 24 + 64 + 14 + 4 = 184. Don’t fasten off.
Strap: Ch 1, then sc in the 4 top sc only. (4 sts) Work 11 more rows of 4 sc, for 12 rows in total and 3 in (7.6 cm). Fasten off, leaving a 12 in (30.5 cm) tail.
Pocket Front (make 3)
The design is symmetrical, so each row below reads the same in both directions. Carry G from Row 1 through Row 14.
With T, ch 25 and lay G along the chain.
Row 1: Sc in the 2nd ch from hook and in each ch across, working over G. (24 sts)
Row 2: T24.
Rows 3–4: T8, G8, T8. (24 sts) This makes the chevron point.
Rows 5–6: T6, G4, T4, G4, T6. (24 sts)
Rows 7–8: T4, G4, T3, G2, T3, G4, T4. (24 sts) The diamond begins.
Rows 9–10: T2, G4, T3, G6, T3, G4, T2. (24 sts)
Rows 11–12: G4, T5, G2, T2, G2, T5, G4. (24 sts) The teal center forms the lattice eye.
Rows 13–14: G2, T9, G2, T9, G2. (24 sts) This is the top of the diamond, with the chevron tips at the edges.
Cut G. Checkpoint: 6 in (15.2 cm) x 3.5 in (8.9 cm).
V-opening, first half:
Row 15: Ch 1, turn, sc in the next 10 sts, sc2tog. (11 sts) Leave 12 sts unworked.
Row 16: Ch 1, turn, sc2tog, sc to the end. (10 sts)
Row 17: Ch 1, turn, sc to the last 2 sts, sc2tog. (9 sts)
Rows 18–20: Keep decreasing 1 st at the center edge each row: 8, 7, 6 sts. Fasten off.
Second half: With the same side facing as for Row 15, join T in the first unworked st next to the center.
Row 15: Ch 1, sc2tog, sc in the next 10 sts. (11 sts)
Rows 16–20: Decrease 1 st at the center edge each row: 10, 9, 8, 7, 6 sts. Fasten off.
Each side edge has 20 row-ends. Each V edge has 6 row-ends. Each top edge has 6 sts.
Gusset (make 3)
With T, ch 17.
Row 1: Sc in the 2nd ch from hook and in each ch across. (16 sts)
Rows 2–64: Ch 1, turn, sc in each st across. (16 sts)
Fasten off, leaving a 24 in (61.0 cm) tail. On one long edge, place markers at row-ends 20 and 44. These divide the strip into 20 + 24 + 20 row-ends: side, bottom, side.
Make All Pieces
- Color T only: 1 back panel and 3 gussets
- Colors T and G: 3 pocket fronts
Layout, front view:
        [ring]
         ||        strap, 12 rows
        /  \       point, Rows 65–74
       |    |      plain, Rows 61–64
       | P3 |      pocket 3, Rows 41–60
       | P2 |      pocket 2, Rows 21–40
       | P1 |      pocket 1, Rows 1–20
Joining
Step 1 – Front to gusset (gold seam). Hold a front and a gusset with wrong sides together and the front facing you. Line up the unmarked gusset edge with the front as follows:
- 20 row-ends to the left side
- 24 row-ends to the 24 foundation sts
- 20 row-ends to the right side
Join G at the top left. Sc through both layers: 20 + 24 + 20 = 64 sc. Each sc pairs one front row-end or stitch with one gusset row-end, and matching gauge makes this exact. Don’t add stitches at the bottom corners, because the gusset folds there on its own. Fasten off.
Keep your tension even. A tight seam puckers the front, and a loose seam lets the pocket sag.
Step 2 – Pocket to back panel. Use T and a tapestry needle. Match the free gusset edge (64 row-ends) to the back panel, one-to-one.
- Pocket 1: Sew 20 row-ends to left side edging sc 1–20, counting up from the corner ch-1 sp. Then sew 24 row-ends to the 24 bottom edging sc. Finish with 20 row-ends to right side edging sc 1–20.
- Pocket 2: Sew to side edging sc 21–40 on each side. Sew the 24 bottom row-ends across the 24 sts of Row 21, catching one strand of each stitch.
- Pocket 3: Sew to side edging sc 41–60 and across the 24 sts of Row 41.
Whipstitch firmly, but not so tightly that the panel ripples. Rows 61–64 stay visible above pocket 3.
Strap: Slip the strap through the ring from front to back. Fold it down and whipstitch Row 12 to the back of Rows 71–74. This leaves a 1.5 in (3.8 cm) loop.
Size checkpoint: The assembled holder measures 6.5 in (16.5 cm) wide and 19 in (48.3 cm) to the point. Each pocket stands 4 in (10.2 cm) deep.
Border
Border gauge: 4 sc per inch, the same as the body.
Work one gold border row along each pocket opening, starting with pocket 1. Join G at the back top corner of the left gusset.
- Left gusset top: 16 sc, 1 in each st.
- Front left top: 6 sc.
- Left V edge: (6 row-ends x 1) + 2 extra = 8 sc. Work 2 sc in row-ends 2 and 5.
- Right V edge: (6 row-ends x 1) + 2 extra = 8 sc. Work 2 sc in row-ends 2 and 5, counting upward.
- Front right top: 6 sc.
- Right gusset top: 16 sc.
Total: 16 + 6 + 8 + 8 + 6 + 16 = 60 sc. Fasten off, then repeat on pockets 2 and 3.
Why the math works: Each V edge slopes at 45 degrees. Six rows rise 1.5 in (3.8 cm) and run 1.5 in (3.8 cm), so the slanted edge is about 2.1 in (5.3 cm) long. At 4 sc per inch, that edge needs 8 sc, not 6. The flat edges take 1 sc per stitch, so they neither flare nor pull in. The same logic gives the back panel diagonals 14 sc, because 10 rows make a slanted edge of about 3.5 in (8.9 cm).
Final Blocking
- Weave in all ends through stitches of the same color.
- Mist the whole holder until it is damp but not soaked.
- Lay it face up on the blocking mat and pin the back panel to 6.5 in (16.5 cm) x 19 in (48.3 cm).
- Put a toilet roll wrapped in a plastic bag inside each pocket so it dries square at 4 in (10.2 cm) deep.
- Pin each V point and each top corner so the gold border lies flat.
- Let the holder dry completely, for at least 24 hours, before you hang it.
Final Quality-Control Checklist
- The back panel is 24 sts wide, with 64 rows plus a 10-row point.
- The edging totals 184 sc plus 2 corner ch-1 sps.
- Each front has 24 sts through Row 14, and 6 sts on each top after Row 20.
- The chevron steps and diamonds line up on all three pockets.
- Each gold seam has 64 sc, and each pocket border has 60 sc.
- Each gusset is sewn 64-to-64, with no row-ends left over.
- The pockets sit at Rows 1, 21 and 41 and are level from side to side.
- The strap is centered and holds the ring securely.
Troubleshooting
- Teal shows through the gold: Keep the carried strand behind the stitches. Change colors on the final yarn-over of the stitch before.
- Fronts cup or narrow: The carried strand is too tight. Spread the stitches out after each color change.
- Gusset is too long or too short: Your row gauge doesn’t match your stitch gauge. Add or remove gusset rows until it matches the front perimeter exactly.
- V edge ruffles: Leave out one of the extra border stitches on that edge.
- V edge pulls tight: Add 1 extra sc at row-end 4.
- Pockets tilt forward: Sew the bottom gusset edge to the back panel row again, more firmly.
Care
Hand wash in cool water with mild soap. Press the water out in a towel, then dry flat with rolls inside the pockets to hold their shape. Don’t tumble dry.
Final Notes
The whole design rests on one chain of measurements. A gauge of 4 sts and 4 rows per inch gives a front and back that are 24 stitches and 6 in (15.2 cm) wide. They match a 64-row, 16 in (40.6 cm) gusset, split into 20 + 24 + 20. The 64-row back panel holds three 20-row pockets. One edging round brings the width to 6.5 in (16.5 cm), and the 60-stitch gold borders finish each opening. Check your gauge once, and every seam will line up stitch for stitch.
Happy crocheting!