

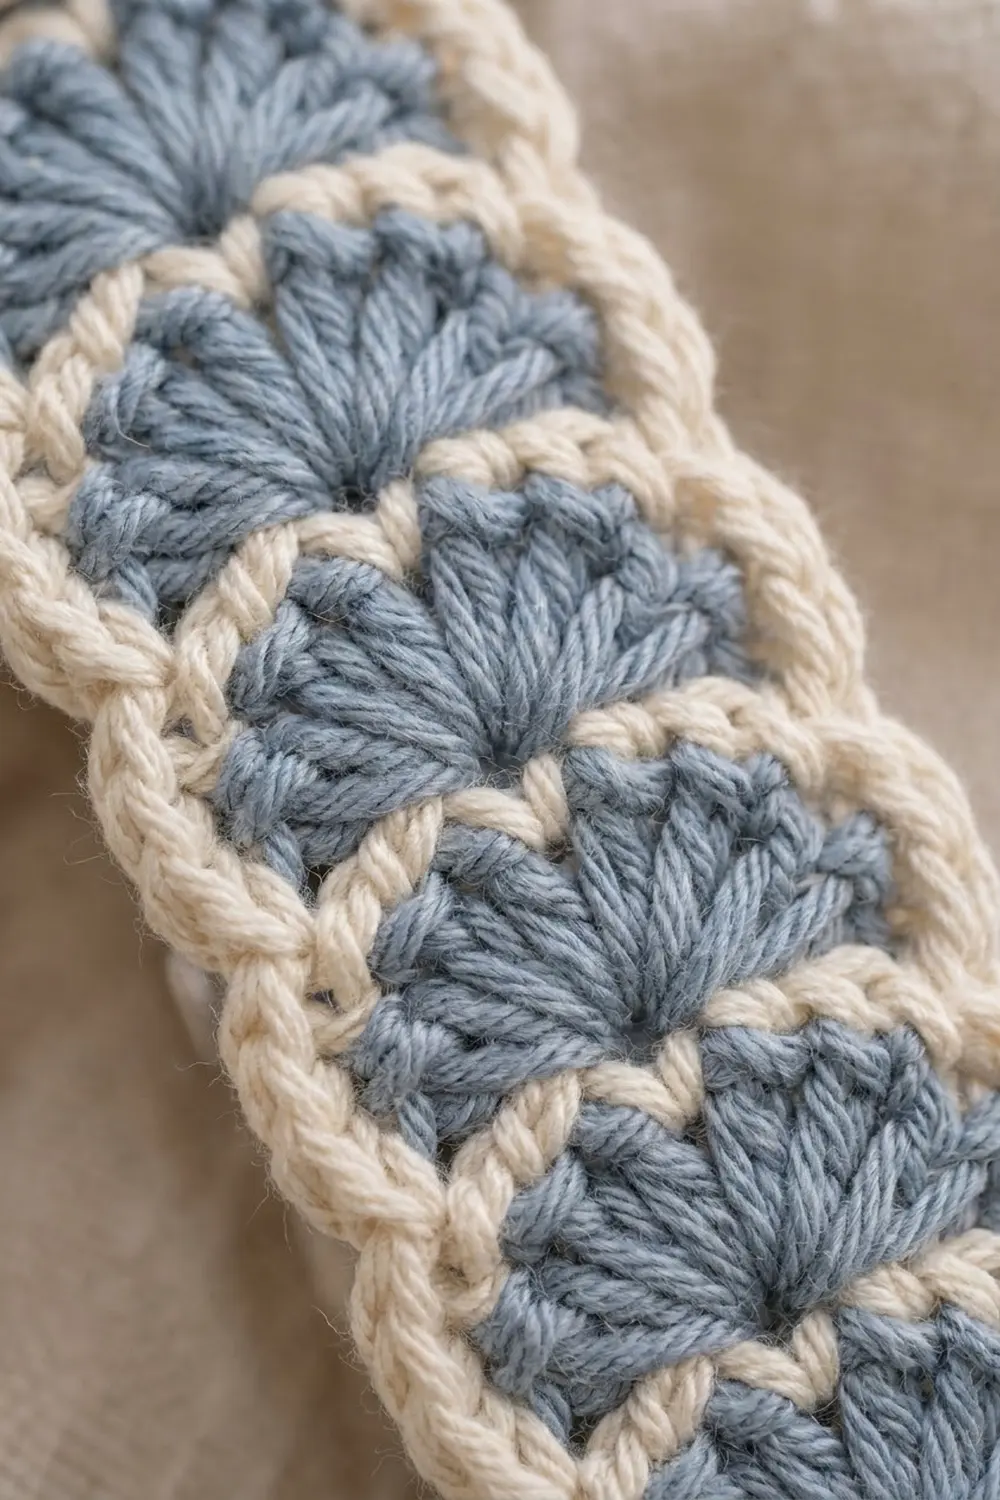
The Bluebell Scallop Watch Band is a slim crocheted strap for a smartwatch. It is one column of small dusty-blue fans, each outlined in soft cream, stacked from one end of the strap to the other. The fans bulge at the sides, so both long edges have a gentle scallop that looks delicate on the wrist.
The colors are dusty blue and cream, which go well with rose-gold, silver and pale watch cases. The style is vintage and feminine. This band is also a good way to use up small leftovers of cotton yarn.
This pattern uses US crochet terms. With the border, the finished band is 1.0 in (2.5 cm) wide across the fans, 0.8 in (2.0 cm) wide at the end tabs and 7.7 in (19.6 cm) long. It fits wrists of about 6–7 in (15.2–17.8 cm). You can make it longer or shorter in steps of 0.4 in (1.0 cm).
The construction is simple. You crochet one strip in short rows across its width. You start with a plain cream tab, then work 15 repeats of a blue fan row and a cream leveling row, then a second plain tab. One round of cream single crochet finishes the edges. To fit it to the watch, you sew one tab around an adapter. The other end goes through the second adapter and folds back under a metal slide keeper.
Finished Size and Construction
- Finished size: 1.0 in (2.5 cm) wide at the fans x 7.7 in (19.6 cm) long
- Skill level: Easy–intermediate
- Terminology: US crochet terms
- Yarn weight: Fingering (#1 super fine) cotton
- Hook: 2.0 mm
- Number of pieces: 1
- Layout: One straight strip of 15 stacked fans
- Piece size before border: 0.8 in (2.0 cm) wide x 7.5 in (19.1 cm) long
- Tab width before border: 0.6 in (1.5 cm)
- Border depth: 0.1 in (0.3 cm) on every edge
Materials
Choose a smooth, mercerized fingering-weight cotton or cotton blend with about 170 m per 50 g. Cotton holds the fan shape, doesn’t stretch much and stands up to daily wear and hand washing. Avoid fuzzy or very stretchy yarns. The fans will blur and the band will grow.
- Color A, Cream: 8 g, about 27 m
- Color B, Dusty Blue: 6 g, about 20 m
These amounts include a margin of about 30% for checking your gauge, yarn tails and sewing.
Tools
- 2.0 mm crochet hook
- Tapestry needle
- 2 smartwatch lug adapters sized for your watch, each with an open bar at least 0.8 in (2.0 cm) wide inside
- 1 rectangular metal slide keeper with an inner opening of at least 1.1 in x 0.25 in (2.8 cm x 0.6 cm)
- Cream sewing thread and a sharp needle
- 2 stitch markers
- Ruler or tape measure
- Blocking mat, rust-proof pins and a spray bottle
Abbreviations (US Terms)
- ch: chain
- sc: single crochet
- hdc: half double crochet
- dc: double crochet
- sc2tog: single crochet 2 together
- sl st: slip stitch
- st(s): stitch(es)
- sp: space
- RS / WS: right side / wrong side
Special stitch, Fan: 5 dc worked into the same stitch.
Color change: Work the last stitch of the row until 2 loops are left on the hook. Yarn over with the new color and pull through. Don’t cut the old color. Carry it loosely up the right-hand edge, where the border will cover it.
Gauge and Checkpoints
The band itself is your gauge swatch. Work Rows 1–12 (the first tab and 3 fan units), then measure before you go on.
- Width: 7 sts across a cream leveling row = 0.8 in (2.0 cm)
- Sc rows: 8 rows = 1 in (2.5 cm), so each sc row = 0.125 in (0.3 cm)
- Fan unit: 1 fan row + 1 leveling row = 0.4 in (1.0 cm)
Checkpoints
- After Row 6 (Tab A): 0.6 in (1.5 cm) wide x 0.75 in (1.9 cm) long.
- After Row 16 (5 fan units): 0.8 in (2.0 cm) wide x 2.75 in (7.0 cm) long.
- After Row 36 (15 fan units): 6.75 in (17.1 cm) long.
- After Row 42: 7.5 in (19.1 cm) long.
- After the border: 1.0 in (2.5 cm) wide x 7.7 in (19.6 cm) long.
If the band is too wide, it will bunch up in the adapter bar. Start again with a 1.75 mm hook. If it is too narrow, try a 2.25 mm hook. If only the length is off, keep your hook and add or remove fan units at Checkpoint 3.
Band Pattern
Tab A
With Color A, ch 6.
Row 1 (RS): Sc in 2nd ch from hook and in each ch across, turn. (5 sc)
Rows 2–6: Ch 1, sc in each st across, turn. (5 sc)
At the end of Row 6 (WS), change to Color B. Tab A measures 0.6 in (1.5 cm) wide x 0.75 in (1.9 cm) long.
Fan Units
Each fan unit has two rows. The blue fan row has short sc stitches at the edges and tall dc stitches in the middle, so it forms an arch. The cream leveling row uses tall stitches at the edges and short ones over the arch. This row outlines the fan in cream, fills the cream wedges between fans at the edges and keeps the strip flat.
Row 7 (RS, Color B, first fan row, growth row): Ch 1, sc in first st, skip next st, 5 dc in next st, skip next st, sc in last st, change to Color A, turn. (7 sts: 2 sc + 5 dc)
This is the only row where the strip gets wider, going from 5 sts to 7 sts.
Row 8 (WS, Color A, leveling row): Ch 3 (counts as dc), hdc in next dc, sc in each of next 3 dc, hdc in next dc, dc in last sc, change to Color B, turn. (7 sts: 2 dc + 2 hdc + 3 sc)
Row 9 (RS, Color B, fan row): Ch 1, sc in first st, skip next 2 sts, 5 dc in next st (the center sc), skip next 2 sts, sc in top of turning ch, change to Color A, turn. (7 sts: 2 sc + 5 dc)
Row 10 (WS, Color A): Repeat Row 8. (7 sts)
Rows 11–36: Repeat Rows 9–10 thirteen more times. At the end of Row 36, don’t change to Color B. Fasten off Color B and leave a 4 in (10.2 cm) tail.
You now have 15 blue fans (Rows 7, 9, 11 … 35) and 15 cream leveling rows (Rows 8, 10, 12 … 36). The strip is 0.8 in (2.0 cm) wide and 6.75 in (17.1 cm) long.
To adjust the length: Each fan unit adds 0.4 in (1.0 cm). For wrists over 7 in (17.8 cm), add 1 unit for every extra 0.4 in (1.0 cm). For wrists under 6 in (15.2 cm), remove units. Each unit you add or remove changes the border count on each long side by 3 sc.
Decrease Row and Tab B
Row 37 (RS, Color A, decrease row): Ch 1, sc2tog over first 2 sts, sc in each of next 3 sts, sc2tog over last 2 sts (the hdc and the top of the turning ch), turn. (5 sts: 3 sc + 2 sc2tog)
Rows 38–42: Ch 1, sc in each st across, turn. (5 sc)
Don’t fasten off. Tab B measures 0.6 in (1.5 cm) wide x 0.625 in (1.6 cm) long. The strip is now 7.5 in (19.1 cm) long.
Border
Border gauge: Work 1 sc into the end of each sc row and each fan row (the fan row’s edge stitch is a sc). Work 2 sc into the end of each leveling row (its edge stitch is a dc).
Round 1 (RS, Color A): After the turn at the end of Row 42, the RS faces you.
- Short end (Tab B): Ch 1, sc in each of the 5 sts of Row 42. (5 sc)
- Corner: Ch 1.
- First long side: Work along the row ends down to Row 1:
- Rows 42–37: 1 sc in each row end. (6 sc)
- Rows 36–7: 2 sc in each leveling row end and 1 sc in each fan row end. (45 sc)
- Rows 6–1: 1 sc in each row end. (6 sc)
- Side total: 57 sc
- Corner: Ch 1.
- Short end (Tab A): Working into the free loops of the foundation ch, sc in each of the 5 loops. (5 sc)
- Corner: Ch 1.
- Second long side: Work as for the first long side, going from Row 1 up to Row 42. (57 sc)
- Corner: Ch 1, join with a sl st to the first sc.
Total: 57 + 5 + 57 + 5 = 124 sc, plus 4 corner ch-1 sps. The ch-1 sps don’t count as stitches.
Fasten off. Weave in all ends along the border on the WS.
Why the math works: Each long side has 42 rows. Twelve of them are plain sc rows (Rows 1–6 and 37–42), which give 12 sc. Each of the 15 fan units gives 1 + 2 = 3 sc, so 15 x 3 = 45 sc. That makes 12 + 45 = 57 sc along 7.5 in (19.1 cm), or about 7.6 sc per inch. This matches how sc naturally spaces along the edge.
The short ends use exactly the 5 tab stitches. The corner chains are counted separately, so no stitch is counted twice. The border adds 0.1 in (0.3 cm) on each edge, which brings the band to 1.0 in (2.5 cm) x 7.7 in (19.6 cm).
Final Blocking
- Spray the band with water until it is damp but not soaked.
- Lay it RS up on the blocking mat.
- Pin both short ends so the band measures 7.7 in (19.6 cm) long. Don’t stretch it any further.
- Use your fingertips to ease each fan into a rounded half-circle, so the cream outline sits evenly around it.
- Pin the widest point of every fan to a width of 1.0 in (2.5 cm). Keep the cream dips between the fans slightly inward to shape the scallop.
- Check that the tabs are 0.8 in (2.0 cm) wide and centered on the column of fans.
- Let the band dry completely, which takes at least 4 hours.
Attaching the Hardware
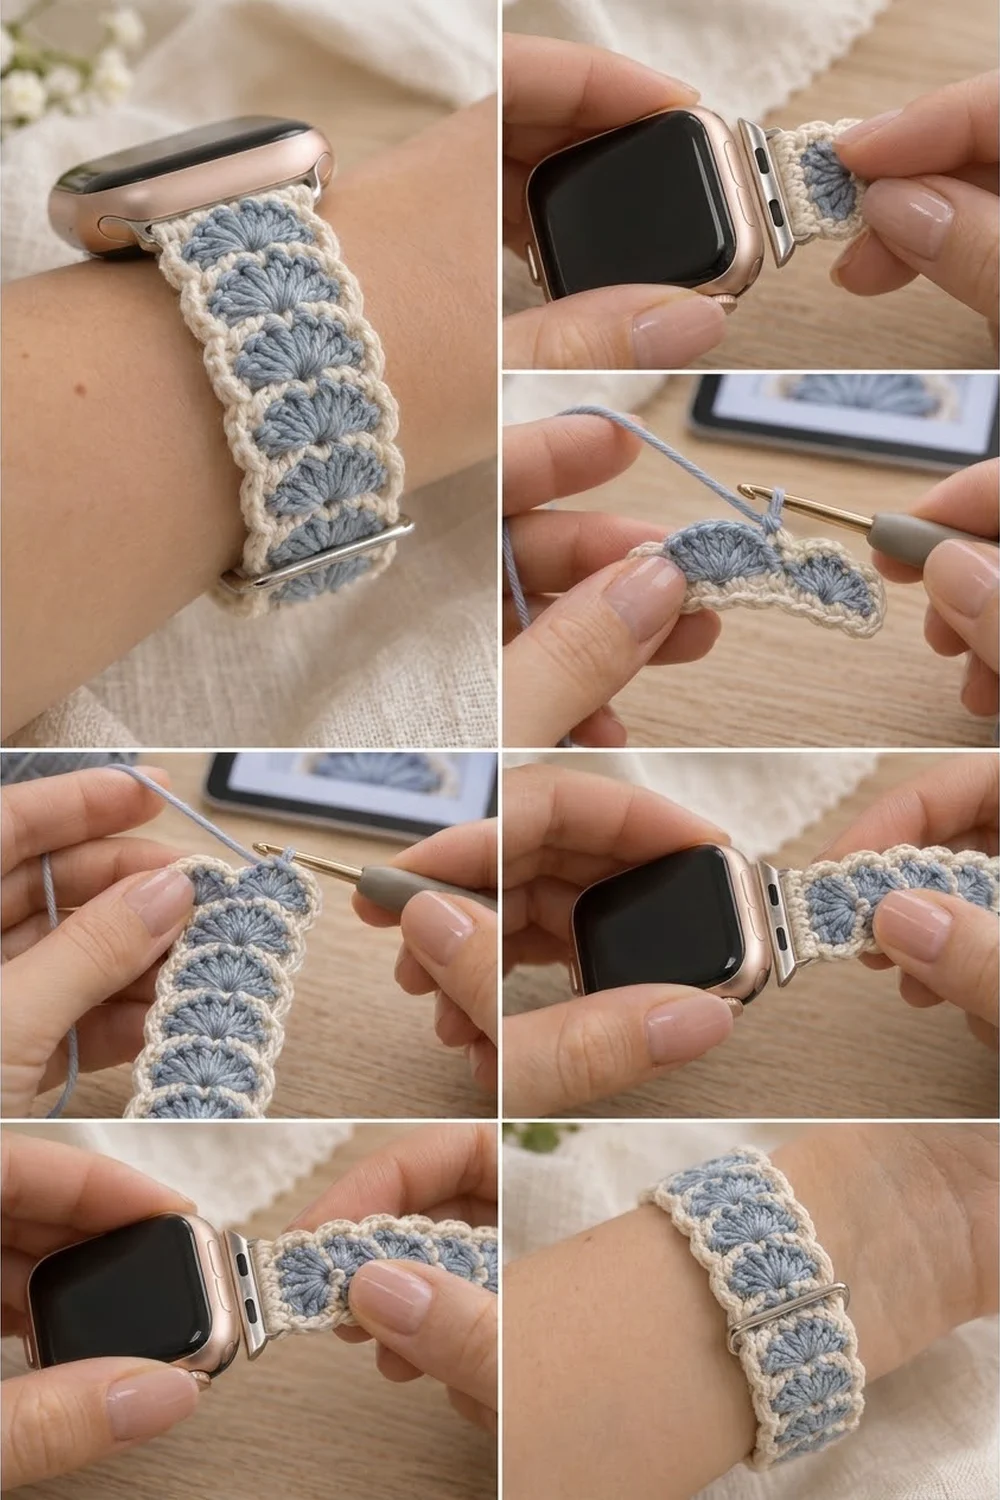
- Fixed end: Pass Tab A through the bar of the first adapter from front to back. Fold it to the WS so the foundation edge meets the top of Row 6. The folded part is about 0.375 in (1.0 cm) long. Whipstitch the edge in place through both layers with cream sewing thread, across all 5 border stitches.
- Slide keeper: Slide the metal keeper onto the free end and push it about 2 in (5.1 cm) along the band.
- Adjustable end: Attach both adapters to the watch. Wrap the band around your wrist. Thread Tab B through the bar of the second adapter from front to back, then fold it back along the WS of the band.
- Pull until the fit feels comfortable. Slide the keeper over both layers so it holds the tail flat.
Example fit: on a 6.5 in (16.5 cm) wrist with a 1.75 in (4.4 cm) watch case, about 4.75 in (12.1 cm) of band runs between the adapters. About 2 in (5.1 cm) folds back under the keeper.
Final Quality-Control Checklist
- 15 blue fans, each with 5 dc
- Every leveling row has 7 sts
- Tabs have 5 sts and measure 0.6 in (1.5 cm) before the border
- 57 sc on each long side and 5 sc on each short end
- Band is 1.0 in (2.5 cm) x 7.7 in (19.6 cm) after blocking
- Carried yarn is hidden under the border
- Both tab ends sit flat and centered in the adapters
- The keeper slides easily but holds the tail
Troubleshooting
The band curls along its length: The leveling row is too short at the edges. Make sure the edges are dc and the center is sc. Work the turning ch-3 loosely.
The edges ruffle: Your dc stitches are too loose. Go down 0.25 mm in hook size, or snug up each dc a little.
The fans look flat instead of round: Make sure you skip 2 sts on each side in Rows 9–35. If you skip only 1, there are too many stitches under the fan.
The border puckers: You worked too few sc into the ends of the leveling rows. Use 2 sc in each.
The border flares: You worked 2 sc into the ends of the fan rows. Use 1.
The tab won’t fit the adapter: Choose an adapter with a wider bar, or crochet both tabs with a 1.75 mm hook so they come out narrower.
The carried yarn shows: Carry it more loosely, and work the border sc over the carried strands.
Care
Take the band off the watch before washing. Hand wash in cool water with mild soap, squeeze gently and dry flat.
Final Notes
Here is the full measurement chain. Tab A is 0.6 in (1.5 cm) wide and 0.75 in (1.9 cm) long. Fifteen fan units of 0.4 in (1.0 cm) each bring the strip to 6.75 in (17.1 cm). The decrease row and Tab B finish it at 7.5 in (19.1 cm). The border adds 0.1 in (0.3 cm) on each edge, for a finished band of 1.0 in (2.5 cm) x 7.7 in (19.6 cm).
If your gauge matches at the first checkpoint, all the later counts will work out. Enjoy wearing your little column of blue fans.
Happy crocheting!