

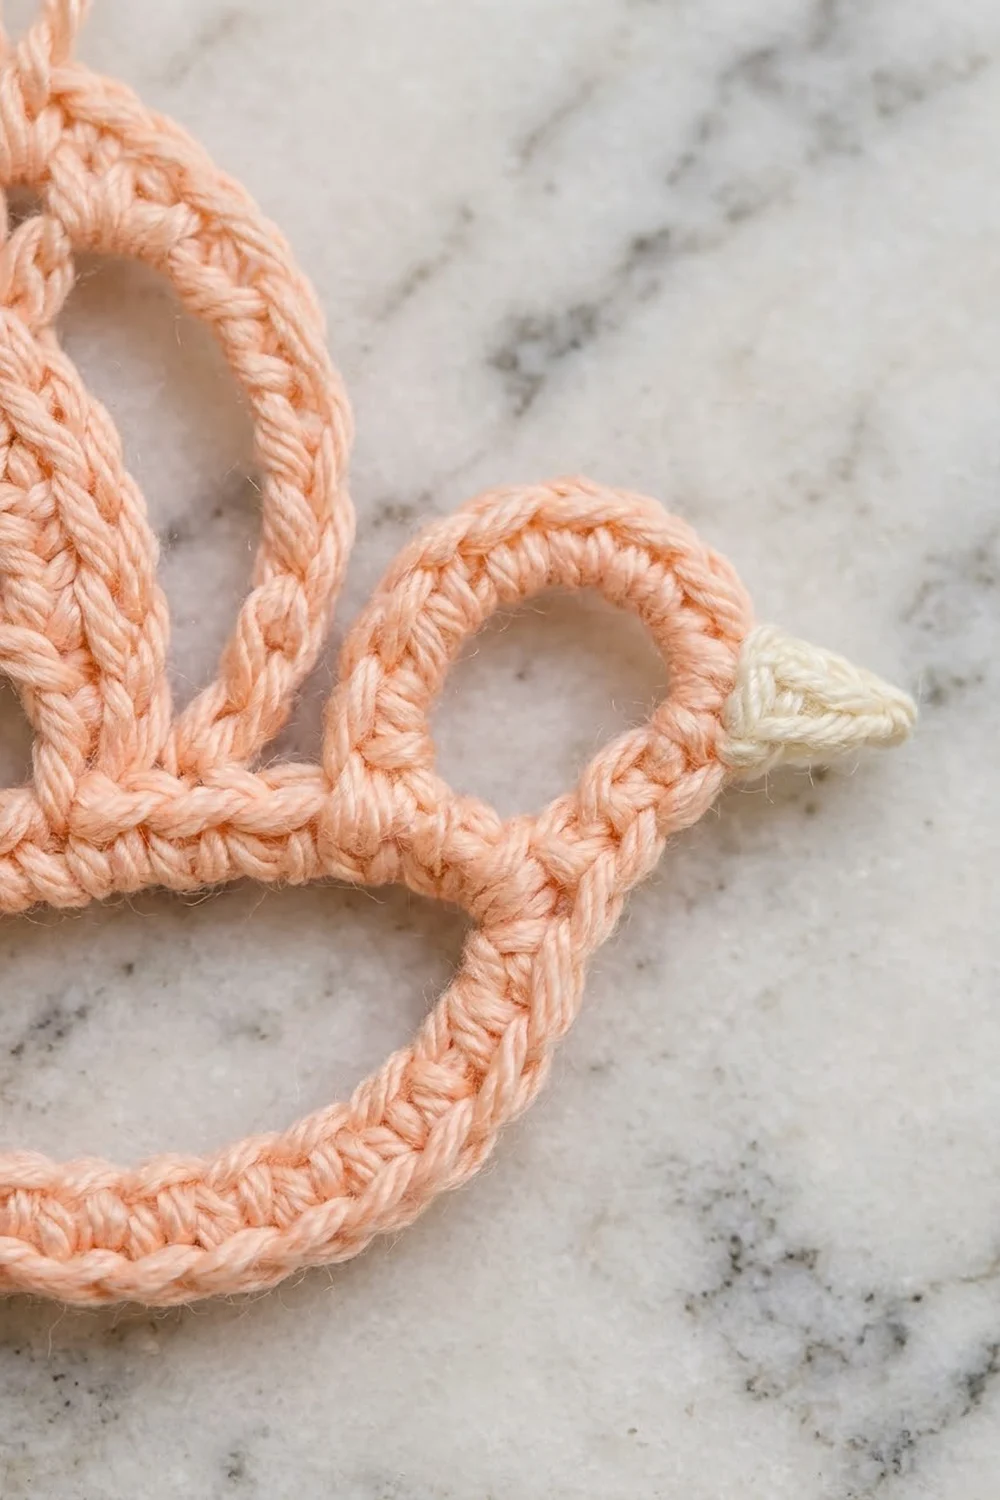
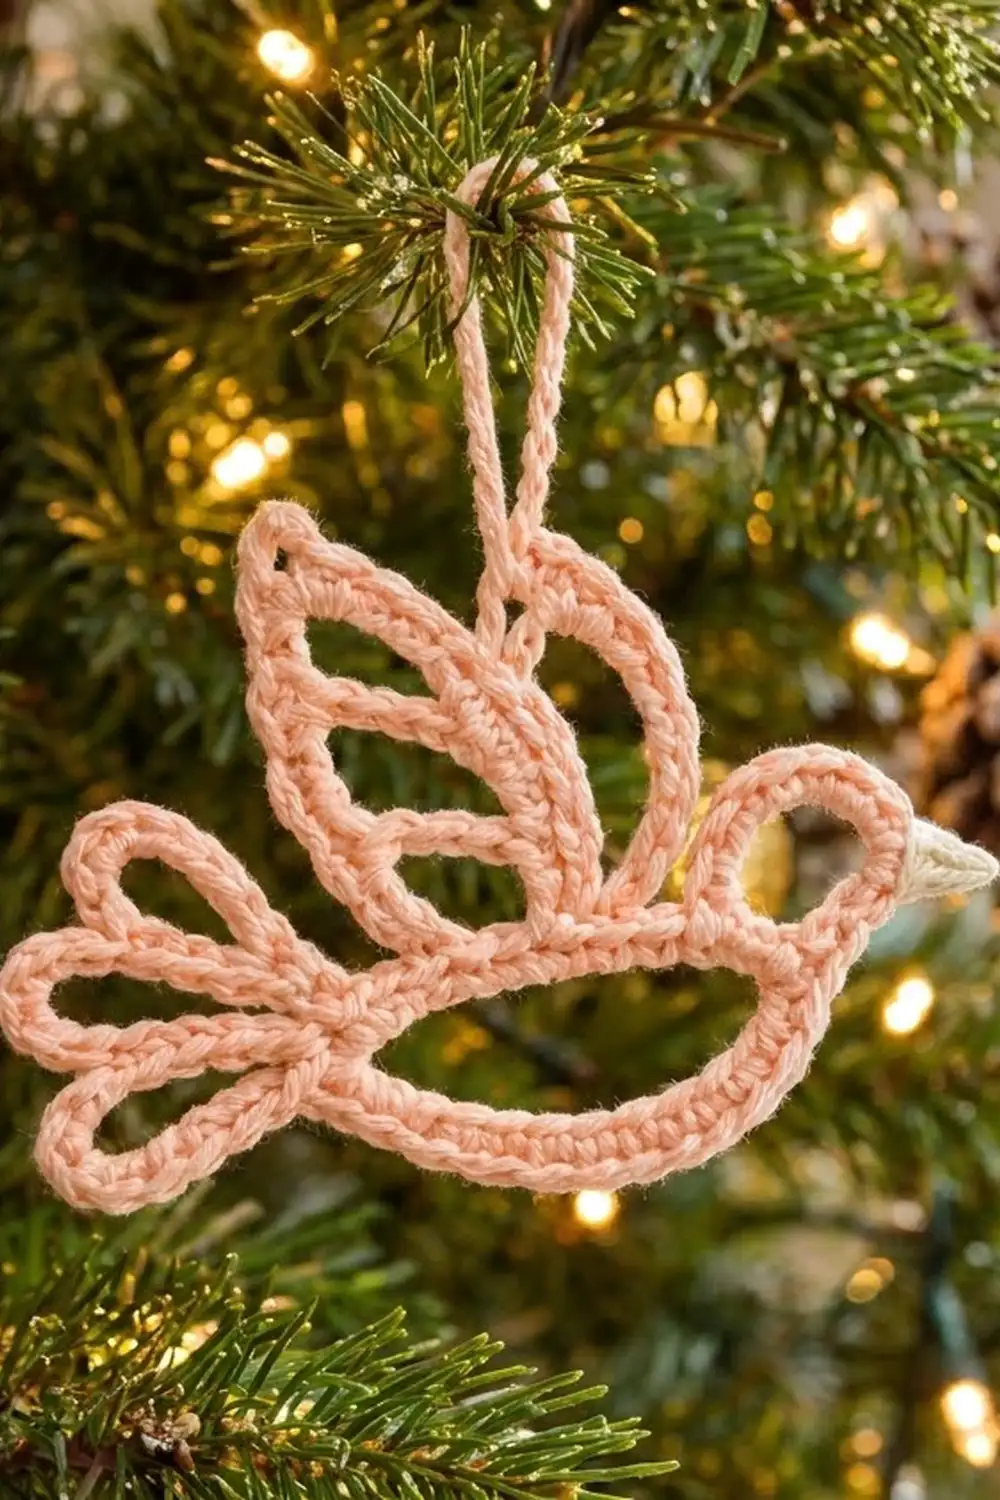
This little openwork bird is made entirely of corded outlines. A soft peach oval forms the body, a round loop makes the head, three teardrop loops fan out as the tail, and three pointed petals rise up as the wing. A tiny cream beak adds the finishing touch.
The look is light, airy and a little vintage, much like tatted lace but much faster to make. It looks lovely on a Christmas tree, tied to a gift, or hanging in a window. Each one uses only a few grams of yarn.
This pattern uses US crochet terms. The finished bird measures about 5.25 in (13.3 cm) wide and 3 in (7.6 cm) tall, plus a hanging loop about 2 in (5.1 cm) tall.
Construction is simple and continuous. First you work a chain ring covered in single crochet to make the body. Then you slip stitch along its top edge and work the head, wing petals and tail loops one at a time. Each one is a chain loop anchored to the body and covered in single crochet. The beak is a tiny cone that you sew on at the end.
Finished Size and Construction
- Finished size: 5.25 in (13.3 cm) wide x 3 in (7.6 cm) tall, not counting the hanging loop
- Hanging loop: about 2 in (5.1 cm) tall
- Skill level: Easy–Intermediate (you need to control your chain tension)
- Terminology: US
- Yarn weight: DK / light worsted (#3) cotton
- Hook: 3.5 mm (E-4)
- Number of pieces: 1 ornament (main body plus a small sewn-on beak)
- Layout: single motif, not joined to anything else
- Body oval: 3.25 in (8.3 cm) long x 1 in (2.5 cm) tall
- Size before finishing: same as finished size; blocking only sets the shape
- Border depth: none added. The corded single crochet line, about 0.25 in (0.6 cm) wide, is the edge.
Materials
Use a smooth mercerized or combed cotton in DK weight. Cotton holds crisp outlines and blocks flat. Acrylic tends to curl and look fuzzy on such thin lines.
- Color A – Peach: 10 g, about 22 m (24 yd)
- Color B – Cream: 2 g, about 4 m (4.4 yd)
These quantities include a generous margin. One ornament actually uses about 4 g of peach and under 1 g of cream.
Tools:
– 3.5 mm (E-4) crochet hook
– 4 locking stitch markers
– Tapestry needle
– Scissors
– Spray starch or a stiffening solution (optional)
– Blocking mat and rustproof pins
Abbreviations (US Terms)
- ch – chain
- sc – single crochet
- sl st – slip stitch
- st(s) – stitch(es)
- sp – space
- MR – magic ring
- Rnd – round
Special technique – Covered chain loop: Chain the number given, then sl st into the anchor stitch named. This closes the chain into a loop. Next, work single crochet into the loop as instructed:
– Rounded loops: work the sc into the ch-sp, which means around the chain.
– Pointed petals: work 1 sc into each chain, with (sc, ch 1, sc) in the center chain to make the point.
Finish each loop with a sl st back into the same anchor stitch.
Gauge and Checkpoints
Gauge: 18 sc = 4 in (10.2 cm) in a single row worked into a foundation chain.
Gauge test: Ch 19. Sc in the 2nd ch from the hook and in each ch across (18 sc). Measure. Your strip should be 4 in (10.2 cm) long.
Make one complete test bird before making a set. Thin outlines show every tension change, so one full ornament is the most reliable test.
Checkpoints:
– After the body (Rnd 1): Flatten the ring into an oval. It should measure 3.25 in (8.3 cm) long x 1 in (2.5 cm) tall. The total outline is about 7.1 in (18.0 cm).
– After the head: The head loop should be about 1 in (2.5 cm) across.
– After the wing: The back petal should reach about 2.1 in (5.3 cm) from the body.
– Finished bird: about 5.25 in (13.3 cm) x 3 in (7.6 cm).
If your bird is too big: go down to a 3.25 mm hook, or tighten your chains. Loose chains are the most common cause.
If your bird is too small: go up to a 3.75 mm hook. Keep the stitch counts the same, because the proportions depend on them.
Pattern
Part 1: Body Oval
With Color A, ch 32. Sl st into the first ch to form a ring, taking care not to twist the chain.
Rnd 1: Ch 1 (does not count as a st). Sc in each ch around. Sl st into the first sc to join. (32 sc)
Do not fasten off.
Flatten the ring into a horizontal oval with the joining point at the right end. Number the stitches as follows:
– Sts 1–16 run across the top edge, from right to left.
– Sts 17–32 run across the bottom edge, from left to right.
Place markers in sts 4, 7, 11 and 16. These markers show where the head, wing and tail attach.
Part 2: Head Loop
Sl st into st 2.
Head: Ch 12, then sl st into st 4 to form a loop over the top right end of the body. Work 14 sc into the ch-12 sp. Sl st into st 4 again. (14 sc on the head)
The head should sit as a round loop on the upper right of the body, about 1 in (2.5 cm) across.
Part 3: Wing Petals
Sl st into sts 5, 6 and 7. The working loop is now at st 7.
Front petal (anchored at st 7): Ch 11, then sl st back into st 7. Working along the chain loop, sc in each of the first 5 ch, (sc, ch 1, sc) in the 6th ch, then sc in each of the last 5 ch. Sl st into st 7. (12 sc + ch-1 tip)
The petal is about 1.2 in (3.0 cm) long, with a sharp point.
Sl st into sts 8 and 9.
Middle petal and hanging loop (anchored at st 9): Ch 15, then sl st back into st 9. Sc in each of the first 7 ch. In the 8th ch, work (sc, ch 18, sc). The ch-18 forms the hanging loop. Then sc in each of the last 7 ch. Sl st into st 9. (16 sc + ch-18 hanging loop)
The petal is about 1.7 in (4.3 cm) long, and the hanging loop rises about 2 in (5.1 cm) above its tip.
Sl st into sts 10 and 11.
Back petal (anchored at st 11): Ch 19, then sl st back into st 11. Sc in each of the first 9 ch, (sc, ch 1, sc) in the 10th ch, then sc in each of the last 9 ch. Sl st into st 11. (20 sc + ch-1 tip)
The petal is about 2.1 in (5.3 cm) long.
Inner petal (also anchored at st 11): Ch 11, then sl st back into st 11. Sc in each of the first 5 ch, (sc, ch 1, sc) in the 6th ch, then sc in each of the last 5 ch. Sl st into st 11. (12 sc + ch-1 tip)
This smaller petal lies inside the outline of the back petal. You will position it when you block.
Part 4: Tail Loops
Sl st into sts 12, 13, 14, 15 and 16. The working loop is now at the left end of the body.
Upper tail loop (anchored at st 16): Ch 12, then sl st back into st 16. Work 14 sc into the ch-12 sp. Sl st into st 16. (14 sc)
This loop is about 1.2 in (3.0 cm) long.
Sl st into st 17.
Middle tail loop (anchored at st 17): Ch 16, then sl st back into st 17. Work 18 sc into the ch-16 sp. Sl st into st 17. (18 sc)
This loop is about 1.6 in (4.1 cm) long and is the longest tail loop.
Sl st into st 18.
Lower tail loop (anchored at st 18): Ch 12, then sl st back into st 18. Work 14 sc into the ch-12 sp. Sl st into st 18. (14 sc)
Fasten off and weave in the ends along the back of the body cord.
Part 5: Beak
With Color B:
Rnd 1: Work 4 sc into a MR. Pull the ring tight. (4 sc)
Rnd 2: (Sc in next st, 2 sc in next st) twice. (6 sc)
Rnd 3: Sc in each st around. (6 sc)
Sl st to join and fasten off, leaving a 6 in (15.2 cm) tail.
The cone is about 0.4 in (1.0 cm) long. Place its open end against the right side of the head loop, with the point facing right. Sew it on with small stitches through the head cord, then weave in the end.
Border (Edge Finish)
This bird does not get a separate border round. The covered chain loops are the edging. Each outline is a corded line of single crochet about 0.25 in (0.6 cm) wide, worked at the same 18 sc per 4 in (10.2 cm) gauge as the body.
Edge counts per element:
– Body: 32 sc
– Head: 14 sc over ch 12
– Front petal: 12 sc over ch 11
– Middle petal: 16 sc over ch 15
– Back petal: 20 sc over ch 19
– Inner petal: 12 sc over ch 11
– Upper and lower tail loops: 14 sc each over ch 12
– Middle tail loop: 18 sc over ch 16
Why the math works:
– Rounded loops get 2 more sc than chains (ch 12 → 14 sc, ch 16 → 18 sc). The single crochet sits on the outside of the curve, which is slightly longer than the chain inside it. Two extra stitches stop the loop from cupping or pulling into a narrow slit.
– Pointed petals use an odd number of chains, so there is always one true center chain: (11 − 1) ÷ 2 = 5 chains on each side of the center. The (sc, ch 1, sc) in that center chain gives 1 extra stitch over the chain count (11 ch → 12 sc). That extra stitch, together with the ch-1, makes the sharp tip.
– The body uses exactly 1 sc per chain (32 ch → 32 sc). It stays a firm, flat oval that can support all the loops.
Final Blocking
- Wet the ornament in cool water and gently squeeze out the extra water in a towel. Do not wring it.
- Lay it right side up on the blocking mat.
- Shape the body into a smooth oval, 3.25 in (8.3 cm) x 1 in (2.5 cm), and pin it at each end and at the top and bottom center.
- Round out the head loop to 1 in (2.5 cm) and pin it.
- Fan the wing petals: lean the back petal to the left, stand the middle petal upright, and lean the front petal to the right. Pin each tip at its ch-1 so the point stays sharp.
- Center the inner petal inside the back petal with an even gap all around, and pin its tip.
- Fan the tail loops to the left, with the middle loop straight out and the other two angled up and down. Pin each loop at its rounded end.
- Check the overall size: 5.25 in (13.3 cm) x 3 in (7.6 cm).
- Spray with starch if you want a stiffer ornament. Leave it to dry completely before unpinning.
Final Quality-Control Checklist
- Body has 32 sc and lies as a flat oval with no twist.
- Head loop has 14 sc and sits on the upper right of the body.
- Three wing petals have 12, 16 and 20 sc, each with a sharp tip.
- Inner petal has 12 sc and sits inside the back petal.
- Hanging loop is ch 18 and rises from the tip of the middle petal.
- Tail loops have 14, 18 and 14 sc, with the middle one longest.
- Beak is sewn on firmly and points right.
- All ends are woven in invisibly along the body cord.
- Finished size is 5.25 in (13.3 cm) x 3 in (7.6 cm).
Troubleshooting
- The body ring is twisted: Before you sl st the chain into a ring, lay it flat and make sure every V faces the same way.
- Loops cup or ruffle: The chains are too loose compared with your sc. Tighten your chains or use 1 fewer sc in rounded loops.
- Loops pinch into narrow slits: Add 1 sc to each rounded loop, or chain a little more loosely.
- Petal tips look blunt: Make sure the (sc, ch 1, sc) goes into the exact center chain. Count 5, 7 or 9 chains from the anchor before working the tip.
- The body puckers where loops attach: Keep your travel slip stitches loose, or work them in the back loop only.
- The bird won’t lie flat: Block again with more pins and use starch.
Care
Hand wash in cool water and lay flat to dry, reshaping while damp. Store flat or hanging so the petals don’t crush.
Final Notes
Each measurement leads to the next:
1. Your gauge of 18 sc per 4 in (10.2 cm) sets the body oval at 3.25 in (8.3 cm) x 1 in (2.5 cm).
2. The fixed chain counts then give a 1 in (2.5 cm) head, a 2.1 in (5.3 cm) back petal and a 1.6 in (4.1 cm) tail.
3. Together these make a finished bird of 5.25 in (13.3 cm) x 3 in (7.6 cm), with a 2 in (5.1 cm) hanging loop.
If your gauge matches, everything else falls into place. Make one, check it against the checkpoints, then make a whole flock for your tree.
Happy crocheting!