

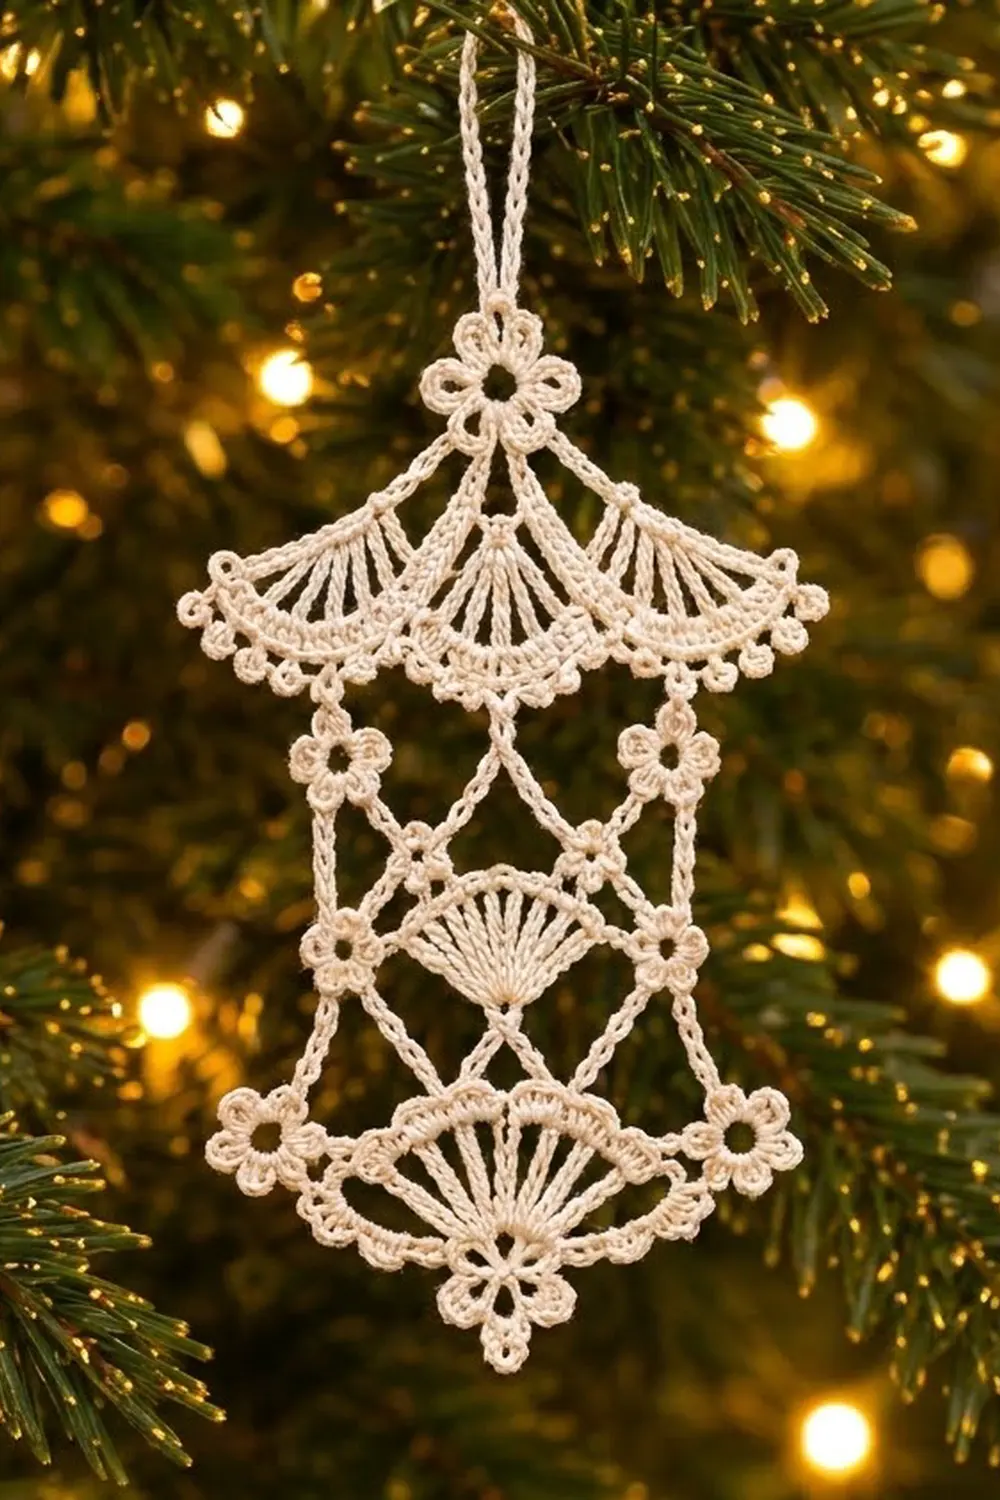
The Winter Glow Lantern is a small thread-lace ornament shaped like an old-fashioned hanging lantern. A wide fan “roof” sits under a tiny five-petal flower and a slim hanging loop. An open chain lattice forms the body, and a rounded fan “bell” tapers down to a second flower at the bottom tip.
It is worked in a single color, a soft cream or ivory, so the texture does all the work: radiating fan rays, crossing chain diagonals, six tiny chain flowers along the sides, and fine picot edges. The style is classic thread lace, light enough to hang from a slim branch.
This pattern uses US crochet terms. The finished ornament measures about 2.6 in (6.6 cm) wide at the roof tips and 4.5 in (11.4 cm) tall, not counting the hanging loop. The loop adds 1 in (2.5 cm), for a total hanging length of 5.5 in (14.0 cm).
The ornament is one single piece, worked from the bottom up in this order: bottom flower, bell fan, three lattice rows with the small center fan, roof foundation, roof rows, and finally the top flower and loop. You add a picot edging at the end, then stiffen the piece and pin it flat.
Finished Size and Construction
- Finished size: 2.6 in (6.6 cm) wide x 4.5 in (11.4 cm) tall, plus a 1 in (2.5 cm) loop
- Skill level: Intermediate (thread work, chain counting, clusters)
- Terminology: US
- Yarn weight: Size 10 crochet cotton thread (Lace / 0)
- Hook: 1.5 mm (US steel 8)
- Number of pieces: 1
- Layout: Vertical, symmetrical lantern: flower, roof, lattice, bell, flower
- Piece size before edging: 2.4 in (6.1 cm) wide at the roof, 4.5 in (11.4 cm) tall
- Edging depth: Picots add about 0.125 in (0.3 cm). The roof-tip trefoils add about 0.1 in (0.3 cm) at each end.
Materials
Choose a mercerized size 10 cotton. It keeps stitches crisp, takes stiffener well, and won’t fuzz over the years. Avoid acrylic thread, because it won’t hold a blocked shape.
- Cream / ivory size 10 cotton: 8 g, about 45 m (49 yd)
Tools:
- 1.5 mm (US steel 8) crochet hook
- Fine tapestry needle (size 24 or 26)
- Small sharp scissors
- 2 removable stitch markers
- Blocking board or foam, plus rust-proof pins
- Fabric stiffener, or a 1:1 white glue and water mix
- Plastic wrap to protect the board
The thread quantity includes about 40 percent extra to cover gauge differences and a test swatch.
Abbreviations (US Terms)
- ch: chain
- sl st: slip stitch
- sc: single crochet
- hdc: half double crochet
- dc: double crochet
- tr: treble crochet
- BL / FL: back loop / front loop
- sk: skip
- sp(s): space(s)
- dc2tog: double crochet 2 together
- dc6tog: double crochet 6 together (1 finished cluster)
Special stitches
- Picot: Ch 3, sl st in 3rd ch from hook.
- Trefoil: (Ch 3, sl st in 3rd ch from hook) 3 times, all at the same point.
- Chain Flower (fl): Ch 5, sl st in 5th ch from hook to form a small ring, (ch 3, sl st in ring) 5 times. This gives five ch-3 petals around the ring. Start the next chain directly from the ring.
Gauge and Checkpoints
Gauge: 13 sc = 1 in (2.5 cm), and 10 ch = about 0.75 in (1.9 cm).
As a test, make one bottom flower and the three bell rows before you go further. Measure at each stage:
- Flower: 0.5 in (1.3 cm) across.
- Bell (Row 3): The 27-sc rim measures 2.1 in (5.3 cm) along its edge. Flower plus bell is 1.1 in (2.8 cm) tall.
- Lattice (Row 6): The piece measures 3.0 in (7.6 cm) from the bottom tip to the top side flowers.
- Roof Row 1: 31 sc measure 2.4 in (6.1 cm).
- Finished body: The roof adds 1.0 in (2.5 cm) and the top flower 0.5 in (1.3 cm), for 4.5 in (11.4 cm).
If your bell rim is longer than 2.1 in (5.3 cm), go down to a 1.25 mm hook. If it is shorter than 1.9 in (4.8 cm), go up to a 1.75 mm hook. The lattice chain lengths depend on gauge, so match gauge before you start the lattice.
Part 1: Bottom Flower
Ch 5, sl st in first ch to form a ring.
Rnd 1: Ch 1, 10 sc in ring, sl st in first sc. (10 sc)
Rnd 2: *Ch 3, sk 1 sc, sl st in next sc; rep from * 4 more times, placing the last sl st in the first sc. (5 ch-3 sps)
Rnd 3: Sl st in first ch-3 sp, (sc, hdc, dc, hdc, sc) in each ch-3 sp around, sl st in first sc. (25 sts, 5 petals)
Sl st in the next sc, next hdc and next dc. You are now at the center dc of one petal, which points up into the bell. Do not fasten off.
Part 2: Bell Fan
The bell opens upward from the flower, with rays fanning out from a single point.
Row 1: Ch 3 (counts as dc), 6 dc in same dc. (7 dc)
Row 2: Ch 5 (counts as tr + ch 1), turn, tr in first dc, *ch 1, (tr, ch 1, tr) in next dc; rep from * 5 more times, working the last group in the top of the beginning ch-3. (14 tr, 13 ch-1 sps)
Row 3: Ch 1, turn, sc in first tr, fl, sl st in the sc just made (left corner flower). *Sc in next ch-1 sp, sc in next tr; rep from * 12 more times, ending in the 4th ch of the beginning ch-5. Fl, sl st in last sc (right corner flower). (27 sc = 1 + 13 x 2; 2 corner flowers)
Number the rim sc 1 to 27, starting from the left corner. Rows 4 and 5 anchor in back loops only, so the front loops stay free for the edging.
Part 3: Chain Lattice and Center Fan
Row 4 (arches and center fan, right to left): Start from sc 27.
- Ch 7, sk 6 sc, sc in BL of sc 20 (arch A).
- Ch 7, sk 5 sc, sc in BL of sc 14 (arch B).
- Center Fan: Ch 11, tr in 6th ch from hook (the 5 skipped ch count as tr + ch 1), (ch 1, tr in same ch) 3 times. Ch 4, sl st in the same ch as the tr. Sl st in each of the 5 stem ch, then sl st in BL of sc 14. (5 tr, 4 ch-1 sps, on a 5-ch stem about 0.4 in / 1.0 cm tall)
- Ch 7, sk 5 sc, sc in BL of sc 8 (arch C).
- Ch 7, sk 6 sc, sc in BL of sc 1 (arch D).
Count: 4 ch-7 arches, 5 anchor sc, 1 center fan.
Row 5 (middle tier, left to right):
- Ch 10, fl (middle-left flower).
- Ch 9, sc in 4th ch of arch D.
- Ch 6, sc in 4th ch of arch C.
- Ch 5, sc in top of last tr of the Center Fan.
- Fan edge: (2 sc in next ch-1 sp, sc in next tr) 3 times, 2 sc in last ch-1 sp, sc in top of the beginning chain ray. (13 sc on the fan edge)
- Ch 5, sc in 4th ch of arch B.
- Ch 6, sc in 4th ch of arch A.
- Ch 9, fl (middle-right flower).
- Ch 10, sl st in sc 27. Sl st in each of the 10 ch back up, then sl st in the middle-right flower ring.
The two ch-10 posts make the straight sides. The diagonals between the flowers and the arch centers form the lower diamonds.
Row 6 (upper tier, right to left):
- Ch 10, fl (top-right flower).
- Ch 18, sc in the 7th (center) sc of the fan edge.
- Ch 18, fl (top-left flower).
- Ch 10, sl st in the middle-left flower ring. Sl st in each of the 10 ch back up, then sl st in the top-left flower ring.
The two ch-18 diagonals, about 1.4 in (3.6 cm) each, meet at the center fan and form the large upper diamond. Check that the piece now measures 3.0 in (7.6 cm) from the bottom tip to the top flowers.
Row 7 (roof foundation): Ch 31, sl st in the top-right flower ring.
Part 4: Fan Roof
The roof narrows as it rises, so its rays come together at the top flower.
Row 1: Ch 1, turn. Working in the back bump of each foundation ch, sc in each of the 31 ch. (31 sc)
Row 2: Ch 6 (counts as tr + ch 2), turn, sk 2 sc, *tr in next sc, ch 2, sk 2 sc; rep from * 8 more times, tr in last sc. (11 tr, 10 ch-2 sps)
Row 3: Ch 4 (counts as dc + ch 1), turn, *dc in next tr, ch 1; rep from * 8 more times, dc in 4th ch of the beginning ch-6. (11 dc, 10 ch-1 sps)
Row 4: Ch 3 (counts as dc), turn. Skipping all ch-1 sps, *dc2tog over next 2 dc; rep from * 4 more times, finishing the last dc2tog in the 3rd ch of the beginning ch-4. (6 sts = 1 + 5 clusters)
Row 5: Ch 2 (does not count), turn, dc6tog over all 6 sts. (1 cluster)
The roof now stands about 1.0 in (2.5 cm) tall.
Part 5: Top Flower and Hanging Loop
Ch 6, sl st in 5th ch from hook to form a ring. The remaining 1 ch is a short stem.
Rnds 1–3: Work as for the Bottom Flower. (25 sts, 5 petals)
Sl st across to the center dc of the topmost petal. Ch 26, sl st in the same dc to form a 1 in (2.5 cm) loop. Fasten off.
Edging (Border)
The edging adds the fine dotted texture to the bell rim and the underside of the roof. Picot spacing: 1 picot every 2 sts, about every 0.15 in (0.4 cm).
Edge 1, bell rim (27 sts): Join with a sl st in FL of sc 1. Ch 1, sc in same FL, picot, *sc in FL of next 2 sc, picot; rep from * 12 more times. Fasten off. (27 sc, 14 picots)
Math: 1 + (13 x 2) = 27, so each rim sc is used once. Each end finishes with a single sc and a picot, which keeps the rim symmetrical.
Edge 2, roof underside (31 sts): Join with a sl st in the first free loop of the foundation ch at the left roof tip. Ch 1, sc in same loop, trefoil, *sc in next 2 loops, picot; rep from * 13 more times, sc in last 2 loops, trefoil, sl st in last sc. Fasten off. (31 sc, 14 picots, 2 trefoils)
Math: 1 + (14 x 2) + 2 = 31, so the edging covers the foundation exactly. Each trefoil has 2 sc between it and the nearest picot, and the center loop (number 16) sits between picots 7 and 8, so the two halves of the roof edge match.
Weave in all ends along the chain lines, splitting the thread plies.
Final Blocking
- Cover the blocking board with plastic wrap. Draw a 2.6 in (6.6 cm) x 4.5 in (11.4 cm) rectangle with a center line.
- Soak the ornament in stiffener for one minute, then press out the excess in a towel. Don’t wring it.
- Pin the outer petal tips of the top and bottom flowers on the center line, 4.5 in (11.4 cm) apart.
- Pin the roof tips to the outer lines so the roof spans 2.6 in (6.6 cm).
- Pin the bell corner flowers 2.1 in (5.3 cm) apart. Then pull the middle and top side flowers outward until the side posts run straight.
- Pin the center fan so its point sits on the center line and its rays spread evenly.
- Open each petal and picot with a pin tip. Lay the hanging loop straight up.
- Let it dry fully, at least 12 hours, before unpinning.
Final Quality-Control Checklist
- Both large flowers have 5 even petals of 5 sts each.
- The bell rim has 27 sc and 14 picots. The roof underside has 31 sc, 14 picots and 2 trefoils.
- The center fan has 5 rays and a 13-sc edge, centered in the lattice.
- Six small flowers sit in matching pairs at three levels.
- The side posts are straight, and the diagonals cross evenly on both sides.
- Width is 2.6 in (6.6 cm), height is 4.5 in (11.4 cm), and the loop is 1 in (2.5 cm).
- No ends show on the front, and the piece hangs straight.
Troubleshooting
- Bell cups instead of lying flat: Your tr rays are too tight. Loosen Row 2, or use extra pins along the rim when blocking.
- Roof ruffles: The Row 2 tr are too tall. Work them more firmly, or change the ch-2 sps to ch-1.
- Lattice sags or pulls: Your chains don’t match gauge. Check 10 ch against 0.75 in (1.9 cm), and change hook size for the chains only.
- Center fan leans: The stem sl sts are too tight. Re-pin the fan upright while it’s still wet.
- Picots disappear: Make each picot chain a little looser, and open it with a pin when blocking.
- Piece twists when hung: The loop is off center. Re-attach it at the dc of the topmost petal.
Care
Dust gently with a soft brush, and store the ornament flat in tissue. If it goes soft, rinse it, stiffen it again, and re-block it on the same template.

Final Notes
Here is how the measurements build. A 0.5 in (1.3 cm) flower leads to a 2.1 in (5.3 cm) bell rim of 27 sc. The ch-10 posts and the lattice bring the piece to 3.0 in (7.6 cm). The 31-sc roof spans 2.4 in (6.1 cm), and the roof and top flower bring the height to 4.5 in (11.4 cm). The trefoil tips widen the finished piece to 2.6 in (6.6 cm). If you hit each checkpoint along the way, the finished lantern will come out the right size.
Happy crocheting!