

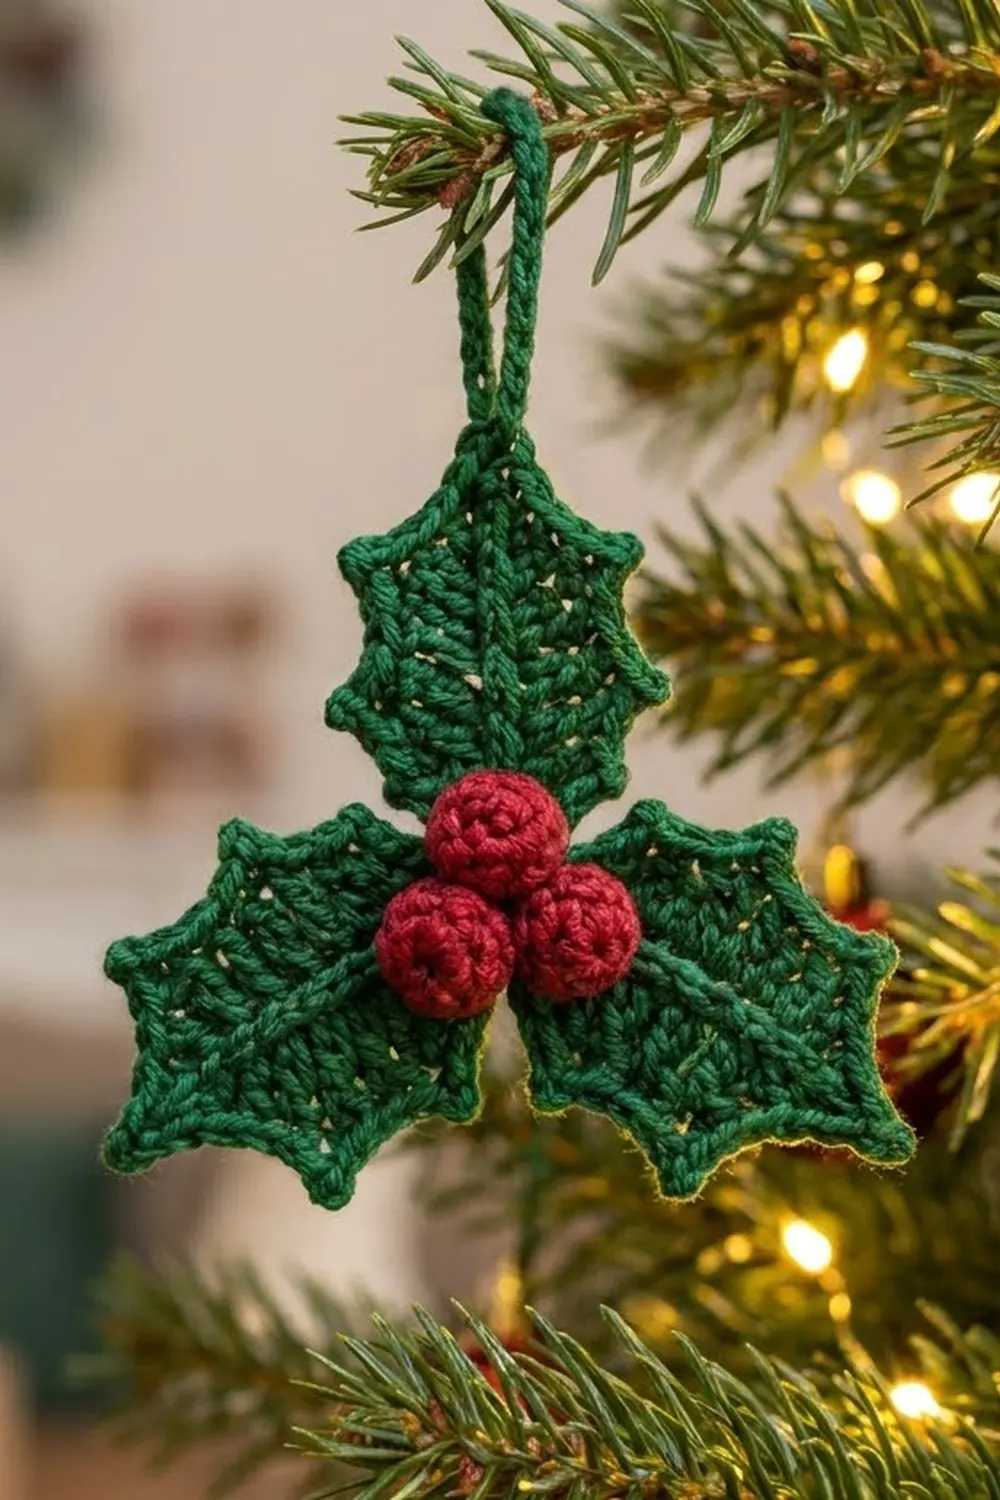
The Merry Sprig Holly Ornament is a small, classic Christmas sprig: three pointed green holly leaves, three round red berries clustered at the center, and a slim green loop for hanging. Each leaf has a raised center vein, fine diagonal ridges, and a scalloped edge with sharp little points, so it reads as holly even from across the room.
The palette is just two colors: a deep forest green for the leaves and loop, and a rich cranberry red for the berries. Mercerized cotton gives crisp stitch definition and a soft sheen that catches tree lights nicely.
The pattern uses US crochet terms. The finished ornament measures about 5 in (12.7 cm) wide and 4.5 in (11.4 cm) tall, plus a 1.5 in (3.8 cm) hanging loop, for a total height of about 6 in (15.2 cm).
Construction is simple. Each leaf is worked in the round around a foundation chain, then finished with a pointed edging round. The berries are tiny stuffed balls. Everything is sewn together at the center, and the loop is worked straight off the tip of the top leaf.
Finished Size and Construction
- Finished size: about 5 in (12.7 cm) wide x 4.5 in (11.4 cm) tall, plus 1.5 in (3.8 cm) loop
- Skill level: Easy+ (working both sides of a chain, picots, small amigurumi)
- Terminology: US crochet terms
- Yarn weight: Sport weight (2), mercerized cotton
- Hook: 2.75 mm (C-2)
- Number of pieces: 6 sewn pieces (3 leaves, 3 berries), plus 1 loop worked directly onto the top leaf
- Layout: one leaf pointing up (12 o’clock), two leaves angled down at about 4 and 8 o’clock, berries grouped in a triangle at the center
- Leaf size before edging: 2.4 in (6.1 cm) long x 1.25 in (3.2 cm) wide
- Leaf size after edging: 2.75 in (7.0 cm) long x 1.75 in (4.4 cm) wide, point to point
- Edging depth: about 0.25 in (0.6 cm) per side
- Berry size: about 0.75 in (1.9 cm) across
Materials
Choose a smooth, tightly plied sport-weight cotton. Mercerized cotton holds the points crisply and does not fuzz. Acrylic will work, but the points will be softer and the leaves slightly puffier.
If you only have DK cotton, you can still use this pattern with a 3 mm hook. Expect each leaf to come out about 0.25 in (0.6 cm) longer and the whole sprig to grow a little.
- Green (leaves and loop): 6 g, about 18 m
- Red (berries): 3 g, about 9 m (includes scrap yarn for stuffing)
Tools:
- 2.75 mm (C-2) crochet hook
- Tapestry needle
- Scissors
- Locking stitch marker
- Rustproof pins and a blocking mat or folded towel
- Spray bottle with water
Quantities include a margin of roughly 20 percent for swatching and sewing tails.
Abbreviations (US Terms)
- ch: chain
- sl st: slip stitch
- sc: single crochet
- hdc: half double crochet
- dc: double crochet
- sc2tog: single crochet 2 together
- BLO: back loop only
- st(s): stitch(es)
- MR: magic ring
Special stitches:
- Picot: ch 3, sl st in 3rd ch from hook.
- Point: (hdc, picot, hdc) all in the same st.
- Tip point: (hdc, dc, picot, dc, hdc) all in the same st.
Gauge and Checkpoints
Gauge: 12 sc and 13 rows = 2 in (5.1 cm) square in sc with a 2.75 mm hook.
Gauge matters less for an ornament than for a garment, but it controls whether the leaves lie flat and the points stay sharp. Make one complete leaf first and check these numbers:
- Foundation ch 13: about 2 in (5.1 cm) long
- After Rnd 1: 2.25 in (5.7 cm) long x 1 in (2.5 cm) wide
- After Rnd 2: 2.4 in (6.1 cm) long x 1.25 in (3.2 cm) wide
- After Rnd 3: 2.75 in (7.0 cm) long x 1.75 in (4.4 cm) wide, point to point
- Berry: 0.75 in (1.9 cm) across after stuffing
If your leaf is too big: go down to a 2.5 mm hook. Large leaves also tend to ruffle at the edging.
If your leaf is too small or cups: go up to a 3 mm hook, or loosen your foundation chain. A tight chain is the most common reason a leaf curls along its vein.

Leaf (Make 3)
Each leaf is worked around both sides of one foundation chain. The chain itself becomes the center vein. The tall dc stitches on each side lean slightly, which forms the diagonal ridges.
With green, ch 13.
Rnd 1: Working in the top loops of the chain: sc in 2nd ch from hook, hdc in next ch, dc in next 7 ch, hdc in next ch, sc in next ch, 3 sc in last ch (tip). Rotate and work along the underside of the chain: sc in next ch, hdc in next ch, dc in next 7 ch, hdc in next ch, sc in next ch (this is the same ch as the very first sc), 1 more sc in that same ch (base). Join with sl st to first sc. (26 sts)
Count check: side A 11 sts + tip 3 sts + side B 11 sts + base 1 st = 26 sts. Place a marker in the center st of the tip group (the 13th st).
Rnd 2: Ch 1 (does not count as a st). Working in BLO: sc in first 12 sts, 3 sc in marked tip st, sc in next 12 sts, 3 sc in last st (base). Join with sl st to first sc. (30 sts)
Count check: 12 + 3 + 12 + 3 = 30 sts. Working in BLO leaves the front loops of Rnd 1 as a fine ridge that outlines the leaf body.
For the next round, number the Rnd 2 sts as follows:
- Sts 1–12: side A
- Sts 13–15: tip group (center st 14)
- Sts 16–27: side B
- Sts 28–30: base group
Rnd 3 is the edging, and it is written out in the Border section below. Work it on each leaf before assembly.
Vein (optional but recommended): With a 12 in (30.5 cm) length of green, work surface sl sts along the foundation chain from base to tip, 1 sl st per chain, 12 sl sts total. Keep it relaxed so the leaf does not pucker. This gives the raised center vein.
Berry (Make 3)
With red, work in continuous rounds. Mark the first st of each round.
Rnd 1: 6 sc in MR. (6 sts)
Rnd 2: 2 sc in each st around. (12 sts)
Rnd 3: Sc in each st around. (12 sts)
Rnd 4: Sc in each st around. (12 sts)
Stuff firmly with red scrap yarn so no white shows between stitches.
Rnd 5: Sc2tog 6 times. (6 sts)
Fasten off, leaving an 8 in (20.3 cm) tail. Weave the tail through the front loops of the last 6 sts, pull closed, and keep the tail for sewing. Each berry should measure about 0.75 in (1.9 cm) across.
Make All Pieces
- Green: 3 leaves (each with Rnd 3 edging and vein), plus 1 hanging loop worked after assembly
- Red: 3 berries
Text layout (front view):
            [loop]
              |
          [ Leaf 1 ]
         (tip up, 12)
              B1
 [ Leaf 2 ]  B2 B3  [ Leaf 3 ]
  (tip at 8)         (tip at 4)
The leaf bases meet at the center. The berries sit on top of the bases and hide the join.
Joining
Method: whipstitch the leaves together with the leaf tails, then tack the berries on top.
Stitch-to-stitch logic: each leaf has a 3-st base group of sl sts (Rnd 3, sts 28–30). These are the only stitches joined edge to edge.
- Lay Leaf 1 tip up. Place Leaf 2 and Leaf 3 below it with their tips pointing to 8 o’clock and 4 o’clock, about 120 degrees apart.
- Slide the base groups of Leaves 2 and 3 about 0.25 in (0.6 cm) under the base of Leaf 1.
- Using the tail from Leaf 1, whipstitch its 3 base sts to the 3 base sts of Leaf 2, then to the 3 base sts of Leaf 3. That is 3 stitches to 3 stitches for each pair.
- Where the side edges of neighboring leaves touch near the center, add 2 tacking stitches through the back only so nothing shows on the front.
- Sew Berry 1 just above the center, slightly onto Leaf 1. Sew Berries 2 and 3 below it, side by side, touching each other and Berry 1. Pass the needle through each berry’s base and the leaves 3–4 times, then through the neighboring berries once to lock the cluster.
Tension advice: pull each sewing stitch snug but not tight. Overtight stitching pulls the leaf bases into a lump and tips the leaves forward.
Size checkpoint: the joined sprig should measure about 5 in (12.7 cm) wide x 4.5 in (11.4 cm) tall. If it is narrower, the side leaves are tucked too far under. Loosen and reposition them.
Hanging loop: join green with a sl st into the tip picot of Leaf 1. Ch 20, sl st into the same picot. Sl st in each of the 20 ch around the loop. Fasten off and weave in. The loop stands about 1.5 in (3.8 cm) tall.
Border (Leaf Edging, Rnd 3)
This pointed edging is the leaf’s border. Work it on each leaf right after Rnd 2, before joining.
Border gauge: the 12 sts of each Rnd 2 side measure about 2 in (5.1 cm), so a point falls about every 0.6 in (1.5 cm).
Rnd 3: Ch 1 (does not count as a st).
- Side A (sts 1–12): [sl st in next st, sc in next st, point in next st, sc in next st] 3 times. (15 sts + 3 picots)
- Tip (sts 13–15): sc in next st, tip point in center st, sc in next st. (6 sts + 1 picot)
- Side B (sts 16–27): [sc in next st, point in next st, sc in next st, sl st in next st] 3 times. (15 sts + 3 picots)
- Base (sts 28–30): sl st in each of next 3 sts. (3 sts)
Join with sl st to first sl st. (39 sts + 7 picots)
Fasten off, leaving a 12 in (30.5 cm) tail on Leaf 1 for joining. Leaves 2 and 3 can have 8 in (20.3 cm) tails.
Count check: 15 + 6 + 15 + 3 = 39 sts. As a conversion: 30 sts worked 1 per existing st + 6 extra sts (one extra hdc from each of the 6 side points) + 3 extra sts (the tip point puts 4 sts into 1 st) = 39 sts, plus 7 picots.
Why the math works:
- Each side has exactly 12 sts, which divides evenly into 3 repeats of 4. No leftover sts means no lopsided gaps.
- Side B repeats are written in the reverse order of Side A. Counting from the base, both sides run sl st, sc, point, so the leaf is mirror-symmetric.
- The sl sts sit at the low point of each curve and pull the edge inward between points. That creates the scalloped holly shape.
- The base group stays as flat sl sts, giving a neat, low edge for sewing.
Final Blocking
- Weave in all ends except the sewing tails before assembly. After assembly, weave in the remaining tails along the back.
- Lay the ornament face down on a blocking mat or folded towel.
- Mist lightly with water until damp, not soaked.
- Turn face up. Pin each leaf at its tip and at every picot point, pulling each point outward slightly.
- Check that each leaf measures 2.75 in (7.0 cm) long x 1.75 in (4.4 cm) wide, and that the whole sprig is 5 in (12.7 cm) x 4.5 in (11.4 cm).
- Gently roll each berry between your fingers to round it out.
- Leave it to dry completely, at least 8 hours, before unpinning.
Final Quality-Control Checklist
- Each leaf has 7 points: 3 per side plus 1 tip.
- Each leaf measures 2.75 in (7.0 cm) x 1.75 in (4.4 cm).
- The center vein runs straight from base to tip.
- The leaves sit about 120 degrees apart with no gap at the center.
- The three berries form a tight triangle and fully cover the leaf bases.
- No stuffing shows through the berries.
- The loop is centered above Leaf 1 and stands about 1.5 in (3.8 cm) tall.
- All ends are woven in on the back.
- The ornament hangs straight without tilting.
Troubleshooting
Leaf curls along the vein: the foundation chain is too tight. Remake it with a larger hook for the chain only.
Edges ruffle: Rnd 2 is loose or has extra sts. Recount: Rnd 2 must be 30 sts.
Points are blunt: pull each picot sl st snug and pin the points firmly during blocking.
Picots flip to the back: after each picot, pull the closing sl st toward you before working the next hdc.
Leaf is lopsided: check that Side B was worked as written (sc, point, sc, sl st), not as a copy of Side A.
Berries look flat: stuff them more firmly before Rnd 5, using red scraps.
Ornament tilts when hanging: the loop is off center. Move it to the exact tip picot of Leaf 1.
Center looks bulky: reduce the tuck-under to 0.25 in (0.6 cm) and loosen the whipstitches.
Care
Spot clean with cool water and mild soap, then reshape and dry flat. Store flat or hanging, away from heavy ornaments that could crush the berries.
Final Notes
The measurement chain is short and easy to check. A 13-ch foundation of about 2 in (5.1 cm) gives a 26-st Rnd 1 leaf that is 2.25 in (5.7 cm) long. Rnd 2 grows it to 30 sts and 2.4 in (6.1 cm). The pointed edging takes it to 39 sts plus 7 picots and 2.75 in (7.0 cm) long. Three leaves and three 0.75 in (1.9 cm) berries assemble into a 5 in (12.7 cm) x 4.5 in (11.4 cm) sprig, with a 1.5 in (3.8 cm) loop on top.
If your first leaf hits the checkpoints, the rest of the ornament will fall into place. Make one for the tree, a few more for gift toppers, and enjoy how quickly they work up.
Happy crocheting!