

This hanging teardrop holder keeps two spare rolls in reach and looks pretty doing it. A solid mauve back, a front with a wide opening and an oval base make a soft pouch that hangs from a wooden ring.
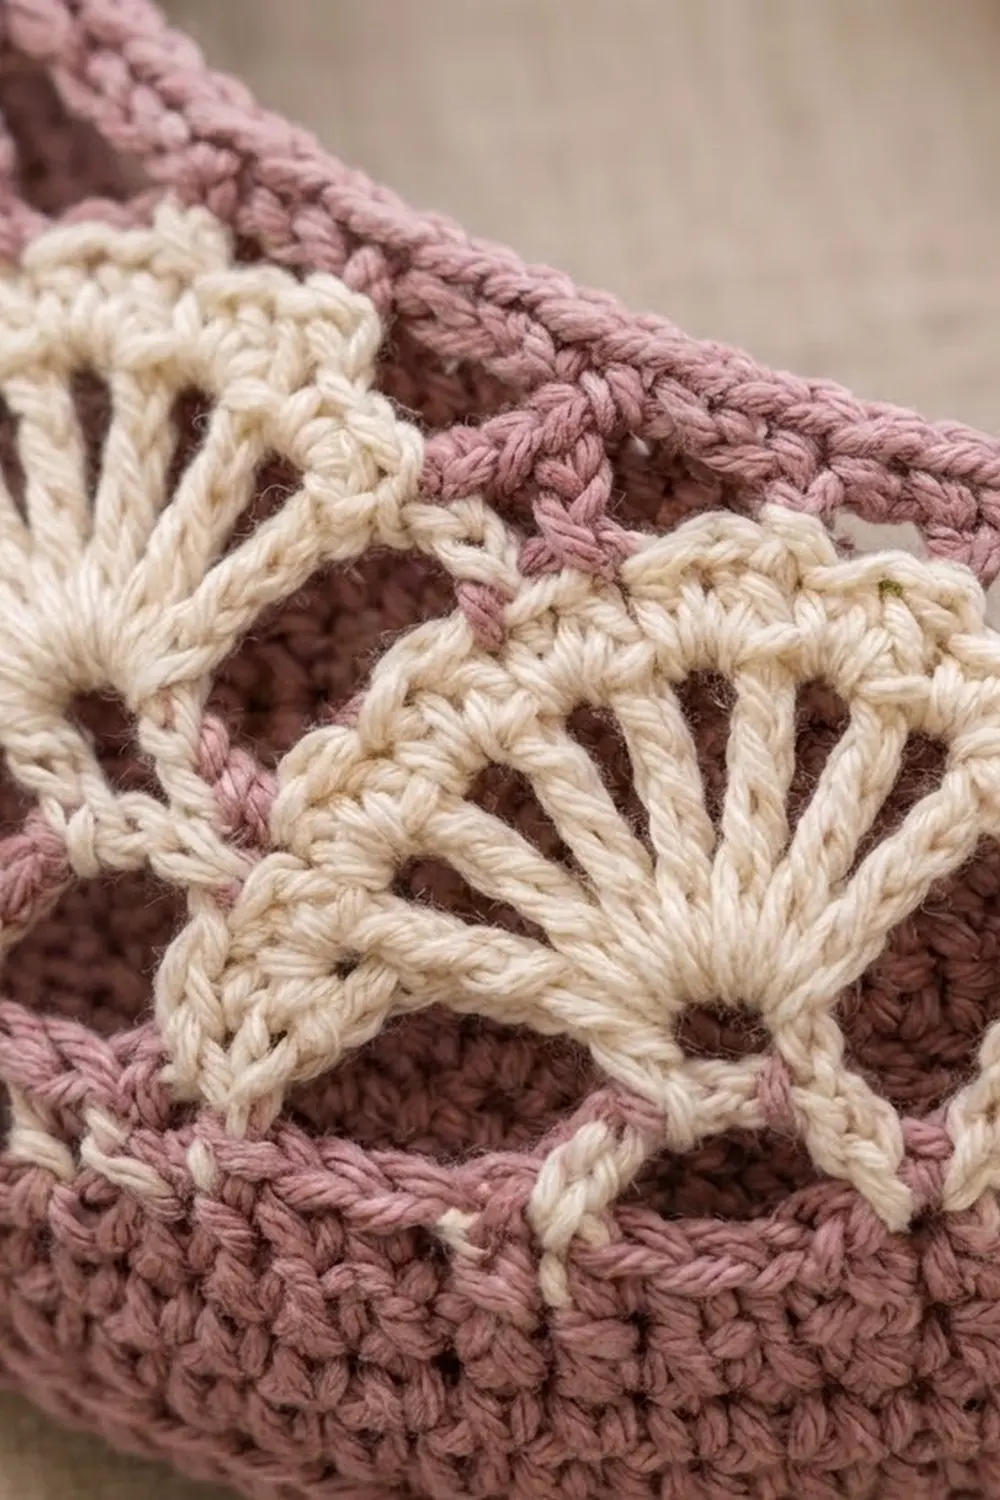
The detail is a crescent of cream fan shells that runs down the left side of the opening and around the bottom. Mauve mesh and single crochet frame each fan. The right side stays a narrow plain band, so the opening sits off-center and looks like a scooped pocket.
The finished holder measures 9¼” (23.5 cm) wide, 16″ (40.6 cm) tall and 4″ (10.2 cm) deep at the base. With the hanging tab it reaches about 18″ (45.7 cm). The pattern uses US crochet terms.
You’ll work the back flat in rows and the base in rounds. The front is one long strip worked lengthwise, with the fans set in as a short row. Its inner edge is shortened so the strip curves into a frame. Everything is then seamed and the opening gets a neat border.
Finished Size and Construction
- Finished size: 9¼” x 16″ (23.5 x 40.6 cm), plus a 2″ (5.1 cm) tab loop
- Skill level: Intermediate
- Terminology: US
- Yarn weight: Worsted (#4) cotton
- Hook: 4.0 mm (G-6)
- Number of pieces: 4 (back, front, base, tab) plus a wooden ring
- Layout: back and front joined at the sides, oval base set into the bottom, tab at the top
- Back panel size: 9¼” x 16″ (23.5 x 40.6 cm)
- Size before border: same as finished; the border goes only around the opening
- Border depth: about ¼” (0.6 cm)
Materials
Use a firm 100% cotton or cotton-blend worsted yarn. Cotton holds the teardrop shape and doesn’t stretch out under the weight of the rolls.
- Mauve (MC): 180 g, about 305 m (334 yd)
- Cream (CC): 30 g, about 51 m (56 yd)
Tools:
- 4.0 mm (G-6) hook
- One wooden ring, 2½” (6.4 cm) outer diameter
- Tapestry needle
- Stitch markers
- Scissors
- Rust-proof pins for blocking
These quantities include about a 15% margin.
Abbreviations (US Terms)
- ch – chain
- sl st – slip stitch
- sc – single crochet
- dc – double crochet
- inc – 2 sc in the same stitch
- sc2tog – single crochet 2 together
- rev sc – reverse single crochet (crab stitch)
- st(s) – stitch(es)
- sp – space
- RS / WS – right side / wrong side
Special stitch – Fan: 7 dc in the same stitch.
Gauge and Checkpoints
Gauge: 16 sc x 18 rows = 4″ (10.2 cm) in sc rows.
Make the back panel first and use it as your gauge piece. If it measures correctly, the other pieces will fit it.
Checkpoints:
- Back, after Row 15: 37 sts measure 9¼” (23.5 cm) wide, and the piece is about 3.3″ (8.4 cm) tall.
- Back, after Row 38: about 8½” (21.6 cm) tall.
- Back, finished: 16″ (40.6 cm) tall, with a top edge of 1¾” (4.4 cm).
- Base, finished: 10″ x 4″ (25.4 x 10.2 cm).
- Front strip, after Row 2: about 40¼” (102.2 cm) long, unblocked.
If your piece is too big, go down a hook size. If it’s too small, go up a size. Keep the stitch counts exactly as written, because every seam depends on them.
Back Panel (make 1, MC)
Work in rows. Begin each row with ch 1; the ch 1 does not count as a stitch.
Row 1 (RS): Ch 18. Sc in the 2nd ch from the hook and in each ch across. (17 sts)
Rows 2–7: Ch 1, turn. Inc in the first st, sc to the last st, inc in the last st. (Row 2: 19 / Row 3: 21 / Row 4: 23 / Row 5: 25 / Row 6: 27 / Row 7: 29 sts)
Rows 8–15: On even rows, work the increase row as above. On odd rows, ch 1, turn and sc in each st. (Rows 8–9: 31 / Rows 10–11: 33 / Rows 12–13: 35 / Rows 14–15: 37 sts)
Rows 16–38: Ch 1, turn. Sc in each st. (37 sts)
Rows 39–68: On odd rows, ch 1, turn, sc2tog, sc to the last 2 sts, sc2tog. On even rows, ch 1, turn and sc in each st. That gives 15 decrease rows. (Row 39: 35 sts … Row 67: 7 sts / Row 68: 7 sts)
Rows 69–72: Ch 1, turn. Sc in each st. (7 sts) Don’t fasten off.
Edging round: Ch 1. Work 1 sc in each row end down the side (72 sc). Work 1 sc in each of the 17 foundation chains (17 sc). Work 1 sc in each row end up the other side (72 sc), then 1 sc in each of the 7 top sts (7 sc). Sl st to the first sc. (168 sc) Fasten off.
Mark the bottom 49 edging sts: the 17 foundation sts plus the 16 row-end sts on each side for Rows 1–16. The base will attach here. That leaves 56 side sts above the base on each side.
Base (make 1, MC)
Work in joined rounds. Ch 1 at the start of each round doesn’t count as a stitch. Sl st to the first sc at the end of each round.
Rnd 1: Ch 25. Work 3 sc in the 2nd ch from the hook and sc in the next 22 chs. Work 3 sc in the last ch. Rotate and sc in the next 22 chs along the other side of the foundation. (50 sts)
Rnd 2: [Inc in each of the next 3 sts, sc in the next 22] twice. (58 sts)
Rnd 3: [(Sc 1, inc) 3 times, sc in the next 22] twice. (64 sts)
Rnds 4–9: [(Sc in the next n–2 sts, inc) 3 times, sc in the next 22] twice, where n is the round number. Each round gains 6 sts. (Rnd 4: 70 / Rnd 5: 76 / Rnd 6: 82 / Rnd 7: 88 / Rnd 8: 94 / Rnd 9: 98 sts)
Fasten off. Rnd 9 has 27 sts across each curved end and 22 sts along each straight side. Those are 49 sts per half, one half for each panel.
Front Panel (make 1)
The front is a single strip worked lengthwise. Row 1 becomes the outer edge, which is sewn to the back and base. Row 5 becomes the edge of the opening.
Row 1 (RS, MC): Ch 162. Sc in the 2nd ch from the hook and in each ch across. (161 sts)
Row 2 (WS, MC): Ch 1, turn. Sc in each st. (161 sts) Fasten off.
Number the Row 2 stitches 1–161 from the end where Row 2 finished, and put a marker in st 1. That end is the top-left of the front:
- Sts 1–56 run down the left side.
- Sts 57–105 run along the bottom (49 sts).
- Sts 106–161 run up the right side.
Row 3 (RS, CC, lace section only): With RS facing, join CC with a sc in st 11. Skip 2 sts, Fan in the next st, skip 2 sts, sc in the next st. Repeat from * 17 more times. The last sc lands in st 119. (18 Fans, 19 sc) Fasten off.
Row 4 (RS, MC): With RS facing, join MC in st 1.
- Sc in sts 1–10.
- Dc in the first sc of Row 3.
- Ch 2, sc in the 4th (center) dc of the next Fan, ch 2, dc in the next sc. Repeat from * 17 more times.
- Sc in Row 2 sts 120–161 (42 sc).
Count: 52 sc in the plain sections, plus 19 dc, 18 sc and 36 ch-2 sps in the lace section.
Row 5 (WS, MC – trim row): Ch 1, turn.
- Sc in each of the 42 sc.
- Across the lace section, work 1 sc in each dc and sc (37 sts) plus 1 sc in each ch-2 sp (36 extra). That gives 37 + 36 = 73 sts.
- Sc in the last 10 sc.
(125 sts) Fasten off.
Row 5 puts only one sc in each ch-2 sp instead of two. That shortens the inner edge from 161 sts to 125, which pulls the strip into a curve. The fan section grows to about 2″ (5.1 cm) wide, while the plain sections stay about 0.9″ (2.3 cm) wide.
Hanging Tab (make 1, MC)
Row 1: Ch 8. Sc in the 2nd ch from the hook and in each ch across. (7 sts)
Rows 2–27: Ch 1, turn. Sc in each st. (7 sts)
The tab measures 1¾” x 6″ (4.4 x 15.2 cm). Fasten off and leave a long tail.
Make All Pieces
Pieces needed:
- MC: 1 back, 1 base, 1 tab, plus Rows 1, 2, 4 and 5 of the front
- CC: Row 3 of the front (18 Fans)
Layout, seen from the front:
          ( ring )
          [ tab  ]
         /  top   \
   front |  open-  | back panel
   left  |  ing    | behind
   (fans)|         | (plain right)
          \_fans__/
          [ base ]
Joining
Use MC and work single crochet through both layers from the outside, so the seam shows as a mauve outline.
- Base to back: With the base and back held wrong sides together, sc through each of the 49 marked bottom sts of the back and 49 sts of the base. (49 sc)
- Base to front: Join front sts 57–105 to the other 49 base sts in the same way. (49 sc)
- Sides: Join front sts 1–56 to the back’s 56 left side sts. Then join front sts 106–161 to the 56 right side sts. (56 sc per side)
- Top: Lay the two short ends of the front strip side by side over the back’s 7 top sts. Fold the tab around the ring and tuck both ends 1″ (2.5 cm) between the layers. Sew through all layers.
Each seam joins equal counts stitch to stitch, so you never need to skip or add stitches. Keep the seam tension the same as your fabric: a tight seam will pucker the curve.
Size checkpoint: The joined holder should measure 9¼” (23.5 cm) wide and 16″ (40.6 cm) tall.
Border
The border goes around the opening only and uses the same gauge as the fabric: 4 sts per inch (2.5 cm).
Rnd 1 (MC): Join at the top tip. Sc in each Row 5 st around the opening. That’s 73 sts along the fan side and 52 along the plain sides (10 top-left + 42 right). Sl st to the first sc. (125 sts)
Rnd 2: Ch 1. Rev sc in each st around. (125 sts) Fasten off.
Why the math works: Both rounds are worked 1:1 into the 125-st edge, so the opening keeps the length set in Row 5. It won’t ruffle and it won’t tighten.
Final Blocking
- Weave in all ends.
- Mist the holder until it’s damp, not soaked.
- Stuff it with a rolled towel so it takes its 3D shape.
- Pin it out to 9¼” x 16″ (23.5 x 40.6 cm).
- Spread each Fan evenly and straighten the mesh.
- Shape the base into a 10″ x 4″ (25.4 x 10.2 cm) oval.
- Let it dry completely before you remove the towel.
Final Quality-Control Checklist
- [ ] Back has 168 edging sts; base has 98 sts; front has 161 / 125 sts
- [ ] 18 Fans, all pointing toward the opening
- [ ] Seams are 49 + 49 + 56 + 56 sts
- [ ] The opening border lies flat at 125 sts
- [ ] The tab is secure and the ring is centered
- [ ] The holder is 9¼” (23.5 cm) wide and 16″ (40.6 cm) tall
Troubleshooting
- Fans look crowded: Check that you skipped 2 sts on each side of every Fan.
- The front won’t curve: Make sure Row 5 has only 1 sc per ch-2 sp.
- The base is too large for the panels: Recount Rnd 9. It should have exactly 98 sts.
- Side seams pucker: Loosen your tension, or use a hook one size larger for the seams only.
- The holder sags: Use firmer cotton, or line the base with plastic canvas cut to 10″ x 4″ (25.4 x 10.2 cm).
Care
Hand wash in cool water and lay flat to dry, reshaping it over a rolled towel. Don’t tumble dry.

Final Notes
The measurement chain is simple. Gauge sets the back at 168 edging sts, which split into 49 for the base and 56 for each side. The base’s 98 sts give 49 per panel. The front’s 161-st outer edge matches 56 + 49 + 56, and its 125-st inner edge sets the size of the opening. The 125-st border keeps that opening flat. If the counts match, the pieces fit together.
Happy crocheting!