

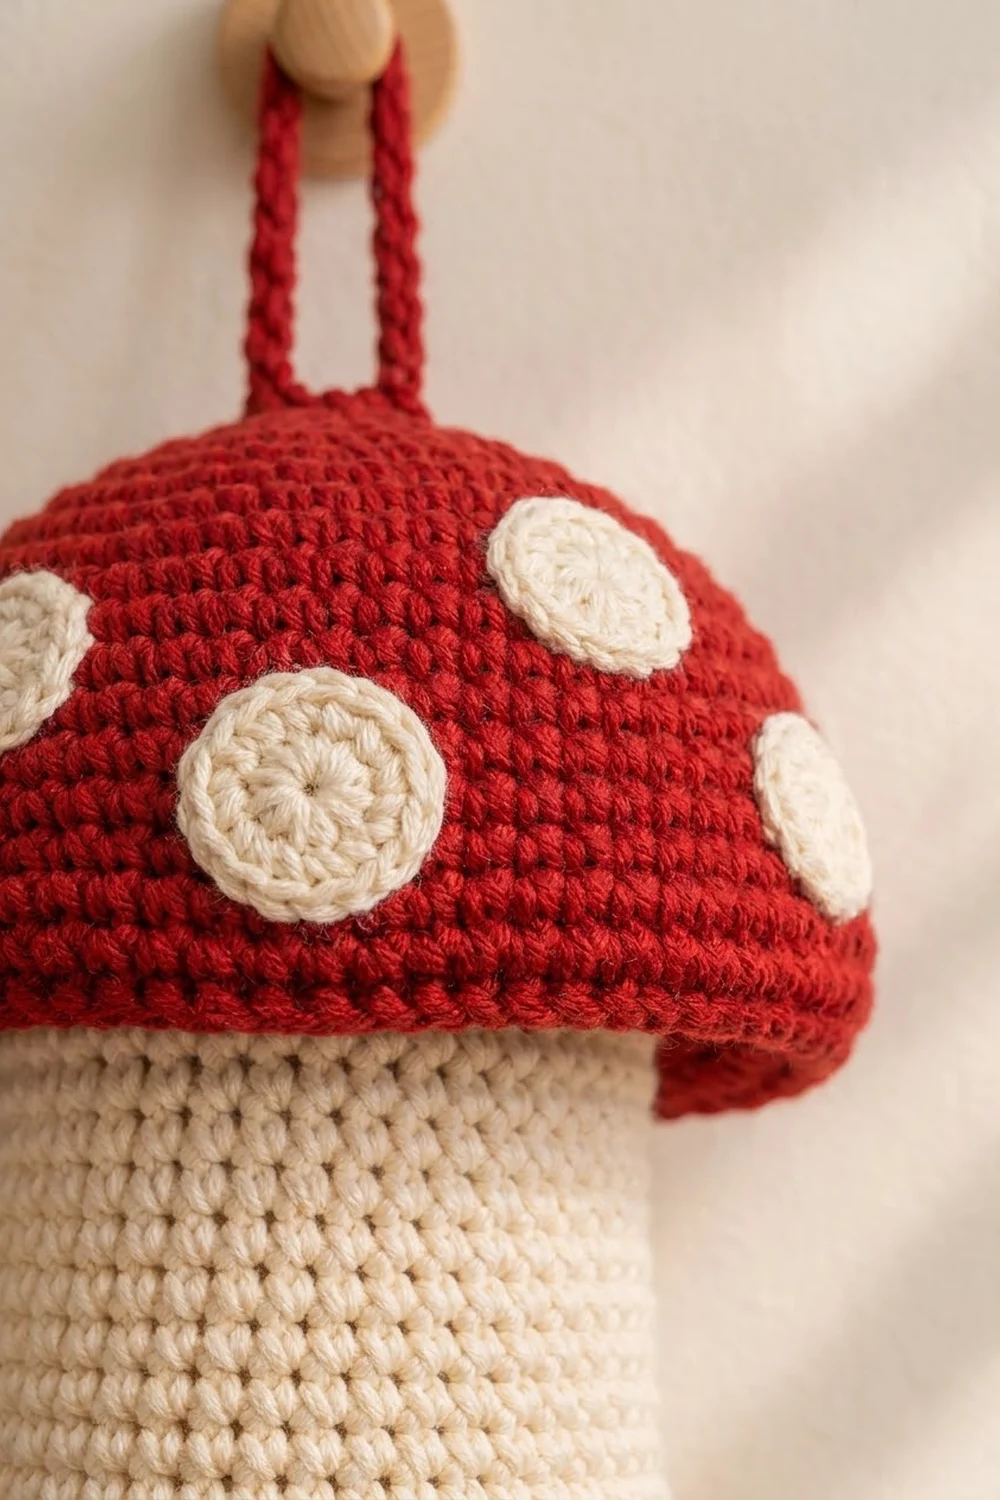
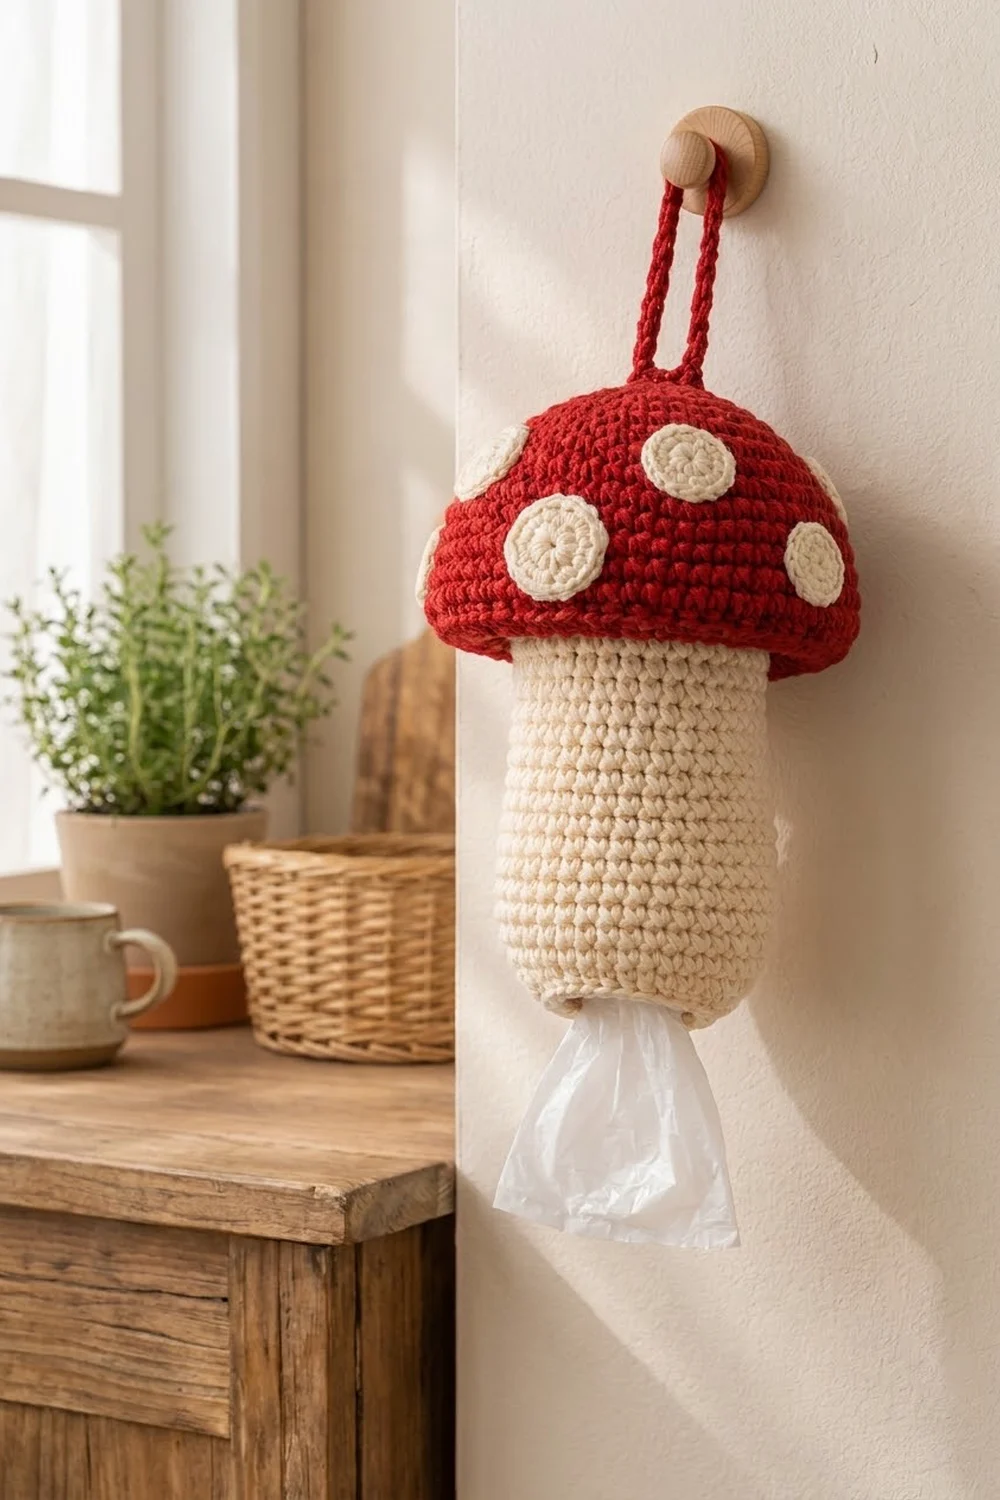
This toadstool bag holder turns a stack of plastic grocery bags into a cheerful kitchen decoration. It has a classic red-and-cream color scheme: a smooth cream stem, a rounded red cap with a rolled brim, and soft cream spots in two sizes. A red loop at the top lets it hang from a peg or hook.
The pattern uses US crochet terms throughout. Almost every stitch is single crochet worked in continuous rounds, so the fabric is dense, neat and strong enough to hold a good bundle of bags.
The finished holder is about 14.5 in (36.8 cm) tall without the loop and about 19 in (48.3 cm) tall including the loop. The stem is 4.8 in (12.2 cm) in diameter, and the cap is about 6.7 in (17.0 cm) across.
Here is the construction. You work the stem from the closed top disc down to a tapered bottom opening. You work the cap from the top down, then fold it under to form the brim and underside. The strap and spots are made separately. Then you sew everything together. You load bags through the stretchy bottom opening and pull them out one at a time.
Finished Size and Construction
- Finished size: 14.5 in (36.8 cm) tall without the loop; 19 in (48.3 cm) tall with it
- Skill level: Easy to intermediate
- Terminology: US crochet terms
- Yarn weight: Worsted (#4)
- Hook: 4.5 mm (US 7)
- Number of pieces: 11 (1 stem, 1 cap, 1 strap, 3 large spots, 5 small spots)
- Layout: Cap sewn over the top of the stem, strap at the center of the cap, spots spread over the dome
- Stem size: 4.8 in (12.2 cm) diameter × 11.5 in (29.2 cm) long
- Stem size before the opening edging: 11.3 in (28.7 cm) long
- Opening edging depth: 0.25 in (0.6 cm)
Materials
Worsted-weight cotton or cotton-blend yarn is the best choice here. It holds its shape, doesn’t fuzz, and gives the crisp stitch texture you see on this holder. Smooth acrylic also works, but it will be a little softer and more stretchy.
- Cream (stem and spots): 80 g / 140 m
- Red (cap and strap): 50 g / 90 m
- 4.5 mm (US 7) crochet hook
- Stitch markers (at least 2)
- Tapestry needle
- A small handful of polyester fiberfill (about 10 g)
- Scissors
- Pins
These quantities include a margin of about 25% beyond what the pattern actually uses.
Abbreviations (US Terms)
- ch – chain
- sc – single crochet
- inc – 2 sc in the same stitch
- sc2tog – single crochet 2 together (invisible decrease recommended)
- sl st – slip stitch
- BLO – back loop only
- MR – magic ring
- st(s) – stitch(es)
- Rnd – round
Special stitch – invisible decrease: Insert your hook into the front loop only of the next stitch, then into the front loop only of the stitch after it. Yarn over and pull through both front loops. Yarn over and pull through both loops on the hook. This gives a smoother dome and taper than a standard sc2tog.
All rounds are worked in continuous spirals unless a pattern says to join. Move your marker up at the start of every round.
Gauge and Checkpoints
Gauge: 16 sc × 17 rounds = 4 in (10.2 cm) in sc worked in the round. That works out to 4 stitches and 4.25 rounds per inch.
Make the stem’s top disc first and use it as your test piece.
- Checkpoint 1 (after stem Rnd 10, 60 sts): The disc measures 4.7 in (11.9 cm) across.
- Checkpoint 2 (after stem Rnd 52): The sides measure 9.9 in (25.1 cm) from the disc edge. The tube flattens to 7.5 in (19.1 cm) wide.
- Checkpoint 3 (after cap Rnd 8, 48 sts): The cap top measures 3.8 in (9.7 cm) across.
- Checkpoint 4 (after cap Rnd 24, 84 sts): The cap rim measures 21 in (53.3 cm) around.
If your disc is too big, go down 0.5 mm in hook size. If it is too small, go up 0.5 mm. A stem that is too big will look baggy under the cap. A stem that is too small will hold fewer bags.
Stem (Cream)
Top disc:
- Rnd 1: 6 sc in MR. (6)
- Rnd 2: inc in each st. (12)
- Rnd 3: (1 sc, inc) × 6. (18)
- Rnd 4: (2 sc, inc) × 6. (24)
- Rnd 5: (3 sc, inc) × 6. (30)
- Rnd 6: (4 sc, inc) × 6. (36)
- Rnd 7: (5 sc, inc) × 6. (42)
- Rnd 8: (6 sc, inc) × 6. (48)
- Rnd 9: (7 sc, inc) × 6. (54)
- Rnd 10: (8 sc, inc) × 6. (60)
Check the disc against Checkpoint 1. It should lie flat with no ruffling or cupping.
Sides:
- Rnd 11: sc in BLO of each st. (60) This creates the crisp folded edge where the flat top turns into the sides.
- Rnds 12–52: sc in each st. (60 per round, 41 rounds)
Check the sides against Checkpoint 2.
Bottom taper:
- Rnd 53: (8 sc, sc2tog) × 6. (54)
- Rnd 54: sc in each st. (54)
- Rnd 55: (7 sc, sc2tog) × 6. (48)
- Rnd 56: sc in each st. (48)
- Rnd 57: (6 sc, sc2tog) × 6. (42)
- Rnd 58: sc in each st. (42)
The taper adds 1.4 in (3.6 cm), so the stem now measures 11.3 in (28.7 cm) below the disc. Leave the yarn attached and go on to the opening edging in the Border section.
Cap (Red)
Dome:
- Rnd 1: 6 sc in MR. (6)
- Rnds 2–8: Increase exactly as in stem Rnds 2–8. (48 after Rnd 8)
- Rnd 9: sc in each st. (48)
- Rnd 10: (7 sc, inc) × 6. (54)
- Rnd 11: sc in each st. (54)
- Rnd 12: (8 sc, inc) × 6. (60)
- Rnd 13: sc in each st. (60)
- Rnd 14: (9 sc, inc) × 6. (66)
- Rnd 15: sc in each st. (66)
- Rnd 16: (10 sc, inc) × 6. (72)
- Rnd 17: sc in each st. (72)
- Rnd 18: (11 sc, inc) × 6. (78)
- Rnd 19: sc in each st. (78)
- Rnd 20: (12 sc, inc) × 6. (84)
- Rnds 21–24: sc in each st. (84 per round)
Working an even round between each increase round makes the cap curve down into a dome instead of lying flat. Check the cap against Checkpoint 4. It should be about 3.75 in (9.5 cm) deep.
Brim and underside:
- Rnd 25: sc in BLO of each st. (84) The unused front loops form the rolled outer edge of the brim.
- Rnd 26: sc in each st. (84)
- Rnd 27: (12 sc, sc2tog) × 6. (78)
- Rnd 28: (11 sc, sc2tog) × 6. (72)
- Rnd 29: (10 sc, sc2tog) × 6. (66)
- Rnd 30: (9 sc, sc2tog) × 6. (60)
The underside rounds turn inward and form a flat ring about 0.9 in (2.3 cm) wide. Sl st in the next st and fasten off, leaving a 30 in (76.2 cm) tail for sewing.
Hanging Strap (Red)
- Foundation: ch 41.
- Row 1: sc in the 2nd ch from the hook and in each remaining ch. (40)
- Row 2: ch 1, turn, sc in each st. (40)
Fasten off, leaving a 12 in (30.5 cm) tail. The strap measures 10 in (25.4 cm) long and 0.5 in (1.3 cm) wide.
Spots (Cream)
All spots are joined with a sl st to the first sc of the last round. Fasten off each spot with an 8 in (20.3 cm) tail.
Large spot (make 3):
- Rnd 1: 6 sc in MR. (6)
- Rnd 2: inc in each st. (12)
- Rnd 3: (1 sc, inc) × 6. (18)
- Rnd 4: (2 sc, inc) × 6. (24)
A large spot is 1.9 in (4.8 cm) across.
Small spot (make 5):
- Work Rnds 1–3 of the large spot. (18)
A small spot is 1.4 in (3.6 cm) across.
Pull each magic ring very tight. Leaving a tiny center hole gives the ringed look seen on the cap.
Make All Pieces
- Cream: 1 stem, 3 large spots, 5 small spots
- Red: 1 cap, 1 strap
Spot layout (cap seen from the front, top of the cap at the top):
            [S]
   [S]              [S]
        [L]    [L]
 [S]                  [S]
            [L]
- L = large spot (1.9 in / 4.8 cm)
- S = small spot (1.4 in / 3.6 cm)
Keep every spot at least 0.75 in (1.9 cm) above the brim fold so it doesn’t curl over the brim.
Joining
Spots: Pin each spot in place following the layout. Whipstitch through the outer loops of the spot’s last round, 1 stitch per spot stitch: 24 for a large spot and 18 for a small spot. Pick up one cap stitch each time. Pull each stitch snug, but not so tight that the spot puckers.
Strap: Fold the strap in half. Overlap the two ends side by side over cap Rnds 1–2 for 0.5 in (1.3 cm) and sew them down firmly with several passes. The loop that remains stands about 4.5 in (11.4 cm) tall.
Cap to stem: Slide the cap over the top of the stem so the stem’s disc sits inside the dome. Line up the 60 stitches of cap Rnd 30 with the 60 stitches of stem Rnd 16, which is about 1.2 in (3.0 cm) below the folded top edge. Place markers at 4 evenly spaced points, every 15 stitches, on both pieces so the cap sits straight.
Whipstitch 1 cap stitch to 1 stem stitch all the way around. Because both rounds have 60 stitches, the seam needs no easing. Before closing the last 15 stitches, push a thin, even layer of fiberfill into the brim and the space above the disc. Use enough to round out the dome, but not so much that it bulges.
Keep your tension steady. A seam that is too tight pinches the stem and tilts the cap.
Size checkpoint: The holder should measure 14.5 in (36.8 cm) from the top of the cap to the bottom edge, and the cap should be 6.7 in (17.0 cm) across.
Border (Bottom Opening Edging)
The border is a firm edging around the bag opening. It uses the same gauge as the stem: 4 stitches per inch.
Flattened, the opening has 2 sides of 21 stitches each, 42 stitches in total. A round opening has no corners, so no stitches are added at the folds.
- Rnd 59: sc in each st. (42; 21 per flattened side)
- Rnd 60: sl st loosely in each st. (42; 21 per flattened side)
Fasten off and weave in the end.
Why the math works: 42 stitches ÷ 4 stitches per inch = 10.5 in (26.7 cm) around. That is an opening about 3.3 in (8.4 cm) across, which is small enough to keep bags inside. The slip-stitch round firms up the edge so it bounces back after you push a bundle of bags through. Rnd 59 adds no stitches, so the opening stays at 42 stitches, exactly the count from Rnd 58.
Final Blocking
- Lightly mist the whole holder with water.
- Stuff the stem loosely with a rolled towel so it holds a round 4.8 in (12.2 cm) diameter.
- Shape the cap with your hands. Push the dome out evenly and roll the brim edge outward along the Rnd 25 fold.
- Flatten each spot gently with your fingertips.
- Straighten the strap and let it hang down.
- Let it dry completely standing upright, then remove the towel.
Final Quality-Control Checklist
- [ ] Stem Rnd 10 has 60 sts, and the disc is 4.7 in (11.9 cm) across.
- [ ] The stem is 11.5 in (29.2 cm) long, including the edging.
- [ ] The opening has 42 sts and measures 10.5 in (26.7 cm) around.
- [ ] Cap Rnd 24 has 84 sts, and Rnd 30 has 60 sts.
- [ ] The cap-to-stem seam joins 60 sts to 60 sts with no gaps.
- [ ] All 8 spots are sewn flat, with none curling over the brim.
- [ ] The strap loop stands 4.5 in (11.4 cm) and is centered.
- [ ] All ends are woven in securely.
Troubleshooting
- Cap is flat instead of domed: You skipped the even rounds between increases. Check Rnds 9–19.
- Cap is too pointed: Your tension tightened during the dome. Relax your grip or go up 0.5 mm in hook size for the cap only.
- Cap tilts: The seam markers were uneven. Re-sew using 4 markers at 15-stitch intervals.
- Spots ripple: You sewed into the spot’s inner stitches. Sew only through the outer loops.
- Bags fall out: The opening is too loose. Work Rnd 60 tighter, or add a second sl st round.
- Stem is twisted: This is normal for spiral rounds. Block it straight with the towel.
Care
Hand wash in cool water with mild soap, gently press out the water, and reshape the holder before drying it upright. Don’t put it in the dryer, because heat can flatten the cap.
Final Notes
Every measurement depends on the one before it. A gauge of 16 sc = 4 in (10.2 cm) gives a 60-stitch stem disc of 4.7 in (11.9 cm) and a stem 4.8 in (12.2 cm) wide. The 84-stitch cap rim measures 21 in (53.3 cm) around, and the cap decreases back to 60 stitches to match the stem stitch for stitch. The 42-stitch opening measures 10.5 in (26.7 cm) around. The result is a holder 14.5 in (36.8 cm) tall, or 19 in (48.3 cm) with its loop. For a softer look, swap the red for lilac and keep every count the same.
Happy crocheting!