

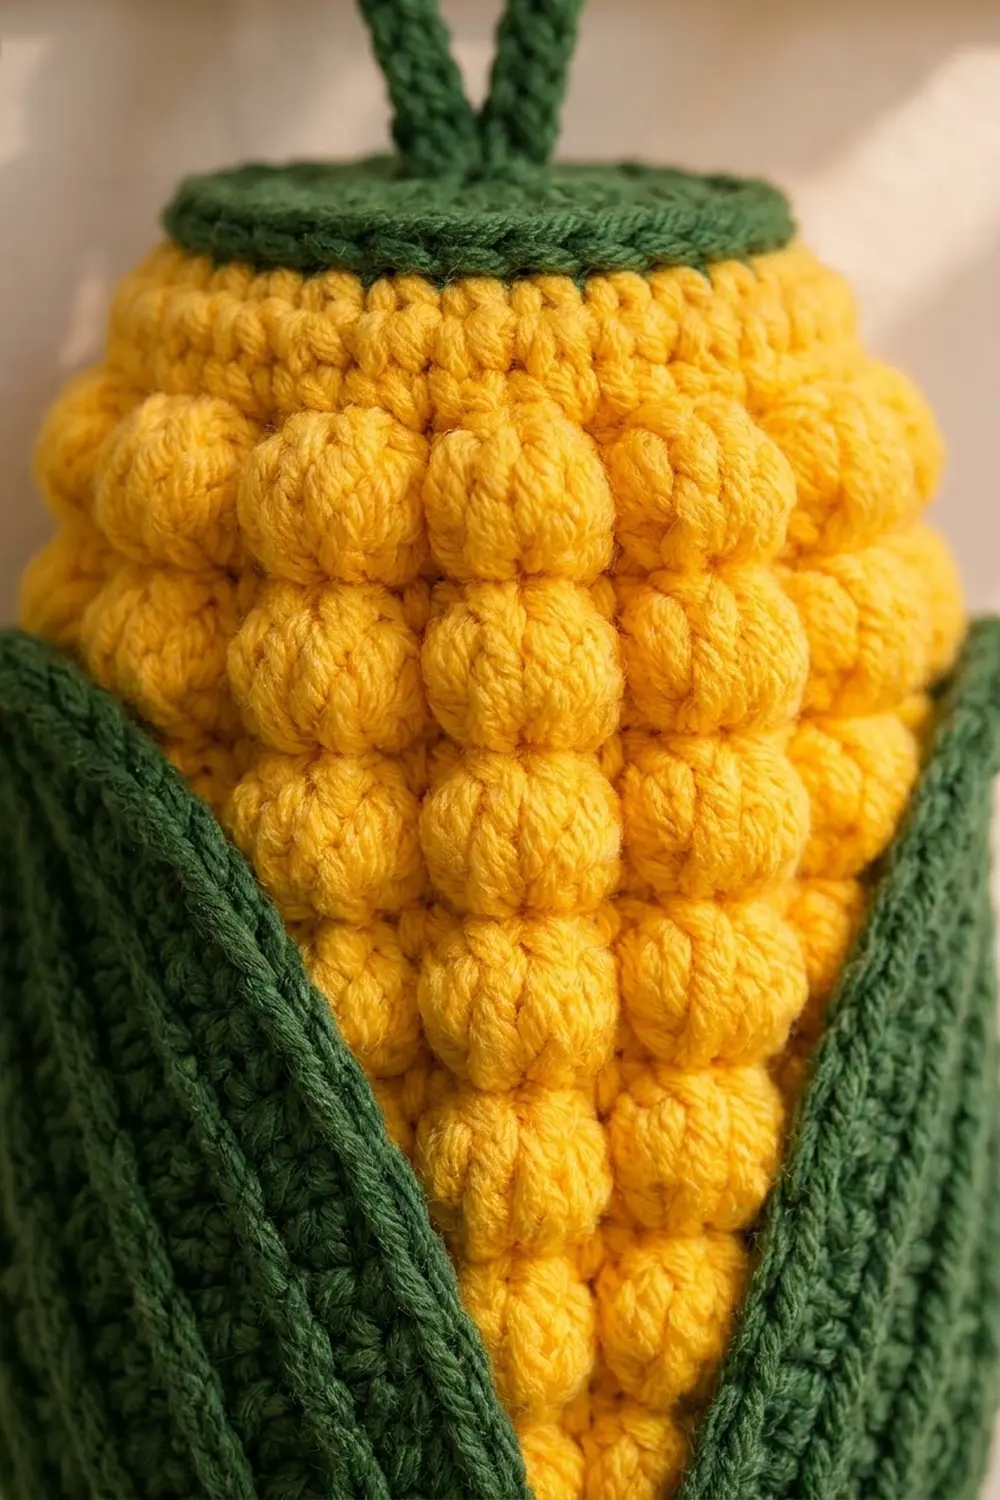
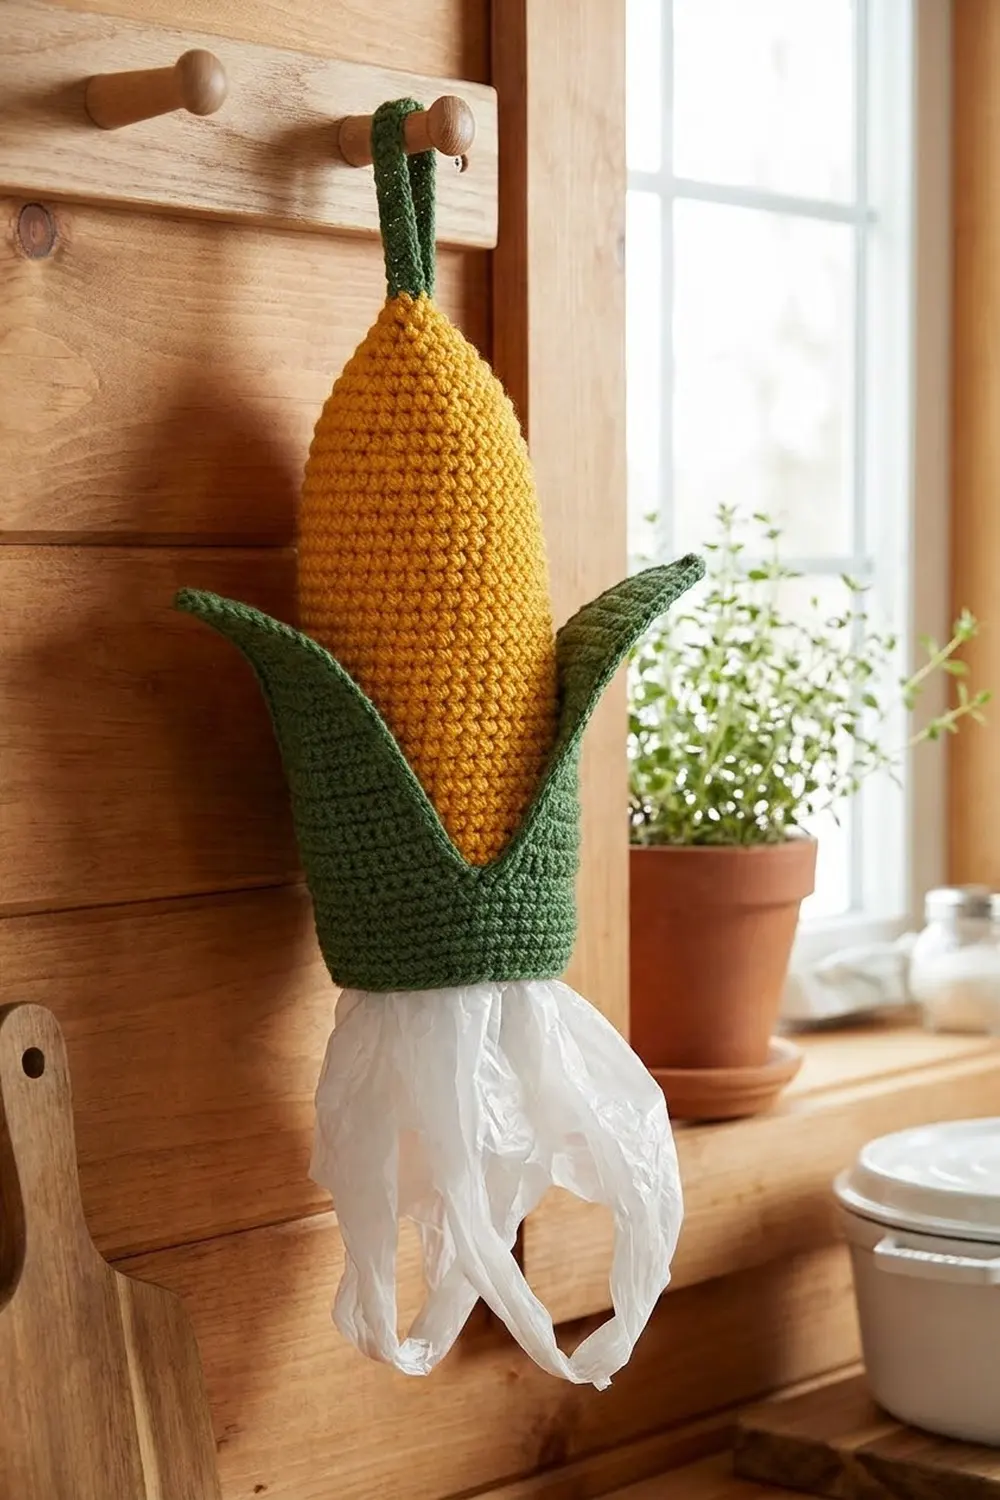
This cheerful corn cob keeps your plastic grocery bags in one tidy place. It has rows of plump golden kernels, two ribbed green husks, and a sturdy loop for hanging on a peg or cabinet knob. You stuff the bags in through the bottom opening and pull them out one at a time from the same opening.
The design uses two colors: bright golden yellow for the kernels and deep forest green for the base, cap, husks, and strap. The kernels are 4-dc popcorn stitches stacked into vertical columns. The husks are worked lengthwise in back-loop single crochet, which makes ribs that run from base to tip.
All terms are US crochet terms. The finished holder is about 4.5 in (11.4 cm) wide laid flat and 12.5 in (31.8 cm) tall. The hanging loop adds about 3.5 in (8.9 cm), for a total hanging length of about 16 in (40.6 cm).
You work the body from the bottom up as one seamless tube. It starts with an open green band, continues in yellow popcorn rounds, decreases into a green cap, and ends with a strap. You make two leaves separately, edge them, and sew them to the base.
Finished Size and Construction
- Finished size: 4.5 in (11.4 cm) wide flat × 12.5 in (31.8 cm) tall, plus a 3.5 in (8.9 cm) loop
- Skill level: Advanced beginner to intermediate
- Terminology: US
- Yarn weight: Worsted (#4)
- Hook: 5.0 mm (H-8)
- Number of pieces: 1 finished item made from 4 parts (body, 2 leaves, strap)
- Layout: Leaves sewn to opposite sides of the base band; strap sewn to the center of the cap
- Body circumference: 36 sts = 9 in (22.9 cm)
- Leaf size before edging: 8 in (20.3 cm) long × 3.75 in (9.5 cm) wide
- Leaf edging depth: 0.25 in (0.6 cm), so the finished leaf is 8.25 in (21.0 cm) × 4.25 in (10.8 cm)
Materials
Choose a smooth worsted-weight acrylic or cotton blend. Popcorns look best in a yarn with good stitch definition, and acrylic helps the body keep its shape when it is full of bags. The amounts below assume about 200 m per 100 g.
- Golden yellow: 95 g (190 m)
- Forest green: 65 g (130 m)
Tools:
- 5.0 mm (H-8) crochet hook
- Stitch marker
- Tapestry needle
- Scissors
- Straight pins
- Measuring tape
These quantities include a margin of about 15% for gauge swatches and differences in tension.
Abbreviations (US Terms)
- ch – chain
- sl st – slip stitch
- sc – single crochet
- dc – double crochet
- inc – 2 sc in the same stitch
- sc2tog – single crochet 2 together
- BLO – back loop only
- st(s) – stitch(es)
- rnd(s) – round(s)
- pc – popcorn
Popcorn (pc): Work 4 dc in the same stitch. Remove the hook from the loop. Insert the hook from front to back into the top of the first dc, pick up the dropped loop, and pull it through. Ch 1 to close. The popcorn pops toward you, which is the outside of the tube, and counts as 1 stitch.
Gauge and Checkpoints
Single crochet gauge: 16 sts × 18 rnds = 4 in (10.2 cm).
Popcorn pattern gauge: 16 sts × 16 rnds = 4 in (10.2 cm). In the popcorn section, every 2 rounds (one popcorn round and one sc round) add 0.5 in (1.3 cm).
Before you make the leaves, work the green base band (Rnds 1–6) as your test piece. Use these checkpoints:
- After Rnd 1: The opening measures 8 in (20.3 cm) around, or 4 in (10.2 cm) laid flat.
- After Rnd 6: The tube measures 4.5 in (11.4 cm) laid flat and about 1.3 in (3.3 cm) tall.
- After Rnd 38: The body measures about 9.25 in (23.5 cm) tall.
- After Rnd 49: The body measures about 12 in (30.5 cm) tall.
- After Rnd 52: The body measures about 12.5 in (31.8 cm) tall.
If the tube is wider than 4.5 in (11.4 cm), go down half a hook size. If it is narrower, go up half a size. Don’t change the stitch counts, because the leaf bases are sized to match 36 stitches.
Body
Work in continuous spiral rounds. Place a marker in the first stitch of each round and move it up as you go.
Green base band
With forest green, ch 32. Sl st into the first ch to form a ring, making sure the chain isn’t twisted.
- Rnd 1: Sc in each ch around. (32 sts)
- Rnds 2–3: Sc in each st around. (32 sts)
- Rnd 4: Sc in next 7 sts, inc in next st; repeat from * 4 times. (36 sts)
- Rnds 5–6: Sc in each st around. (36 sts)
The band should measure 4.5 in (11.4 cm) flat and 1.3 in (3.3 cm) tall. Change to golden yellow on the last stitch of Rnd 6. Fasten off the green.
Kernel section (straight)
- Rnd 7: Sc in each st around. (36 sts)
- Rnd 8: Pc in next st, sc in next st; repeat from * 18 times. (36 sts: 18 pc + 18 sc)
- Rnd 9: Sc in each st around, working into the closing ch of each popcorn. (36 sts)
- Rnds 10–38: Repeat Rnds 8 and 9, ending with a popcorn round (Rnd 38). (36 sts per round)
Make every popcorn directly above the popcorn two rounds below so the kernels line up in 18 straight columns.
Checkpoint: The body should measure about 9.25 in (23.5 cm) tall and still 4.5 in (11.4 cm) wide flat.
Taper
- Rnd 39: Sc in next 4 sts, sc2tog; repeat from * 6 times. (30 sts)
- Rnd 40: Pc, sc; repeat from * 15 times. (30 sts)
- Rnd 41: Sc in each st. (30 sts)
- Rnd 42: Pc, sc; repeat from * 15 times. (30 sts)
- Rnd 43: Sc in next 3 sts, sc2tog; repeat from * 6 times. (24 sts)
- Rnd 44: Pc, sc; repeat from * 12 times. (24 sts)
- Rnd 45: Sc in each st. (24 sts)
- Rnd 46: Pc, sc; repeat from * 12 times. (24 sts)
- Rnd 47: Sc in next 2 sts, sc2tog; repeat from * 6 times. (18 sts)
- Rnd 48: Pc, sc; repeat from * 9 times. (18 sts)
- Rnd 49: Sc in each st. (18 sts)
The columns shift slightly after each decrease round. That’s expected, and it gives the cob its natural rounded tip. Change to forest green on the last stitch of Rnd 49.
Checkpoint: The body should measure about 12 in (30.5 cm) tall.
Green cap
- Rnd 50: Sc in next st, sc2tog; repeat from * 6 times. (12 sts)
- Rnd 51: Working in BLO, sc in each st. (12 sts) This makes a small flat ridge at the edge of the cap.
- Rnd 52: Sc2tog 6 times. (6 sts)
Fasten off and leave a 6 in (15.2 cm) tail. Weave the tail through the front loops of the last 6 sts, pull it tight to close the top, and secure it.
Leaves (Make 2)
Each leaf is worked lengthwise from a center spine. You work one half on the stitches of Row 1 and the other half on the opposite side of the foundation chain. Shortened rows make the pointed tip, and BLO rows make the lengthwise ribs. The end where Row 1 finishes is the tip, and the end where it starts is the base.
With forest green, ch 33.
Row 1 (base to tip): Sc in the 2nd ch from the hook and in each ch across. Turn. (32 sts)
First half (all rows in BLO):
- Row 2 (tip to base): Ch 1, sc in each st across. Turn. (32 sts)
- Row 3 (base to tip): Ch 1, sc in the next 28 sts, leaving 4 sts unworked. Turn. (28 sts)
- Row 4: Ch 1, sc in each st across. Turn. (28 sts)
- Row 5: Ch 1, sc in the next 24 sts, leaving 4 unworked. Turn. (24 sts)
- Row 6: Ch 1, sc across. Turn. (24 sts)
- Row 7: Ch 1, sc in the next 20 sts, leaving 4 unworked. Turn. (20 sts)
- Row 8: Ch 1, sc across. Turn. (20 sts)
- Row 9: Ch 1, sc in the next 16 sts, leaving 4 unworked. (16 sts) Fasten off.
Second half:
- Row 10 (tip to base): Join the yarn at the tip end of the foundation chain. Ch 1, then sc into the free loop of each chain across. Turn. (32 sts)
- Rows 11–17 (BLO): Repeat Rows 3–9. (Counts: 28, 28, 24, 24, 20, 20, 16)
Don’t fasten off. Go straight on to the leaf edging.
Checkpoint: The leaf should measure 8 in (20.3 cm) long and about 3.75 in (9.5 cm) wide at the base (17 rows).
Border (Leaf Edging and Bottom Opening Edge)
Border gauge: The edging uses the same single crochet gauge, 16 sts = 4 in (10.2 cm). One round adds 0.25 in (0.6 cm) on each side.
Leaf edging round: Work this round with the right side facing. The side counts below don’t include the tip group or the base stitches.
- Second long side: Working along the stepped edge toward the tip, sc once into each exposed stitch top. That’s 16 sts from the outer row and 4 at each of the four steps. At each step, put the first sc of the next group right into the corner, without adding any extra stitches. (32 sc)
- Tip: 3 sc in the tip point. (3 sc)
- First long side: Repeat the same way back down toward the base. (32 sc)
- Base: 1 sc in each row end across. (17 sc)
Sl st to the first sc to join. (84 sts total) Fasten off and leave a 12 in (30.5 cm) tail for sewing.
Why the math works: Each long side has 32 stitch positions, which matches the 32 stitches of the spine. That keeps the side at 8 in (20.3 cm) at 16 sts per 4 in, so the edge lies flat without rippling. The base takes exactly one sc per row (17), so its width doesn’t change. The 3-sc tip group turns the point without cupping. Two leaf bases at about 4.25 in (10.8 cm) each come to 8.5 in (21.6 cm), which is just under the 9 in (22.9 cm) circumference of the base band. That leaves a small gap where the bases nearly meet.
Bottom opening edge: Turn the body upside down. Join forest green into any free loop of the foundation chain. Sc in each free loop around. (32 sc) Sl st to join and fasten off. This firms up the opening so bags slide out one at a time.
Strap and Assembly
Strap: With forest green, ch 31. Sc in the 2nd ch from the hook and in each ch across. (30 sts) That’s about 7.5 in long. Fasten off and leave a long tail.
Attaching the strap: Fold the strap in half. Sew both ends side by side over the closed center of the cap. The loop should stand about 3.5 in (8.9 cm) tall.
Attaching the leaves:
- Pin the base edge of one leaf flat against the green band so it sits over Rnds 2–6, with the ribbed side facing out.
- Center the second leaf on the opposite side. The two bases should almost meet.
- Whipstitch each base edge to the band.
- Tack the side edges of each leaf to the body for 2 in (5.1 cm) above the band. Leave the upper part free so the husks flare out a little and show a V of kernels at the front and back.
Final Blocking
- Lightly spritz both leaves with water. Don’t soak acrylic.
- Lay the leaves flat and pin them to 8.25 in (21.0 cm) × 4.25 in (10.8 cm), pulling the tips into a sharp point.
- Before sewing the leaves on, roll a towel and push it inside the body so it holds its round shape.
- Spritz the green band and cap only. Don’t flatten the popcorns.
- Let everything dry completely, about 6–8 hours.
- Take out the towel and finish the assembly.
Final Quality-Control Checklist
- [ ] The body measures 4.5 in (11.4 cm) wide flat and 12.5 in (31.8 cm) tall.
- [ ] There are 18 straight popcorn columns in the straight section.
- [ ] Every popcorn pops outward.
- [ ] The cap is closed tightly, with no gap.
- [ ] The strap is secure and stands about 3.5 in (8.9 cm) tall.
- [ ] Each leaf edging round has 84 stitches.
- [ ] The leaves are mirrored on opposite sides with their bases nearly meeting.
- [ ] The bottom opening edge has 32 sc and doesn’t flare.
- [ ] All tails are woven in on the inside.
Troubleshooting
- Popcorns sink inward: You probably skipped the drop-and-pull-through step. Remake the popcorns so they close toward you.
- Columns drift diagonally: Double-check that each popcorn lands on the sc directly above the popcorn two rounds below. Don’t count the closing ch as an extra stitch.
- Tube flares: Your popcorns are too loose. Tighten the 4 dc, or go down one hook size.
- Leaf edge ruffles: You added sc at the row ends of the steps. Keep each side at exactly 32 sc.
- Leaf curls: Block it flat again, and check that the base has exactly 17 sc.
- Bags fall out: Tighten the bottom edge by working it with a hook one size smaller.
Care
Hand wash in cool water and lay flat to dry, reshaping the cob while it’s damp. Don’t tumble dry. It can crush the popcorns.
Final Notes
Each stage builds on the measurement before it:
- The 32-stitch ring is 8 in (20.3 cm) around.
- It increases to 36 stitches, or 9 in (22.9 cm) around and 4.5 in (11.4 cm) flat.
- The popcorn section carries the body to about 9.25 in (23.5 cm).
- The taper and green cap bring it to 12.5 in (31.8 cm).
- Each leaf goes from 8 in (20.3 cm) by 3.75 in (9.5 cm) to 8.25 in (21.0 cm) by 4.25 in (10.8 cm) with the edging, so the two bases fit the base band.
Check your gauge at each checkpoint and your cob will come out the same size. For a softer look, try the same pattern in pale butter yellow with sage-green husks.
Happy crocheting!