

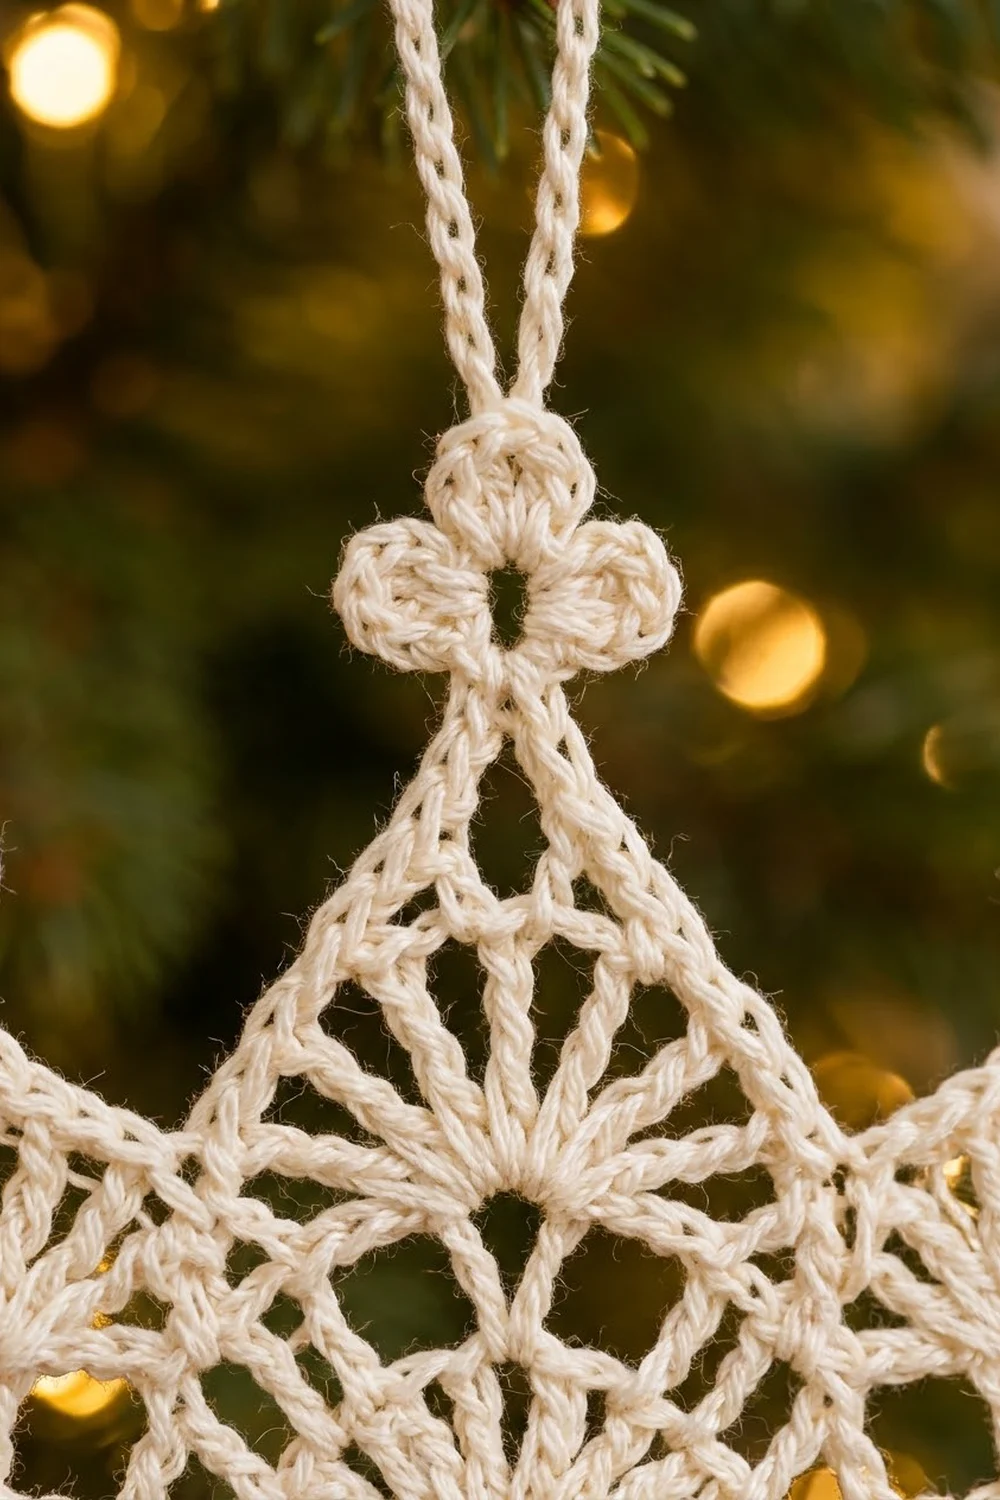
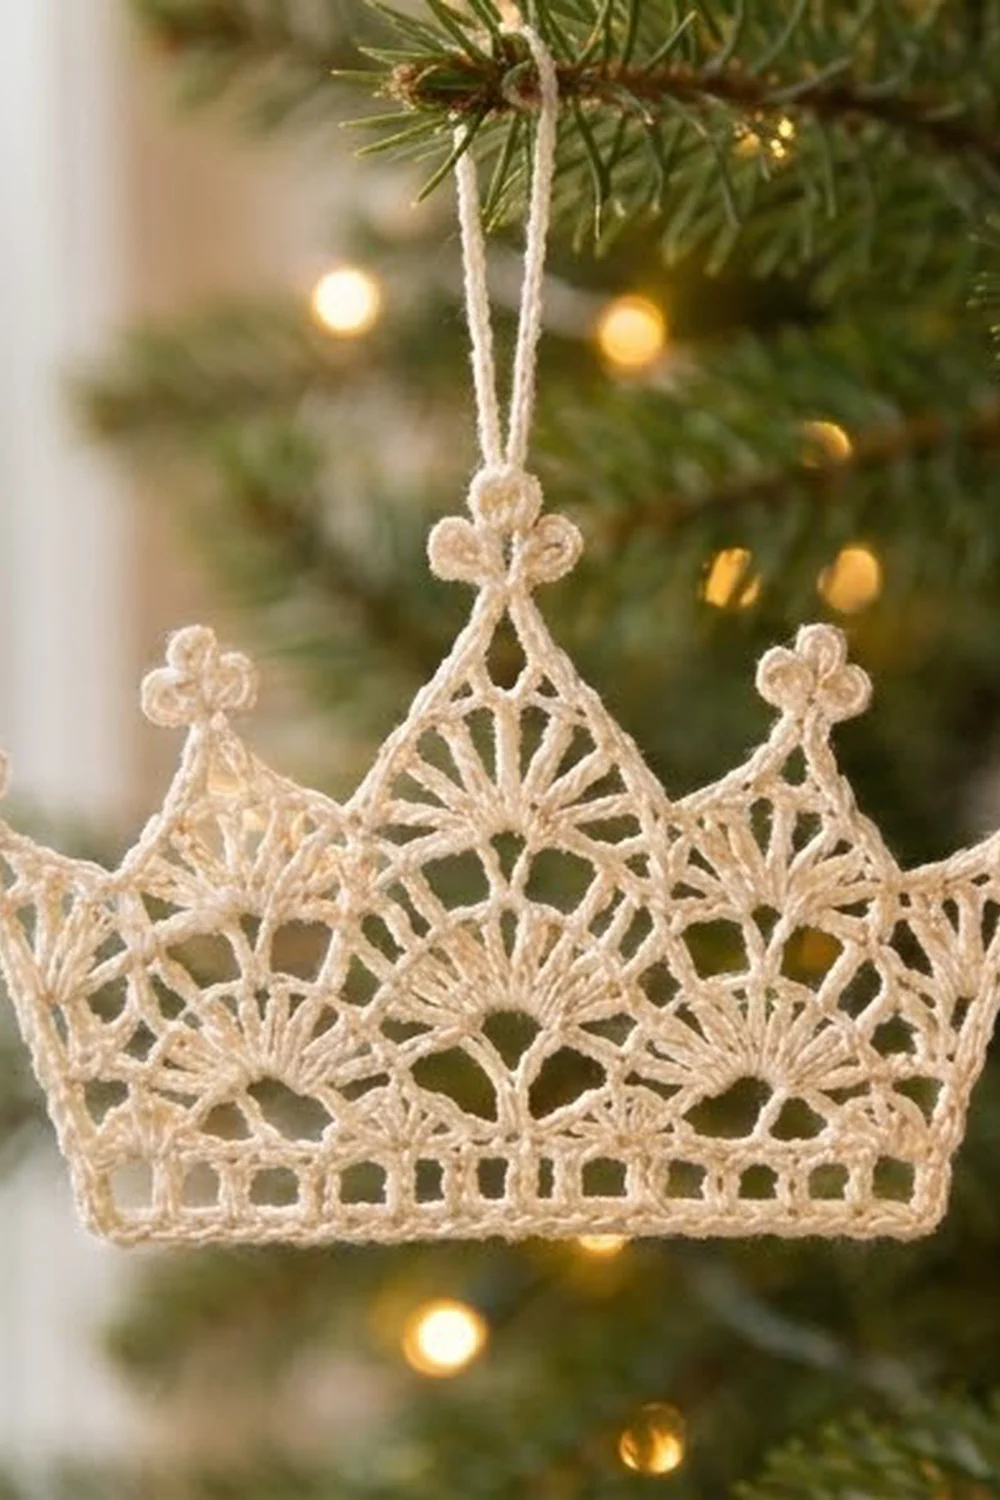
This little lace crown is a delicate ornament for the tree, a gift tag, or a window. It has a straight mesh base band and two rows of fan shells. Five open-mesh points rise above them, each tipped with a tiny three-petal trefoil, and the center point is the tallest.
The crown is made in one color, ivory or cream cotton thread, which gives it a classic heirloom look. Stiffened with a little starch, it holds its shape and hangs flat from the chain loop at the top.
This pattern uses US crochet terms. The finished crown is about 6.25 in (15.9 cm) wide and 3.25 in (8.3 cm) tall, plus a 1.5 in (3.8 cm) hanging loop.
You make it in one flat piece. Work the base band and fan rows back and forth, then work each of the five points separately on top of its own large fan. One outline round then adds the edging, the trefoils and the loop.
Finished Size and Construction
- Finished size: 6.25 in (15.9 cm) wide x 3.25 in (8.3 cm) tall, not including the loop
- Hanging loop: about 1.5 in (3.8 cm)
- Skill level: Intermediate (thread crochet, short-row points)
- Terminology: US
- Yarn weight: Size 10 cotton crochet thread (Lace, weight 0)
- Hook: 1.75 mm steel hook
- Number of pieces: 1
- Layout: One single crown, no assembly
- Piece size before border: 6 in (15.2 cm) wide x 2.75 in (7.0 cm) tall
- Border depth: about 1/8 in (0.3 cm) along the sides and base; the trefoils add 3/8 in (1.0 cm) at the tips
Materials
Thread: Use a mercerized cotton thread in size 10. Mercerized cotton shows the lace clearly, takes starch well and doesn’t fuzz. Pick a soft ivory or cream to match the photo. White also works.
- Ivory/cream: 8 g, about 70 m (77 yd)
Tools:
- 1.75 mm steel crochet hook
- Fine tapestry needle or thread needle
- Small sharp scissors
- Blocking board or foam mat
- Rustproof pins
- Fabric stiffener or spray starch
- Plastic wrap, to protect the board
The thread amount includes a margin for your gauge swatch and for weaving in the ends of the five points.
Abbreviations (US Terms)
- ch – chain
- sl st – slip stitch
- sc – single crochet
- dc – double crochet
- sp(s) – space(s)
- st(s) – stitch(es)
- RS – right side
- beg – beginning
Special stitches:
- Fan: Work the stated number of dc (5, 7 or 9) all into the same stitch.
- Trefoil (tref): Ch 2 for the stem. Then ch 4, sl st in the top stem ch, three times in total, to make three petals from one point. Finish with a sl st in each of the 2 stem ch, back down to the base. The trefoil is not counted in the stitch totals.
Gauge and Checkpoints
Gauge matters because the base row sets the whole width.
Gauge: 10 sc = 1 in (2.5 cm), and 7 dc rows = 2 in (5.1 cm).
To check your gauge, work the foundation and Rows 1–3 as a test piece first. They take only a few minutes and give you the real width of your crown.
Checkpoints:
- After Row 1: 61 sc measure 6 in (15.2 cm).
- After Row 3: The base band is 6 in x 0.5 in (15.2 cm x 1.3 cm).
- After Row 6: The piece is 6 in (15.2 cm) wide and about 1.375 in (3.5 cm) tall.
- Point heights above Row 6:
- Outer points: about 0.9 in (2.3 cm)
- Medium points: about 1.1 in (2.8 cm)
- Center point: about 1.4 in (3.6 cm)
- After the border: The crown is 6.25 in x 3.25 in (15.9 cm x 8.3 cm).
If your base is too wide, go down to a 1.5 mm hook. If it is too narrow, go up to a 2.0 mm hook. Don’t change the stitch count, because the 61-stitch base is built around 6-stitch fan repeats.
Pattern: Base Band
Foundation: Ch 62.
Row 1: Sc in 2nd ch from hook and in each ch across. Turn. (61 sc)
Row 2 (mesh row): Ch 4 (counts as dc + ch 1). Skip next sc, dc in next sc. Ch 1, skip next sc, dc in next sc; repeat from * across. Turn. (31 dc, 30 ch-1 sps)
The ch-1 spaces make the open mesh windows along the base.
Row 3: Ch 1. Sc in each dc and each ch-1 sp across, ending with sc in the 3rd ch of the beg ch-4. Turn. (61 sc)
This is a conversion row: 31 sc into the dc + 30 sc into the spaces = 61 sc.
Checkpoint: 6 in x 0.5 in (15.2 cm x 1.3 cm).
Pattern: Fan Rows
Row 4 (small fans):
- Ch 3 (counts as dc), 2 dc in first sc. This is a half fan.
- Skip 2 sc, sc in next sc, skip 2 sc, 5 dc in next sc. Repeat from * 8 more times, for 9 full fans in total.
- Skip 2 sc, sc in next sc, skip 2 sc, 3 dc in last sc. This is the second half fan.
- Turn.
(61 sts: 2 half fans of 3 dc + 9 fans of 5 dc + 10 sc)
Check: 6 + 45 + 10 = 61.
Row 5 (arch row):
- Ch 1, sc in first dc.
- Ch 2, dc in next sc, ch 2, sc in 3rd (center) dc of next fan. Repeat from * across.
- The last repeat ends: ch 2, dc in last sc, ch 2, sc in top of the beg ch-3.
- Turn.
(11 sc, 10 dc, 20 ch-2 sps)
The sc sit on the fan centers and the dc sit on the low sc, so the top edge comes out level.
Row 6 (large fans):
- Ch 1, sc in first sc.
- Then work these five sections, one per point. For each section: ch 2, skip (ch-2 sp, dc, ch-2 sp), work the Fan in the next sc. Then ch 2, skip (ch-2 sp, dc, ch-2 sp), sc in next sc.
- Section 1 (outer): 5-dc fan
- Section 2 (medium): 7-dc fan
- Section 3 (center): 9-dc fan
- Section 4 (medium): 7-dc fan
- Section 5 (outer): 5-dc fan
- Do not turn. Fasten off.
(6 sc, 33 dc, 10 ch-2 sps)
Check: 5 + 7 + 9 + 7 + 5 = 33 dc. Each section spans 12 base stitches, and the 6 sc land on stitches 1, 13, 25, 37, 49 and 61.
Checkpoint: 6 in (15.2 cm) wide, about 1.375 in (3.5 cm) tall.
Pattern: The Five Points
Work each point separately on its own large fan. Keep the same side facing as Row 6 when you join.
Point Row 1:
- Join thread with a sl st in the first dc of the fan.
- Ch 4 (counts as dc + ch 1), skip next dc, dc in next dc.
- Ch 1, skip next dc, dc in next dc. Repeat from * to the end of the fan.
- Turn.
Point Row 2 and following rows:
- Sl st in first ch-1 sp, ch 4 (counts as dc + ch 1), dc in next ch-1 sp.
- Ch 1, dc in next ch-1 sp. Repeat from * to the end.
- Turn.
Each row is one dc narrower than the row before, which makes the triangle shape.
Apex row: When only 1 ch-1 sp is left, sl st in it and ch 3. The ch-3 counts as a dc and is the tip. Fasten off.
Outer points (make 2), on the 5-dc fans:
- Row 1: 3 dc, 2 sps
- Row 2: 2 dc, 1 sp
- Row 3 (apex): 1 dc
That is 3 rows in total.
Medium points (make 2), on the 7-dc fans:
- Row 1: 4 dc, 3 sps
- Row 2: 3 dc, 2 sps
- Row 3: 2 dc, 1 sp
- Row 4 (apex): 1 dc
That is 4 rows in total.
Center point (make 1), on the 9-dc fan:
- Row 1: 5 dc, 4 sps
- Row 2: 4 dc, 3 sps
- Row 3: 3 dc, 2 sps
- Row 4: 2 dc, 1 sp
- Row 5 (apex): 1 dc
That is 5 rows in total.
The different row counts give the crown its outline: short outer points, medium points, and a tall center. The sc at stitches 13, 25, 37 and 49 of Row 6 stay unworked. They become the four valleys between the points.
Weave in all point ends now, on the wrong side, along the dc posts.
Border
Border gauge: Work the border in sc at these rates:
- 1 sc per sc row end
- 2 sc per dc row end, including each ch-3 or ch-4 turning chain
- 3 sc in each ch-2 sp of Row 6
Round 1: Start with the RS facing. Join thread in the first foundation ch, at the bottom corner.
- Bottom edge: Ch 1, 3 sc in the same ch, sc in each of next 59 ch, 3 sc in last ch. That is 65 sc: 61 worked 1 per ch + 4 extra, from 2 extra at each corner.
- First side edge (7 sc): Work along the row ends:
- Row 2: 2 sc
- Row 3: 1 sc
- Row 4: 2 sc
- Row 5: 1 sc
- Row 6: 1 sc
Nothing goes into Row 1 here, because the corner group already covers it.
3. Outer point, up (9 sc): 3 sc in the Row 6 ch-2 sp, then 2 sc along each of point Rows 1, 2 and 3.
4. Outer apex: (Sc, tref, sc) in the top ch of the apex ch-3.
5. Outer point, down (9 sc): Work the same as the way up, in reverse order.
6. Valley: 1 sc in the unworked Row 6 sc.
7. Medium point: 11 sc up (3 in the ch-2 sp + 2 per row for 4 rows), (sc, tref, sc) at the apex, 11 sc down. Then 1 sc in the valley.
8. Center point: 13 sc up (3 + 2 per row for 5 rows).
9. Center apex with loop: Sc in the top of the apex ch-3, then ch 2 for the stem. Work 2 petals (ch 4, sl st in top stem ch, twice). Ch 30 and sl st in the top stem ch to make the hanging loop. Work the 3rd petal, sl st down the 2 stem ch, then sc in the same apex st.
10. Center point, down: 13 sc, then 1 sc in the valley.
11. Repeat the medium point (11 sc, apex, 11 sc), 1 sc in the valley, then the outer point (9 sc, apex, 9 sc).
12. Second side edge (7 sc): Work as for the first side, in reverse order.
13. Sl st to the first sc. Fasten off. (199 sc, 5 trefoils)
Why the math works:
- Base and sides: 65 + 7 + 7 = 79 sc.
- Points: 2 x (9 + 9) + 2 x (11 + 11) + (13 + 13) = 36 + 44 + 26 = 106 sc.
- Apexes: 5 x 2 = 10 sc. Valleys: 4 sc.
- Total: 79 + 106 + 10 + 4 = 199 sc.
Using 2 sc per dc row end matches the height of a dc, about twice a sc, so the edges stay flat without ruffling or pulling. The 3 extra-wide sc in each ch-2 sp ease the outline around the base of each fan.
Final Blocking
- Weave in the border ends and trim them close.
- Soak the crown in fabric stiffener, or in a starch mix of 1 part starch to 1 part water.
- Press out the extra liquid with a towel. Don’t wring it.
- Cover your blocking board with plastic wrap.
- Pin the base edge straight, at 6.25 in (15.9 cm) wide.
- Pin each point tip out. The center trefoil sits 3.25 in (8.3 cm) above the base.
- Open each trefoil and pin the three petals apart.
- Pin the mesh spaces and the fan shells open so the lace pattern reads clearly.
- Let it dry completely, at least 12 hours.
- Unpin it and hang it by the loop to check that it hangs level.
Final Quality-Control Checklist
- The base is straight and measures 6.25 in (15.9 cm).
- The mesh row shows 30 even open windows.
- Row 4 has 9 full fans and 2 half fans.
- Row 6 fans read 5, 7, 9, 7, 5 dc from edge to edge.
- The points rise in the order short, medium, tall, medium, short.
- Both halves are symmetrical.
- All 5 trefoils are open, with three petals each.
- The hanging loop is centered and about 1.5 in (3.8 cm) long.
- No ends show on the RS.
- The crown lies flat and hangs straight.
Troubleshooting
The base cups or ruffles. Check that Row 3 has exactly 61 sc. During blocking, pin the base first and then the points.
The points lean or twist. Make sure each point row starts with a sl st into the first ch-1 sp, not into a dc. Then pin the points straight while the stiffener dries.
The large fans pucker. A 9-dc fan in one sc is tight. Keep the dc slightly loose, or ease them out with pins when blocking.
The border ripples. You may be using too many sc per row end. Stick to 1 sc per sc row and 2 sc per dc row.
The border pulls the points inward. Work the sc more loosely, or go up 0.25 mm in hook size for the border only.
The trefoils collapse. Make sure each petal is a full ch 4, and pin the petals open while they dry.
The crown hangs crooked. Check that the loop is anchored in the center trefoil stem and that both halves have matching border counts.
Care
Hand wash in cool water with mild soap only when needed. Then reshape it, stiffen it again and pin it flat to dry. Store it flat or hanging, away from heavy decorations that could crush the points.
Final Notes
The measurements build up in a simple chain:
- Your 61-stitch base sets the 6 in (15.2 cm) width.
- The base band and fan rows bring the height to about 1.375 in (3.5 cm).
- The points add 0.9 in, 1.1 in and 1.4 in (2.3 cm, 2.8 cm and 3.6 cm), for 2.75 in (7.0 cm) before the border.
- The 199-stitch border and the trefoils finish the crown at 6.25 in x 3.25 in (15.9 cm x 8.3 cm).
Check your gauge on the first three rows and count your stitches at each checkpoint. Your crown should block out evenly.
Happy crocheting!