

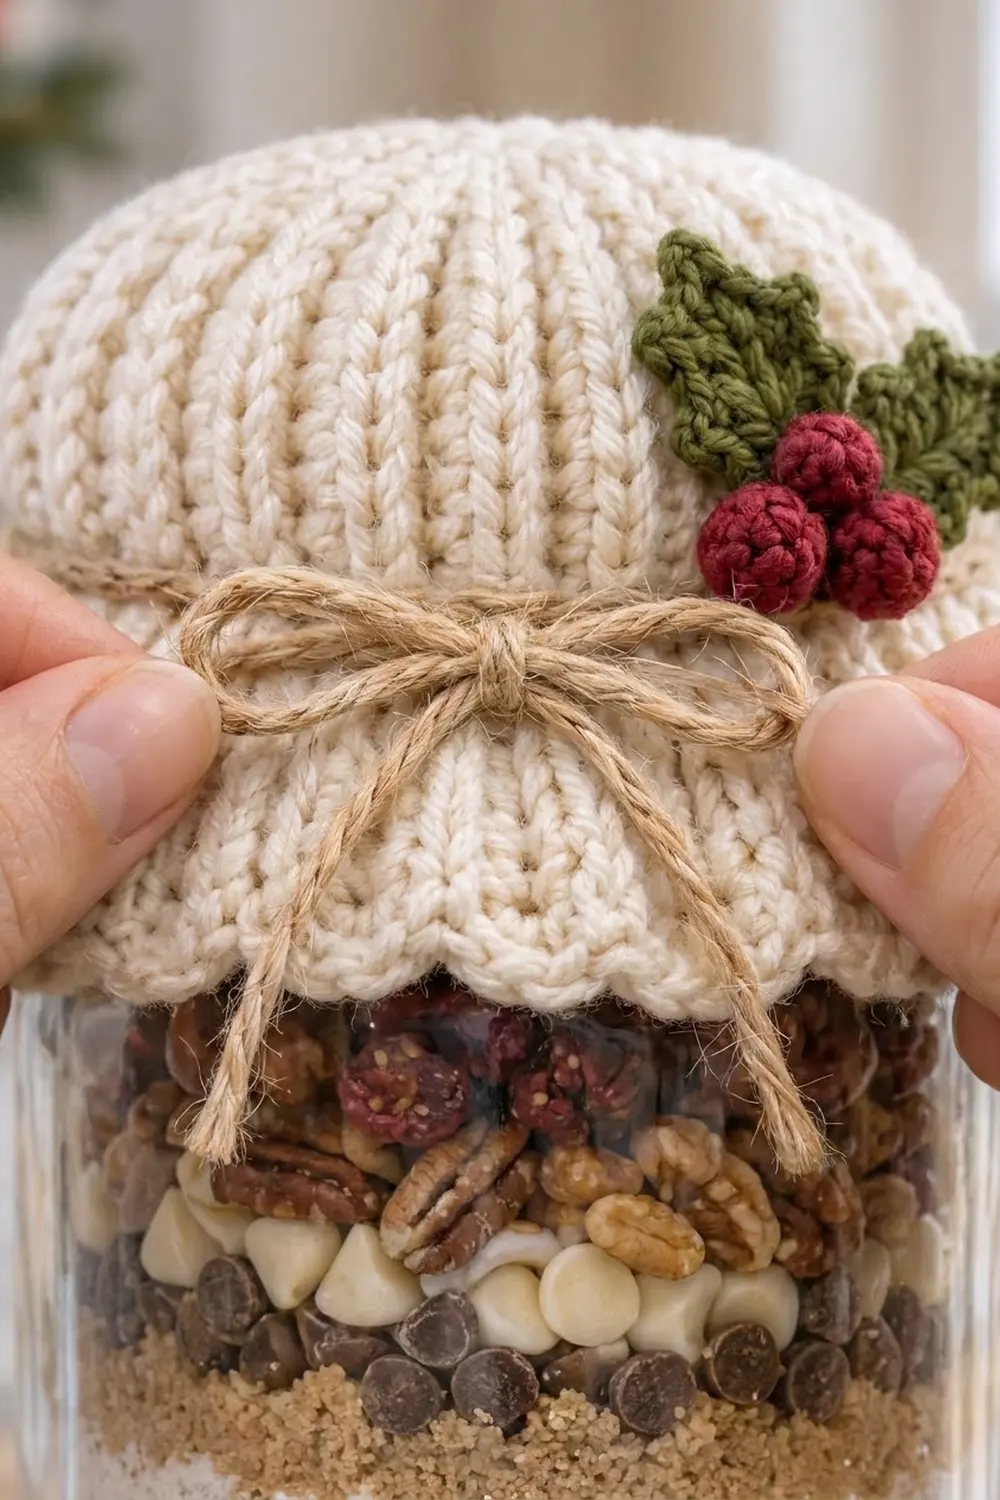
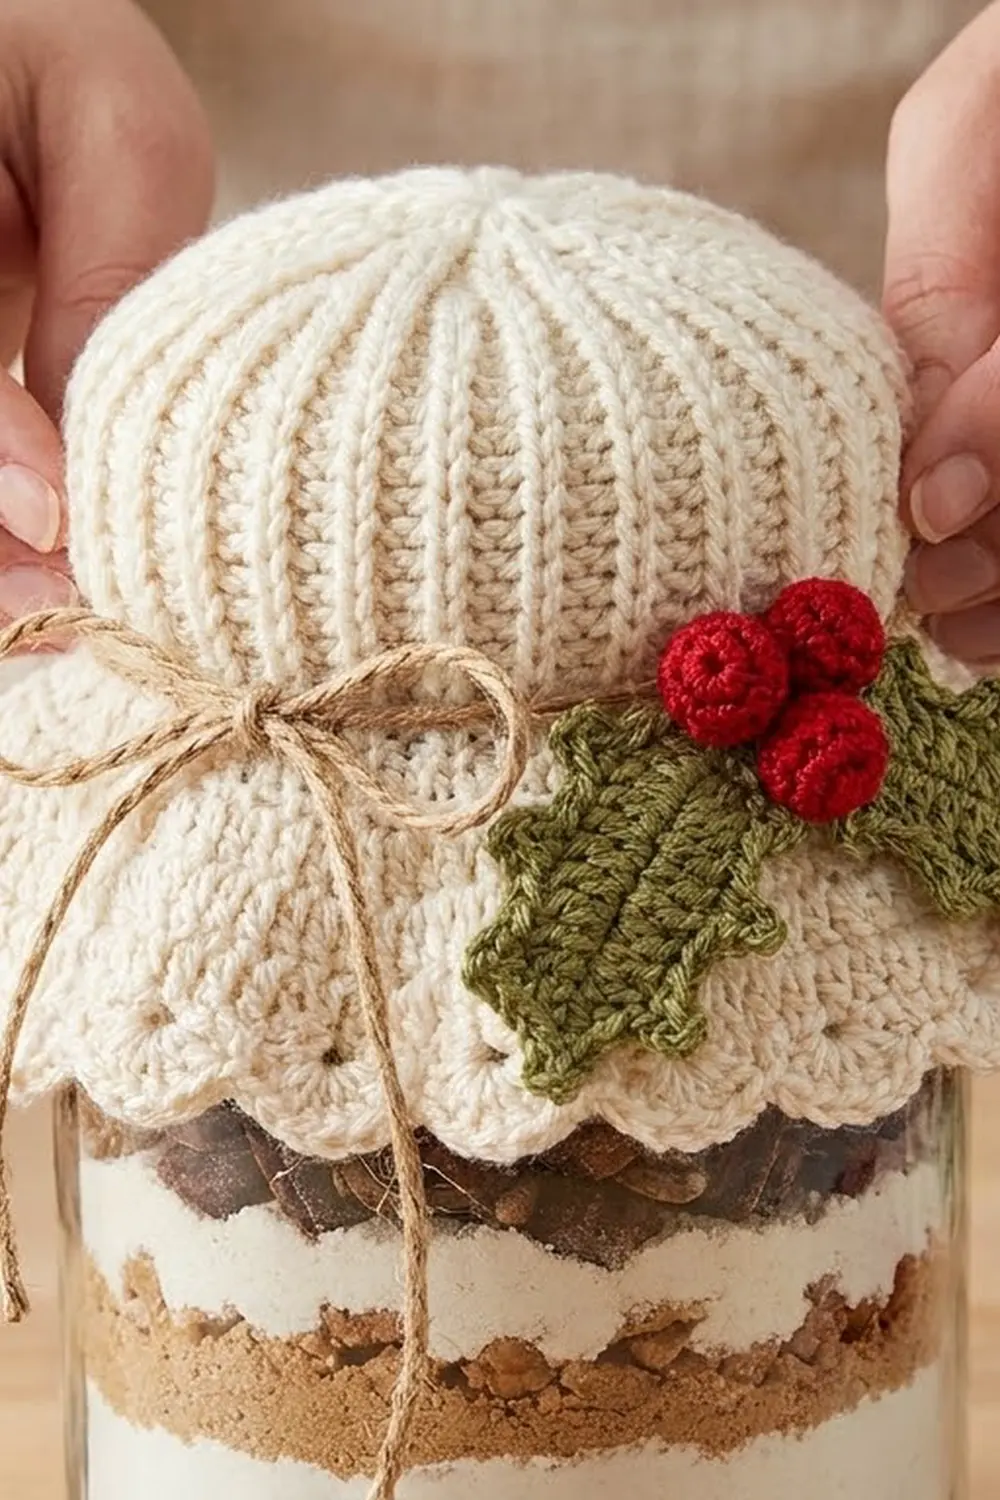
This Holly Berry Ruffle Jar Cover turns a plain jar of cookie mix into a gift that looks finished. It has a soft, gathered crown in knit-look ribbing, a flared scalloped ruffle around the bottom, and a small holly sprig sewn on the front. A length of jute twine is threaded around the base of the ruffle and tied in a bow, so the cover stays on the jar.
The cover shown is cream, with two green holly leaves and three round red berries. The style is cozy farmhouse Christmas: plain neutral ribs, one bright accent and a natural twine bow. The same pattern also works in deep red or forest green if you want a set of jars.
The pattern uses US crochet terms. When relaxed, the finished cover is 10 in (25.4 cm) around at the ribbed band, and it stretches to about 12 in (30.5 cm). It measures 5.5 in (14.0 cm) from the center of the crown to the scalloped edge. It fits regular-mouth and most wide-mouth jars with lids 3 to 3.5 in (7.6 to 8.9 cm) across.
Construction is simple. First you work one ribbed rectangle sideways, seam it into a tube and gather the top closed to make the crown. Then you work four ruffle rounds into the bottom edge. Finally, you make the holly leaves and berries separately, sew them on and thread the twine.
Finished Size and Construction
- Finished size: 10 in (25.4 cm) around when relaxed; 5.5 in (14.0 cm) from crown center to scalloped edge
- Skill level: Easy
- Terminology: US crochet terms
- Yarn weight: Worsted (#4)
- Hooks: 4.0 mm (US G-6) for the cover; 3.5 mm (US E-4) for the holly
- Number of pieces: 1 cover, plus 2 leaves and 3 berries sewn on as appliqués
- Layout: One piece worked flat, seamed into a tube, with the top gathered closed
- Ribbed panel size: 10 in x 4 in (25.4 cm x 10.2 cm) when flat
- Size before ruffle: 10 in (25.4 cm) around and 4 in (10.2 cm) from the gathered crown to the bottom edge
- Ruffle (border) depth: 1.5 in (3.8 cm)
Materials
Choose a smooth worsted-weight yarn so the ribs show clearly. Cotton or a cotton blend gives crisp ribs and a ruffle that holds its shape. Soft acrylic also works and has a little more stretch. Avoid fuzzy or very textured yarn, because it hides the knit-look columns.
- Cream (main color): 30 g, about 60 m
- Green (leaves): 5 g, about 10 m
- Red (berries): 5 g, about 10 m
- Jute twine: one piece 24 in (61.0 cm) long
Tools:
- 4.0 mm (US G-6) crochet hook
- 3.5 mm (US E-4) crochet hook
- Tapestry needle
- Scissors
- 2 stitch markers
- Red yarn scraps or a little fiberfill for stuffing the berries
- A jar to fit and block on
All yarn quantities include a margin of about 25% for your gauge check and tails.
Abbreviations (US Terms)
- ch: chain
- sl st: slip stitch
- sc: single crochet
- hdc: half double crochet
- dc: double crochet
- BLO: back loop only
- sc2tog: single crochet 2 together
- MR: magic ring
- st(s): stitch(es)
- sk: skip
- RS / WS: right side / wrong side
Special stitches:
- Picot: ch 3, sl st in 3rd ch from hook.
- Shell: 5 dc in the same stitch.
Gauge and Checkpoints
Gauge: 20 sts and 20 rows = 4 in (10.2 cm) in sc BLO ribbing with the 4.0 mm hook.
This cover is small, so the main panel doubles as your gauge test. Work the first 10 rows, then lay the piece flat and measure it before going on.
Checkpoints:
- After Row 10: The panel is 4 in (10.2 cm) tall across the 20 sts and 2 in (5.1 cm) wide across the rows.
- After Row 50: The panel measures 10 in x 4 in (25.4 cm x 10.2 cm).
- After seaming: The tube is 10 in (25.4 cm) around and slides over the jar lid with a little stretch.
- After Ruffle Round 4: The cover measures 5.5 in (14.0 cm) from crown center to scallop tip.
If your piece is too big: Go down one hook size (3.75 mm) and start again. If it is too small: Go up one hook size (4.5 mm). Change the hook rather than the row count, because the ruffle math depends on exactly 50 rows.
The Ribbed Panel
With cream and the 4.0 mm hook:
Foundation: Ch 21.
Row 1 (RS): Sc in 2nd ch from hook and in each ch across, turn. (20 sc)
Row 2: Ch 1 (does not count as a st), sc BLO in each st across, turn. (20 sc)
Rows 3–50: Repeat Row 2. (20 sc in every row)
Every two rows makes one raised rib. On the jar, the ribs run vertically because the rows run from crown to ruffle.
Mark one long edge as the top with a stitch marker. The other long edge is the bottom, where the ruffle goes.
Do not fasten off.
Seaming and Gathering the Crown
Seam: Fold the panel with the RS facing in so Row 50 meets the foundation chain. Sl st across, working through the BLO of Row 50 and the free loops of the foundation chain together. (20 sl sts) Fasten off and turn the tube RS out.
The tube now has 50 row ends along the top edge and 50 row ends along the bottom edge.
Gather the crown: Cut a 20 in (50.8 cm) cream tail and thread it on the tapestry needle. Weave it in and out through all 50 row ends along the top edge, about 1/4 in (0.6 cm) in from the edge. Pull firmly so the top closes into a small rosette. The center hole should be 1/4 in (0.6 cm) or smaller. Make two passes across the center to close it, knot securely on the WS and weave in the end.
The ribs now spread out from the center like the segments of a dome.
The Scalloped Ruffle (Border)
Rejoin cream at the bottom edge, right next to the seam. Place a marker at the start of each round. Join every round with a sl st to the first st.
Ruffle Round 1 (conversion round): Ch 1, sc in the end of each row around. Join. (50 sc = 50 sts worked one per row end + 0 extra)
Ruffle Round 2 (growth round): Ch 1, sc in next 4 sts, 2 sc in next st; repeat from * 10 times total. Join. (60 sc total for this round)
Ruffle Round 3 (growth round): Ch 2 (does not count as a st), dc in next 4 sts, 2 dc in next st; repeat from * 12 times total. Join to first dc. (72 dc total for this round)
Ruffle Round 4 (scallop round): Ch 1, sc in next st, sk 2 sts, shell in next st, sk 2 sts; repeat from * 12 times total. Join to first sc. (12 shells and 12 sc; uses all 72 sts of Round 3)
Fasten off and weave in all ends.
Border Gauge and Counts
Ruffle Round 1 is worked at 5 sc per inch (2.5 cm). The ribbed panel has 5 rows per inch, so one sc per row end lies flat without pulling or rippling.
Because the cover is round, the counts are given per half (front half and back half) instead of per side:
| Round | Total | Per half | Repeats |
|---|---|---|---|
| 1 | 50 sc | 25 sc | — |
| 2 | 60 sc | 30 sc | 10 |
| 3 | 72 dc | 36 dc | 12 |
| 4 | 12 shells + 12 sc | 6 shells + 6 sc | 12 |
Why the Math Works
- 50 rows at 5 rows per inch gives exactly 10 in (25.4 cm). Round 1 keeps that count, so the band stays the same size as the ribbing.
- Round 2 adds 10 sts, one per 5-st repeat: 50 + 10 = 60.
- Round 3 adds 12 sts, one per 5-st repeat: 60 + 12 = 72. The taller dc and the extra stitches make the ruffle flare outward.
- Each Round 4 repeat uses 6 sts (1 sc + 2 skipped + 1 shell st + 2 skipped). Since 72 ÷ 6 = 12, the round ends on a complete scallop with no partial repeat.
Holly Leaves (Make 2)
With green and the 3.5 mm hook:
Ch 10.
Side 1: Sl st in 2nd ch from hook, sc in next ch, hdc in next ch, picot, dc in next 2 ch, picot, dc in next ch, hdc in next ch, picot, sc in next ch, 3 sc in last ch.
Side 2: Rotate and work along the opposite side of the foundation chain. Sc in next ch, picot, hdc in next ch, dc in next ch, picot, dc in next 2 ch, picot, hdc in next ch, sc in next ch.
Tip: Picot, sl st in the first sl st.
Each leaf has 3 picot points on each side plus a pointed tip, for 7 points in total. It measures about 2 in (5.1 cm) long and 1 in (2.5 cm) wide. Fasten off, leaving an 8 in (20.3 cm) tail for sewing.
Holly Berries (Make 3)
With red and the 3.5 mm hook:
Round 1: 6 sc in MR. (6 sc)
Round 2: 2 sc in each st around. (12 sc)
Round 3: Sc in each st around. (12 sc)
Round 4: Sc2tog 6 times. (6 sc)
Stuff firmly with red scraps or a small pinch of fiberfill. Red scraps work best because white fiberfill can show through the stitches. Fasten off, leaving an 8 in (20.3 cm) tail. Weave the tail through the front loops of the last 6 sts and pull it closed. Each berry is about 3/4 in (1.9 cm) across.
Finishing and Assembly
- Twine: Start at the front center and weave the 24 in (61.0 cm) jute twine in and out through Ruffle Round 1, passing over 2 sts and under 2 sts all the way around. Finish at the front center so both ends come out next to each other.
- Leaves: Place the two leaves in a shallow V on the front right of the crown, with the bases touching and the tips pointing up and out. The bases should sit about 1 in (2.5 cm) above the twine line. Sew around the edges of each leaf with small stitches.
- Berries: Sew the three berries in a tight triangle over the point where the leaf bases meet. Pass the needle through the center of each berry a few times so it sits firmly against the crown.
- Weave in all tails on the WS.
Final Blocking
- Put the cover on the jar you plan to give, or on a jar of the same size.
- Gently tug the ribs so they run straight from the crown center down to the ruffle.
- Lightly mist only the ruffle with water, or hold a steam iron 1 in (2.5 cm) above it. Do not let the iron touch the yarn, especially if you used acrylic.
- Shape each of the 12 scallops with your fingers so they flare evenly around the jar.
- Leave the ribbed crown unsteamed so it keeps its stretch.
- Let the cover dry completely on the jar.
- Pull the twine snug against the jar neck and tie a bow at the front center. Trim the twine ends evenly.
Final Quality-Control Checklist
- The panel has 50 rows of 20 sts each.
- The seam is straight, and no row ends are skipped on the top or bottom edge.
- The center hole of the crown is closed to 1/4 in (0.6 cm) or smaller.
- Ruffle Round 1 has 50 sc, Round 2 has 60 sc and Round 3 has 72 dc.
- Round 4 has 12 complete, evenly spaced shells.
- The cover measures 5.5 in (14.0 cm) from crown center to scallop tip.
- Both leaves have 7 crisp points.
- The berries are round and firm and are sewn on tightly.
- The twine bow sits at the front center, below the holly.
Troubleshooting
The ribs look flat. From Row 2 onward, make sure you work into the back loop only on every row. Working through both loops removes the ridges.
The panel edges are uneven. You may be skipping the first stitch or working into the turning ch. Count to 20 sts every few rows.
The crown will not close. Your gathering stitches are too far from the edge. Weave a second pass closer to the row ends.
The ruffle cups inward. Your dc are too tight. Loosen your tension on Round 3, or switch to a 4.5 mm hook for Rounds 3 and 4 only.
The ruffle waves too much. Your dc are too loose. Use a 3.75 mm hook for Rounds 3 and 4.
Round 4 does not end with a full shell. Recount Round 3. It must have 72 sts.
The cover slides off the jar. Pull the twine tighter before you tie the bow.
The berries look lumpy. Stuff them a little more firmly and pull the closing tail tight.
Care
Hand wash in cool water, then dry flat or on the jar to keep the shape. Remove the twine before washing, because jute can shed and stain.
Final Notes
The measurements for this cover are easy to check as you go. Twenty stitches give a 4 in (10.2 cm) panel, and 50 rows give 10 in (25.4 cm), the exact size of the ribbed band. The 50 row ends become 50 sc, then 60 sc, then 72 dc, and 72 divides into 12 even scallops. Add 1.5 in (3.8 cm) of ruffle, and the cover measures 5.5 in (14.0 cm) from crown to edge.
Once you finish one cover, the next one goes quickly. Make a set in cream, red and green for a row of gift jars.
Happy crocheting!