

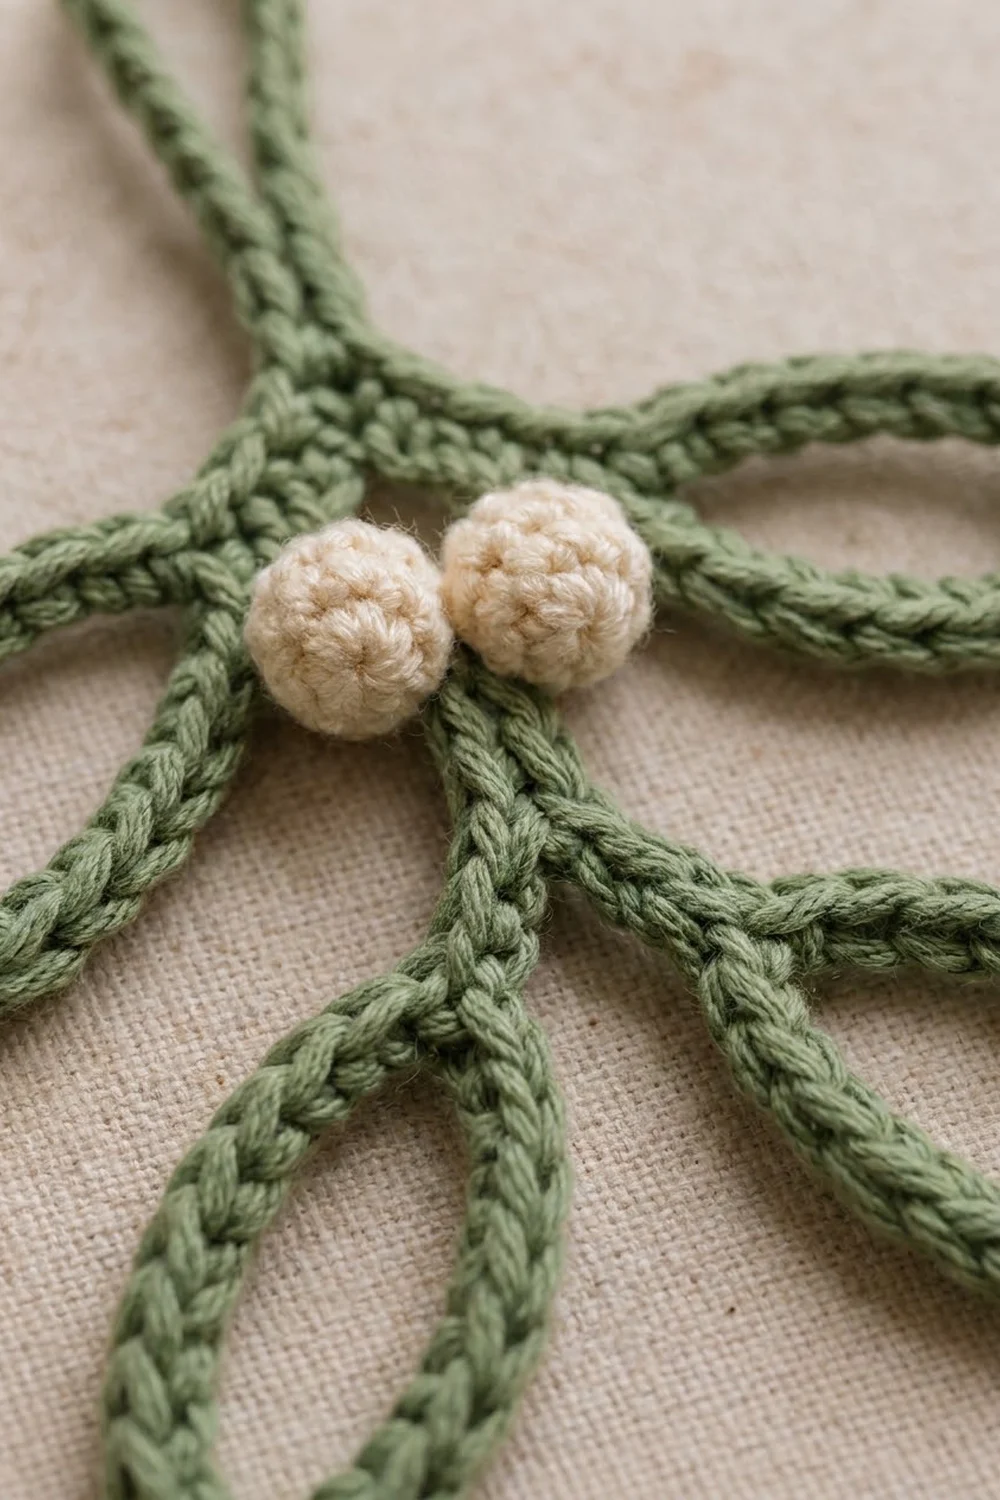
Every holiday tree needs a little mistletoe. This ornament is a simple sprig made from one continuous sage green cord: a hanging loop, a straight stem, two leaves pointing sideways, two leaves angled down, and a pair of cream berries at the center.
The look is light and modern, almost like a line drawing. The leaves are open outlines, so the tree lights and branches show through them. Sage green and cream keep it soft and natural, and it suits rustic, Scandinavian, or neutral holiday decor.
This pattern uses US crochet terms. The finished ornament measures about 4.75 in (12.1 cm) wide by 6.25 in (15.9 cm) tall, including the hanging loop.
Construction is simple. You chain the outline from the top down, closing each leaf into a ring as you go. Then you work slip stitches into the back bumps of the chains, which turns the thin chain into a thick, braided-looking cord. Last, you crochet two tiny berries and sew them to the center.
Finished Size and Construction
- Finished size: 4.75 in (12.1 cm) wide x 6.25 in (15.9 cm) tall
- Skill level: Easy
- Terminology: US crochet terms
- Yarn weight: Worsted weight (#4)
- Hook: 5.0 mm (US H-8)
- Number of pieces: 1 cord sprig + 2 berries sewn on (no panels or motifs to join)
- Layout: Hanging loop at top, upper stem, 2 side leaves, berries at center, lower stem, 2 downward leaves
- Cord width: about 0.25 in (0.6 cm)
- Size before edge finishing: about the same as the finished size; the slip-stitch pass thickens the cord but adds no length
- Border depth: none; the slip-stitch cord is the edge
Materials
Yarn: Use a smooth worsted weight yarn with good stitch definition. Cotton or a cotton blend keeps its shape best and shows the braided texture clearly. Acrylic also works, but it is softer, so it may need firmer blocking. Avoid fuzzy or brushed yarns, because they blur the cord.
- Sage green (sprig): 6 g / 15 m
- Cream (berries): 2 g / 5 m
These amounts include a margin for your gauge swatch and weaving in ends. One sprig actually uses about 4 g (10 m) of green.
Tools:
– 5.0 mm (US H-8) crochet hook
– Tapestry needle
– Scissors
– Stitch markers (2)
– Ruler or measuring tape
– Pins and a foam blocking mat
– Spray bottle with water
– Optional: a little fabric stiffener
Abbreviations (US Terms)
- ch – chain
- sl st – slip stitch
- sc – single crochet
- sc2tog – single crochet 2 together
- st(s) – stitch(es)
- MR – magic ring
Special technique – back bump slip stitch (BB sl st): Turn your chain over. The back of each chain has a small horizontal bar called the back bump. Insert the hook under that bump only, yarn over, and pull through the bump and the loop on your hook. Working one BB sl st into every chain gives a raised, double-V cord.
Key points:
– Point T is the base of the hanging loop.
– Point C is the center, where the upper leaves and the berries sit.
– Point S is the split point for the lower leaves.
Gauge and Checkpoints
Gauge: 4 ch = 1 in (2.5 cm), measured flat and relaxed. Once you work the BB sl st pass, the cord should be about 0.25 in (0.6 cm) wide.
Test first: Ch 16 and work 1 BB sl st into each chain back to the start. The cord should measure 4 in (10.2 cm) long. This short sample is a good preview of the finished cord.
Checkpoints during the main piece:
1. Hanging loop, pinched flat: 1.5 in (3.8 cm) tall
2. Upper stem: 1.5 in (3.8 cm) long
3. Each upper leaf, from C to tip: 2.25 in (5.7 cm)
4. Lower stem: 1 in (2.5 cm) long
5. Each lower leaf, from S to tip: 2.5 in (6.4 cm)
If your sample is too long (more than 4 in / 10.2 cm), your chains are loose. Go down to a 4.5 mm hook. If it is too short (less than 4 in / 10.2 cm), go up to a 5.5 mm hook. Tight chains make the BB sl st pass hard to work and can make the leaves curl.
Sprig Pattern
Work all of this in sage green. Leave a 6 in (15.2 cm) starting tail.
Hanging Loop
Step 1: Ch 12. Sl st in the 1st ch to form a ring. (12 ch in the ring + 1 joining sl st.) The 1st ch is now Point T.
Step 2: Work 1 BB sl st into each ch around the ring. Begin with the chain next to the join and end in Point T. (12 BB sl st)
Pinch the loop flat. It should be 1.5 in (3.8 cm) tall.
Upper Stem
Step 3: Ch 6. Place a marker in the 6th ch. This is Point C. (6 ch)
Leave the stem chains unworked for now. You will thicken them on the way back up.
Upper Leaves
Step 4 (left upper leaf): Ch 18. Sl st in Point C to close the ring. Work 1 BB sl st into each of the 18 leaf chains, going around the ring. Sl st in Point C. (18 ch, 18 BB sl st, 2 joining sl st)
Step 5 (right upper leaf): Repeat Step 4. (18 ch, 18 BB sl st, 2 joining sl st)
Lay the piece flat. One upper leaf should point left and the other right, each measuring 2.25 in (5.7 cm) from C to tip. An 18-chain ring is 4.5 in (11.4 cm) around, so it folds into a leaf half that long.
Lower Stem
Step 6: Ch 4. Place a marker in the 4th ch. This is Point S. (4 ch)
Lower Leaves
Step 7 (lower left leaf): Ch 20. Sl st in Point S to close the ring. Work 1 BB sl st into each of the 20 leaf chains, going around. Sl st in Point S. (20 ch, 20 BB sl st, 2 joining sl st)
Step 8 (lower right leaf): Repeat Step 7. (20 ch, 20 BB sl st, 2 joining sl st)
Each lower leaf should measure 2.5 in (6.4 cm) from S to tip. A 20-chain ring is 5 in (12.7 cm) around.
Return Pass (Thickening the Stems)
Step 9: Work 1 BB sl st into each of the 3 lower-stem chains between S and C, then sl st in Point C. (4 sl st)
Step 10: Work 1 BB sl st into each of the 5 upper-stem chains between C and T, then sl st in Point T. (6 sl st)
Fasten off and leave a 6 in (15.2 cm) tail.
Main piece totals:
– 98 chains (12 + 6 + 18 + 18 + 4 + 20 + 20)
– 107 slip stitches (13 for the loop, 40 for the upper leaves, 44 for the lower leaves, 10 for the return pass)
Every chain gets exactly one BB sl st, so the cord thickness is the same all the way around.
Berries (Make 2)
Use cream yarn and the same 5.0 mm hook.
Round 1: MR, 6 sc into the ring. Pull the ring closed. (6 sts)
Round 2: Sc in each st around. (6 sts)
Tuck the starting tail inside as stuffing.
Round 3: Sc2tog 3 times. (3 sts)
Fasten off and leave an 8 in (20.3 cm) tail. Thread it through the 3 remaining sts and pull tight. Each berry is a firm ball about 0.5 in (1.3 cm) across.
Attaching the Berries
Place the two berries side by side over Point C so they touch each other. Sit them on the stem just below where the upper leaves branch off. Use the cream tails to sew each berry through the cord at C, with 3 to 4 small stitches per berry. Knot the tails on the back and hide the ends inside the cord.
Edge Finish (In Place of a Border)
This ornament has no added border. The BB sl st pass is the finished edge. Here is how the counts work.
Edge gauge: 1 BB sl st per chain. That means 4 sl st = 1 in (2.5 cm), the same as the chain gauge.
Per-segment counts:
– Hanging loop: 12 ch, 12 BB sl st
– Each upper leaf: 18 ch, 18 BB sl st
– Each lower leaf: 20 ch, 20 BB sl st
– Lower stem: 4 ch. Its last chain is Point S, which the leaf joins already cover, so the return pass works 3 BB sl st plus 1 sl st into C.
– Upper stem: 6 ch. Its last chain is Point C, so the return pass works 5 BB sl st plus 1 sl st into T.
Why the math works: Every chain gets exactly one finishing stitch, and none are skipped or doubled. The joining slip stitches go into points that already exist (T, C, and S), so they add no length. Because the slip-stitch pass adds no length, each segment keeps its chain length: 12 ch = 3 in (7.6 cm) of loop, 18 ch = 4.5 in (11.4 cm) of leaf outline, and 20 ch = 5 in (12.7 cm) of leaf outline.
Final Blocking
- Weave in the green tails along the back of the stem, working through several stitches in both directions.
- Lightly spritz the sprig with water until it is damp, not soaked.
- Lay it face up on the blocking mat.
- Pin the hanging loop straight up into a 1.5 in (3.8 cm) teardrop.
- Pin the upper stem straight, 1.5 in (3.8 cm) long.
- Pin the upper leaves out to the sides, angled slightly upward. Each should be 2.25 in (5.7 cm) long with a pointed tip.
- Pin the lower leaves angled downward, about 30 degrees from the stem on each side, each 2.5 in (6.4 cm) long.
- Check the overall size: 4.75 in (12.1 cm) wide and 6.25 in (15.9 cm) tall.
- If you want it stiffer, brush on a thin coat of fabric stiffener. Keep it off the berries.
- Let it dry completely before unpinning.
Final Quality-Control Checklist
- Every chain has one BB sl st, with no thin spots.
- The hanging loop is closed securely at T.
- All 4 leaves are open outlines with smooth, even curves.
- The upper leaves are the same length: 2.25 in (5.7 cm).
- The lower leaves are the same length: 2.5 in (6.4 cm).
- Both berries are firm and round and sewn tightly at C.
- No tails show on the front.
- The ornament hangs straight when held by the loop.
- The overall size is 4.75 in x 6.25 in (12.1 cm x 15.9 cm).
Troubleshooting
The cord twists into a spiral. You are probably working into the front loops instead of the back bumps. Pull back and work only into the back bump of each chain.
The leaves curl or cup. Your chain tension is tighter than your slip stitch tension. Loosen your chains, or block the leaves firmly with extra pins.
One leaf is longer than its partner. Count the chains in each ring. Paired leaves must match exactly: 18 and 18, or 20 and 20.
The ornament tilts when hung. The berries are off-center, or the upper leaves are uneven. Re-sew the berries centered over C and re-block the leaves.
The berries are lumpy. Pull the closing tail tighter, and roll each berry between your palms before sewing it on.
The hanging loop is too small for a hook. Work it as 16 ch instead of 12, and work 16 BB sl st. Then pin the loop to 2 in (5.1 cm) tall when blocking. The ornament will be 0.5 in (1.3 cm) taller.
Care
Spot clean with cool water and mild soap, then lay flat and reshape while it dries. Store it flat or hang it on a hook, away from heavy ornaments that could crush the leaves.

Final Notes
The whole design depends on one measurement: 4 chains to 1 in (2.5 cm). From that, the 12-chain loop pinches to 1.5 in (3.8 cm). The 6-chain upper stem gives 1.5 in (3.8 cm), and the 4-chain lower stem gives 1 in (2.5 cm). The 18-chain upper leaves fold to 2.25 in (5.7 cm), and the 20-chain lower leaves fold to 2.5 in (6.4 cm). Each chain gets one slip stitch, which keeps the cord thickness even without changing those lengths. Together this gives a finished sprig of 4.75 in x 6.25 in (12.1 cm x 15.9 cm). Check your gauge first and measure at each checkpoint, and every sprig you make will match.
Happy crocheting!