

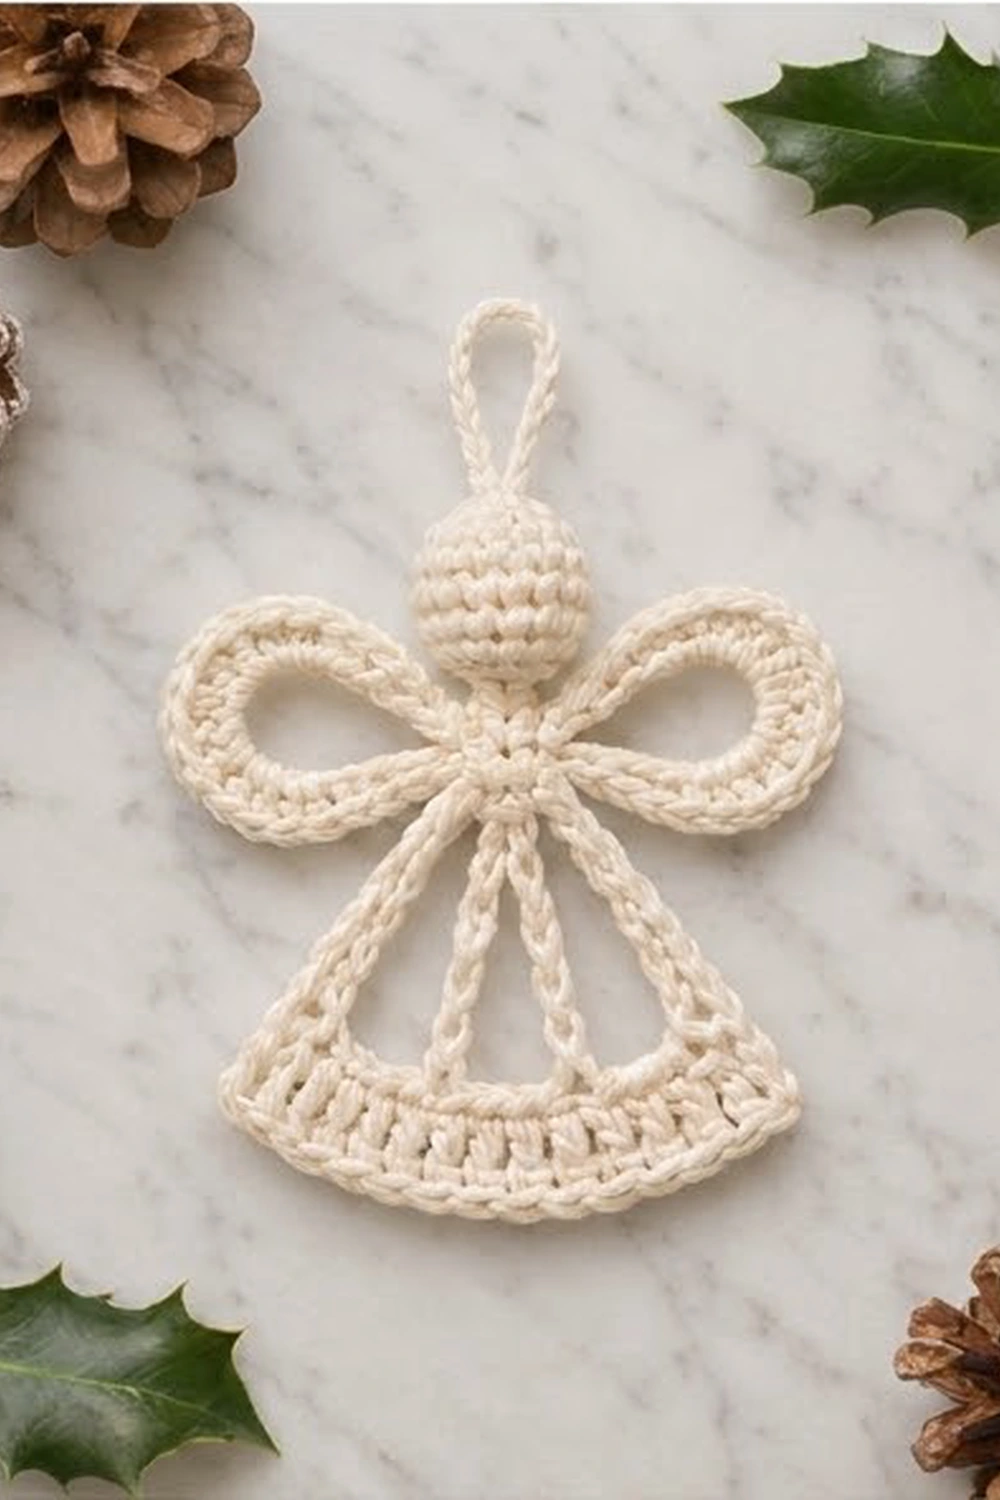
The Ivory Grace Angel is a small, airy Christmas ornament in one soft cream color. She has a round stuffed head, two looped wings, and an open skirt made of slender chain spokes. A neat curved band of stitches finishes the hem. She looks lovely on a green tree, tied to a gift, or hung in a window.
This pattern is a single piece worked in one color. It uses US crochet terms. The finished angel is about 4 in (10.2 cm) across the wings and 3.75 in (9.5 cm) tall from the top of the head to the hem. With the hanging loop she is about 4.75 in (12.1 cm) tall.
You work the angel almost entirely with one strand of yarn. You start with the head as a small amigurumi ball and add a short neck round. From the neck you make both wings and a chain framework for the skirt. Then you slip stitch down to the hem and work three rows for the hem band. You add the hanging loop last.
The stitches are basic, but the framework needs careful counting. Mark your neck stitches and you will find the angel goes together quickly.
Finished Size and Construction
- Finished size: 4 in (10.2 cm) wingspan × 3.75 in (9.5 cm) body height; 4.75 in (12.1 cm) with the loop
- Skill level: Easy+ / confident beginner
- Terminology: US crochet terms
- Yarn weight: Sport weight (#2), cotton
- Hook: 2.5 mm (US B/1 or C/2)
- Number of pieces: 1 (worked continuously, plus the loop added at the end)
- Layout: Head at top, wings left and right, skirt triangle below
- Head size: about 1 in (2.5 cm) diameter
- Skirt frame before hem band: hem chain about 3.75 in (9.5 cm) wide
- Hem band depth: 0.75 in (1.9 cm); bottom edge about 4.25 in (10.8 cm) wide
Materials
Yarn: Use a smooth, tightly plied sport-weight cotton or cotton blend. Mercerized cotton gives the crisp stitch definition shown here, and it holds the wings’ shape after blocking. Avoid fuzzy or very splitty yarns, because the spokes need to look clean.
- Cream: about 10 g / 25 m (27.3 yd)
Quantities include a margin for your gauge swatch and tails. One 50 g ball makes several angels.
Tools:
- 2.5 mm crochet hook
- Small amount of polyester fiberfill
- Stitch markers (at least 3)
- Tapestry needle
- Scissors
- Blocking board or foam mat, and rust-proof pins
- Spray bottle with water, or a light fabric stiffener (optional)
Abbreviations (US Terms)
- ch – chain
- sl st – slip stitch
- sc – single crochet
- dc – double crochet
- sc2tog – single crochet 2 together
- st(s) – stitch(es)
- MR – magic ring
- rnd – round
Special technique: corded spoke. Chain the stated number and secure the end as directed. Then sl st back along the chain, inserting the hook under the back bump of each chain. This makes a firm, rounded line instead of a flat chain.
Gauge and Checkpoints
Gauge: 12 sc × 12 rows = 2 in (5.1 cm) in sc worked in rows.
Chains should measure about 6 ch per 1 in (2.5 cm) when lightly stretched.
Gauge matters here because the spoke lengths are set to fit the hem chain. Make one test angel before you make a set.
Checkpoints:
- After Rnd 3 of the head: the flat circle measures about 1 in (2.5 cm) across.
- Finished head: about 1 in (2.5 cm) diameter and 3 in (7.6 cm) around.
- Each wing: about 1.75 in (4.4 cm) long × 1.25 in (3.2 cm) tall.
- Hem chain: about 3.75 in (9.5 cm) from corner to corner.
- Finished hem band: 0.75 in (1.9 cm) deep.
If the angel is too big, go down 0.25 mm in hook size, or chain more tightly. If it is too small, go up 0.25 mm. If only the inner spokes sag or pull, adjust them by one chain each rather than changing the hook.
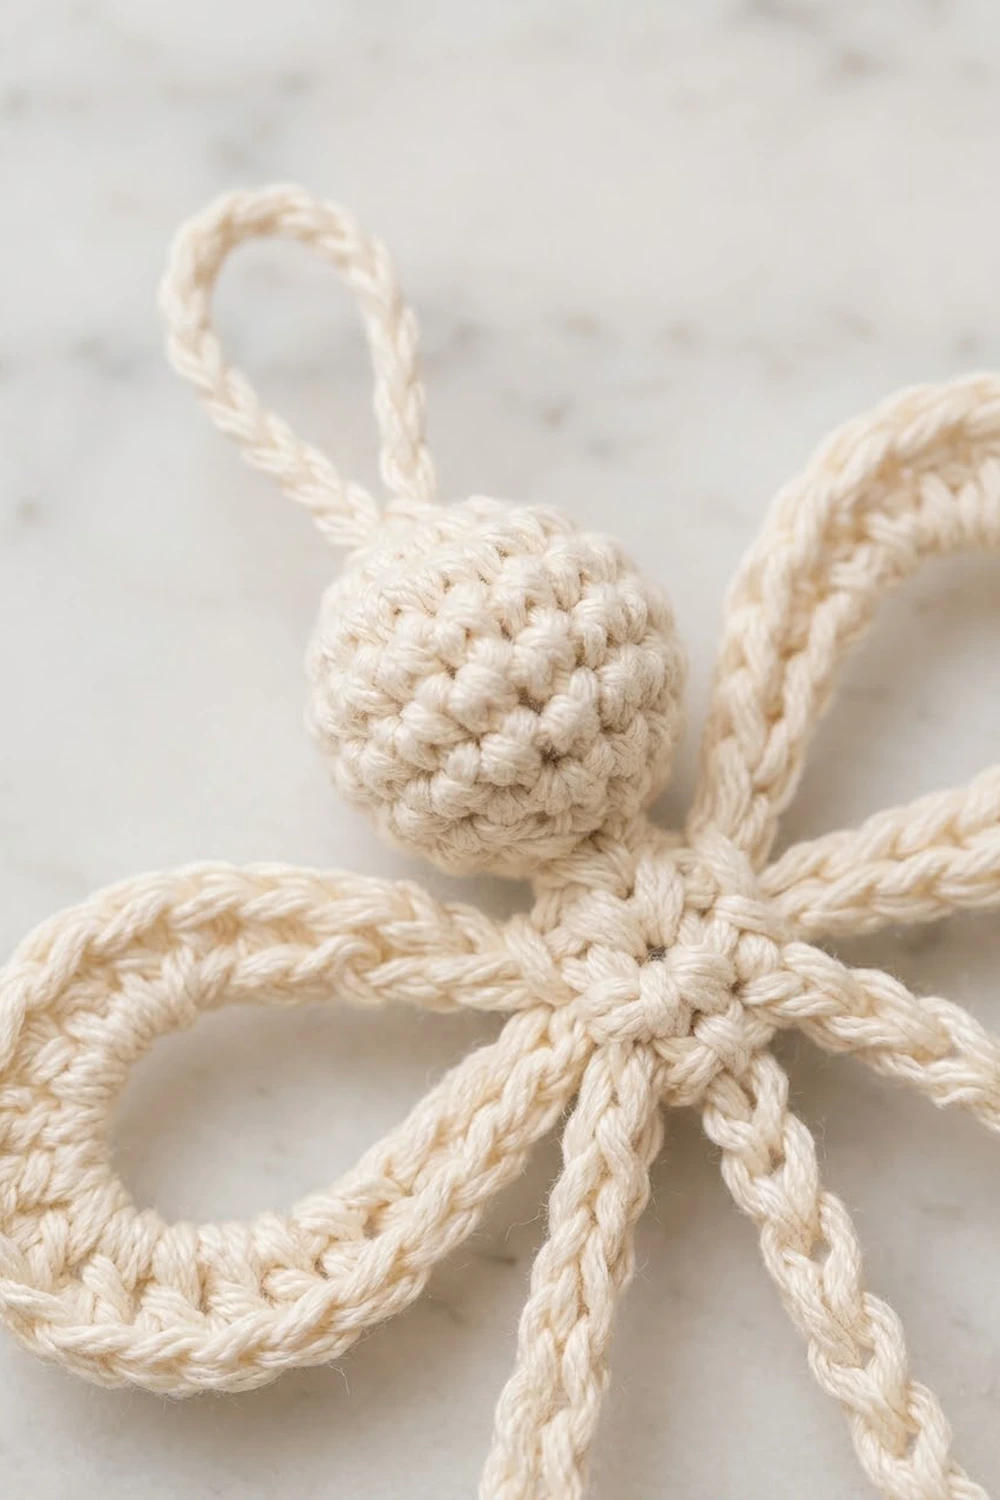
Head
Work in continuous rounds without joining. Place a marker in the first st of each rnd.
Rnd 1: Make a MR, 6 sc in the ring. Pull the ring closed. (6 sts)
Rnd 2: 2 sc in each st around. (12 sts)
Rnd 3: Sc in next st, 2 sc in next st; repeat from * 6 times. (18 sts)
Rnds 4–6: Sc in each st around. (18 sts per rnd)
Rnd 7: Sc in next st, sc2tog; repeat from * 6 times. (12 sts)
Stuff the head firmly and evenly. Push the stuffing toward the top so the ball stays round.
Rnd 8: Sc2tog 6 times. (6 sts)
Top up the stuffing with a tiny tuft through the opening if needed.
Neck
Rnd 9: Sc in each st around. (6 sts)
This short round forms the neck. Do not fasten off.
Lay the head flat, with the MR at the top. Number the six neck sts so the angel stays symmetrical:
- St 1 – left side (place a marker)
- Sts 2 and 3 – front center
- St 4 – right side (place a marker)
- Sts 5 and 6 – back
Rnd 9 ends at st 6. Sl st in st 1.
Wings
Left Wing
- Ch 24. Sl st in st 1 again (the same neck st) to form a loop.
- Work 36 sc into the ch-24 loop, working over the chain rather than into each chain. Space the sts evenly and push them together as you go.
- Sl st in st 1 to close the wing.
The wing now has 36 sc over 24 chains, which is 1.5 sc per chain. That extra fullness makes the thick, rope-like edge and keeps the loop open instead of curling.
Checkpoint: Flattened, the wing measures about 1.75 in (4.4 cm) long × 1.25 in (3.2 cm) tall.
Skirt Framework
Work the outer frame next, then the right wing, then the inner spokes.
Outer Frame
From st 1:
- Left spoke: Ch 14.
- Hem chain: Ch 22. These 22 chains are the base of the hem. Number them from the left: hem ch 1 is next to the left spoke, and hem ch 22 is next to the right spoke.
- Right spoke: Ch 14.
- Sl st in st 4 of the neck.
You now have an open chain triangle. Keep it untwisted, with all chains lying flat toward you.
Right Wing
- Ch 24. Sl st in st 4 to form a loop.
- Work 36 sc into the ch-24 loop.
- Sl st in st 4.
Compare the two wings. They should be the same size.
Inner Spokes
- Sl st in st 3.
- Right inner spoke: Ch 11. Sl st into hem ch 15.
- Sl st in each of the 11 chains back up the spoke (the corded spoke technique), then sl st in st 3.
- Sl st in st 2.
- Left inner spoke: Ch 11. Sl st into hem ch 8.
- Sl st in each of the 11 chains back up the spoke, then sl st in st 2.
- Sl st in st 1.
Why chains 8 and 15: The hem chain runs from ch 1 to ch 22. Spokes attached at ch 8 and ch 15 split it into three equal sections of 7 chain spaces each (1→8, 8→15, 15→22). That spaces the four skirt lines evenly.
Cord the Left Spoke
Sl st in each of the 14 chains of the left spoke, working down from the neck. End at the left corner, where the left spoke meets hem ch 1.
Checkpoint: Lay the angel flat. The skirt should be an even triangle with the spokes just straight, neither sagging nor puckering the hem. The point where all spokes meet should be about 1.75 in (4.4 cm) above the hem chain.
Border: Hem Band
The hem band is the angel’s border. It is worked in turned rows along the 22-chain hem.
Band gauge: 1 sc row = about 0.17 in (0.4 cm); 1 dc row = about 0.4 in (1 cm). Three rows give 0.75 in (1.9 cm).
Row 1 (conversion row): Ch 1. Sc in each of the 22 hem chains, working under the chain and catching the sl sts where the inner spokes join at ch 8 and ch 15. Turn.
Count: 22 sc (22 worked one per chain + 0 extra).
Row 2 (growth row): Ch 3 (counts as first dc). Dc in next 2 sts. 2 dc in next st, dc in next 3 sts; repeat from * 4 times. Dc in last 3 sts. Turn.
Count: 26 sts.
Check your work against this breakdown:
- Opening: ch-3 plus 2 dc uses 3 sts and makes 3 sts.
- Repeats: 4 repeats use 16 sts and make 20 sts.
- Closing: 3 dc uses 3 sts and makes 3 sts.
- Totals: 3 + 16 + 3 = 22 sts used; 3 + 20 + 3 = 26 sts made.
Row 3 (trim row): Ch 1. Sc in each st across, including the top of the turning ch. Do not turn.
Count: 26 sc (26 worked one per stitch + 0 extra).
Why the math works: The 22-st top edge stays the same width as the hem chain, about 3.75 in (9.5 cm). The 4 increases in Row 2 make the lower edge 26 sts wide, about 4.25 in (10.8 cm). The bottom edge is longer than the top, so the band curves gently outward like a bell, just as the skirt should.
Finish the Right Side
- Rotate to work up the right edge of the band. Sl st 1 in the side of Row 3, 2 in the side of Row 2, and 1 in the side of Row 1, for 4 sl sts. You arrive at the right corner of the hem chain.
- Sl st in each of the 14 chains of the right spoke, working up toward the neck.
- Sl st in st 4. Fasten off and weave the tail into the neck.
Both outer spokes and both inner spokes are now corded, so all four lines match.
Hanging Loop
- Join yarn with a sl st at the center top of the head, in the MR.
- Ch 14. Sl st in the same st to form a loop.
- Sl st in each of the 14 chains around the loop.
- Sl st in the starting st. Fasten off and weave the tail down into the head.
The loop stands about 1 in (2.5 cm) above the head.
Final Blocking
- Weave in all remaining tails along the spokes or into the head. Trim them close.
- Mist the angel lightly with water, or brush on a thin coat of diluted fabric stiffener.
- Lay the angel face up on a blocking board.
- Pin the hem band into a gentle curve: 3.75 in (9.5 cm) at the top edge and 4.25 in (10.8 cm) at the bottom edge.
- Pin each wing open into a smooth teardrop, 1.75 in (4.4 cm) long. The full wingspan should be 4 in (10.2 cm).
- Straighten each spoke with a pin at its midpoint so the lines run straight.
- Pin the hanging loop upright into a neat oval.
- Leave it to dry completely, about 6–12 hours. Do not wet the stuffed head heavily.
Final Quality-Control Checklist
- Head is round, firm, and about 1 in (2.5 cm) across, with no stuffing showing.
- Neck has 6 sts with no gaps.
- Each wing has 36 sc, and the two wings are the same size.
- Four corded spokes, evenly spaced, meet neatly at the neck.
- Hem band rows count 22 / 26 / 26.
- Hem band is 0.75 in (1.9 cm) deep and gently curved.
- Wingspan is 4 in (10.2 cm); total height is 4.75 in (12.1 cm) with the loop.
- All tails are hidden, and the hanging loop is centered.
Troubleshooting
Wings curl or twist: The sc are too crowded or uneven. Spread the 36 sc evenly and block the wings flat. If they still curl, rework with 34 sc.
Wings too small or floppy: Check your chain gauge. Tight chains shrink the wings, and loose ones make them floppy.
Inner spokes sag: Work them with 10 chains instead of 11.
Inner spokes pull the hem upward: Work them with 12 chains instead of 11.
Hem band ruffles: Your dc are loose. Go down a hook size for Row 2 only.
Hem band is flat, with no curve: Make sure Row 2 includes all 4 increases (26 sts).
Head looks lumpy: Use smaller tufts of stuffing and shape the ball with your fingers before Rnd 8.
Skirt leans to one side: Recount the hem chain (22) and both outer spokes (14 each).
Care
Spot clean gently with cool water and mild soap, then reshape and dry flat. Store the angel flat in tissue paper so the wings and loop keep their shape.
Final Notes
The measurements build on each other:
- A 1 in (2.5 cm) head sits on a 6-stitch neck.
- Two ch-24 wings covered in 36 sc give a 4 in (10.2 cm) wingspan.
- 14-chain outer spokes open onto a 22-chain hem, 3.75 in (9.5 cm) wide.
- Inner spokes at hem ch 8 and ch 15 divide the skirt into three equal sections.
- The hem band grows from 22 to 26 sts, so it curves out to 4.25 in (10.8 cm) at a depth of 0.75 in (1.9 cm).
- A 1 in (2.5 cm) loop brings the total height to 4.75 in (12.1 cm).
Check each stage as you go and every angel in your set will match. Happy crocheting!