

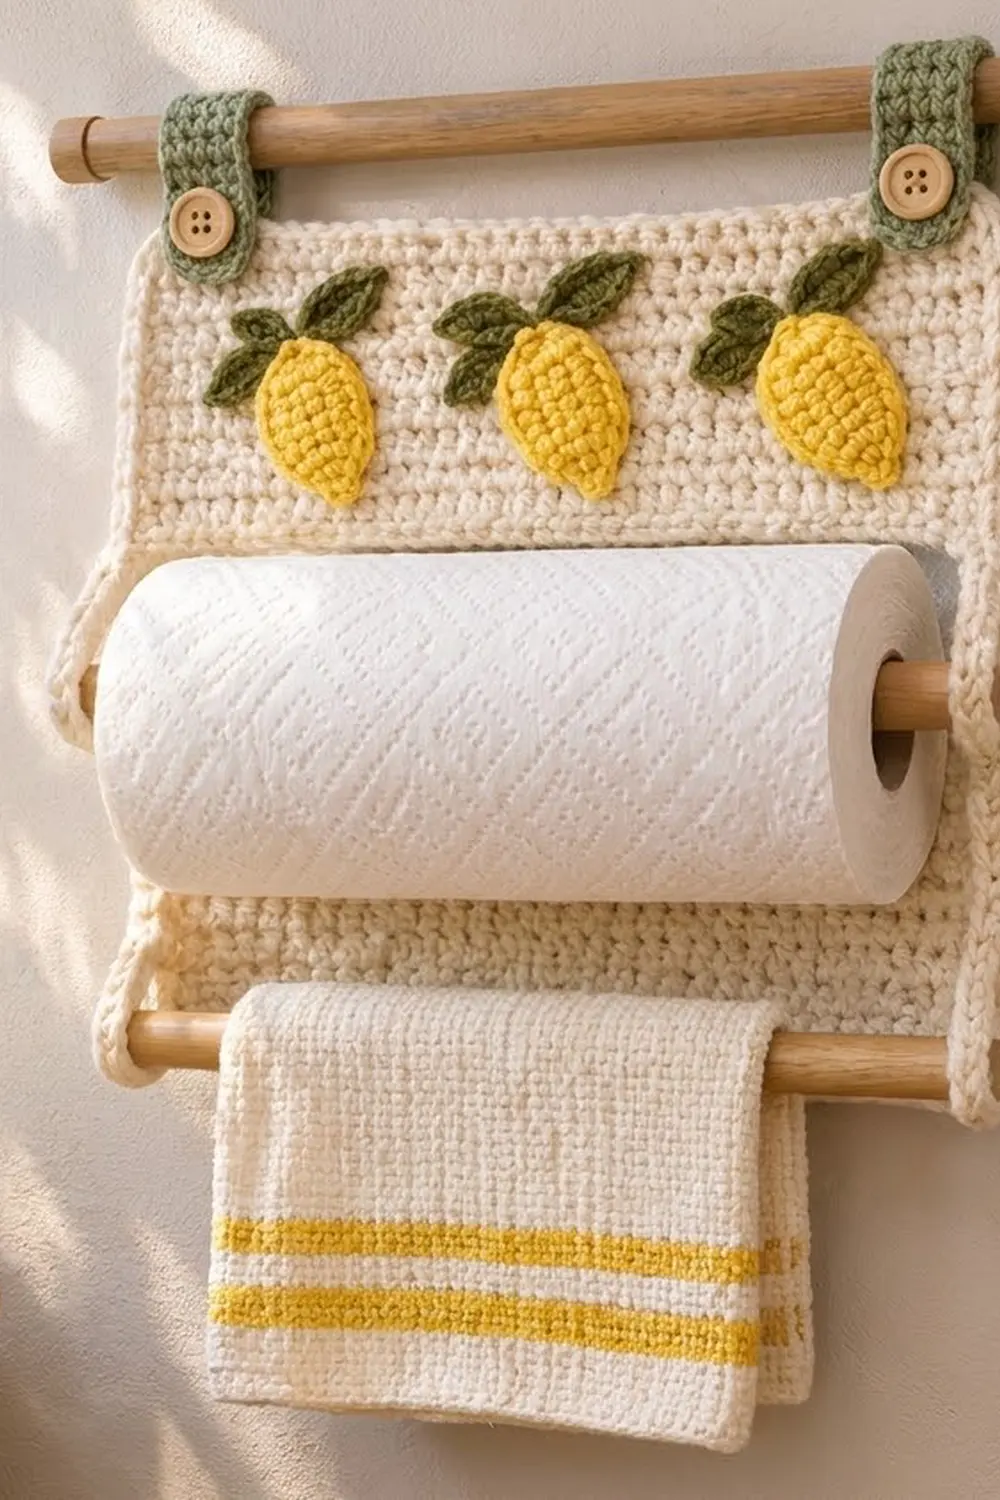
This wall-hanging paper towel holder pairs a calm cream background with three bright yellow lemons and soft olive-green leaves. It hangs from a wooden dowel on two green button tabs. A second dowel through the side legs holds the paper towel roll, and a third dowel lower down holds a folded tea towel.
The look is simple farmhouse kitchen. The cream panel is plain single crochet, which makes a dense, sturdy fabric. Each lemon is a small raised oval with a tiny tip at each end, and two leaves fan out in a V from its top.
The pattern uses US crochet terms. With the border, the finished panel measures 15.5 in wide x 16.5 in tall (39.4 cm x 41.9 cm).
Construction is straightforward. You work the panel from the bottom up in rows. First comes a solid bottom bar, then two separate side legs with built-in eyelets for the dowels, then a full-width header across the top. A window edging and a one-round border tidy all the edges. You make the lemons, leaves and tabs separately and sew them on.
Finished Size and Construction
- Finished size: 15.5 in wide x 16.5 in tall (39.4 cm x 41.9 cm)
- Skill level: Easy / advanced beginner
- Terminology: US crochet terms
- Yarn weight: Worsted (#4) cotton or cotton blend
- Hooks: 5 mm (H-8) for the panel and tabs; 4 mm (G-6) for the lemons and leaves
- Number of pieces: 1 main panel, plus 3 lemons, 6 leaves and 2 tabs sewn on
- Layout: Rectangular frame with a bottom bar, two side legs and a header with 3 lemons in a row
- Panel size before border: 15 in x 16 in (38.1 cm x 40.6 cm)
- Open window before edging: 12 in x 10 in (30.5 cm x 25.4 cm)
- Open window after edging: 11.5 in x 9.5 in (29.2 cm x 24.1 cm)
- Border depth: 0.25 in (0.6 cm) on each side
Materials
Choose a smooth worsted-weight cotton or cotton blend. Cotton holds its shape well under the weight of a full paper towel roll, and it washes easily. Don’t use a very stretchy acrylic for the cream panel.
- Cream (main color): 85 g, about 155 m (170 yd)
- Yellow (lemons): 10 g, about 18 m (20 yd)
- Olive green (leaves and tabs): 15 g, about 27 m (30 yd)
Tools and notions:
- 5 mm (H-8) and 4 mm (G-6) crochet hooks
- Tapestry needle
- 2 wooden buttons, 1 in (2.5 cm) diameter
- 3 wooden dowels, 18 in (45.7 cm) long, 0.625 in (1.6 cm) diameter
- Stitch markers, scissors, measuring tape, rust-proof pins
- A small amount of fiberfill (optional, for plumper lemons)
The yarn amounts include a margin of about 20% for gauge swatching and differences in tension.
Abbreviations (US Terms)
- ch – chain
- sl st – slip stitch
- sc – single crochet
- hdc – half double crochet
- dc – double crochet
- sk – skip
- sp – space
- st(s) – stitch(es)
- RS / WS – right side / wrong side
Special stitch – picot tip: Ch 2, sl st in 2nd ch from hook. This makes the small nub at each end of a lemon.
Gauge and Checkpoints
Panel gauge: 16 sc and 18 rows = 4 in (10.2 cm) with the 5 mm hook. That works out to 4 sts and 4.5 rows per inch.
Test your gauge on the panel itself. Work the bottom bar (Rows 1–9) and measure it before you go on. It should be 15 in wide x 2 in tall (38.1 cm x 5.1 cm).
Checkpoints:
- After Row 9: 15 in x 2 in (38.1 cm x 5.1 cm)
- After Row 54: each leg 1.5 in (3.8 cm) wide and 10 in (25.4 cm) tall
- After Row 72: 15 in x 16 in (38.1 cm x 40.6 cm)
- After the border: 15.5 in x 16.5 in (39.4 cm x 41.9 cm)
- Each lemon: about 2 in x 1.5 in (5.1 cm x 3.8 cm)
If your piece is too big, switch to a hook 0.5 mm smaller. If it is too small, go up 0.5 mm. Width matters most. After edging, the window must be at least 11.5 in (29.2 cm) wide so a standard 11 in (27.9 cm) roll fits.
Main Panel
Use cream and the 5 mm hook. The ch-1 at the start of each row does not count as a stitch.
Bottom Bar
Foundation: Ch 61.
Row 1 (RS): Sc in 2nd ch from hook and in each ch across, turn. (60 sc)
Rows 2–9: Ch 1, sc in each st across, turn. (60 sc)
Checkpoint: 15 in x 2 in (38.1 cm x 5.1 cm).
Leg 1
Row 10: Ch 1, sc in first 6 sts, turn. Leave the remaining 54 sts unworked. (6 sc)
Row 11: Ch 1, sc in each st across, turn. (6 sc)
Row 12 (towel-rod eyelet): Ch 1, sc in first st, ch 4, sk 4 sts, sc in last st, turn. (2 sc + ch-4 sp)
Row 13: Ch 1, sc in first st, 4 sc in ch-4 sp, sc in last st, turn. (6 sc)
Rows 14–39: Ch 1, sc in each st across, turn. (6 sc)
Row 40 (paper-towel-rod eyelet): Work as Row 12.
Row 41: Work as Row 13. (6 sc)
Rows 42–54: Ch 1, sc in each st across, turn. (6 sc)
Fasten off.
Leg 2
Row 10: Hold the panel so the same side faces you as when you started Leg 1. Skip the next 48 unworked sts of Row 9 and join cream in the next st. Ch 1, sc in the same st and in the last 5 sts, turn. (6 sc)
Rows 11–54: Work exactly as for Leg 1, with eyelets on Rows 12 and 40. Do not fasten off. (6 sc)
The two legs now stand 48 sts apart. Each eyelet opening is 1 in (2.5 cm) wide, which is enough for a 0.625 in (1.6 cm) dowel.
Checkpoint: each leg is 1.5 in (3.8 cm) wide and 10 in (25.4 cm) tall.
Header
Row 55: Ch 1, sc in the 6 sts of Leg 2, ch 48, sc in the 6 sts of Leg 1, turn. (12 sc + 48 ch = 60 sts)
Keep the ch-48 untwisted and level with the tops of the legs.
Row 56: Ch 1, sc in first 6 sts, sc in each of next 48 ch, sc in last 6 sts, turn. (60 sc)
Rows 57–72: Ch 1, sc in each st across, turn. (60 sc)
Fasten off.
Checkpoint: 15 in x 16 in (38.1 cm x 40.6 cm). The header is 4 in (10.2 cm) tall.
Window Edging
This round neatens the inside of the frame.
Rnd 1: With RS facing, join cream in the first unworked st of Row 9 at a lower window corner.
- Bottom of window: Ch 1, sc in the same st and in each remaining unworked st of Row 9. (48 sc)
- First inner leg edge: *Sc in next 8 row ends, sk 1 row end; rep from * 4 more times. (40 sc over 45 row ends)
- Top of window: Sc in the underside of each of the 48 ch from Row 55. (48 sc)
- Second inner leg edge: Repeat the row-end sequence. (40 sc)
- Join with sl st to first sc. Fasten off. (176 sc)
The window now measures 11.5 in x 9.5 in (29.2 cm x 24.1 cm).
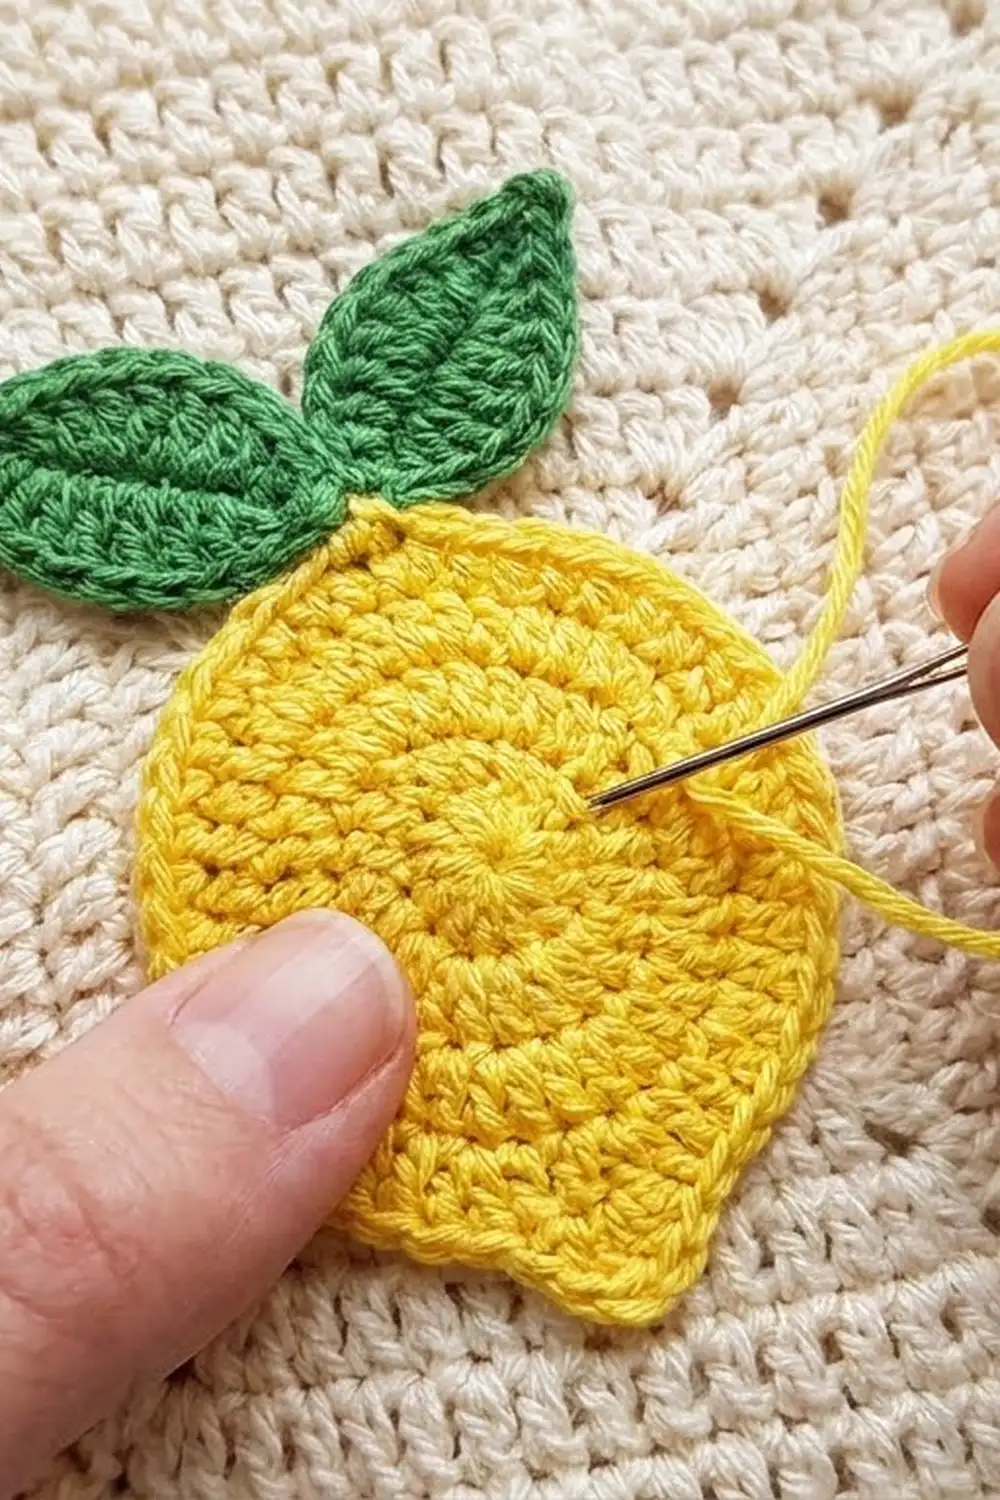
Lemons (make 3)
Use yellow and the 4 mm hook. Work in joined rounds.
Foundation: Ch 6.
Rnd 1: Sc in 2nd ch from hook, sc in next 3 ch, 3 sc in last ch. Working along the opposite side of the chain, sc in next 3 ch, 2 sc in last ch (the same ch as the first sc). Join with sl st to first sc. (12 sc)
Rnd 2: Ch 1, 2 sc in first st, sc in next 3 sts, 2 sc in each of next 3 sts, sc in next 3 sts, 2 sc in each of last 2 sts. Join. (18 sc)
Rnd 3: Ch 1, sc in first st, picot tip, sc in next 8 sts, sc in next st, picot tip, sc in last 8 sts. Join. (18 sc + 2 picot tips)
The picot tips sit at opposite ends of the oval. Fasten off, leaving a 12 in (30.5 cm) tail for sewing.
Checkpoint: about 2 in (5.1 cm) long from tip to tip and 1.5 in (3.8 cm) wide.
Leaves (make 6)
Use olive green and the 4 mm hook.
Foundation: Ch 7.
Leaf:
- First side: Sl st in 2nd ch from hook, sc in next ch, hdc in next ch, dc in next ch, hdc in next ch, sc in last ch. (6 sts)
- Tip: Ch 1.
- Second side: Turn the piece and work along the opposite side of the chain: sc in first ch, hdc in next ch, dc in next ch, hdc in next ch, sc in next ch, sl st in last ch. (6 sts)
Total: 12 sts + ch-1 tip.
Fasten off, leaving a 10 in (25.4 cm) tail. Each leaf is about 1.5 in (3.8 cm) long.
Hanging Tabs (make 2)
Use olive green and the 5 mm hook.
Foundation: Ch 6.
Row 1: Sc in 2nd ch from hook and in each ch across, turn. (5 sc)
Rows 2–24: Ch 1, sc in each st across, turn. (5 sc)
Row 25 (buttonhole): Ch 1, sc in first st, ch 3, sk 3 sts, sc in last st, turn. (2 sc + ch-3 sp)
Row 26: Ch 1, sc in first st, 3 sc in ch-3 sp, sc in last st, turn. (5 sc)
Row 27: Ch 1, sc in each st across. (5 sc)
Fasten off, leaving a 12 in (30.5 cm) tail. Each tab is 1.25 in x 6 in (3.2 cm x 15.2 cm).
Assembly
Assemble the holder after the border and blocking (see below), so the appliqués go onto a flat, square panel.
- Lemons: Place the 3 lemons upright across the header, with the picot tips pointing up and down. Put their centers 3.75 in, 7.75 in and 11.75 in (9.5 cm, 19.7 cm and 29.8 cm) from the left edge, so they are 4 in (10.2 cm) apart. Each lemon center should be 1.5 in (3.8 cm) above the top of the window. Add a little fiberfill if you like. Whipstitch around the edge through the back loops of Rnd 3.
- Leaves: Sew 2 leaves at the top tip of each lemon. Tuck the leaf bases just under the lemon and fan the tips out in a V, so each leaf slightly overlaps the top of the lemon.
- Tabs: Sew the Row 1 end of each tab to the WS of the header, overlapping it by 1.5 in (3.8 cm). Center each tab 1.25 in (3.2 cm) in from a side edge.
- Buttons: Sew a button to the RS of the header directly in front of each tab, with its center 1 in (2.5 cm) below the top edge. Fold each tab over the top dowel and button it.
- Dowels: Slide one dowel through both Row 40 eyelets, passing it through the paper towel roll on the way. Slide another dowel through both Row 12 eyelets for the tea towel.
Border
The border gauge matches the panel gauge: 4 sc per inch. Use cream and the 5 mm hook.
Rnd 1: With RS facing, join cream in the first st of Row 72 (top right corner).
- Top: Ch 1, 3 sc in first st, sc in next 58 sts, 3 sc in last st.
- Left side: Working into the row ends, *sc in next 6 row ends, sk 1 row end; rep from * 9 more times, sc in last 2 row ends. (62 sc over 72 row ends)
- Bottom: Working into the foundation chain, 3 sc in first ch, sc in next 58 ch, 3 sc in last ch.
- Right side: Repeat the row-end sequence. (62 sc)
- Join with sl st to first sc. (252 sc)
Fasten off and weave in the ends.
Counts per side, corner stitches included:
- Top and bottom: 1 corner + 1 + 58 + 1 + 1 corner = 62 sts each
- Left and right sides: 1 corner + 1 + 62 + 1 + 1 corner = 66 sts each
- Check: (2 x 62) + (2 x 66) − 4 shared corners = 252 sts
Why the math works: The top had 60 sts. Each 3-sc corner adds 1 stitch outward at its end, which brings the count to 62 sts. At 4 sts per inch, 62 sts measure 15.5 in (39.4 cm). That is the 15 in panel plus 0.25 in of border on each side.
Each side has 72 rows, which measure 16 in. The border puts 62 sc along those row ends, and the two corners bring the count to 66 sts. At 4 sts per inch, 66 sts measure 16.5 in (41.9 cm). That is the 16 in panel plus 0.25 in of border at the top and bottom.
Skipping 1 of every 7 row ends keeps the sides from rippling.
Final Blocking
- Weave in all the ends before blocking.
- Lay the panel face down on a blocking mat or a folded towel.
- Pin the outer edge to 15.5 in x 16.5 in (39.4 cm x 41.9 cm). Pin the four corners first, then the middle of each side.
- Pin the window open to 11.5 in x 9.5 in (29.2 cm x 24.1 cm). Check that both legs are straight and 1.5 in (3.8 cm) wide.
- Spray evenly with water until damp but not soaked.
- Let it dry completely, for at least 12 hours.
- Block the lemons and leaves separately. Pin them into shape and mist them, flattening each leaf and pointing its tip.
- Unpin everything, then follow the Assembly steps.
Final Quality-Control Checklist
- The panel measures 15.5 in x 16.5 in (39.4 cm x 41.9 cm).
- The window is 11.5 in x 9.5 in (29.2 cm x 24.1 cm), square and not skewed.
- The eyelets on both legs line up at the same height.
- The border has 252 sts, and the corners lie flat with no cupping.
- All three lemons sit at the same height, 4 in (10.2 cm) apart.
- Each lemon has two leaves in a V at its top.
- The tabs are centered 1.25 in (3.2 cm) from the side edges, and the buttons pass easily through the buttonholes.
- All ends are woven in securely on the WS.
Troubleshooting
The roll won’t fit the window. Your gauge is too tight. Remake the panel with a larger hook, or block the window wider.
The legs lean or twist. Count 6 sts on every leg row. Missing the last stitch narrows the leg, so count often.
The ch-48 bridge sags. Your chain is looser than your sc. Work that chain with a hook 0.5 mm smaller.
The border ripples along the sides. Skip row ends more often, about 1 in every 6.
The border pulls in along the sides. Skip row ends less often, about 1 in every 8.
The lemons look round instead of oval. Start with exactly ch 6, and keep the Rnd 2 increases snug.
The dowels slip out of the eyelets. Use dowels with a small knob or end cap, or wrap a rubber band near each end.
Care
If you can, remove the dowels and buttons first. Hand wash in cool water with mild soap, roll the panel in a towel to press out the water, and lay it flat to dry.
Final Notes
Every measurement comes from the gauge of 4 sts per inch. The 60-st bottom bar measures 15 in (38.1 cm). It splits into two 6-st legs of 1.5 in (3.8 cm) each and a 48-st window of 12 in (30.5 cm). 72 rows give 16 in (40.6 cm) of height. The window edging trims the opening to 11.5 in x 9.5 in (29.2 cm x 24.1 cm). The border brings the panel to 15.5 in x 16.5 in (39.4 cm x 41.9 cm).
If each checkpoint matches, the roll, the tea towel and the three lemons will all fit as planned.
Happy crocheting!