

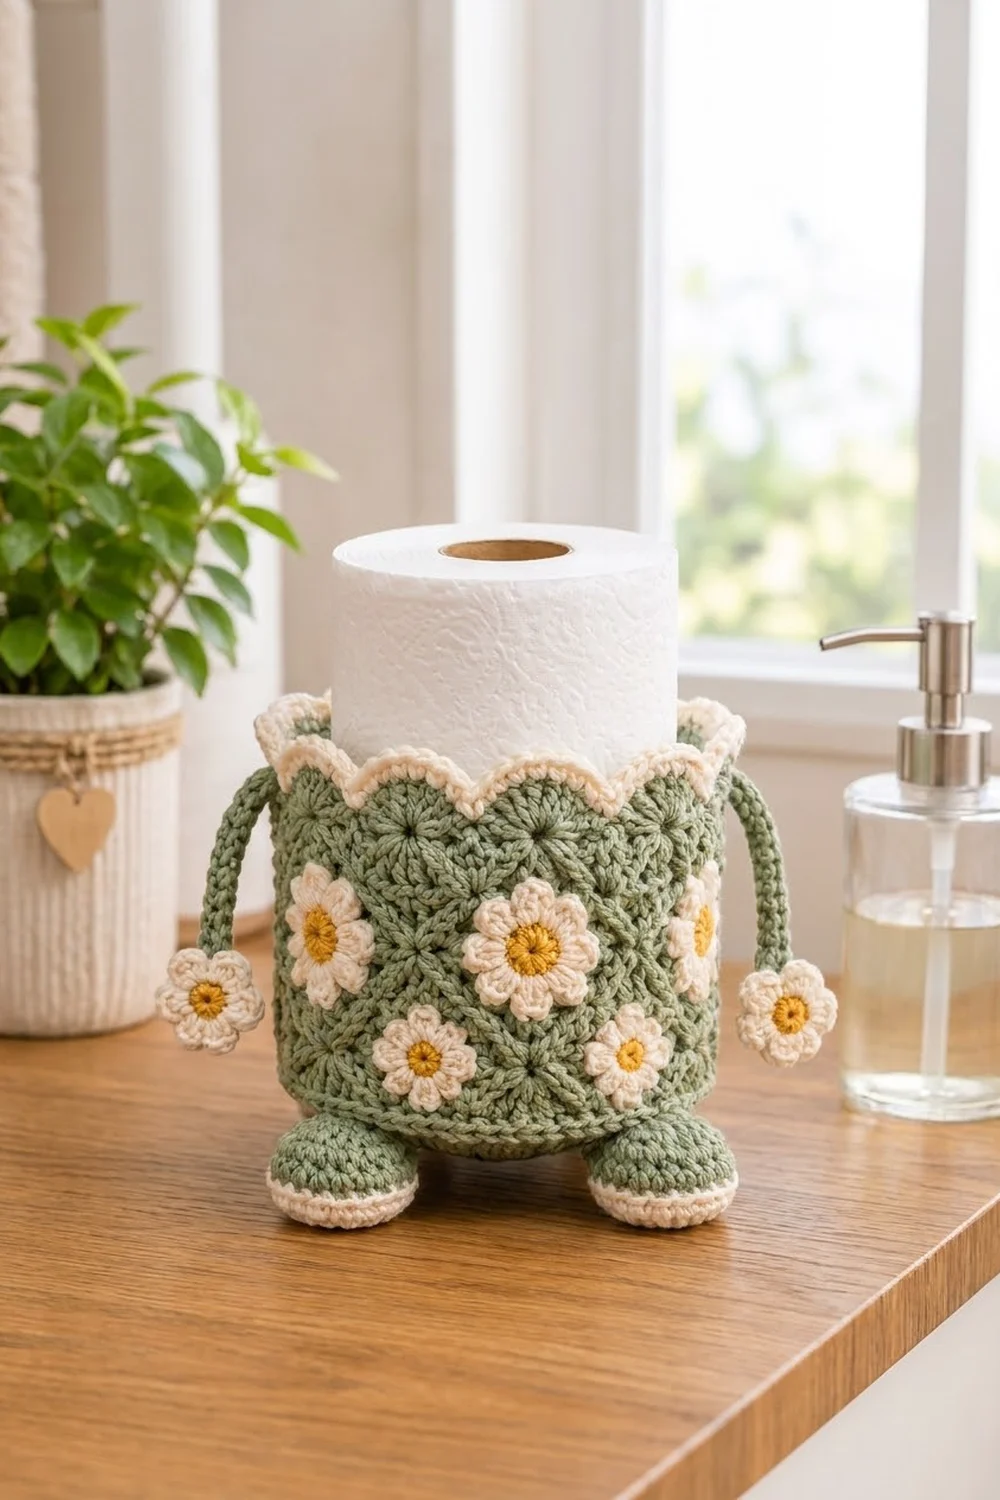
This little holder slips over one standard toilet paper roll and looks like a small round creature with arms and feet. The body is a sage green cylinder made of small square motifs, each with a sunburst of double crochet stitches in the middle. Cream daisies with mustard centers sit on the squares, and a cream scalloped edge finishes the top.
Two thin green arms hang from the sides, each ending in a daisy. Two round green feet with cream bands sit at the front of the bottom edge. The colors are sage green, cream, and mustard gold, and the style is soft cottage farmhouse.
The pattern uses US crochet terms. The finished holder is 16 in (40.6 cm) around, about 5.1 in (13.0 cm) across, and about 5 in (12.7 cm) tall without the feet. It fits a roll about 4.5 in (11.4 cm) wide and 4 in (10.2 cm) tall.
You make 16 small squares and sew them into a tube 8 squares around and 2 squares high. Then you make a flat round base and join it to the bottom edge with a round of sc. A scalloped border goes around the top. Last, you sew on the feet, arms, and daisies.
Finished Size and Construction
- Finished size: 16 in (40.6 cm) around, about 5.1 in (13.0 cm) across, about 5 in (12.7 cm) tall without feet
- Skill level: Intermediate
- Terminology: US
- Yarn weight: DK (#3), cotton or cotton blend
- Hook: 3.5 mm (E-4)
- Number of pieces: 31 (16 squares, 1 base, 2 feet, 2 arms, 10 daisies)
- Layout: squares joined 8 around x 2 high into a tube
- Square size: 2 in x 2 in (5.1 cm x 5.1 cm), 8 sts per side
- Size before border: 16 in (40.6 cm) around x 4 in (10.2 cm) tall
- Border depth: top border about 0.75 in (1.9 cm); bottom joining round about 0.25 in (0.6 cm)
Materials
Use a smooth cotton DK, either mercerized or matte. Cotton holds its shape well and handles damp bathrooms. Avoid fuzzy yarns, because they hide the sunburst texture.
- Sage green (Color A): 100 g, about 230 m
- Cream (Color B): 40 g, about 90 m
- Mustard gold (Color C): 10 g, about 23 m
These amounts include a safety margin of about 20 percent.
Tools:
- 3.5 mm (E-4) hook
- Tapestry needle
- Locking stitch markers
- Small amount of fiberfill for the feet
- Scissors
- Measuring tape
- Blocking mat and pins
- Spray bottle
Abbreviations (US Terms)
- ch – chain
- sl st – slip stitch
- sc – single crochet
- hdc – half double crochet
- dc – double crochet
- sc2tog – single crochet 2 together
- inc – 2 sc in the same st
- BLO – back loop only
- MR – magic ring
- st(s) – stitch(es)
- sp – space
- rnd(s) – round(s)
Special stitch: Petal – (hdc, 3 dc, hdc) all in the same st.
Gauge and Checkpoints
Gauge: 4 sc = 1 in (2.5 cm). One finished square = 2 in x 2 in (5.1 cm x 5.1 cm).
Make one square and block it before you start the others. Check these sizes as you go:
- After Rnd 1: about 1 in (2.5 cm) across
- After Rnd 2: about 1.6 in (4.1 cm) across
- After Rnd 3: 2 in (5.1 cm) per side
If your square is bigger than 2 in (5.1 cm), switch to a 3.25 mm hook. If it is smaller, switch to a 3.75 mm hook. Being off by only 0.1 in (0.3 cm) per square adds up to 0.8 in (2.0 cm) around the whole tube. That is enough to make the holder loose or too tight on the roll.
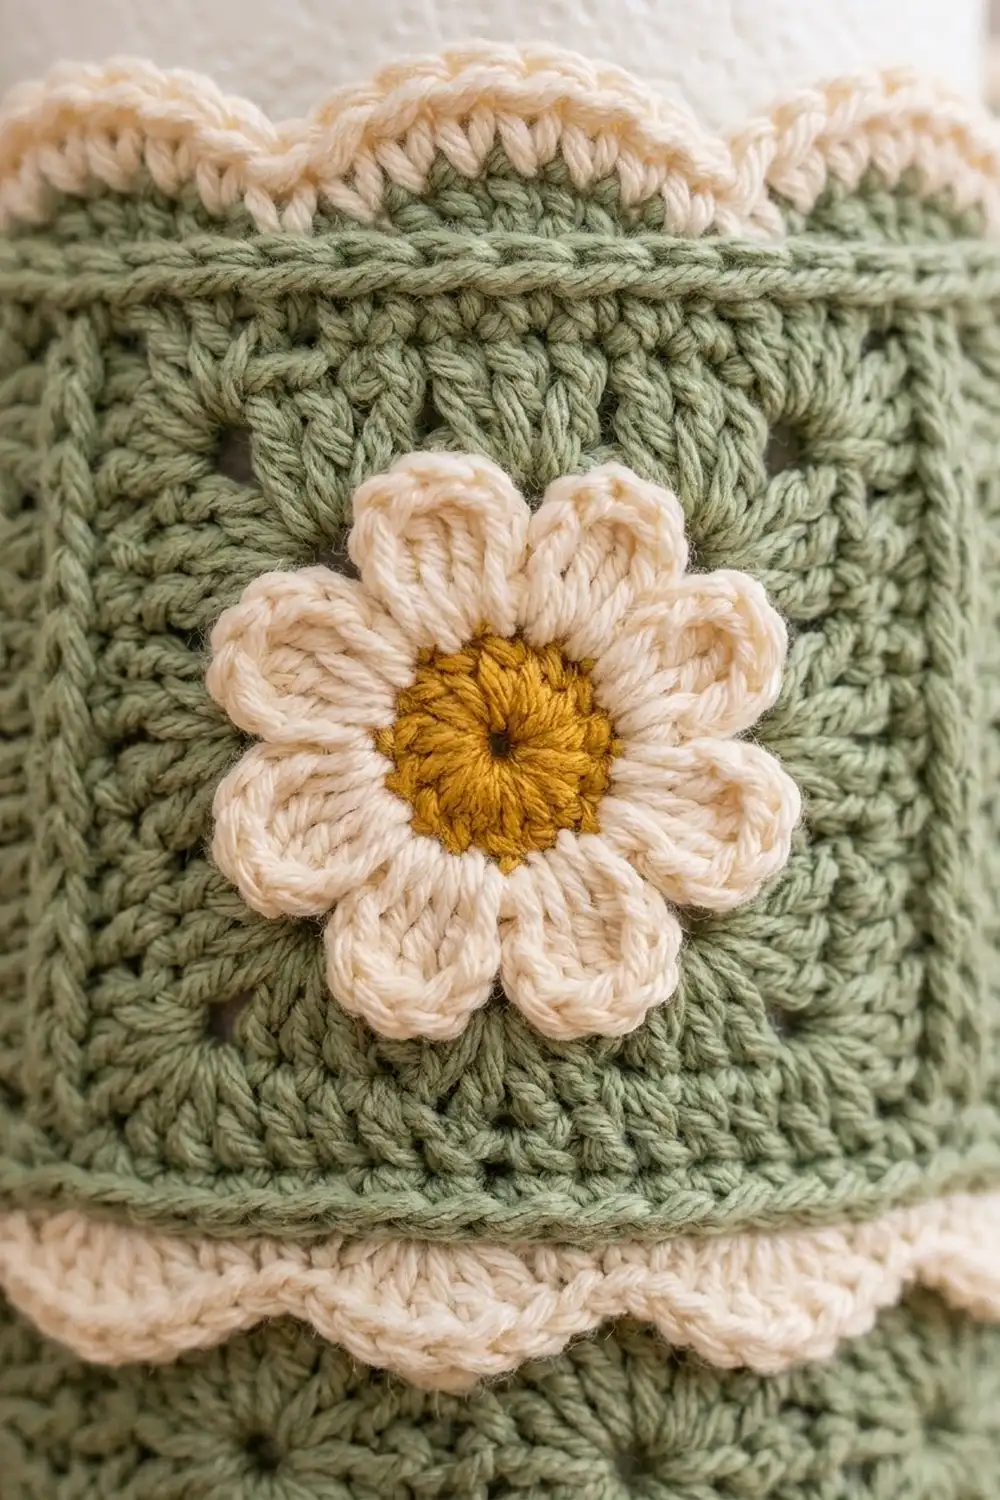
Sunburst Square (make 16)
Use Color A.
Rnd 1: In a MR, ch 3 (counts as dc), work 11 dc in the ring. Pull the ring closed. Sl st to the top of the ch-3 to join. (12 dc)
These 12 dc spread out from the center like rays and make the star texture.
Rnd 2: Ch 3 (counts as dc), (ch 2, dc) in the same st as the join, hdc in each of the next 2 sts, (dc, ch 2, dc) in the next st, hdc in each of the next 2 sts; repeat from * to * 2 more times. Sl st to the top of the ch-3 to join. (8 dc, 8 hdc, 4 ch-2 sps)
You now have 4 corners. Between the corner spaces, each side has 1 dc, 2 hdc, and 1 dc.
Rnd 3: Ch 1, sc in the same st, 3 sc in the ch-2 corner sp, sc in each of the next 4 sts; repeat from * to * 3 more times, but leave out the last sc on the final repeat. Sl st to the first sc to join. (28 sc)
Each corner has a group of 3 sc. To count one side, go from one corner’s center sc to the next corner’s center sc and include both: 1 + 1 + 4 + 1 + 1 = 8 sts per side. Each corner center sc belongs to two sides, so the whole square has 4 sides x 7 = 28 sts.
Fasten off. On 8 of the squares, leave a 12 in (30.5 cm) tail for sewing. Block every square to 2 in x 2 in (5.1 cm x 5.1 cm).
Base (make 1)
Use Color A. Work in continuous rnds and mark the first st of each rnd.
- Rnd 1: 8 sc in MR. (8)
- Rnd 2: Inc in each st. (16)
- Rnd 3: (Sc 1, inc) 8 times. (24)
- Rnd 4: (Sc 2, inc) 8 times. (32)
- Rnd 5: (Sc 3, inc) 8 times. (40)
- Rnd 6: (Sc 4, inc) 8 times. (48)
- Rnd 7: (Sc 5, inc) 8 times. (56)
- Rnd 8: (Sc 6, inc) 8 times. (64)
Sl st into the next st and fasten off. At 4 sts per inch, 64 sts = 16 in (40.6 cm) around, which matches the tube. The circle should be about 5.1 in (13.0 cm) across and lie flat. If the edge ripples, redo Rnd 8 with a smaller hook. If it cups, use a bigger hook.
Feet (make 2)
Each foot is a small stuffed dome. The top is green, with a cream band and a flat cream bottom.
Use Color A and work in continuous rnds.
- Rnd 1: 6 sc in MR. (6)
- Rnd 2: Inc in each st. (12)
- Rnd 3: (Sc 1, inc) 6 times. (18)
- Rnd 4: (Sc 2, inc) 6 times. (24)
- Rnds 5–6: Sc in each st. (24)
Change to Color B.
- Rnds 7–8: Sc in each st. (24)
- Rnd 9: Work in BLO: (sc 2, sc2tog) 6 times. (18)
Working in BLO makes a sharp fold, so the bottom sits flat.
- Rnd 10: (Sc 1, sc2tog) 6 times. (12)
Stuff lightly. The foot should feel firm but still a little flat.
- Rnd 11: Sc2tog 6 times. (6)
Fasten off and close the hole. The foot should be about 1.9 in (4.8 cm) across and 1.25 in (3.2 cm) tall.
Arms (make 2)
Use Color A and work in continuous rnds. Do not stuff.
- Rnd 1: 5 sc in MR. (5)
- Rnds 2–18: Sc in each st. (5)
Fasten off and leave a tail for sewing. The arm should be a narrow, soft tube about 3 in (7.6 cm) long.
Daisies (make 10)
Rnd 1: With Color C, work 12 sc in a MR. Sl st to the first sc to join. (12) Fasten off.
Rnd 2: Join Color B in any st. Sc in the next st, Petal in the next st; repeat from * to * 5 more times. Sl st to the first sc to join. (6 sc + 6 Petals = 36 sts)
Fasten off and leave a 10 in (25.4 cm) tail. Each daisy should be about 1.5 in (3.8 cm) across, with 6 rounded petals.
Make All Pieces
Count your pieces before you start putting the holder together:
- Color A: 16 squares, 1 base, 2 arms, 2 feet (top part)
- Color B: 10 daisy petal rnds, 2 foot bands and bottoms, top border
- Color C: 10 daisy centers
Layout grid: This shows the tube opened flat. Column 1 joins Column 8 to close the tube. D = square with a daisy, S = plain square.
Row 1 (top):    D  S  D  S  D  S  D  S
Row 2 (bottom): S  D  S  D  S  D  S  D
This puts 8 daisies on the body in a checkerboard. The other 2 daisies go on the ends of the arms.
Joining
Use Color A and a tapestry needle. Lay 2 squares right side up with their edges side by side. Whipstitch through the back loops only, matching each st to the st across from it. Sew from one corner center sc to the other corner center sc, which is 8 sts to 8 sts.
- Join each top square to the square below it. You now have 8 columns of 2 squares each.
- Join the columns side by side in order, from 1 to 8.
- Bring Column 8 around to Column 1 and join them to make a tube.
Sewing through the back loops leaves a neat ridge of front loops on the outside. It adds no stitches to the edge. Keep your tension even and snug, but not tight. Pulling too hard makes the tube narrower and puckers the seams.
Checkpoint: Lay the tube flat. It should measure 8 in (20.3 cm) across, which means 16 in (40.6 cm) around, and 4 in (10.2 cm) tall.
Border
Border gauge: 4 sc = 1 in (2.5 cm), the same gauge as the squares.
Starting count: Each edge of the tube has 8 squares x 8 sts per side = 64 sts. Work into both corner sts of every square at each seam. Do not add any sts at the seams.
Bottom Joining Round
Put the base inside the bottom of the tube, wrong sides together, with the base’s right side facing down. Join Color A in any st at a seam. Ch 1, then sc through 1 tube st and 1 st of base Rnd 8 together, all the way around. Sl st to the first sc to join. (64 sc)
The tube and the base both have 64 sts, so they match one to one. The base stays flat and the wall stays straight.
Top Border
Rnd 1: Join Color A at any seam on the top edge. Ch 1, sc in each st around. Sl st to the first sc to join. (64 sc: 64 worked 1-per-st + 0 added)
Rnd 2: Join Color B. Ch 1, sc in each st around. Sl st to join. (64 sc)
Rnd 3 (scallops): Ch 1, sc in the next st, skip 1 st, 5 dc in the next st, skip 1 st; repeat from * to * 15 more times. Sl st to the first sc to join. (16 sc + 80 dc = 96 sts; 16 scallops)
Why the math works: Each scallop uses 4 sts, and 64 ÷ 4 = 16, so the repeat ends evenly with no sts left over. That gives 2 scallops per square, so the scallops line up with the squares. The top border adds about 0.75 in (1.9 cm) and the bottom round adds about 0.25 in (0.6 cm). The total height is 4 + 0.25 + 0.75 = 5 in (12.7 cm).
Attaching the Pieces
- Feet: Place the feet at the front, about 1.5 in (3.8 cm) apart. Sew the side of each green dome to the bottom joining round, with the cream bottom level with the base. The holder then stands steady on its base and both feet.
- Arms: Flatten the top end of each arm. Sew it about 0.5 in (1.3 cm) below the scallop tips, on 2 opposite seams with 4 squares between them. Sew 1 daisy to the bottom end of each arm.
- Daisies: Center 1 daisy on each D square in the grid. Sew around the mustard center and the base of each petal, leaving the petal tips free.
Final Blocking
- Put a roll of toilet paper inside the holder so the tube keeps its shape.
- Spray the body until it is damp but not soaked.
- Shape each scallop with your fingers and pin the scallops so they stand up evenly.
- Press each daisy flat and gently spread its petals.
- Let the arms hang straight down.
- Let everything dry completely with the roll still inside.
Final Quality-Control Checklist
- [ ] All 16 squares are 2 in (5.1 cm) per side.
- [ ] The tube is 16 in (40.6 cm) around.
- [ ] The base lies flat and the joining round has 64 sc.
- [ ] The top has exactly 16 evenly spaced scallops.
- [ ] Both arms are the same length and hang at the same height.
- [ ] Both feet are level and the holder does not wobble.
- [ ] All 10 daisies are sewn on firmly and all ends are woven in.
Troubleshooting
- The squares look like rounded diamonds: In Rnd 2, check that every corner is (dc, ch 2, dc). In Rnd 3, check that each corner sp has 3 sc.
- The tube is too tight for the roll: Your squares are too small. Go up one hook size and make them again.
- The scallops flare out: Use 4 dc instead of 5 in each scallop. That makes 80 sts and still gives 16 scallops.
- The base bulges: You may have extra sts or loose tension. Count Rnd 8 again; it should have 64 sts.
- The holder tips forward: Use less stuffing in the feet, or sew them a little higher.
- The arms curl: Steam them lightly and let them hang straight while they dry.
Care
Hand wash in cool water with mild soap. Press out the water in a towel, reshape the holder over a roll, and let it dry.
Final Notes
The size of the whole holder depends on your gauge. At 4 sc per 1 in (2.5 cm), each square has 8 sts per side and measures 2 in (5.1 cm). Eight squares around gives 64 sts, or 16 in (40.6 cm). The base also ends with 64 sts, and the 64-st top edge makes 16 even scallops. Get your first square right and every other size will follow.
Happy crocheting!