

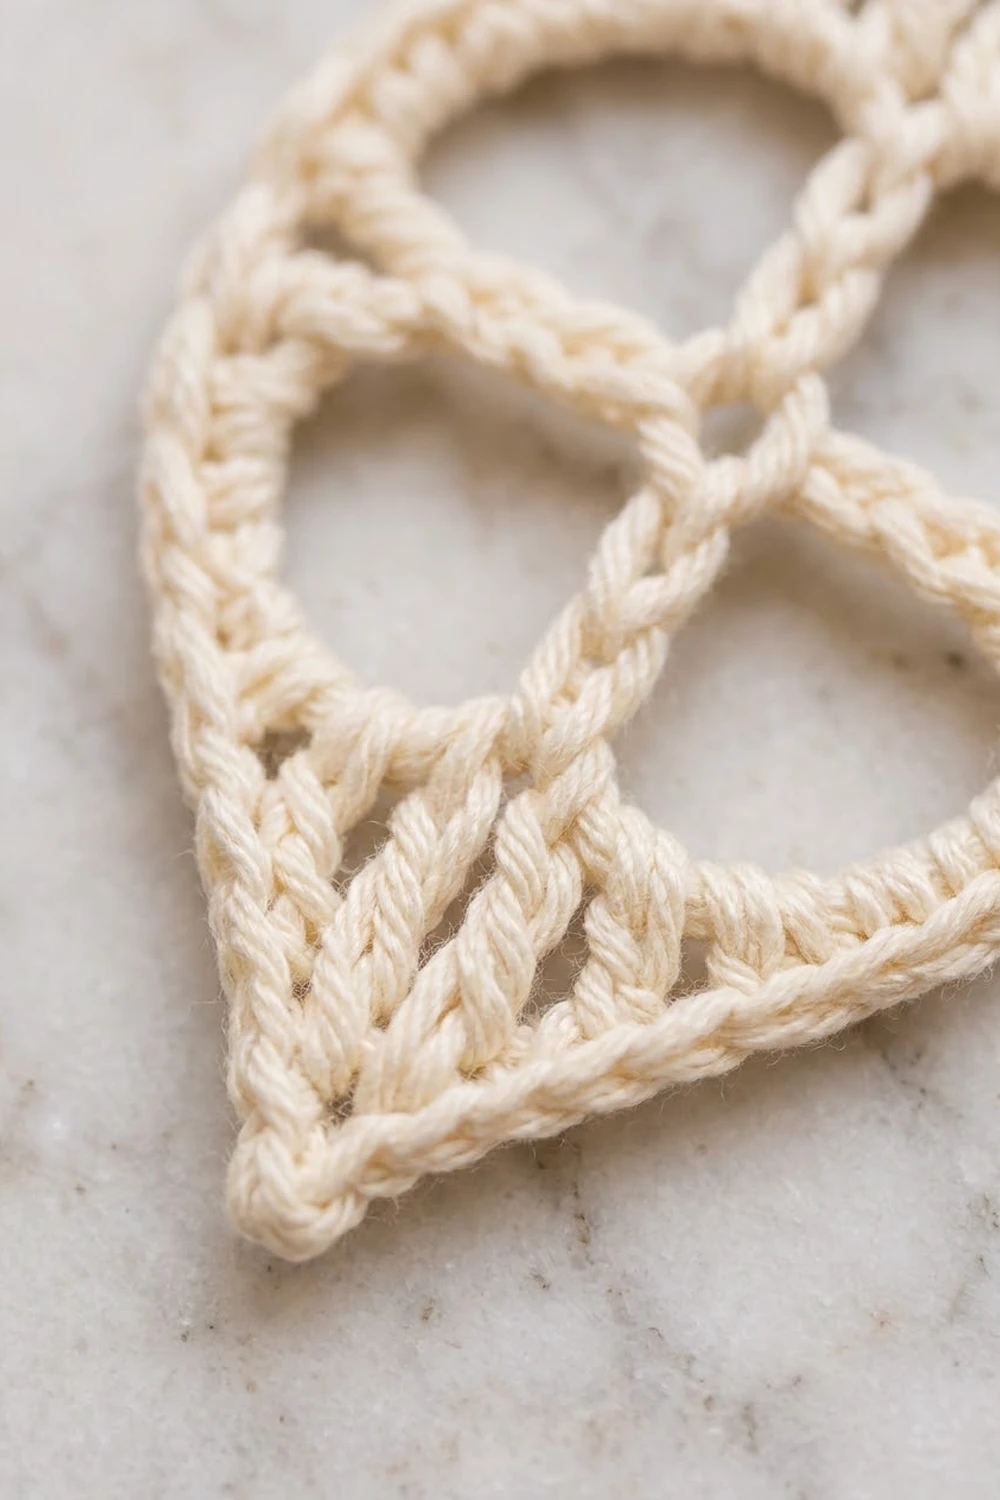
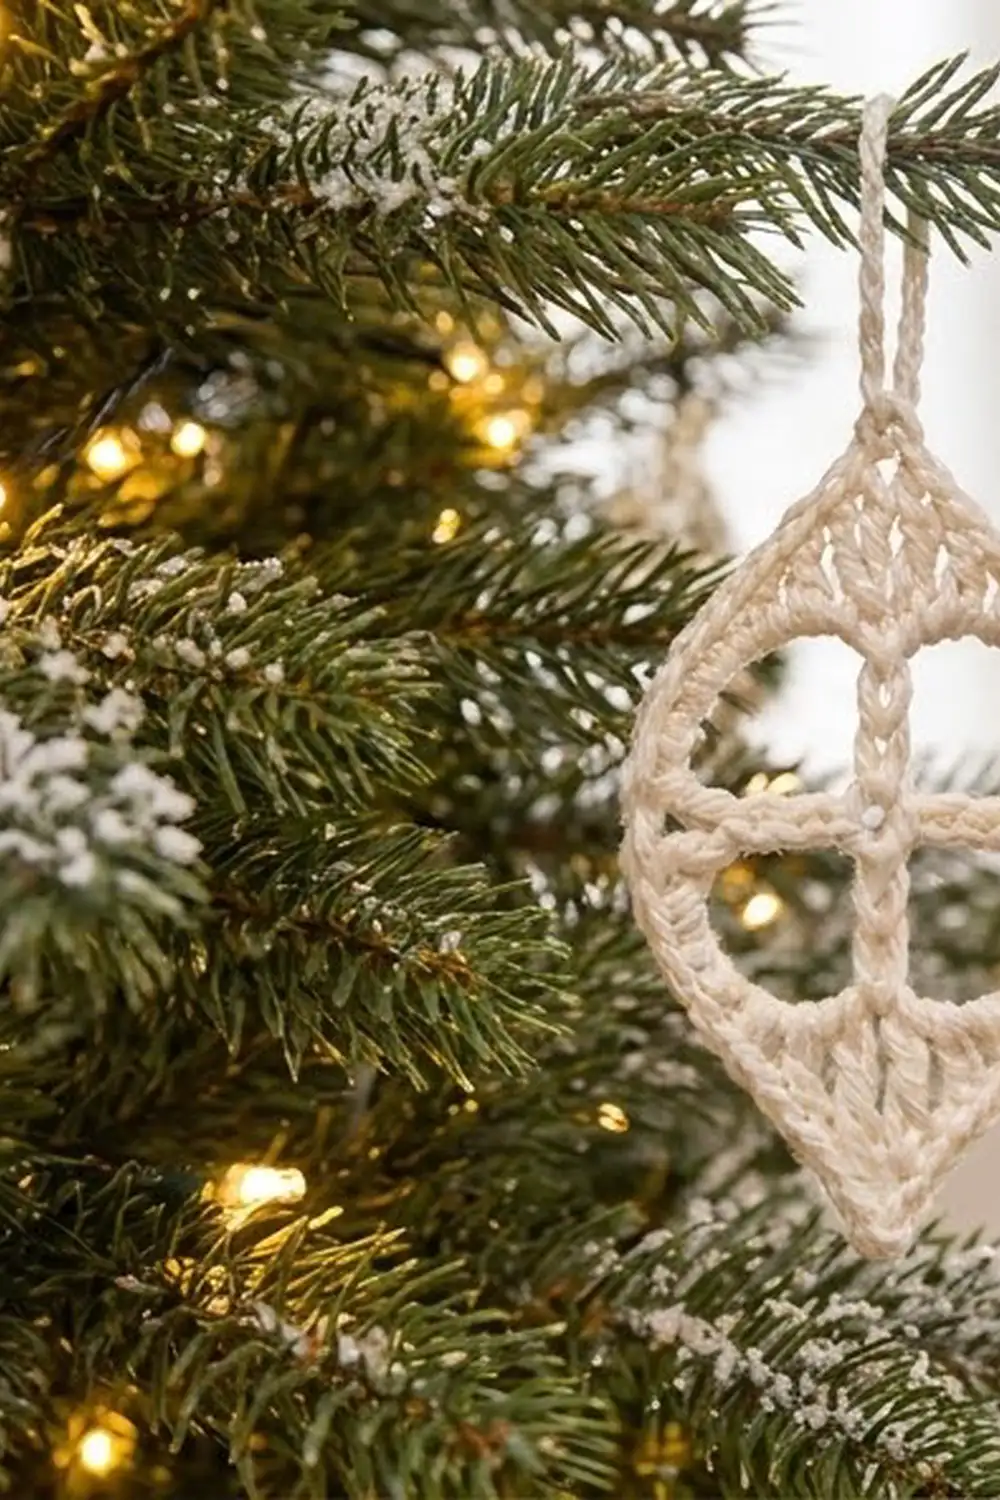
This ornament is a simple pointed oval. It has a round, windowed center frame, a slim cross through the middle, and a ribbed, pointed cap at the top and at the bottom. It looks like a mix of a vintage glass bauble and a leaf, and it stands out well against green branches and warm lights.
It is worked in one soft cream cotton, so the texture does the work. The four open windows let the tree show through. The upright double crochet columns in the caps catch the light. The style is minimal and classic, so it works well as a matching set.
This pattern uses US crochet terms. The finished ornament measures 2.5 in (6.4 cm) wide by 4.5 in (11.4 cm) tall. The hanging loop adds about 1.5 in (3.8 cm).
You make it in one piece. First you work a small center ring with four corded spokes. Then you connect the spoke tips with a chain frame and cover it with single crochet. Next you work a short, decreasing double crochet cap on the top and bottom of the frame. Last, you add one round of edging and a corded loop.
Finished Size and Construction
- Finished size: 2.5 in (6.4 cm) wide x 4.5 in (11.4 cm) tall, plus a 1.5 in (3.8 cm) loop
- Skill level: Easy
- Terminology: US crochet terms
- Yarn weight: DK (light, #3) cotton
- Hook: 3.5 mm (E-4)
- Number of pieces: 1 (single ornament)
- Layout: one stand-alone motif, hung vertically
- Piece size before edging: 2.3 in (5.8 cm) wide x 4.3 in (10.9 cm) tall
- Edging depth: about 0.1 in (0.3 cm) on every side
Materials
Yarn: Use a smooth, mercerized or combed DK cotton in cream or ivory. Cotton holds the crisp shape of the windows and caps, and it shows the stitches more clearly than fuzzy acrylic. Don’t use a splitty yarn, because you will work into chain spaces and over chains a lot.
- Cream / Ivory (Main Color): 6 g, about 13 m (14 yd) per ornament
This amount includes extra for a test piece, yarn tails, and the hanging loop. One 50 g ball is plenty for a set of six.
Tools:
- 3.5 mm (E-4) crochet hook
- Tapestry needle
- Scissors
- 2 stitch markers
- Ruler or tape measure
- Blocking mat and rust-proof pins
- Spray bottle with water
- Optional: liquid fabric stiffener or light starch spray
Abbreviations (US Terms)
- ch – chain
- sl st – slip stitch
- sc – single crochet
- dc – double crochet
- st(s) – stitch(es)
- sp – space
- RS / WS – right side / wrong side
- dc3tog – double crochet 3 together: [yarn over, insert hook in next st, pull up a loop, yarn over, pull through 2 loops] 3 times, yarn over, pull through all 4 loops on hook
- sc5tog – single crochet 5 together: [insert hook in next st, pull up a loop] 5 times, yarn over, pull through all 6 loops on hook
Special stitch: Corded spoke. Ch 6, sl st in 3rd ch from hook (this forms a ch-2 tip loop), sl st in the back bump of each of the next 3 ch, then sl st back into the same sc you started from. This makes a firm, rope-like spoke 4 ch long with a small loop at the tip.
Gauge and Checkpoints
Gauge: 10 sc = 2 in (5.1 cm) in DK cotton with a 3.5 mm hook. A dc row is about 0.4 in (1.0 cm) tall.
Make one full ornament as your test piece first. It uses very little yarn, and much of this design is worked over chains, so a full ornament tells you more than a flat swatch.
Checkpoints:
- After Round 1: the ring measures about 0.4 in (1.0 cm) across.
- After Round 2: spoke tip to spoke tip is about 2.0 in (5.1 cm), both across and top to bottom.
- After Round 4: the round body is about 2.3 in (5.8 cm) across.
- After both caps: tip to tip is about 4.3 in (10.9 cm).
- After the edging: 2.5 in (6.4 cm) x 4.5 in (11.4 cm).
If your piece is too big: go down to a 3.25 mm or 3 mm hook and keep your chains snug. If it is too small: go up to a 3.75 mm or 4 mm hook. Loose chains in Round 3 are the most common reason the body grows, so check that round first.
Pattern
Round 1: Center Ring
Ch 4, sl st in the first ch to form a ring.
Ch 1, work 8 sc in the ring, sl st in the first sc to join. (8 sc)
Mark sc 1 as the top of the ornament.
Round 2: Corded Spokes
This round makes the cross. The spokes go into sc 1 (top), sc 3 (right), sc 5 (bottom), and sc 7 (left).
Work a corded spoke in the same sc as the join (sc 1). Sl st in the next sc, sl st in the next sc, then work a corded spoke in that same sc. Repeat from * to * 2 more times. Sl st in sc 8, then sl st in the first sc.
Count: 4 spokes, each 4 ch long with a ch-2 tip loop. The 8 ring stitches stay the same.
Fasten off and weave in the tail. Straighten the spokes into an even cross. Spoke tip to spoke tip should measure 2.0 in (5.1 cm).
Round 3: Chain Frame
With the RS facing, join yarn in the ch-2 tip loop of the top spoke.
Ch 1, sc in the same tip loop. Ch 9, sc in the ch-2 tip loop of the next spoke. Repeat from * to * 2 more times (right, bottom, left). Ch 9, sl st in the first sc to join.
(4 sc + 4 ch-9 spaces)
Keep the chains even and not tight. Each ch-9 should lie in a gentle quarter-circle without pulling the spokes into a square.
Round 4: Frame Cover
Ch 1, sc in the same st as the join. Work 11 sc in the next ch-9 sp, then sc in the next sc. Repeat from * to * 2 more times. Work 11 sc in the last ch-9 sp, then sl st in the first sc to join.
Count: (4 sc worked 1-per-existing-sc) + (44 sc worked into the four ch-9 spaces) = 48 sc.
Number the stitches starting at the top. St 1 sits on the top spoke, st 13 on the right spoke, st 25 on the bottom spoke, and st 37 on the left spoke, with 11 sts in each arc between them. Working 11 sc over 9 ch adds 2 extra sts per arc, which gives the outer edge enough length to curve smoothly.
Fasten off. The body should now be a round frame 2.3 in (5.8 cm) across, with four open quarter-circle windows.
Top Cap
The cap is worked in rows over 9 frame sts centered on st 1: sts 45, 46, 47, 48, 1, 2, 3, 4, and 5. Place a marker in st 45 and in st 5.
Row 1 (RS): Join yarn in st 45. Ch 3 (counts as dc), dc in each of the next 8 sts. (9 dc)
The base of the cap is about 1.8 in (4.6 cm) along the frame.
Row 2 (WS): Ch 2 (does not count as a st), turn. Dc3tog over the first 3 sts, dc in each of the next 3 sts, dc3tog over the last 3 sts. The last st is the top of the ch-3. (5 sts)
Row 3 (RS): Ch 1, turn. Sc5tog over all 5 sts. (1 st)
Fasten off. The center dc of Row 1 sits on st 1, right above the vertical spoke, so the middle rib continues the line of the cross. The stacked dc form the upright ribbed columns that meet at the point. The cap rises about 0.9 in (2.3 cm) above the frame.
Bottom Cap
Work the bottom cap the same way over the 9 sts centered on st 25, which are sts 21 through 29.
Row 1 (RS): Join yarn in st 21. Ch 3 (counts as dc), dc in each of the next 8 sts. (9 dc)
Row 2 (WS): Ch 2, turn. Dc3tog, dc in each of the next 3 sts, dc3tog. (5 sts)
Row 3 (RS): Ch 1, turn. Sc5tog. (1 st)
Fasten off. Tip to tip should now measure about 4.3 in (10.9 cm).
Edging
Edging gauge: Same as the main gauge, 5 sc per 1 in (2.5 cm). The edging adds about 0.1 in (0.3 cm) on every side.
The caps cover 18 of the 48 frame sts (9 + 9), which leaves 30 sts. That is 15 sts on the right side (sts 6–20) and 15 sts on the left side (sts 30–44).
Round 5 (RS): Join yarn in the sc5tog at the top tip.
- Top tip: Ch 1, 3 sc in the sc5tog. (3 sc)
- Top cap, right edge: 1 sc in the side of Row 3, 2 sc in the side of Row 2, 2 sc in the side of Row 1. (5 sc)
- Right frame: sc in each of sts 6–20. (15 sc)
- Bottom cap, right edge: 2 sc in the side of Row 1, 2 sc in the side of Row 2, 1 sc in the side of Row 3. (5 sc)
- Bottom tip: 3 sc in the sc5tog. (3 sc)
- Bottom cap, left edge: 1 sc in the side of Row 3, 2 sc in the side of Row 2, 2 sc in the side of Row 1. (5 sc)
- Left frame: sc in each of sts 30–44. (15 sc)
- Top cap, left edge: 2 sc in the side of Row 1, 2 sc in the side of Row 2, 1 sc in the side of Row 3. (5 sc)
Sl st in the first sc to join.
Count: 3 + 5 + 15 + 5 + 3 + 5 + 15 + 5 = 56 sc. Each long side has 25 sc (5 + 15 + 5) between the two 3-sc tips.
Why the math works: A dc row end is about as tall as 2 sc, and an sc row end is as tall as 1 sc. That means 5 sc fit along each cap side without ruffling. The frame sts already have the right length, so you work them 1-for-1. Working 3 sc at each tip keeps the points sharp. At 5 sc per inch, 25 sc covers about 5 in (12.7 cm). Add the tips and you get about 5.6 in (14.2 cm), which is the length of one curved side of a 2.5 in (6.4 cm) x 4.5 in (11.4 cm) pointed oval.
Hanging Loop
Don’t fasten off. Sl st in the center sc of the top tip, which is the 2nd sc of the 3-sc group. Ch 20, then sl st in the same center sc to form the loop. Sl st in each of the 20 ch around the loop, then sl st in the center sc again. (20 sl st)
This makes a firm corded loop about 1.5 in (3.8 cm) tall. Fasten off, leaving a 6 in (15.2 cm) tail, and weave it down into the cap.
Final Blocking
- Weave in all tails along the frame or inside the cap columns. Don’t carry them across the windows.
- Spray the ornament until it is evenly damp, or dip it in water and press it in a towel.
- Pin it flat with the RS up. Pin the top and bottom tips first, 4.5 in (11.4 cm) apart.
- Pin the widest points of the sides 2.5 in (6.4 cm) apart, in line with the side spokes.
- Put a pin in each window to round the openings and straighten the cross.
- Smooth each cap so the dc columns stand straight and meet at the point.
- If you like, add fabric stiffener or starch spray.
- Let it dry completely, at least 6 hours, before you unpin it.
Final Quality-Control Checklist
- The center ring is round and about 0.4 in (1.0 cm) across.
- All four spokes are the same length and form a straight cross.
- Round 4 has 48 sc, with 11 sc in each arc.
- Each cap has 9 / 5 / 1 sts, and its center column lines up with the vertical spoke.
- The edging has 56 sc, with 25 on each side between the tips.
- The size is 2.5 in (6.4 cm) x 4.5 in (11.4 cm), and the loop is about 1.5 in (3.8 cm).
- No tails cross the windows.
Troubleshooting
The frame looks square: The Round 3 chains are too tight. Rework that round more loosely or with a hook one size larger.
The frame ripples or cups: There are extra sc in Round 4. Re-count to 11 per arc.
The caps flare: You either missed a dc3tog or counted the turning ch as a st in Row 2. Re-count to 5 sts.
The tips are blunt: Check that you worked 3 sc into each sc5tog, and pin the tips firmly when you block.
The cross is off-center: The spokes must come from sc 1, 3, 5, and 7.
The ornament curls: Block it again while damp, and use stiffener if needed.
Care
Hand wash in cool water with mild soap, press out the water in a towel, and dry flat, pinned to shape. Store flat or hanging so the caps don’t get crushed.
Final Notes
The measurement chain is short:
- 0.4 in (1.0 cm) ring
- 2.0 in (5.1 cm) spoke cross
- 2.3 in (5.8 cm) round frame of 48 sc
- 4.3 in (10.9 cm) tip to tip with both caps
- 2.5 in (6.4 cm) x 4.5 in (11.4 cm) after the 56-sc edging, plus a 1.5 in (3.8 cm) loop
If each checkpoint matches, the finished ornament will too. Make one, check it, then make as many as your tree needs.
Happy crocheting!