

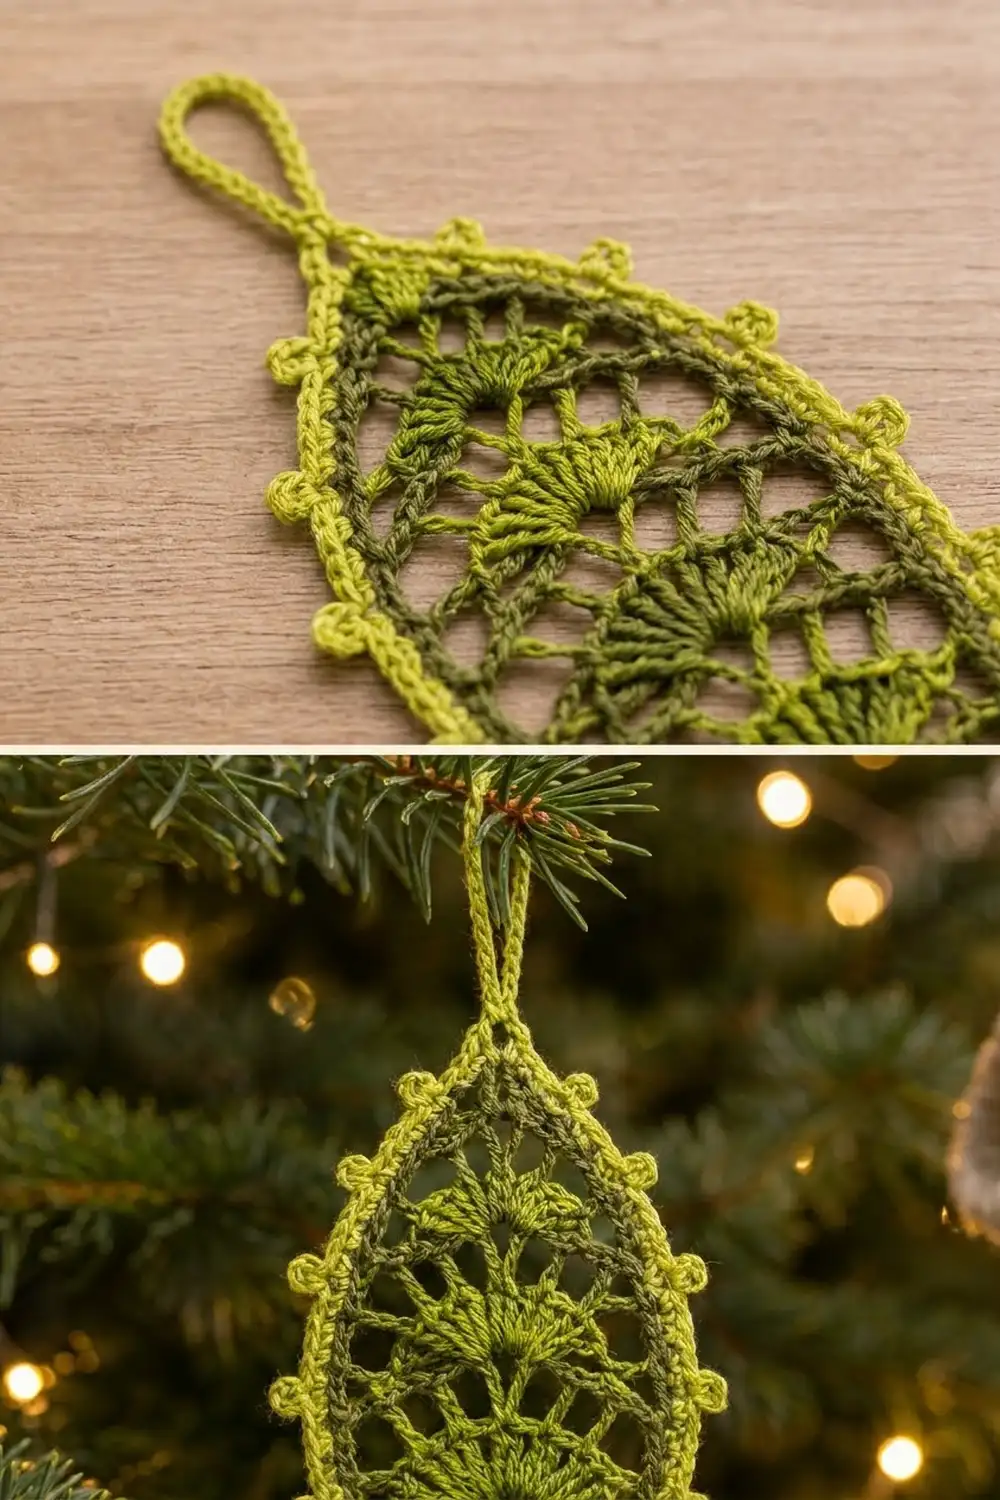
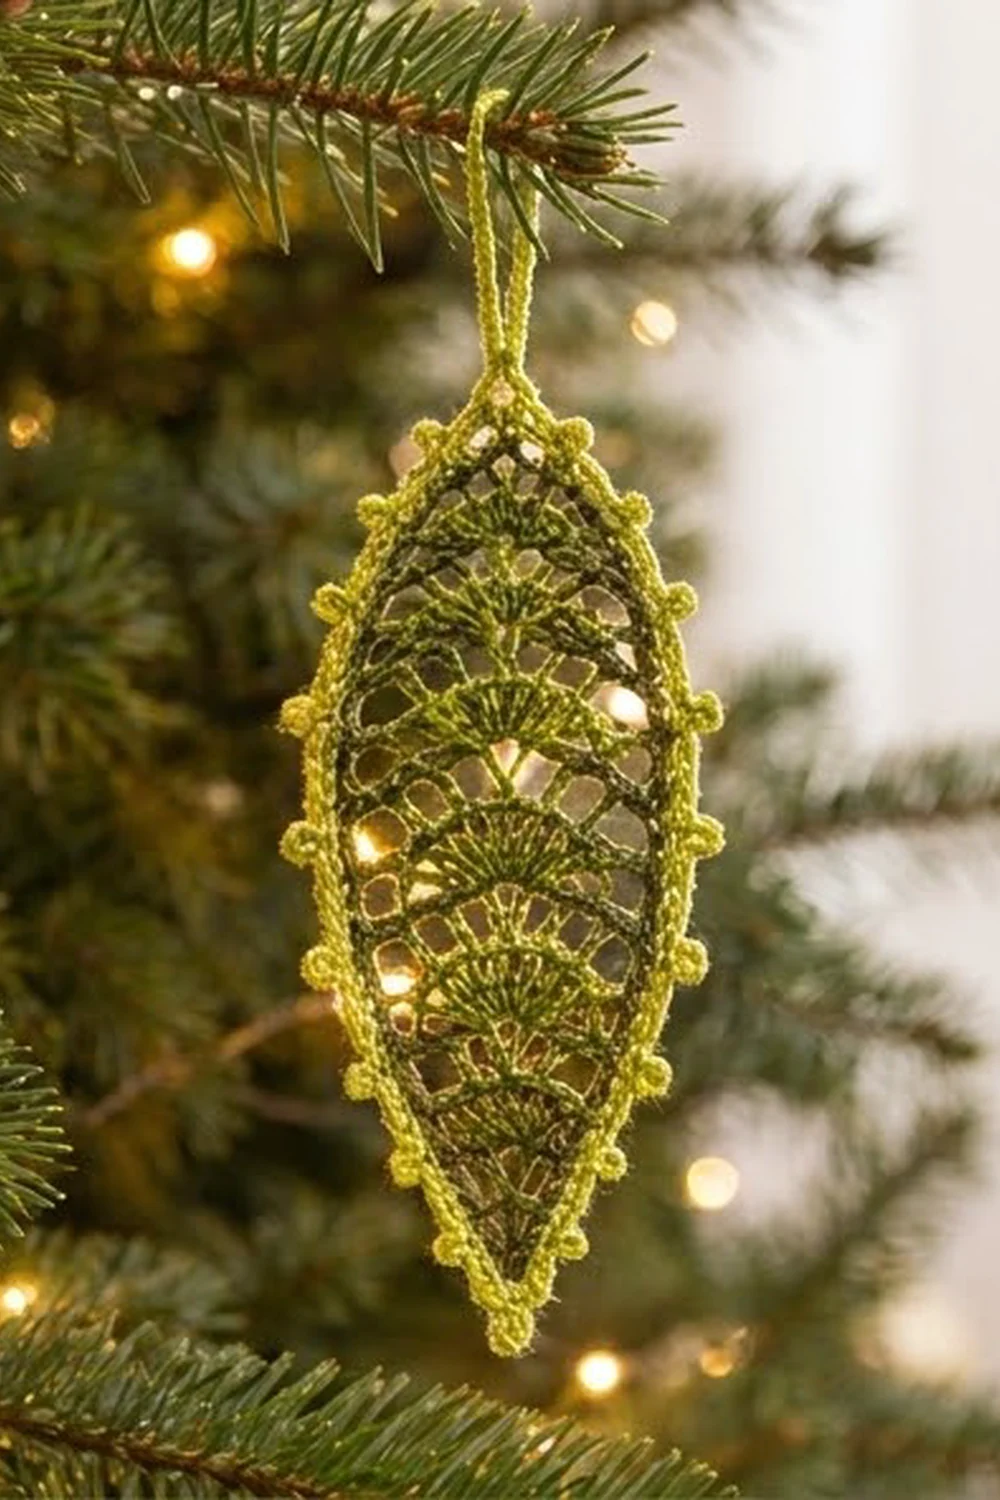
The Evergreen Fan Leaf is a slim, lacy ornament shaped like a pointed leaf or a lantern. Seven openwork fans sit one inside the next from the bottom point to the top point, so the ornament looks like a stylized fir cone or a glowing leaf when it hangs in front of tree lights.
It uses two greens. Dark olive and bright lime alternate fan by fan. An olive chain frame holds the fans in shape, and a lime picot border gives the edge a beaded look. The style is light and airy, and works on a tree, a gift tag, or a window garland hook.
This pattern uses US crochet terms. The finished ornament measures 6 in (15.2 cm) tall by 2.4 in (6.1 cm) wide. The hanging loop adds 1.5 in (3.8 cm) above the top point.
Construction overview: You work seven fans of treble crochet, each one into the center space of the fan below. Then you work one olive frame round of chains and single crochets that anchors each fan tip and forms the two points. Last, you work one lime border round with picots and the hanging loop.
Finished Size and Construction
- Finished size: 6 in (15.2 cm) tall x 2.4 in (6.1 cm) wide, not including the loop
- Hanging loop: 1.5 in (3.8 cm)
- Skill level: Easy-intermediate
- Terminology: US crochet terms
- Yarn weight: Fingering / super fine (#1) cotton
- Hook: 2.75 mm (US C-2)
- Number of pieces: 1
- Layout: Single standalone motif, nothing to assemble
- Piece size before border: 5.5 in (14.0 cm) tall x 2 in (5.1 cm) wide
- Border depth: 0.2 in (0.5 cm) on each side, not counting the picots
Materials
Yarn: Use a smooth, mercerized fingering-weight cotton. Cotton holds the fan shapes well after blocking and doesn’t fuzz, so the open spaces stay crisp. Avoid fuzzy or very stretchy yarns because the lace will lose its outline.
- Color A, dark olive: about 4 g (about 14 m), for fans 1, 3, 5, 7 and the frame round
- Color B, bright lime: about 4 g (about 14 m), for fans 2, 4, 6 and the border round
The quantities include a safety margin for gauge swatching and weaving in ends.
Tools:
- 2.75 mm (US C-2) crochet hook
- Tapestry needle
- Small scissors
- Rust-proof pins
- Foam blocking mat
- Spray bottle with water
- Optional: fabric stiffener or a light starch solution
Abbreviations (US Terms)
- ch – chain
- sl st – slip stitch
- sc – single crochet
- tr – treble crochet (yarn over twice)
- sp – space
- st(s) – stitch(es)
- RS – right side
- beg – beginning
Special stitches:
- Picot: Ch 3, sl st in 3rd ch from hook.
- Standing sc: With a slipknot on the hook, insert the hook into the stitch, pull up a loop, yarn over and pull through both loops.
Gauge and Checkpoints
Gauge in lace is measured by finished shapes, not by a square swatch. Make Fans 1 through 4 as your test. If they match the checkpoints, keep going in the same piece.
- Stitch height: 1 tr = 0.65 in (1.7 cm) tall
- Fan 1 (6 tr), tip to tip: 0.75 in (1.9 cm)
- Fan 2 (8 tr), tip to tip: 1.25 in (3.2 cm)
- Fan 3 (10 tr), tip to tip: 1.5 in (3.8 cm)
- Fan 4 (12 tr), tip to tip: 1.75 in (4.4 cm)
- Height after Fan 4, from the ring to the top center of Fan 4: 2.75 in (7.0 cm)
- Height after Fan 7: 4.7 in (11.9 cm)
Measure with the fan lightly pressed flat, not stretched.
If your fans are too big: Change to a 2.5 mm hook, or pull the yarn over more snugly on each tr.
If your fans are too small: Change to a 3.0 mm hook. Check that you are not pulling the ch-1 spaces tight. They should be open.
Fans
All fans are worked with the RS facing. Never turn. Each fan is fastened off and the next color is joined in the center space. Leave tails of about 4 in (10.2 cm) and weave them in along the tr stems when you finish.
Fan 1 (Color A):
Ch 5, sl st in first ch to form a ring.
Ch 4 (counts as tr), [ch 1, tr in ring] 5 times.
Count: 6 tr, 5 ch-1 sps. The center sp is the 3rd sp. Fasten off.
Fan 2 (Color B):
Join B with a sl st in the 3rd (center) ch-1 sp of Fan 1.
Ch 4 (counts as tr), [ch 1, tr in same sp] 7 times.
Count: 8 tr, 7 ch-1 sps. The center sp is the 4th sp. Fasten off.
Fan 3 (Color A):
Join A with a sl st in the 4th (center) ch-1 sp of Fan 2.
Ch 4 (counts as tr), [ch 1, tr in same sp] 9 times.
Count: 10 tr, 9 ch-1 sps. The center sp is the 5th sp. Fasten off.
Fan 4 (Color B), the widest fan:
Join B with a sl st in the 5th (center) ch-1 sp of Fan 3.
Ch 4 (counts as tr), [ch 1, tr in same sp] 11 times.
Count: 12 tr, 11 ch-1 sps. The center sp is the 6th sp. Fasten off.
Checkpoint: Fan 4 measures 1.75 in (4.4 cm) tip to tip. The piece measures 2.75 in (7.0 cm) from the ring to the top center of Fan 4.
Fan 5 (Color A):
Join A with a sl st in the 6th (center) ch-1 sp of Fan 4.
Ch 4 (counts as tr), [ch 1, tr in same sp] 9 times.
Count: 10 tr, 9 ch-1 sps. The center sp is the 5th sp. Fasten off.
Fan 6 (Color B):
Join B with a sl st in the 5th (center) ch-1 sp of Fan 5.
Ch 4 (counts as tr), [ch 1, tr in same sp] 7 times.
Count: 8 tr, 7 ch-1 sps. The center sp is the 4th sp. Fasten off.
Fan 7 (Color A):
Join A with a sl st in the 4th (center) ch-1 sp of Fan 6.
Ch 4 (counts as tr), [ch 1, tr in same sp] 5 times.
Count: 6 tr, 5 ch-1 sps. The center sp is the 3rd sp. Fasten off.
Checkpoint: The column of fans measures 4.7 in (11.9 cm) from the ring to the top center of Fan 7. The fan sizes run 6, 8, 10, 12, 10, 8, 6 tr, so the outline is already symmetrical.
Each fan’s outer stitches lean sideways over the fan below. This overlap is what creates the nested look. Weave in all fan tails now, before the frame round, so they don’t get caught in the chains.
Frame Round (Color A)
This round anchors the 14 fan tips (2 per fan) and builds the top and bottom points. Every fan has one tip on each side: the top of its beg ch-4 on one side and the top of its last tr on the other.
Top point: Join A with a sl st in the 3rd (center) ch-1 sp of Fan 7. Ch 6, sc in 2nd ch from hook. This makes a stem of 4 ch topped by the top-point sc.
Side 1: Ch 4, sc in the tip of Fan 7. [Ch 5, sc in the tip of the next fan down] 6 times, through Fan 1.
Bottom point: Ch 4, sc around the ring, between the bases of the first and last tr of Fan 1.
Side 2: Ch 4, sc in the other tip of Fan 1. [Ch 5, sc in the tip of the next fan up] 6 times, through Fan 7.
Close: Ch 4, sl st in the top-point sc. Fasten off.
Round count:
- 16 sc: 1 top point, 7 on Side 1, 1 bottom point, 7 on Side 2
- 76 ch in 16 arcs
- Each side has 1 ch-4 arc, 6 ch-5 arcs and 1 ch-4 arc, which is 4 + 30 + 4 = 38 ch per side
Tension tip: Keep the chains relaxed but even. If one ch-5 arc is pulled tight, that fan’s tip will curl inward.
Checkpoint: Lay the piece flat without stretching it. It measures 5.5 in (14.0 cm) from point to point and 2 in (5.1 cm) across at Fan 4.
Border (Color B)
Border gauge: 9 sc = 1 in (2.5 cm) along the edge. Each side of the frame is about 5.9 in (15.0 cm) along its curve. That calls for about 53 sc per side, which is exactly what the counts below give.
Border round:
- Join B with a standing sc in the top-point sc. Ch 20, sc in the same sc. This makes the hanging loop with 2 sc at the top point.
- Side 1: 5 sc in the ch-4 arc. In the next tip sc work (sc, picot). [6 sc in the next ch-5 arc, then (sc, picot) in the next tip sc] 6 times. 5 sc in the ch-4 arc.
- Bottom point: (sc, picot, sc) in the bottom-point sc.
- Side 2: 5 sc in the ch-4 arc. (sc, picot) in the next tip sc. [6 sc in the next ch-5 arc, then (sc, picot) in the next tip sc] 6 times. 5 sc in the last ch-4 arc.
- Sl st in the first sc. Fasten off.
Counts per side: 5 + 7 + 36 + 5 = 53 sc, plus 7 picots. Those numbers are 2 ch-4 arcs with 5 sc each (10 sc), 6 ch-5 arcs with 6 sc each (36 sc), and 7 tip sc with 1 sc each (7 sc).
Round total: 2 top sc + 53 + 2 bottom sc + 53 = 110 sc, plus 15 picots and 1 ch-20 hanging loop.
Why the math works: Each chain arc gets one more sc than it has chains, so 5 sc in a ch-4 and 6 sc in a ch-5. Sc stitches are slightly narrower than chains, so this one extra stitch per arc lets the border lie flat around the curves without ruffling or cupping. The picots sit on the tip stitches, so they line up with the fans, seven on each side, and one marks the bottom point. The doubled sc at each point keeps the points sharp.
Final size: The 0.2 in (0.5 cm) border on every edge brings the ornament to 5.9 in (15.0 cm) tall by 2.4 in (6.1 cm) wide. With the picots it reads as about 6 in (15.2 cm). Including the loop, the whole thing hangs 7.4 in (18.8 cm) long.
Final Blocking
- Weave in all remaining tails along the border sc, not through the open lace.
- Wet the ornament fully with cool water, or dip it in diluted fabric stiffener if you want a firm finish.
- Press out the excess water in a towel. Don’t wring it.
- Lay it on the blocking mat. Pin the bottom point and top point 5.9 in (15.0 cm) apart.
- Pin the widest part at Fan 4 to 2.4 in (6.1 cm) across.
- Pin each picot outward so the curve is smooth on both sides and the picots look like round beads.
- Use your fingers to spread each fan so its tr stems fan out evenly and the ch-1 spaces are open.
- Pin the hanging loop straight up.
- Let it dry completely, at least 12 hours, before unpinning.
Final Quality-Control Checklist
- 7 fans with counts of 6, 8, 10, 12, 10, 8, 6 tr
- Fan colors alternate olive, lime, olive, lime, olive, lime, olive
- Each fan starts in the center ch-1 space of the fan below
- Frame round has 16 sc and 76 ch, with the same layout on both sides
- Border has 53 sc per side, 110 sc in total, and 15 picots
- Both points are sharp and centered on the column of fans
- Size is 5.9 in (15.0 cm) x 2.4 in (6.1 cm), plus a 1.5 in (3.8 cm) loop
- All tails are woven in and trimmed out of sight
Troubleshooting
Fans look crowded or ruffled: Your tension may be tight around the ch-1 spaces. Loosen your chains, or go up 0.25 mm in hook size.
The ornament leans to one side: You may have joined a fan off-center. Count the ch-1 spaces again and rework that fan into the true center space.
Edges cup inward: The frame chains are too short or tight. Rework the frame round with looser chains, or add 1 ch to each ch-5 arc and 1 sc to each matching border arc.
Border ripples: You worked too many sc into the arcs. Check that you have 5 sc per ch-4 arc and 6 sc per ch-5 arc.
Points are blunt: The ch-4 arcs at the points were pulled loose. Pin the points firmly during blocking.
Loop twists: Before you sc to close the loop, check that the ch-20 is not twisted.
Care
Hand wash in cool water with mild soap, press dry in a towel, and reshape flat. If you used stiffener, re-block after washing to restore the shape.
Final Notes
The measurement chain is simple to follow:
- tr stitches at 0.65 in (1.7 cm) tall
- Fan 4 at 1.75 in (4.4 cm) tip to tip
- Seven fans reaching 4.7 in (11.9 cm)
- Frame round giving 5.5 in x 2 in (14.0 cm x 5.1 cm)
- Border at 9 sc per inch giving 5.9 in x 2.4 in (15.0 cm x 6.1 cm)
If each checkpoint matches, the final ornament will match too. Make one in each color balance, with more olive or more lime, for a matching pair on the tree.
Happy crocheting!