

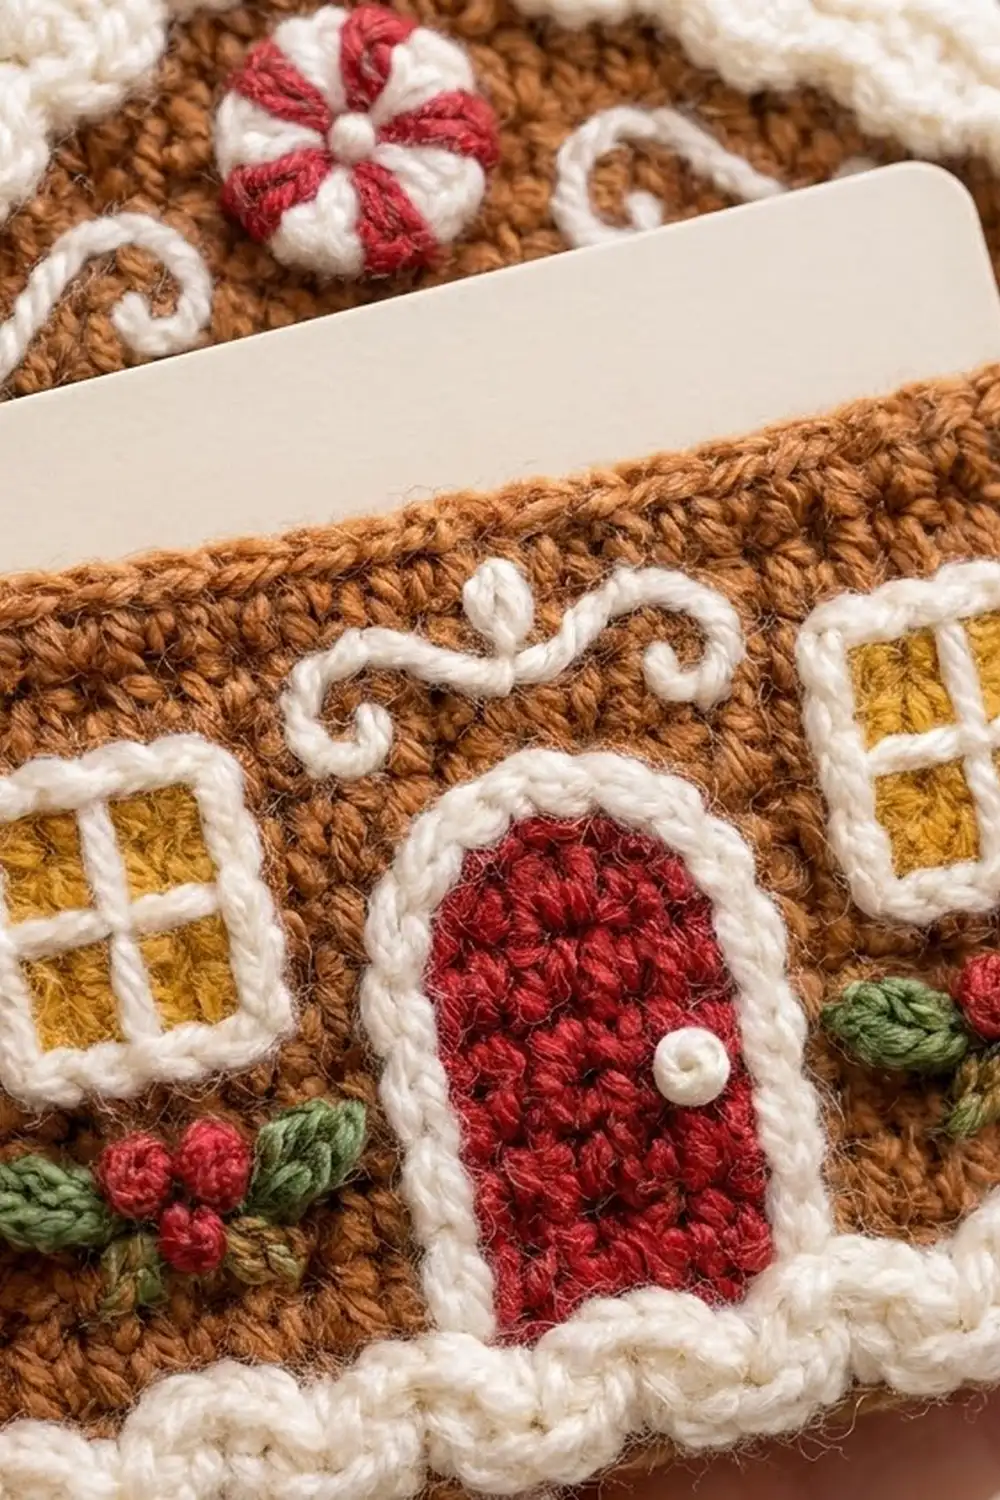
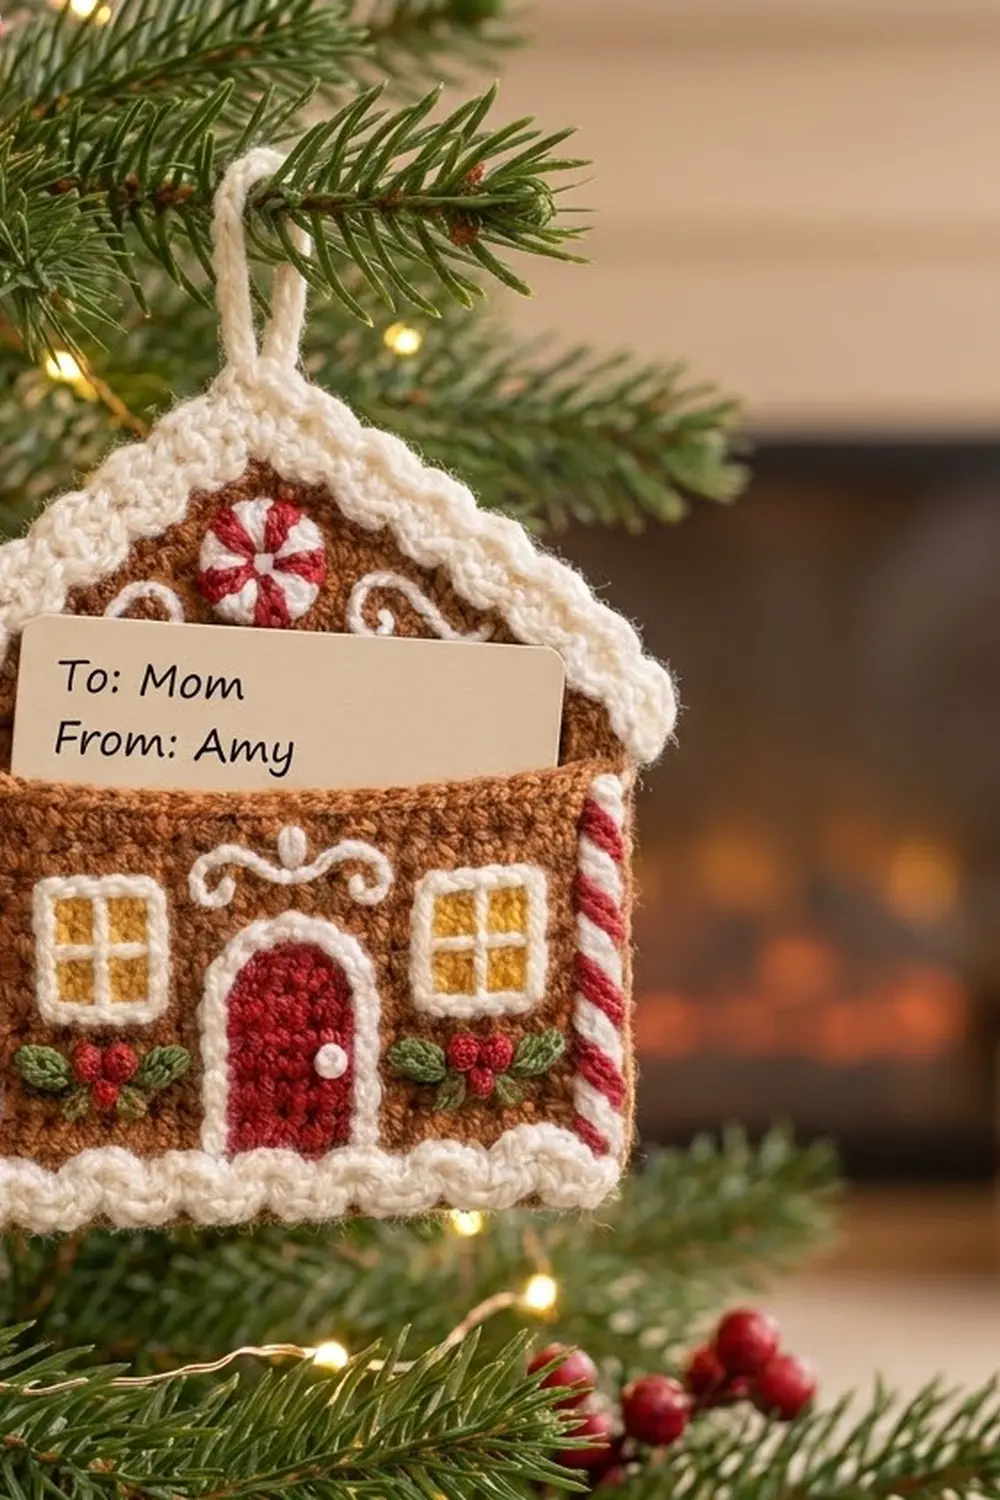
This little gingerbread cottage holds a gift card in its front pocket, with the top of the card showing above the edge. It has a caramel-brown body, bobbly cream icing on the roof and base, a red arched door, golden windows, holly sprigs, and a peppermint candy at the peak. Twisted candy-cane stripes run up both sides of the pocket.
The colors are classic gingerbread: brown, cream, red, mustard gold, and green. It looks like a cozy, hand-iced cookie, but it’s sturdy enough to hang on a tree or tuck into a stocking.
This pattern uses US crochet terms. The finished holder measures about 4.7 in (11.9 cm) wide at the eaves and 4.25 in (10.8 cm) tall, not counting the loop. With the loop it’s about 5.5 in (14.0 cm) tall.
You crochet a house-shaped back panel and a rectangular front pocket in single crochet, then add small appliqués and embroidery to the pocket. Next you seam the pocket to the back and add the cream icing bands, which close the bottom of the pocket. Last come the hanging loop and the candy-cane cords.
Finished Size and Construction
- Finished size: 4.7 in (11.9 cm) wide x 4.25 in (10.8 cm) tall, plus a 1.25 in (3.2 cm) loop
- Skill level: Easy
- Terminology: US
- Yarn weight: DK / light (3)
- Hook: 3.25 mm (US D/3)
- Number of pieces: 2 main panels (back and pocket), plus small appliqués
- Layout: pocket sewn to the lower front of the back panel, open at the top
- Back panel size: 4.2 in (10.7 cm) wide x 3.5 in (8.9 cm) tall
- Pocket size: 4.2 in (10.7 cm) wide x about 1 2/3 in (4.2 cm) tall
- Size before icing bands: 4.2 in (10.7 cm) x 3.5 in (8.9 cm)
- Icing band depth: about 3/8 in (1.0 cm)
Materials
Use a smooth DK cotton or cotton blend with good stitch definition. Soft acrylic also works, but cotton keeps the panels flat and crisp. These quantities assume about 2.4 m per gram (120 m per 50 g).
- Brown (gingerbread): 12 g / 29 m
- Cream (icing, trims, stripes): 8 g / 19 m
- Red (door, berries, peppermint, stripes): 3 g / 7 m
- Mustard gold (windows): 2 g / 5 m
- Green (holly): 2 g / 5 m
All quantities include a safety margin.
Tools:
– 3.25 mm (US D/3) crochet hook
– Tapestry needle
– Scissors
– Stitch markers
– A standard gift card, 3.375 x 2.125 in (8.6 x 5.4 cm), for test fitting
– Pins and a blocking mat
Abbreviations (US Terms)
- ch – chain
- sl st – slip stitch
- sc – single crochet
- hdc – half double crochet
- sc2tog – single crochet 2 together
- st(s) – stitch(es)
- sp – space
- RS / WS – right side / wrong side
Special stitch – Puff: (Yarn over, insert hook in st, yarn over, pull up a loop) 3 times, then yarn over and draw through all 7 loops on hook. You don’t need a closing chain. Each puff counts as 1 st.
Gauge and Checkpoints
Gauge: 20 sc and 24 rows = 4 in (10.2 cm), which works out to 5 sts and 6 rows per 1 in (2.5 cm).
Make the back panel first and use it as your gauge test. It’s small, and every other measurement depends on it.
Checkpoints:
– Back panel after Row 12: 4.2 in (10.7 cm) wide x 2 in (5.1 cm) tall
– Back panel after Row 21: 3.5 in (8.9 cm) tall at the peak
– Pocket after Row 10: 4.2 in (10.7 cm) wide x about 1 2/3 in (4.2 cm) tall
– A gift card should lie flat on the back panel with at least 1/4 in (0.6 cm) of brown showing on each side
If your piece is too big: go down a half size to 3.0 mm.
If your piece is too small: go up to 3.5 mm. A card wider than the back panel won’t fit, so don’t skip this check.
Back Panel
Use brown.
Row 1 (RS): Ch 22, sc in 2nd ch from hook and in each ch across. (21 sts)
Rows 2–12: Ch 1, turn, sc in each st across. (21 sts)
Checkpoint: 4.2 in (10.7 cm) wide x 2 in (5.1 cm) tall.
Roof shaping. Each roof row is a decrease row and loses 1 st at each end.
Row 13: Ch 1, turn, sc2tog, sc in each st to last 2 sts, sc2tog. (19 sts)
Row 14: Repeat Row 13. (17 sts)
Row 15: Repeat Row 13. (15 sts)
Row 16: Repeat Row 13. (13 sts)
Row 17: Repeat Row 13. (11 sts)
Row 18: Repeat Row 13. (9 sts)
Row 19: Repeat Row 13. (7 sts)
Row 20: Repeat Row 13. (5 sts)
Row 21: Ch 1, turn, sc2tog, sc in next st, sc2tog. (3 sts)
Fasten off and weave in the ends. The center st of Row 21 is the roof peak. The roof rises 1.5 in (3.8 cm) over 9 rows, and the panel now measures 3.5 in (8.9 cm) tall.
Front Pocket
Use brown.
Row 1 (RS): Ch 22, sc in 2nd ch from hook and in each ch across. (21 sts)
Rows 2–10: Ch 1, turn, sc in each st across. (21 sts)
Fasten off. The pocket measures 4.2 in (10.7 cm) x about 1 2/3 in (4.2 cm). It’s 2 rows shorter than the back wall, so about 1/2 in (1.3 cm) of a standard card shows above it.
Appliqués and Embroidery
Leave a 6 in (15.2 cm) tail on each appliqué for sewing.
Door (make 1)
Use red.
Row 1: Ch 5, sc in 2nd ch from hook and in each ch across. (4 sts)
Rows 2–6: Ch 1, turn, sc in each st across. (4 sts)
Row 7: Ch 1, turn, sc2tog twice. (2 sts) This row rounds the top into an arch.
Fasten off red.
Door trim: Join cream at the bottom right corner. Work 6 sc up the right side (1 in each row-end of Rows 1–6), 2 sc in the Row 7 row-end, 2 sc in each of the 2 sts of Row 7 (4 sc), 2 sc in the other Row 7 row-end, and 6 sc down the left side. (20 sc)
Fasten off. Leave the bottom edge untrimmed. With trim, the door is about 1.2 in (3.0 cm) wide x 1.3 in (3.3 cm) tall. Make a cream French knot for the doorknob on the right side, 2 rows below the arch.
Windows (make 2)
Use mustard gold.
Row 1: Ch 4, sc in 2nd ch from hook and in each ch across. (3 sts)
Rows 2–4: Ch 1, turn, sc in each st across. (3 sts)
Fasten off gold.
Frame round: Join cream in the first st of Row 4. Work 3 sc in that st, sc in the next st, and 3 sc in the last st (7 sts across the top). Work 1 sc in each row-end of Rows 3 and 2 (2 sts). Work 3 sc in the first free loop of the foundation chain, sc in the next, and 3 sc in the last (7 sts across the bottom). Work 1 sc in each row-end of Rows 2 and 3 on the remaining side (2 sts). Sl st to the first sc. (18 sc)
Panes: With cream, make one vertical straight stitch over the center column and one horizontal straight stitch between Rows 2 and 3. Each framed window is about 1.0 x 1.0 in (2.5 x 2.5 cm).
Holly Leaves (make 4)
Use green. Ch 5, sl st in 2nd ch from hook, sc in next ch, hdc in next ch, sl st in last ch. (4 sts) Fasten off.
Peppermint (make 1)
Rnd 1: With cream, 6 sc in a magic ring. Sl st to the first sc. (6 sts)
Rnd 2: (2 sc in the next st with red, 2 sc in the next st with cream) 3 times. Carry the unused color inside. Sl st to the first sc. (12 sts)
Rnd 3: With cream, (sc in the next st, 2 sc in the next st) 6 times. Sl st to the first sc. (18 sts)
Fasten off. The peppermint is about 3/4 in (1.9 cm) across.
Placement on the Pocket
Lay the pocket RS up, with Row 1 at the bottom.
- Center the door over sts 9–13, with its bottom edge on Row 1. Whipstitch it down with the tails.
- Center one window over sts 3–5 and the other over sts 17–19, each spanning Rows 4–9. Sew them on.
- Below each window, sew 2 holly leaves in a shallow V across Rows 1–3. Add 3 red French knots at the center of each V for berries.
- With cream, chain-stitch a small icing swirl over Rows 9–10 above the door: a tiny center loop with a curl on each side.
Placement on the Back Panel Roof
Center the peppermint over roof Rows 15–19 and sew it down. With cream, chain-stitch one curl on each side of it across Rows 13–15. Keep this decoration above Row 12, because the pocket and card will cover the lower wall.
Joining
Method: whipstitch the sides, then close the bottom with the first row of icing.
- Place the pocket WS against the RS of the back panel. Line up both foundation chains at the bottom and the side edges on both sides.
- With brown, whipstitch the right side through both layers, 1 stitch per row-end. The 10 pocket row-ends match the back panel’s Rows 1–10 one to one, which gives 10 whipstitches.
- Repeat on the left side. (10 whipstitches)
- Leave the pocket top open. The back panel’s Rows 11–12 stay free above the pocket.
Tension: pull each whipstitch just snug enough to close the edge. If you pull harder, the seam will draw in and the pocket will cup.
Checkpoint: slide in the gift card. It should drop in easily, sit flat, and show about 1/2 in (1.3 cm) above the pocket. The joined piece still measures 4.2 in (10.7 cm) across.
Icing Border
Border gauge: the 2-row icing band (1 sc row and 1 puff row) adds about 3/8 in (1.0 cm) to each edge it trims.
Bottom Icing Band
Row 1 (RS): Join cream at the bottom right corner. Working into the free loops of both foundation chains at once, sc in each of the 21 chains. (21 sts)
This is a trim row worked 1 per existing stitch: 21 stitches + 0 extra = 21 sts. It also seals the bottom of the pocket.
Row 2: Ch 1, turn, sc in the first st, (puff in the next st, sc in the next st) 10 times. (21 sts: 11 sc + 10 puffs)
Fasten off. The math works because 21 = 1 + (2 x 10): you start with 1 sc and repeat the 2-st pattern 10 times, so the band ends with an sc and stays exactly as wide as the house.
Roof Icing Band
Row 1 (RS): Join cream at the right eave (the top corner of Row 12 on the right edge).
1. Work 3 sc in that corner row-end.
2. Work 11 sc evenly up the right roof slope, ending in the first st of Row 21.
3. Work 3 sc in the center st of Row 21 (the peak).
4. Work 11 sc evenly down the left slope, starting in the last st of Row 21.
5. Work 3 sc in the left eave corner row-end.
(31 sts: 3 + 11 + 3 + 11 + 3)
Each slope is about 2.3 in (5.8 cm) on the diagonal. The 11 slope sc plus the corner sc give about 12 sts per slope, which matches the gauge of 5 sts per inch, so the band lies flat. The 3-sc groups at the eaves make the icing curve slightly past the walls.
Row 2: Ch 1, turn. Sc in the first st, (puff in the next st, sc in the next st) 7 times, which brings you to the center sc of the peak. Work (puff, ch 1, puff) in the center peak st. (Sc in the next st, puff in the next st) 7 times, then sc in the last st.
(32 sts + 1 ch-1 sp: 16 sc + 16 puffs)
This is a trim row: 31 sts worked 1 per existing stitch, plus 1 extra puff and a ch-1 at the peak. Each side has 8 sc and 8 puffs (16 sts), counting its peak puff. The peak increase keeps the point sharp, so the band doesn’t pull the roof flat.
Fasten off.
Hanging Loop
Join cream in the peak ch-1 sp. Ch 15, then sl st in the same sp. Work 22 sc around the chain loop, then sl st in the peak sp. Fasten off. The padded loop stands about 1.25 in (3.2 cm) tall.
Candy-Cane Cords (make 2)
- Cut 1 red strand and 1 cream strand, each 12 in (30.5 cm) long.
- Knot them together at both ends. Twist until the strands kink, fold in half, and let them twist back on themselves.
- Knot the cord about 2.5 in (6.4 cm) from the fold and trim the excess.
- Sew one cord over each side seam with cream, from the bottom icing band to the top of the pocket. Hide the knot behind the band.
The barber-pole twist creates the diagonal candy stripes.
Final Blocking
- Remove the card.
- Pin the holder RS up on a blocking mat. Make the walls 4.2 in (10.7 cm) wide and the back panel 3.5 in (8.9 cm) tall at the peak, not counting the icing.
- Pin the eave curves so they flare evenly, about 1/4 in (0.6 cm) past each wall.
- Mist lightly with water. Avoid soaking, because the stuffed puffs and knots can distort.
- Shape the puffs into round bumps with your fingertips.
- Let it dry completely, then put the card back in and check the fit.
Final Quality-Control Checklist
- Back panel has 21 sts across Rows 1–12 and ends with 3 sts at Row 21
- Pocket is 21 sts x 10 rows
- Each side seam has 10 whipstitches
- Bottom band: 21 sts in Row 1, then 11 sc + 10 puffs
- Roof band: 31 sts in Row 1, then 32 sts + a ch-1 peak sp
- Card slides in easily, with about 1/2 in (1.3 cm) showing
- Door and windows are square to the rows, and the holly is symmetrical
- Peppermint is centered under the peak
- Loop is centered and firm
- All ends are woven in on the WS
Troubleshooting
The card won’t fit. Your gauge is tight. Remake both panels with a larger hook. Stretching the finished piece won’t fix it.
The roof icing ruffles. You worked too many sc along the slopes. Keep Row 1 at exactly 11 sc per slope.
The roof icing pulls the gable flat. You missed the 3-sc groups in Row 1 or the (puff, ch 1, puff) at the peak in Row 2.
The puffs look flat. Pull each loop up to the height of an hdc before you close the puff.
The pocket cups inward. Your whipstitches are too tight. Unpick them and resew more loosely.
The cord unravels. Tie the knot tighter and add a dab of fabric glue to the inside of the knot.
Care
Spot clean with a damp cloth, or hand wash gently in cool water. Reshape the holder and dry it flat.
Final Notes
The measurement chain is short. Gauge of 5 sts and 6 rows per 1 in (2.5 cm) gives a back panel 4.2 in (10.7 cm) wide and 3.5 in (8.9 cm) tall. The pocket is the same 21-st width, just 2 rows shorter than the wall, which leaves about 1/2 in (1.3 cm) of the card visible. Icing bands about 3/8 in (1.0 cm) deep and the slight eave flare bring the finished holder to about 4.7 x 4.25 in (11.9 x 10.8 cm). If your back panel is correct, the rest will fall into place.
Happy crocheting!