

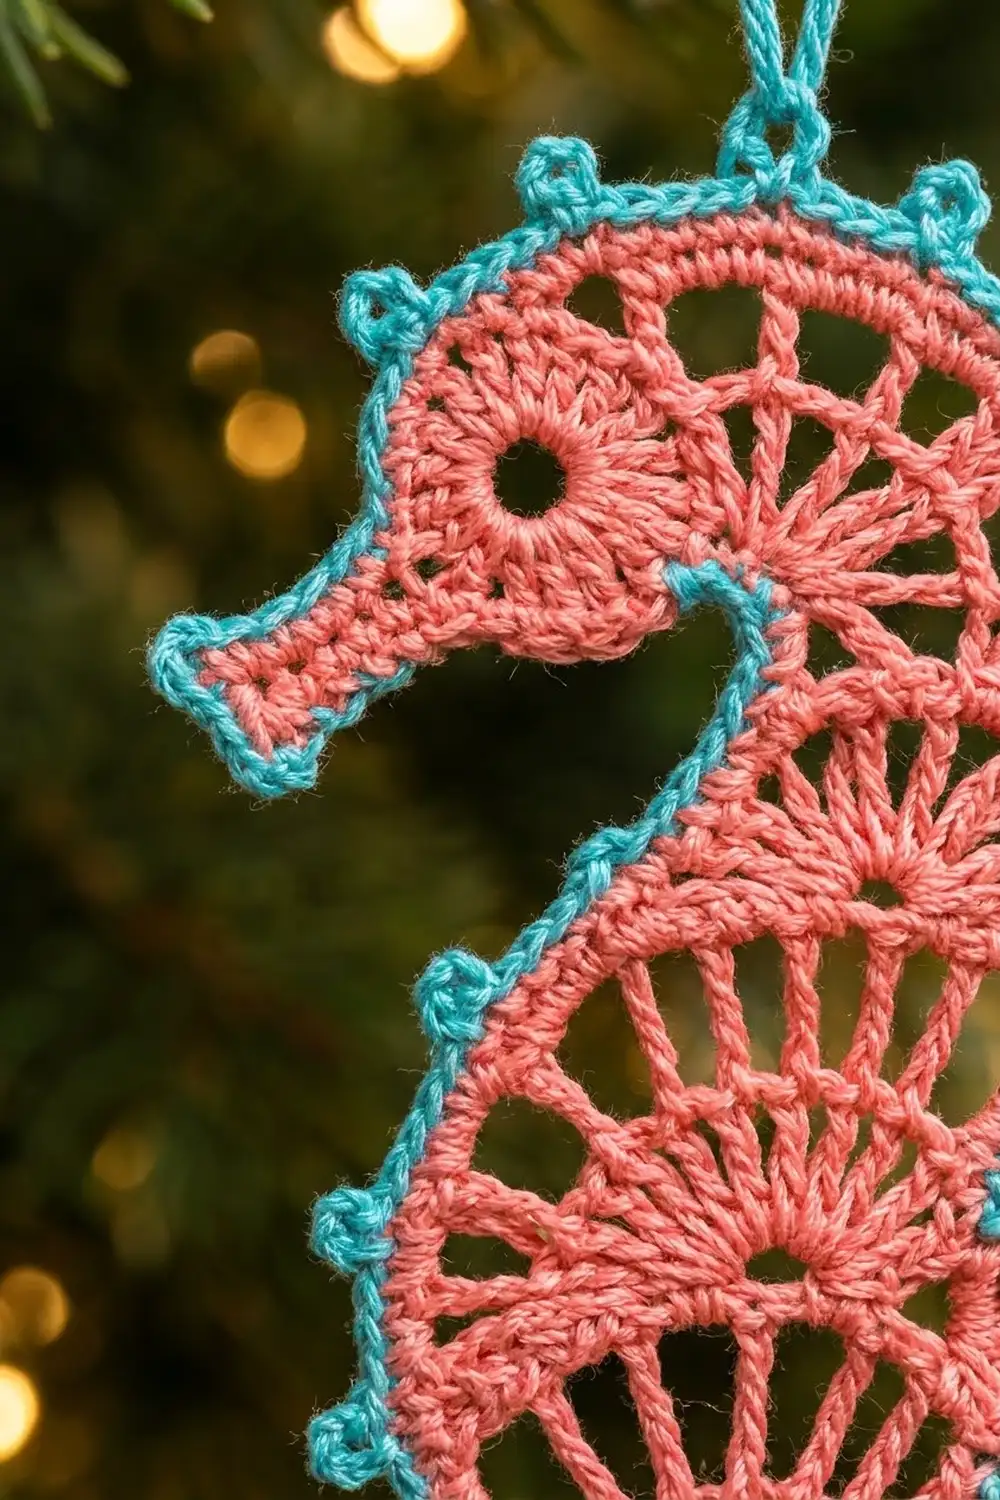
The Coral Tide Seahorse is a small, flat lace ornament worked in fine cotton thread. The body is coral pink, with open “spoke” bands that look like the ribbed segments of a real seahorse. A turquoise picot edging and a turquoise hanging loop frame the whole shape.
The shape is easy to recognize from across a room. A spoked wheel forms the curled tail, and the belly swells into a rounded front. The neck narrows, and the head ends in a short, straight snout with an open eye. A fan-shaped dorsal fin sticks out from the back.
This pattern uses US crochet terms. The finished ornament is 4.5 in (11.4 cm) tall and 2.2 in (5.6 cm) wide including the fin, plus a 1 in (2.5 cm) hanging loop. Total hanging length is 5.5 in (14.0 cm).
You make the whole ornament as one piece. Start with the tail wheel, then work a short stalk in rows that wraps partway around the wheel. From there the body grows upward in rows and ends at the crown. Next, add the snout and fin straight onto the edges. Finish with one turquoise border round, a picot round and the loop.
Finished Size and Construction
- Finished size: 4.5 in (11.4 cm) tall x 2.2 in (5.6 cm) wide; 5.5 in (14.0 cm) including the loop
- Skill level: Intermediate (thread crochet, shaping, working into row ends)
- Terminology: US
- Yarn weight: Size 10 cotton crochet thread (Lace, 0)
- Hook: 1.5 mm (US steel 8)
- Number of pieces: 1 (a single ornament; the snout and fin are worked onto the body)
- Layout: Single motif, no assembly
- Piece size before border: 4.2 in (10.7 cm) tall x 1.9 in (4.8 cm) wide including the fin
- Border depth: 0.15 in (0.4 cm) on every edge
Materials
Use mercerized size 10 cotton thread. It holds the lace open, blocks crisply and keeps its shape on a branch. Avoid fuzzy or very soft threads, because they blur the spoke bands.
- Coral pink (Color A): 5 g, about 26 m
- Turquoise (Color B): 3 g, about 16 m
Tools:
- 1.5 mm (US steel 8) crochet hook
- Fine tapestry needle
- Small sharp scissors
- Rustproof pins and a foam blocking board
- Spray bottle, plus spray starch if you want a stiff ornament
These amounts include about 25% extra for swatching and weaving in ends.
Abbreviations (US Terms)
- ch – chain
- sl st – slip stitch
- sc – single crochet
- sc2tog – single crochet 2 together
- dc – double crochet
- tr – treble crochet
- sp – space
- st(s) – stitch(es)
- RS – right side
Picot: Ch 3, sl st in 3rd ch from hook.
Spoke row: Ch 4 (counts as first tr), ch 1, skip next st, tr in next st; repeat across. On an odd stitch count, this always ends with a tr in the last st.
Gauge and Checkpoints
Gauge: 10 sc and 10 sc rows = 1 in (2.5 cm). One tr row is 0.3 in (0.8 cm) tall. One band (a spoke row plus the sc ridge row after it) is 0.4 in (1.0 cm) tall.
The ornament itself is your swatch. Make the wheel and the stalk, then measure before you go on.
Checkpoints:
- After the tail wheel: 0.9 in (2.3 cm) across
- After Row 8: stalk is 0.7 in (1.8 cm) wide and 0.8 in (2.0 cm) tall
- After Row 15: body is 1.5 in (3.8 cm) wide at the belly
- After Row 21: 3.3 in (8.4 cm) tall from the stalk tip
- After Row 23: neck is 0.7 in (1.8 cm) wide
- After Row 28: 4.2 in (10.7 cm) tall
- After the border: 4.5 in (11.4 cm) x 2.2 in (5.6 cm)
Too big? Go down to a 1.4 mm or 1.25 mm hook. Too small? Go up to 1.65 mm (US steel 7). If only the height is off, check your tr height first. Loose, tall tr loops are the most common cause.
Part 1: Tail Wheel
With Color A, ch 4 and sl st to the first ch to form a ring.
Rnd 1: Ch 3 (counts as dc), 11 dc in the ring, sl st to top of ch-3. (12 dc)
Rnd 2: Ch 4 (counts as dc + ch 1), dc in next dc, ch 1; repeat 10 more times, sl st to 3rd ch of ch-4. (12 dc, 12 ch-1 sps)
The wheel should measure 0.9 in (2.3 cm) across. Don’t fasten off.
Part 2: Tail Stalk
The stalk is worked in rows along the edge of the wheel. At the end of every odd row it joins to the wheel, and that wrap is what makes the curl.
Row 1: Ch 5, sc in 2nd ch from hook and in next 3 ch, sl st in next ch-1 sp of wheel. Turn. (4 sc)
Row 2: Skip sl st, ch 1, sc in each sc across. Turn. (4 sc)
Row 3: Ch 1, sc in next 3 sc, 2 sc in last sc, sl st in next ch-1 sp of wheel. Turn. (5 sc)
Row 4: Skip sl st, ch 1, sc in each sc across. Turn. (5 sc)
Row 5: Ch 1, sc in next 4 sc, 2 sc in last sc, sl st in next ch-1 sp of wheel. Turn. (6 sc)
Row 6: Skip sl st, ch 1, sc in each sc across. Turn. (6 sc)
Row 7: Ch 1, sc in next 5 sc, 2 sc in last sc, sl st in next ch-1 sp of wheel. Turn. (7 sc)
Row 8: Skip sl st, ch 1, sc in each sc across. Turn. (7 sc)
You’ve now used 4 wheel sps in a row. The other 8 stay free for the border.
Part 3: Body
The front (belly) edge is the side above the wheel. The back edge carries straight on from the outer edge of the stalk.
Row 9: Ch 1, 2 sc in first sc, sc in next 5 sc, 2 sc in last sc. Turn. (9 sc)
Row 10 (spoke): Work a spoke row. Turn. (5 tr, 4 ch-1 sps)
Row 11 (ridge): Ch 1, 2 sc in first tr, sc in ch-1 sp, sc in next tr; repeat across, working 2 sc in the last tr. Turn. (9 sts worked 1-per-st + 2 extra = 11 sc)
Row 12 (spoke): Spoke row. Turn. (6 tr, 5 ch-1 sps)
Row 13 (ridge): Work as Row 11. Turn. (11 + 2 = 13 sc)
Row 14 (spoke): Spoke row. Turn. (7 tr, 6 ch-1 sps)
Row 15 (ridge): Work as Row 11. Turn. (13 + 2 = 15 sc)
Checkpoint: 1.5 in (3.8 cm) wide.
Row 16 (spoke): Spoke row. Turn. (8 tr, 7 ch-1 sps)
Row 17 (ridge): Ch 1, sc in each tr and each ch-1 sp across. Turn. (15 sc)
Row 18 (spoke): Spoke row. Turn. (8 tr, 7 ch-1 sps)
Row 19 (ridge): Ch 1, sc2tog over first tr and next ch-1 sp, sc in next tr, sc in next ch-1 sp; repeat until the last ch-1 sp and last tr remain, then sc2tog over them. Turn. (15 sts worked − 2 = 13 sc)
Row 20 (spoke): Spoke row. Turn. (7 tr, 6 ch-1 sps)
Row 21 (ridge): Work as Row 19. Turn. (13 − 2 = 11 sc)
Checkpoint: 3.3 in (8.4 cm) tall.
Row 22: Ch 1, sc2tog, sc in next 7 sc, sc2tog. Turn. (9 sc)
Row 23: Ch 1, sc2tog, sc in next 5 sc, sc2tog. Turn. (7 sc)
Checkpoint: neck 0.7 in (1.8 cm) wide.
Row 24: Ch 1, 2 sc in first sc, sc in next 5 sc, 2 sc in last sc. Turn. (9 sc)
Row 25 (eye row): Ch 4 (counts as tr), ch 1, skip next sc, tr in next sc, ch 3, skip next 3 sc, tr in next sc, ch 1, skip next sc, tr in last sc. Turn. (4 tr, 2 ch-1 sps, 1 ch-3 sp)
The ch-3 sp is the open eye, about 0.3 in (0.8 cm) across.
Row 26: Ch 1, sc in each tr, 1 sc in each ch-1 sp and 3 sc in the ch-3 sp. Turn. (4 + 2 + 3 = 9 sc)
Row 27: Ch 1, sc2tog, sc in next 5 sc, sc2tog. Turn. (7 sc)
Row 28: Ch 1, sc2tog, sc in next 3 sc, sc2tog. (5 sc)
Fasten off. Checkpoint: 4.2 in (10.7 cm) tall.
Part 4: Snout
Row 1: With RS facing, join Color A with a sl st in the front row end of Row 25 (the middle of the tr post). Ch 7, sc in 2nd ch from hook and in next 5 ch, sl st in the same row end. Turn. (6 sc)
Row 2: Skip sl st, sc in each sc across, sl st in the front row end of Row 26. (6 sc)
Fasten off. The snout is 0.6 in (1.5 cm) long and 0.2 in (0.5 cm) deep. It covers the front row ends of Rows 25 and 26.
Part 5: Dorsal Fin
Row 1: With RS facing, join Color A with a sl st in the back row end of Row 17. Ch 4 (counts as tr), (ch 1, tr) 6 times in the same row end. Turn. (7 tr, 6 ch-1 sps)
Row 2: Ch 1, sc in each tr and each ch-1 sp, then sl st in the back row end of Row 15. (13 sc)
Fasten off. The fin fans out 0.4 in (1.0 cm) from the back and covers the back row ends of Rows 16 and 17.
Border
Border gauge: 10 sc = 1 in (2.5 cm) along every edge. Work 1 sc in each sc row end and 3 sc in each tr row end, since a tr row is 0.3 in (0.8 cm) tall.
Rnd 1: With RS facing, join Color B in the front row end of Row 27. Work sc around the edge in this order:
- C, crown (10 sc): 1 sc in each front row end of Rows 27–28 (2); across Row 28 work sc, sc, 2 sc in center st, sc, sc (6); 1 sc in each back row end of Rows 28–27 (2).
- D, upper back (15 sc): Row ends of Rows 26 down to 18. Tr Rows 25, 20 and 18 give 9 sc; sc Rows 26, 24, 23, 22, 21 and 19 give 6 sc.
- E, fin (19 sc): 3 sc down the first fin tr, 1 sc in each of the 13 fin sc, 3 sc along the last fin tr.
- F, lower back (13 sc): Rows 15 down to 9. Tr Rows 14, 12 and 10 give 9 sc; sc Rows 15, 13, 11 and 9 give 4 sc.
- Stalk outer edge (8 sc): 1 sc in each row end of Rows 8 down to 1.
- Stalk tip (5 sc): 1 sc in each of the 4 foundation loops, with 2 sc in the last one to turn the corner.
- G, wheel (23 sc): 2 sc in each of the 8 free ch-1 sps and 1 sc in each of the 7 dc between them.
- A, front (28 sc): Rows 9 up to 24. Tr Rows 10, 12, 14, 16, 18 and 20 give 18 sc; sc Rows 9, 11, 13, 15, 17, 19, 21, 22, 23 and 24 give 10 sc.
- B, snout (15 sc): 6 sc along the foundation edge, 3 sc in the tip, 6 sc along the top.
Sl st to first sc. (10 + 15 + 19 + 13 + 8 + 5 + 23 + 28 + 15 = 136 sc)
Rnd 2 (picots and loop): Sc in next sc, picot, sc in next sc; repeat 67 more times, for 68 repeats total. On the 3rd repeat, which covers crown sts 5 and 6 at the center of the crown, make the loop in place of the picot: ch 24, sl st in the sc just made, work 30 sc into the ch-24 loop, then sl st at its base. When the round is done, sl st to first sc and fasten off. (136 sc, 67 picots, 1 loop)
Why the math works: On the straight edges, 1 sc per sc row end matches the 10-per-inch gauge. On tr rows, 3 sc per row end matches the 0.3 in (0.8 cm) row height, so those edges lie flat too. The wheel arc gets 23 sc because the outside of the border around the curl is about 2.3 in (5.8 cm) long. The total of 136 is even, so the 2-st picot repeat closes with no leftover stitch. The 3rd repeat lands right at the center of the crown, which is where the loop goes. Picots end up 0.2 in (0.5 cm) apart.
Final Blocking
- Weave in all ends inside the sc ridge rows, keeping each thread in its own color.
- Soak the ornament in cool water for 5 minutes, then roll it in a towel to take out the extra water.
- Pin it RS up on the board to 4.5 in (11.4 cm) x 2.2 in (5.6 cm).
- Pin the wheel round, and pin each spoke band open so every ch-1 gap shows.
- Open the eye, straighten the snout and pin the fin out into a fan.
- Pin each picot to a point and lay the loop flat.
- Mist with starch if you like, and let it dry completely before you unpin it.
Final Quality-Control Checklist
- Ornament is 4.5 in (11.4 cm) x 2.2 in (5.6 cm)
- Loop is 1 in (2.5 cm) and centered on the crown
- Wheel has 12 even spokes and curls under the belly
- Spoke bands have even gaps, with no missed ch-1 sps
- Eye is open and round
- Border Rnd 1 has 136 sc; Rnd 2 has 67 picots
- Edges lie flat, with no ruffling or cupping
- No ends show on the RS
Troubleshooting
Border ruffles: There are too many sc in the row ends. Recount each segment against the border list.
Border cups or pulls in: Your tension is too tight, or a tr row end got fewer than 3 sc. Loosen your grip, or go up 0.15 mm for the border only.
Tail doesn’t curl: A stalk join was skipped. The stalk must join to 4 wheel sps in a row.
Body leans to one side: The shaping is uneven. Each shaping row changes both edges by 1 st.
Eye closes up: Make sure you worked 3 sc (not 4) into the ch-3 sp, and pin the eye open while blocking.
Fin flops: Starch it, or work fin Row 2 a little tighter.
Care
Hand-wash in cool water with mild soap, press the water out in a towel and dry flat. Re-block and re-starch as needed, and store the ornament flat between sheets of tissue.

Final Notes
Each stage depends on the one before it. The 0.9 in (2.3 cm) wheel carries a 0.7 in (1.8 cm) stalk. The body widens to a 1.5 in (3.8 cm) belly, narrows to a 0.7 in (1.8 cm) neck and ends 4.2 in (10.7 cm) tall. The snout and fin bring the width to 1.9 in (4.8 cm). The 136-st border adds 0.15 in (0.4 cm) all around, for a finished size of 4.5 in (11.4 cm) x 2.2 in (5.6 cm). Check each measurement as you go, and the seahorse will come out the right size and shape.
Happy crocheting!