

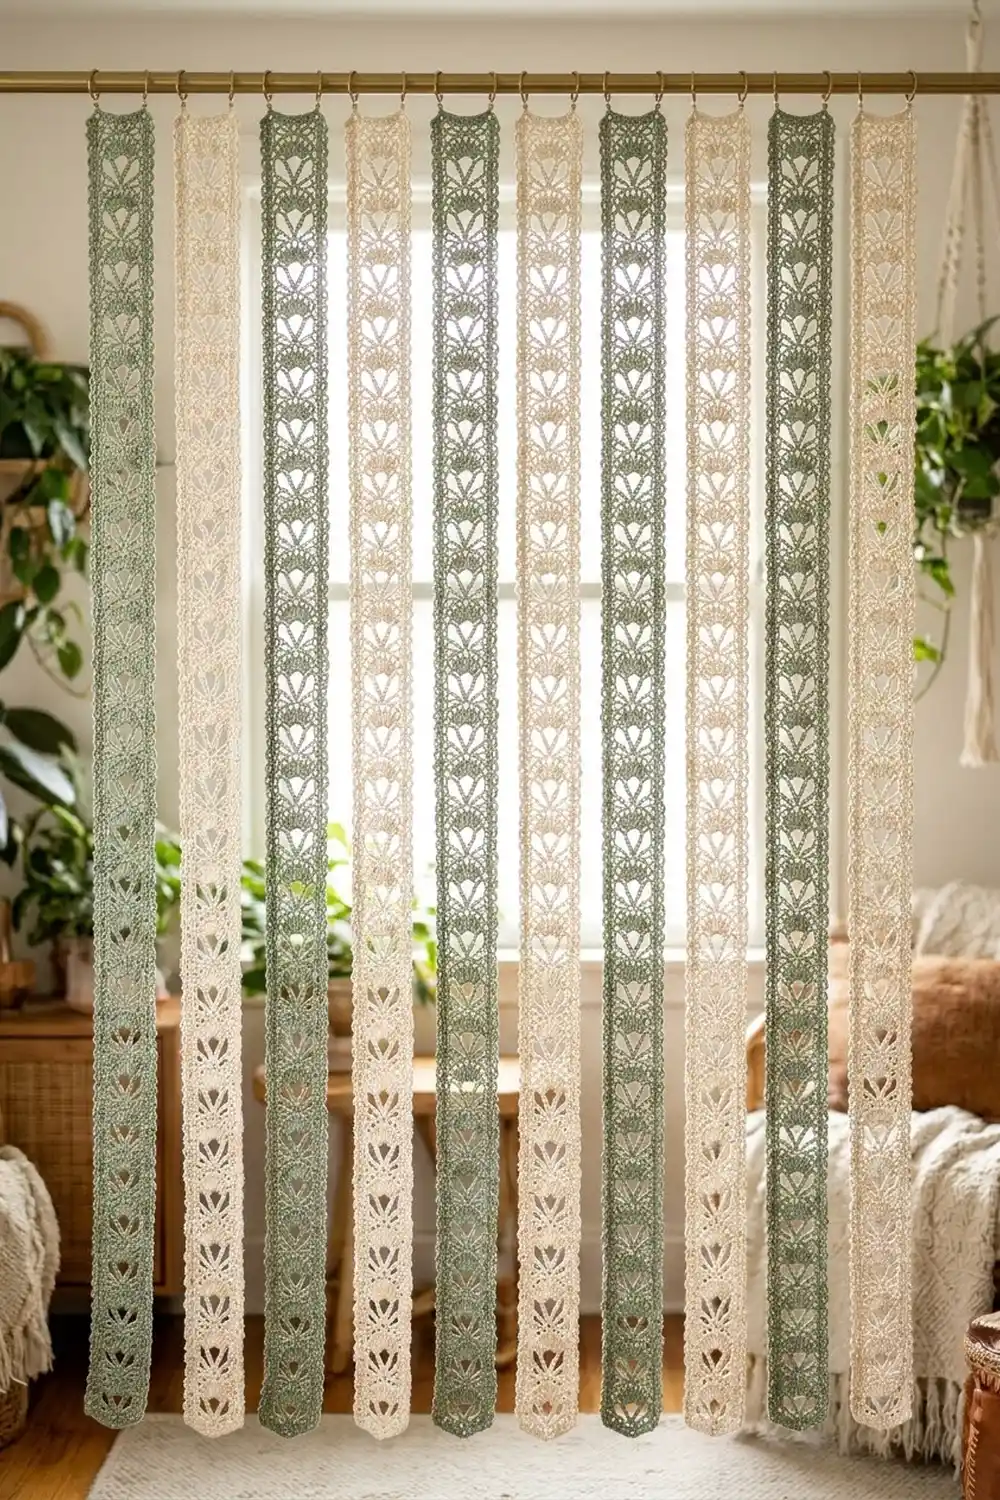
The Sage Meadow curtain is a light, airy window hanging made from ten slim lace strips in alternating sage green and cream. Each strip shows a column of stacked heart-shaped fans. Together, the strips filter daylight softly while still letting the window show through.
The look is relaxed and boho, with soft cotton yarn and a gentle repeating motif. Sage and cream look calm side by side, but you can swap in any two colors you like. The pattern uses US crochet terms throughout.
The finished curtain measures about 42 in (106.7 cm) wide and 60 in (152.4 cm) long, measured from the rod down. Each strip is 3¾ in (9.5 cm) wide after its edging.
Each strip is worked in rows from the bottom up, using a two-row repeat of fans and arches. Next you add a small loop edging along both long sides. Then you fold the top over to make a rod loop. The strips hang independently, so the curtain parts easily and is simple to adjust.
Finished Size and Construction
- Finished curtain size: 42 in (106.7 cm) wide × 60 in (152.4 cm) hanging length
- Skill level: Easy / advanced beginner
- Terminology: US crochet terms
- Yarn weight: DK (light worsted / #3) cotton or cotton blend
- Hook: 4.0 mm (G-6)
- Number of pieces: 10 strips (5 sage, 5 cream)
- Layout: 10 strips in a single row on the rod, colors alternating, with gaps of ½ in (1.3 cm)
- Piece size: 3¾ in (9.5 cm) wide × 63 in (160.0 cm) long before folding the rod loop
- Size before border: 3 in (7.6 cm) wide × 63 in (160.0 cm) long
- Border depth: ⅜ in (1.0 cm) on each long side
Materials
Yarn: Use a smooth, mercerized or combed DK cotton. Cotton keeps the fans crisp and the arches open, and it hangs straight without much stretch. Avoid very fuzzy yarns, because they blur the motif.
- Color A – Sage green: 350 g / about 840 m (918 yd)
- Color B – Cream: 350 g / about 840 m (918 yd)
Each strip uses about 55 g / 130 m (142 yd). These quantities include a margin of about 25% for your gauge swatch, tension differences, and weaving in ends.
Tools:
- 4.0 mm (G-6) crochet hook
- Tapestry needle
- Scissors
- Measuring tape
- Rust-proof pins and a blocking surface (foam mats or a clean towel on a long table)
- Curtain rod, up to ⅞ in (2.2 cm) in diameter
Abbreviations (US Terms)
- ch – chain
- sc – single crochet
- dc – double crochet
- sk – skip
- sp – space
- st(s) – stitch(es)
- RS / WS – right side / wrong side
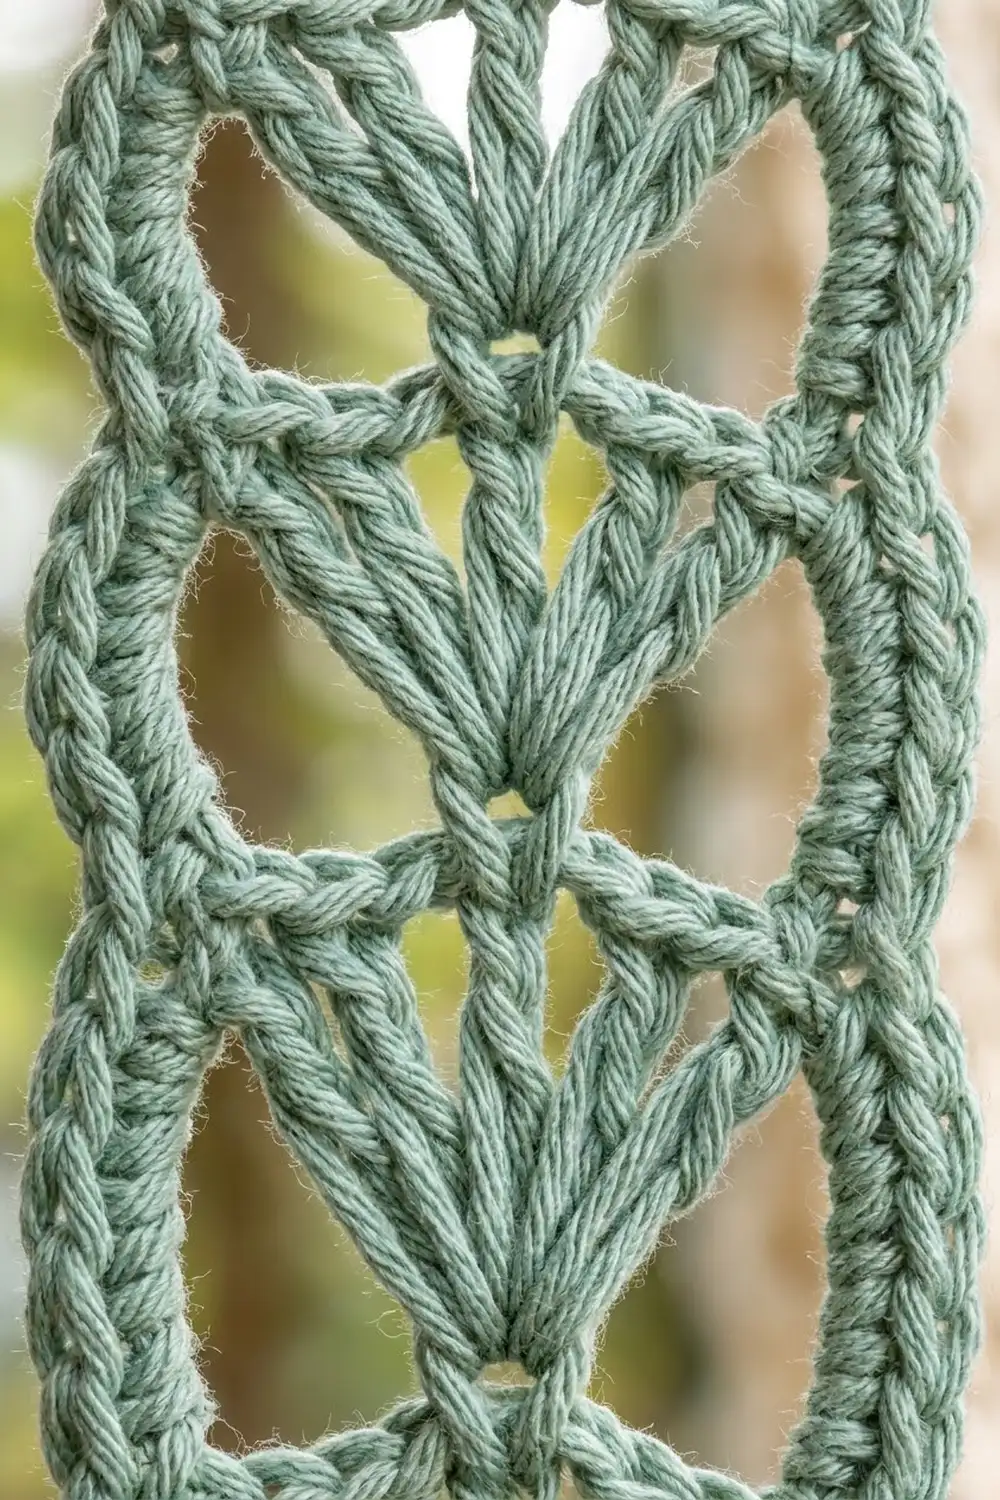
Special stitch – Fan: Work 7 dc into the same stitch. All seven stitches start from one point and spread upward into a fan. This makes the pointed bottom of each heart.
Gauge and Checkpoints
Gauge matters here because small differences add up over 85 rows. Make a test piece before you start the curtain.
Test piece: Ch 14, then work Rows 1–9 below (Row 1 plus 4 repeats). Block it lightly.
- Width: 3 in (7.6 cm) across the body, without edging
- Height: 4 repeats (8 rows above Row 1) = 6 in (15.2 cm), so one repeat = 1½ in (3.8 cm)
If your test piece is too big, go down one hook size. If it is too small, go up one hook size. Width matters less than height, but if the fans cup or ruffle, change the hook before you change the stitch count.
Length checkpoints while you work (unblocked, laid flat, without stretching):
- After 10 repeats: 15 in (38.1 cm)
- After 20 repeats: 30 in (76.2 cm)
- After 30 repeats: 45 in (114.3 cm)
- After 40 repeats: 60 in (152.4 cm)
- After 42 repeats: 63 in (160.0 cm)
Cotton relaxes slightly once it hangs, so being up to ½ in (1.3 cm) short at the 60 in checkpoint is fine.
Strip Pattern (Make 10)
Each strip is worked from the bottom edge up. A row starts with a turning chain, and you turn at the end of every row.
Foundation: Ch 14.
Row 1 (arch row): Sc in the 2nd ch from the hook, ch 5, sk 5 ch, sc in the next ch, ch 5, sk 5 ch, sc in the last ch. Turn.
(3 sc and 2 ch-5 sps. Stitches used: 1 + 5 + 1 + 5 + 1 = 13 of the 14 chains; the skipped first chain is the turning chain.)
Row 2 (fan row): Ch 3 (counts as the first dc), ch 3, sk the ch-5 sp, work a Fan (7 dc) in the center sc, ch 3, sk the next ch-5 sp, dc in the last sc. Turn.
(9 dc total: 7 fan dc + 2 edge dc. Plus 2 ch-3 sps.)
Row 3 (arch row): Ch 1, sc in the first dc, ch 5, sk the ch-3 sp and the first 3 dc of the fan, sc in the 4th (center) dc of the fan, ch 5, sk the last 3 fan dc and the ch-3 sp, sc in the 3rd ch of the turning ch-3. Turn.
(3 sc and 2 ch-5 sps, the same as Row 1.)
Rows 2–3 form one repeat. The fan opens upward from one point, and the two arches meet at its center dc to close the top of the heart. The next fan then grows from that center sc, so each motif stacks directly above the last.
Rows 4–85: Repeat Rows 2–3 another 41 times, for 42 repeats in total.
You end with Row 85, which is an arch row with 3 sc and 2 ch-5 sps. Fasten off and leave a 24 in (61.0 cm) tail for sewing the rod loop later.
Row count check: 1 foundation arch row + (42 repeats × 2 rows) = 85 rows.
Length check: 42 repeats × 1½ in (3.8 cm) = 63 in (160.0 cm).
Make All Pieces
Make 10 strips in total:
- Color A (Sage): 5 strips
- Color B (Cream): 5 strips
Add the side edging (see Border, below) to every strip before you fold the rod loops.
Layout on the rod (left to right, front view):
| A | B | A | B | A | B | A | B | A | B |
 1   2   3   4   5   6   7   8   9   10
Turn every strip so its RS faces the room. The RS is the side facing you when you worked Row 2.
Joining (Rod Loops and Hanging)
The strips are not joined to each other. Each one is folded at the top to make its own rod loop, and the strips are then spaced evenly along the rod. Because the strips move freely, the curtain hangs straight and is easy to part.
Making the rod loop:
- Lay the edged strip RS down.
- Fold the top 2 repeats (Rows 82–85) toward the WS so the last row (Row 85) lies on top of Row 81. Row 81 is the arch row that ends repeat 40.
- Match the rows stitch for stitch: sc to sc and chain to chain. Each arch row has 3 sc + 10 ch = 13 sts, so you are joining 13 sts to 13 sts.
- Using the long tail, whipstitch through both layers across all 13 sts. Keep the stitches snug but not tight. The seam should be as wide as the strip, not narrower.
- Whipstitch the edging loops on both sides together through the 2 repeats of the loop’s side edges. This keeps the rod from slipping out sideways.
- Weave in the ends on the WS.
The loop takes up 2 repeats, or 3 in (7.6 cm), of strip length, so its circumference is about 3 in (7.6 cm). That fits rods up to ⅞ in (2.2 cm) in diameter. Repeats 1–40 hang below the rod: 40 × 1½ in = 60 in (152.4 cm).
Tension advice: If the seam pulls in, the top of the strip will narrow and the strip will twist. Lay the strip flat after sewing and check that the seamed edge measures the full 3¾ in (9.5 cm).
Size checkpoint: Slide the strips onto the rod in layout order and space them ½ in (1.3 cm) apart.
10 strips × 3¾ in = 37½ in (95.3 cm)
9 gaps × ½ in = 4½ in (11.4 cm)
Total width = 42 in (106.7 cm)
For a wider window, widen the gaps evenly or add strips in pairs to keep the colors alternating.
Border (Side Edging)
The edging is worked separately along each long side of every strip. It is not worked across the short ends, because the bottom hangs free and the top is folded into the rod loop.
Border gauge: 2 sc per dc row end and 1 sc per sc row end. On the test piece, this gives about 21 sc per 6 in (15.2 cm), which keeps the edge flat without rippling.
Edging Row 1 (RS facing): Join the yarn at the bottom corner of one long edge. Ch 1 and work along the row ends as follows:
- 1 sc in the end of each arch row (Row 1 and every odd row)
- 2 sc around the post of the edge dc (or turning ch-3) of each fan row (every even row)
Arch rows: 43 rows × 1 sc = 43 sc
Fan rows: 42 rows × 2 sc = 84 sc
Total: 127 sc per side. Turn.
Edging Row 2: Ch 1, sc in the first sc, ch 3, sk 1 sc, sc in the next sc. Repeat from * to the end. Fasten off.
(64 sc and 63 ch-3 loops.)
Why the math works: Row 2 uses 1 sc to start, and each of the 63 repeats uses 2 sts (1 skipped + 1 worked). That is 1 + (63 × 2) = 127, exactly the number of sts in Row 1. Because 127 is odd, the edging starts and ends on a sc, so both corners match.
Repeat Edging Rows 1–2 on the second long side using the same counts. Each side adds about ⅜ in (1.0 cm), taking the strip from 3 in (7.6 cm) to 3¾ in (9.5 cm) wide.
Final Blocking
Block every strip after edging and before folding the rod loop.
- Soak the strip in cool water with a little wool wash for 10 minutes.
- Gently squeeze out the water. Do not wring or twist it. Roll the strip in a towel and press to remove more water.
- Lay it flat on your blocking surface. Because the strip is long, you can block it in two or three sections, letting the rest rest on a towel.
- Pin it to 3¾ in (9.5 cm) wide. Put pins along both long edges at every 4th edging loop.
- Ease the length to 63 in (160.0 cm). Do not stretch it longer, because cotton will not spring back.
- Open each fan so all 7 dc spread evenly, and shape each ch-5 arch into a smooth curve.
- Leave it to dry completely, usually 24 hours, before you unpin it.
Final Quality-Control Checklist
- Every strip has exactly 85 rows (42 complete repeats).
- Every fan row has 9 dc and 2 ch-3 sps; every arch row has 3 sc and 2 ch-5 sps.
- Each long edge has 127 sc in Edging Row 1, and 64 sc with 63 ch-3 loops in Edging Row 2.
- Strips measure 3¾ in (9.5 cm) wide and 63 in (160.0 cm) long after blocking.
- Each rod loop is sewn stitch for stitch (13 sts to 13 sts) and lies flat.
- Hanging length below the rod is 60 in (152.4 cm) on every strip.
- The colors alternate A, B, A, B and so on, with all RS facing out.
- All ends are woven in securely on the WS.
Troubleshooting
The fans look flat or crowded. Make sure all 7 dc go into the same center sc. If they still crowd, loosen your tension slightly on the fan rows only.
The arches sag or look floppy. Your chains may be loose. Work the ch-5 a little tighter, or drop to ch 4 on every arch and check your gauge again.
The strip twists as it hangs. This is usually caused by an edging that is tighter on one side or a rod loop that pulls in. Re-block the strip, and check that both edges have 127 sc.
The strips are different lengths. Count the repeats, not the inches. If they still differ after blocking, re-block the long strips with less stretch.
The edging ripples. You likely added extra sc. Use exactly 2 sc per fan row and 1 sc per arch row.
The rod loop is too tight. Undo the seam and fold only 1½ repeats over, or use a slimmer rod.
Care
Hand wash in cool water, or machine wash on a gentle cycle in a mesh bag. Lay flat to dry and reshape while damp, and never hang the strips wet, because they will stretch.
Final Notes
The measurements build on each other in a simple chain. One repeat is 1½ in (3.8 cm), so 42 repeats make a 63 in (160.0 cm) strip. Folding 2 repeats into the rod loop leaves 60 in (152.4 cm) hanging. The 3 in (7.6 cm) body grows to 3¾ in (9.5 cm) with the edging, and 10 strips with nine ½ in (1.3 cm) gaps fill 42 in (106.7 cm) of rod. If you check your gauge at the start and count your repeats as you go, every strip will hang evenly.
Happy crocheting!