

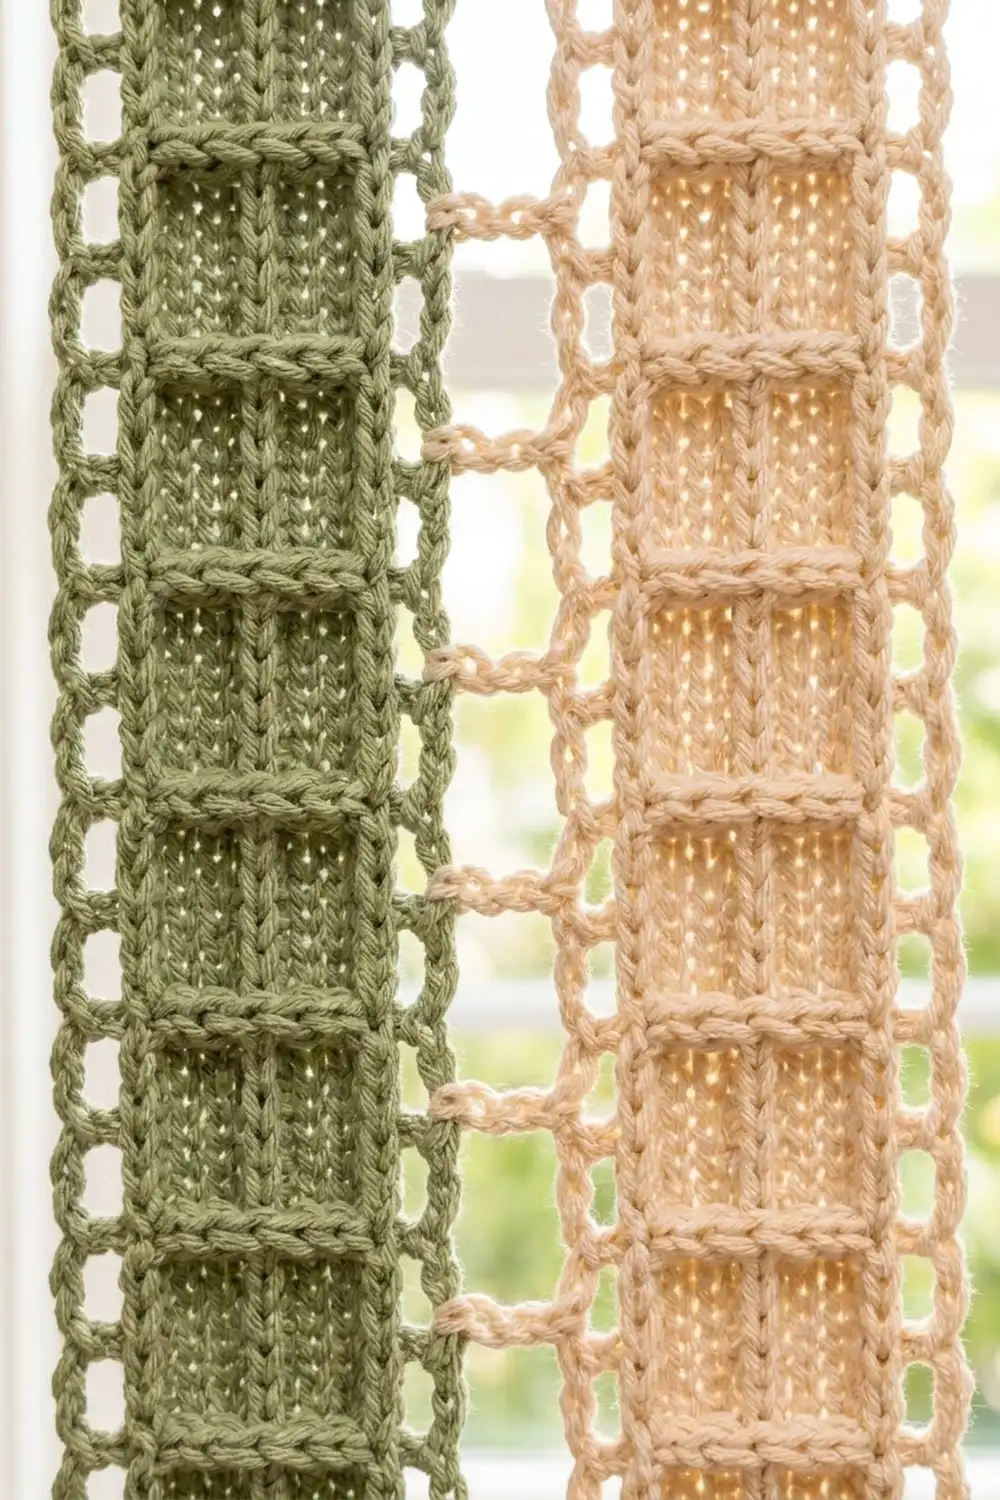
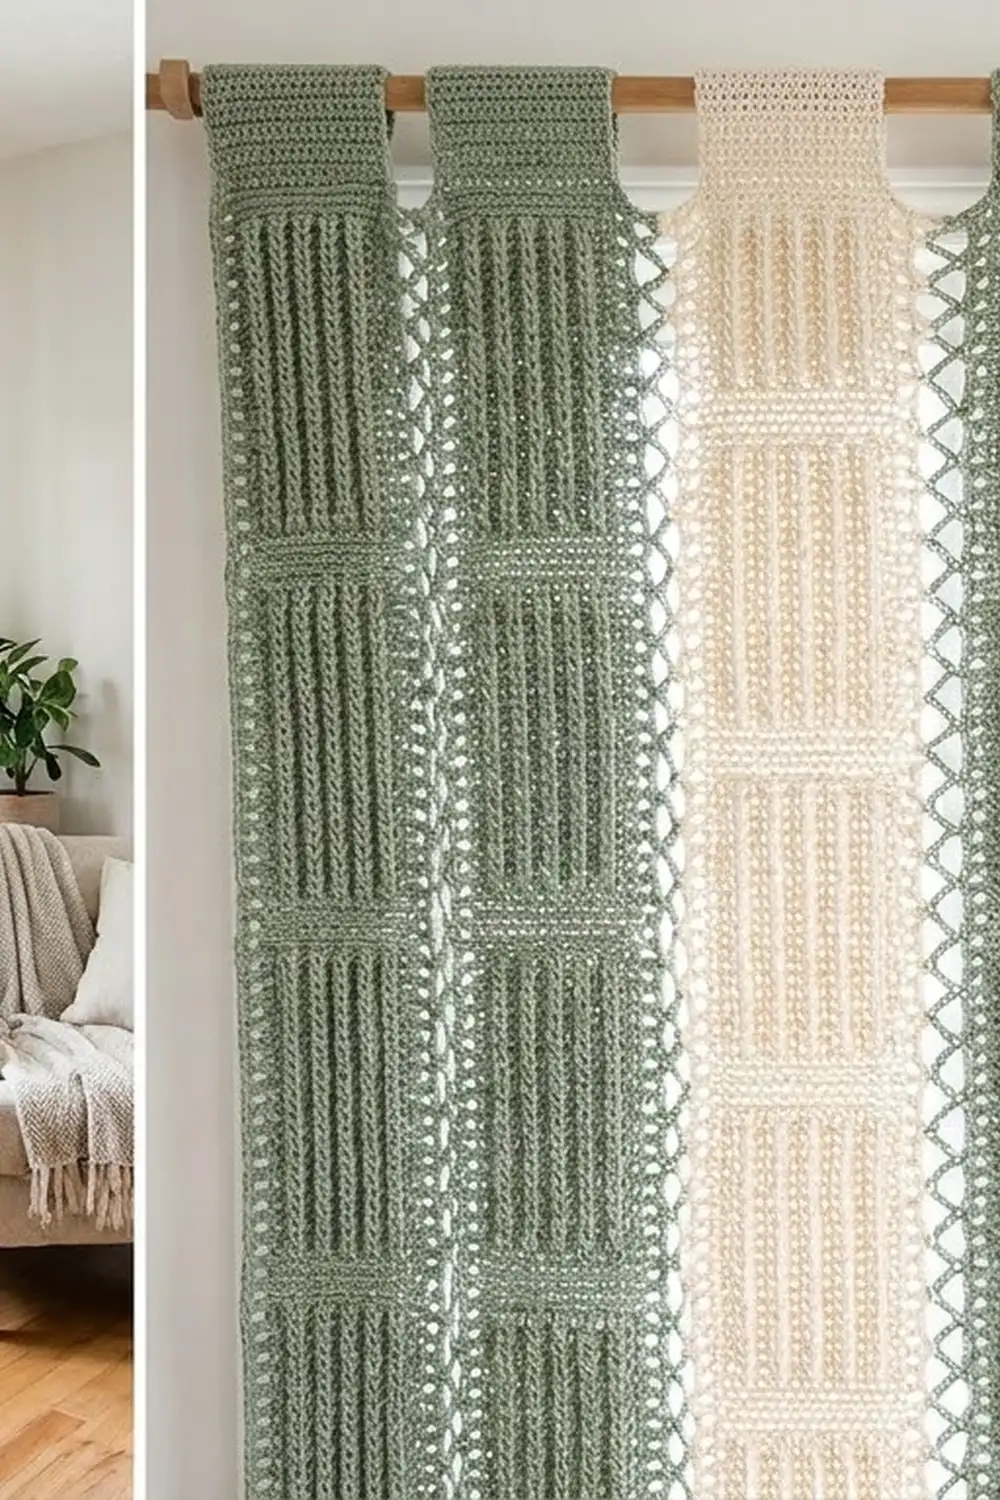
The Sage Ladder Strip Curtain is made of nine textured strips that hang in alternating sage green and cream. Each strip looks like a small ladder. Raised vertical ribs fill stacked blocks, thick horizontal bars divide the blocks, and a column of tiny eyelets runs along both edges.
The strips are joined with soft zigzag chain loops. This leaves narrow open gaps that let light through while the textured strips give some privacy. The colors are calm and natural, so the curtain suits a cottage, farmhouse, or Scandinavian-style room.
This pattern uses US crochet terms. The finished curtain is 35.5 in (90.2 cm) wide and 62.25 in (158.1 cm) long, measured from the top of the rod loops to the bottom edge.
To make it, you work each strip in short rows across its width. A fold-over tab at the top makes the rod loop. You then join the strips with a chain-loop zigzag and finish the bottom with a two-row edging.
Finished Size and Construction
- Finished size: 35.5 in wide x 62.25 in long (90.2 cm x 158.1 cm)
- Skill level: Intermediate (post stitches, side-edge joining)
- Terminology: US crochet terms
- Yarn weight: Worsted (#4) cotton or cotton blend
- Hook: 4.5 mm (US 7)
- Number of pieces: 9 strips (5 sage, 4 cream)
- Layout: 9 strips side by side in 1 row, alternating colors
- Strip size: 3.5 in x 60.5 in (8.9 cm x 153.7 cm) of body, plus a 3 in (7.6 cm) tab that folds into a 1.5 in (3.8 cm) loop
- Size before border: 35.5 in x 62 in (90.2 cm x 157.5 cm)
- Border depth: 0.25 in (0.6 cm), bottom edge only
Materials
Use a smooth worsted-weight cotton or cotton blend. Cotton gives the post-stitch ribs clear definition and hangs straight without stretching too much. Avoid very fuzzy yarns, because they blur the eyelets and the chain-loop joins.
The quantities below assume a ball of about 100 g / 208 yd (190 m).
- Color A (Sage Green): 650 g, about 1,235 m (1,351 yd), for 5 strips
- Color B (Cream): 650 g, about 1,235 m (1,351 yd), for 4 strips, all 8 joins, and the border
One strip uses about 110 g. The quantities include a margin of about 15% for swatching and differences in tension.
Tools:
– 4.5 mm (US 7) crochet hook
– Tapestry needle
– Stitch markers
– Measuring tape
– Rust-proof pins and a blocking surface at least 4 in x 62 in (10.2 cm x 157.5 cm), or space to block in sections
– Scissors
Abbreviations (US Terms)
- ch – chain
- sc – single crochet
- dc – double crochet
- sk – skip
- sp – space
- st(s) – stitch(es)
- tch – turning chain
- RS / WS – right side / wrong side
- FPdc – front post double crochet: yarn over, insert hook from front to back to front around the post of the stitch below, then complete as a dc.
- BPdc – back post double crochet: yarn over, insert hook from back to front to back around the post of the stitch below, then complete as a dc.
- rev sc – reverse single crochet (crab stitch): work sc from left to right (right to left if you crochet left-handed).
Note: In the eyelet rows, the ch-3 at the start of the row counts as 1 dc and the ch-1 space counts as 1 stitch. Every row has 15 stitches.
Gauge and Checkpoints
Gauge: 15 sts = 3.5 in (8.9 cm) wide. 4 sc rows = 1 in (2.5 cm), and 2 dc rows = 1 in (2.5 cm). One 4-row pattern repeat = 1.5 in (3.8 cm) tall.
Test one piece first. Work Rows 1–2, then 4 pattern repeats (Rows 3–18). Lay the swatch flat without stretching it.
- Width checkpoint: 3.5 in (8.9 cm)
- Height checkpoint: 6.5 in (16.5 cm)
If your swatch is too wide or too tall, go down half a hook size. If it is too narrow or too short, go up half a hook size. Gauge matters here because a 0.25 in (0.6 cm) error per strip adds up to 2.25 in (5.7 cm) across the whole curtain. Over the full length of a strip, a small error in height becomes several inches.
Strip Pattern (Make 9)
Each strip is worked flat in rows across its 15-stitch width. The rows build the length of the strip.
Bottom Bar
Row 1 (RS): Ch 16, sc in 2nd ch from hook and in each ch across, turn. (15 sc)
Row 2 (WS): Ch 1, sc in each sc across, turn. (15 sc)
Checkpoint: The strip is 3.5 in (8.9 cm) wide and 0.5 in (1.3 cm) tall.
Ladder Pattern Repeat
Row 3 (RS, rib block): Ch 3 (counts as dc), ch 1, sk next st, dc in next st, FPdc around each of next 9 sts, dc in next st, ch 1, sk next st, dc in last st, turn. (15 sts: 4 dc, 9 FPdc, 2 ch-1 sps)
Row 4 (WS, rib block): Ch 3 (counts as dc), ch 1, sk ch-1 sp, dc in next dc, BPdc around each of next 9 FPdc, dc in next dc, ch 1, sk ch-1 sp, dc in top of tch, turn. (15 sts: 4 dc, 9 BPdc, 2 ch-1 sps)
Rows 3 and 4 make the rib blocks. Working BPdc on a WS row pushes each stitch to the RS, so the 9 raised columns continue straight up the RS. On each side, the ch-1 spaces stack into a 2-row eyelet. This forms the open column along each edge.
Row 5 (RS, bar): Ch 1, sc in first dc, sc in ch-1 sp, sc in next dc, sc in each of next 9 sts, sc in next dc, sc in ch-1 sp, sc in top of tch, turn. (15 sc)
Row 6 (WS, bar): Ch 1, sc in each sc across, turn. (15 sc)
Rows 5 and 6 close the eyelets and make the solid horizontal bar that divides the blocks. In Row 7 and later FPdc rows, work each FPdc around the posts of the Row 6 sc.
Rows 7–162: Repeat Rows 3–6 thirty-nine more times, for 40 repeats in total. Every row has 15 sts.
Checkpoints:
– After 5 repeats (Row 22): 8 in (20.3 cm) tall
– After 20 repeats (Row 82): 30.5 in (77.5 cm) tall
– After 40 repeats (Row 162): 60.5 in (153.7 cm) tall, ending with a bar
Rod Tab
Rows 163–174: Ch 1, sc in each sc across, turn. (15 sc in each row, 12 rows)
The tab is 3 in (7.6 cm) tall. Fasten off, leaving a 12 in (30.5 cm) tail.
Form the loop: Fold the tab toward the WS so that Row 174 lies along the top of Row 162. With the tail, whipstitch the 15 sts of Row 174 to the WS of Row 162. This gives a 1.5 in (3.8 cm) deep loop that fits a rod up to 0.75 in (1.9 cm) in diameter.
Strip checkpoint: The strip is 3.5 in (8.9 cm) wide. Measured from the top of the loop to the bottom edge, it is 62 in (157.5 cm) long. It has 40 rib blocks and 41 bars, counting the bottom bar.
Weave in the starting tail.
Make All Pieces
- Color A (Sage): 5 strips
- Color B (Cream): 4 strips
Lay the strips RS up with all bottom edges aligned, in this order from left to right:
| A | B | A | B | A | B | A | B | A |
  1   2   3   4   5   6   7   8   9
There are 9 strips and 8 joins. A sage strip is at each outer edge.
Joining
Every join is worked in Color B. This matches the cream loops visible between the strips.
Anchor points: On each long edge of a strip, mark 81 anchor points:
– Anchor 1: the edge of the bottom bar, in the side of the Row 2 sc
– For each of the 40 repeats: one anchor around the post of the Row 4 edge stitch (the eyelet block), then one anchor in the side of the Row 6 sc (the bar)
This gives 1 + (40 x 2) = 81 anchors on each edge. The tab rows are not joined, so each rod loop stays separate.
Join (worked on each of the 8 seams):
1. With RS facing, place the left strip (L) beside the right strip (R) with their bottom edges level. Join B with sc to L anchor 1.
2. Ch 3, then sc in R anchor 1.
3. Ch 3, sc in L anchor 2, ch 3, sc in R anchor 2.
4. Continue to zigzag in this way up the seam, ending with sc in R anchor 81. Fasten off and weave in the ends.
Count per seam: 162 sc (81 on each strip) and 161 ch-3 loops.
Why it works: Each anchor is opposite the matching anchor on the other strip, so the strips cannot shift up or down against each other. Each ch-3 measures about 0.7 in (1.8 cm) at gauge. Across a 0.5 in (1.3 cm) gap, this leaves a soft open loop.
Tension: Keep the chains relaxed and even. Tight chains pucker the strip edges, while loose chains let the strips sag apart. If you make your chains tightly, chain with a 5 mm hook and work the sc with the 4.5 mm hook.
Size checkpoints:
– After joining 2 strips: 7.5 in (19.1 cm) wide
– After all 8 joins: (9 x 3.5 in) + (8 x 0.5 in) = 31.5 in + 4 in = 35.5 in (90.2 cm) wide
Border (Bottom Edge Only)
The eyelet columns along the outer edges already finish the sides, and the rod loops finish the top. The border runs along the bottom edge only, where it lines up the strip bottoms and keeps them square.
Border gauge: The same as the strip, 15 sts = 3.5 in (8.9 cm). Ch 2 covers about 0.5 in (1.3 cm).
Row 1 (RS): With RS facing and Color B, join with sc in the first foundation ch loop at the bottom right corner. Work 1 sc in each of the 15 foundation ch loops of each strip. Where the bottom of a join gap comes between two strips, ch 2 and continue into the next strip without working into the gap. (9 strips x 15 sc = 135 sc + 8 ch-2 sps) Do not turn.
Row 2 (RS): Ch 1, working left to right, rev sc in each sc and 2 rev sc in each ch-2 sp. (135 + (8 x 2) = 151 rev sc) Fasten off.
Why the math works: Each strip’s bottom has exactly 15 foundation loops, so the strips contribute 9 x 15 = 135 sts with no extra stitches at the seams. The 8 gaps are bridged only by the stated ch-2 spaces, each about 0.5 in (1.3 cm), which matches the join gap. The border therefore keeps the bottom edge at 35.5 in (90.2 cm) without pulling it in or making it ruffle.
The border adds 0.25 in (0.6 cm), so the finished length is 62.25 in (158.1 cm).
Final Blocking
- Weave in all remaining ends along the bars, where they are easiest to hide.
- Soak the curtain in cool water with a little wool wash or mild soap for 15 minutes.
- Gently press out the water. Do not wring it. Roll it in towels to remove more moisture.
- Lay it flat, working in sections if needed. Pin each strip to 3.5 in (8.9 cm) wide.
- Check the join gaps at 0.5 in (1.3 cm) and the full width at 35.5 in (90.2 cm).
- Pin the bottom edge straight, and check that the length is 62.25 in (158.1 cm).
- Pinch the rib columns into straight vertical lines and open each eyelet with a fingertip.
- Let the curtain dry completely, then hang it on the rod.
Final Quality-Control Checklist
- 9 strips, in the order A-B-A-B-A-B-A-B-A
- Every row of every strip has 15 sts
- Each strip has 40 rib blocks and 41 bars
- 9 raised rib columns run straight through every block
- The eyelets are open and aligned on both edges of every strip
- Each seam has 162 sc and 161 ch-3 loops, with matching anchors level on both sides
- Each tab is folded and sewn into a 1.5 in (3.8 cm) loop
- The border has 135 sc and 8 ch-2 sps in Row 1, and 151 rev sc in Row 2
- The finished size is 35.5 in x 62.25 in (90.2 cm x 158.1 cm)
Troubleshooting
The ribs lean or zigzag. You may be working the posts in the wrong direction. Use FPdc on RS rows and BPdc on WS rows.
The eyelets close up. Make sure you skip the stitch beneath each ch-1 and work dc, not sc, at the edges.
The strip gets narrower. Count the 15 sts at the end of every bar row. Missing the stitch in the top of the tch is the most common mistake.
The strips are different lengths. Count the repeats and compare the strips bar to bar before you join them. Tension in post stitches can change from one session to the next, so block any strip that is short before joining.
The seams pucker. The chains are too tight. Remove the join and rework it with a larger hook for the chains.
The curtain is wider at the bottom than at the top. Check the gap at each anchor. It should be 0.5 in (1.3 cm) all the way up the seam.
Care
Hand wash in cool water, or machine wash on a gentle cycle in a mesh bag. Reshape the curtain and dry it flat, never hanging while wet, so the strips keep their length.
Final Notes
Each measurement depends on the one before it. A gauge of 15 sts = 3.5 in (8.9 cm) gives strips 3.5 in (8.9 cm) wide. Forty repeats of 1.5 in (3.8 cm) plus the 0.5 in (1.3 cm) bottom bar give a 60.5 in (153.7 cm) body, and the 1.5 in (3.8 cm) rod loop brings each strip to 62 in (157.5 cm). Nine strips and eight 0.5 in (1.3 cm) gaps add up to 35.5 in (90.2 cm) wide, and the 0.25 in (0.6 cm) border gives a finished curtain of 35.5 in x 62.25 in (90.2 cm x 158.1 cm). If you check each stage, the finished curtain will hang straight and even.
Happy crocheting!