

This lace strip has a bright orange lantern inside an open lavender frame. It is inspired by Moroccan pierced-metal lanterns. The lantern has a domed cap, small round windows, tall barred windows and a pointed base. A short cord with a round ball hangs from the bottom point.
The pattern uses two colors of DK-weight cotton: orange for the lantern and purple for the frame. All instructions use US crochet terms. The finished strip measures about 4.5 in (11.4 cm) wide and 8.5 in (21.6 cm) tall. With the drop, the total length is about 10.25 in (26.0 cm).
You work the lantern first, top-down in 16 short rows. Then you work three purple rounds around it to form the frame and the chain-loop lattice. A three-row header squares off the top. Last, you add the orange drop and ball, worked in one piece without sewing.
This pattern covers one strip. It works on its own as a window hanging, a bookmark-style wall piece or an ornament.
Finished Size and Construction
- Finished size: 4.5 in x 8.5 in (11.4 cm x 21.6 cm); 10.25 in (26.0 cm) long with the drop
- Skill level: Intermediate
- Terminology: US
- Yarn weight: DK / light (#3) cotton
- Hook: 3.5 mm (E-4)
- Number of pieces: 1 (the lantern, frame, header and drop are all worked onto each other)
- Layout: One vertical strip
- Lantern size: 2.6 in x 5.75 in (6.6 cm x 14.6 cm)
- Size before border: 2.6 in x 5.75 in (6.6 cm x 14.6 cm), which is the bare lantern
- Border depth: about 1 in (2.5 cm) on each side from frame Rounds 1–3, plus a 0.75 in (1.9 cm) header at the top center
Materials
Use a smooth mercerized cotton or a cotton blend in DK weight. Cotton holds the open windows crisply and blocks flat. Avoid fuzzy or very soft acrylics, because the lattice tends to blur and stretch.
Yarn (these amounts assume about 2.5 m per gram):
– Orange (A): 12 g, about 30 m, for the lantern, cord and ball
– Lavender purple (B): 15 g, about 38 m, for the frame and header
The quantities include a margin of about 25% for your gauge swatch and weaving in ends.
Tools:
– 3.5 mm (E-4) crochet hook
– Tapestry needle
– 4 locking stitch markers
– A pinch of fiberfill or orange yarn scraps for the ball
– Blocking mat, rust-proof pins and a spray bottle
– Ruler or tape measure
Abbreviations (US Terms)
- ch – chain
- sl st – slip stitch
- sc – single crochet
- hdc – half double crochet
- dc – double crochet
- tr – treble crochet
- sk – skip
- sp – space
- st(s) – stitch(es)
- sc2tog – single crochet 2 together
Special stitches:
– dc2tog: [yarn over, insert hook in next st, pull up a loop, yarn over, pull through 2 loops] twice, then yarn over and pull through all 3 loops on the hook.
– dc5tog: Work as dc2tog, but over 5 sts. Pull through all 6 loops at the end.
Gauge and Checkpoints
Gauge: 20 dc and 10 dc rows = 4 in (10.2 cm). The sc rows in this pattern are each about 0.2 in (0.5 cm) tall.
Your test piece is the lantern itself. It is small, so make it, measure it, and adjust before you add the frame.
Checkpoints:
– After Row 2: 8 sts measure 1.6 in (4.1 cm) wide.
– After Row 3: 13 sts measure 2.6 in (6.6 cm) wide.
– After Row 11: The lantern is 2.6 in x 3.8 in (6.6 cm x 9.7 cm).
– After Row 16: The lantern is 2.6 in x 5.75 in (6.6 cm x 14.6 cm).
– After frame Round 1: about 3 in x 6.25 in (7.6 cm x 15.9 cm).
– After frame Round 2: about 4 in x 7.25 in (10.2 cm x 18.4 cm).
– After frame Round 3: about 4.5 in x 7.75 in (11.4 cm x 19.7 cm).
If your lantern is too big: Go down a hook size, to 3.25 mm (D-3). If it is too small: Go up a size, to 3.75 mm (F-5). Do not change the stitch counts. The frame math depends on them.
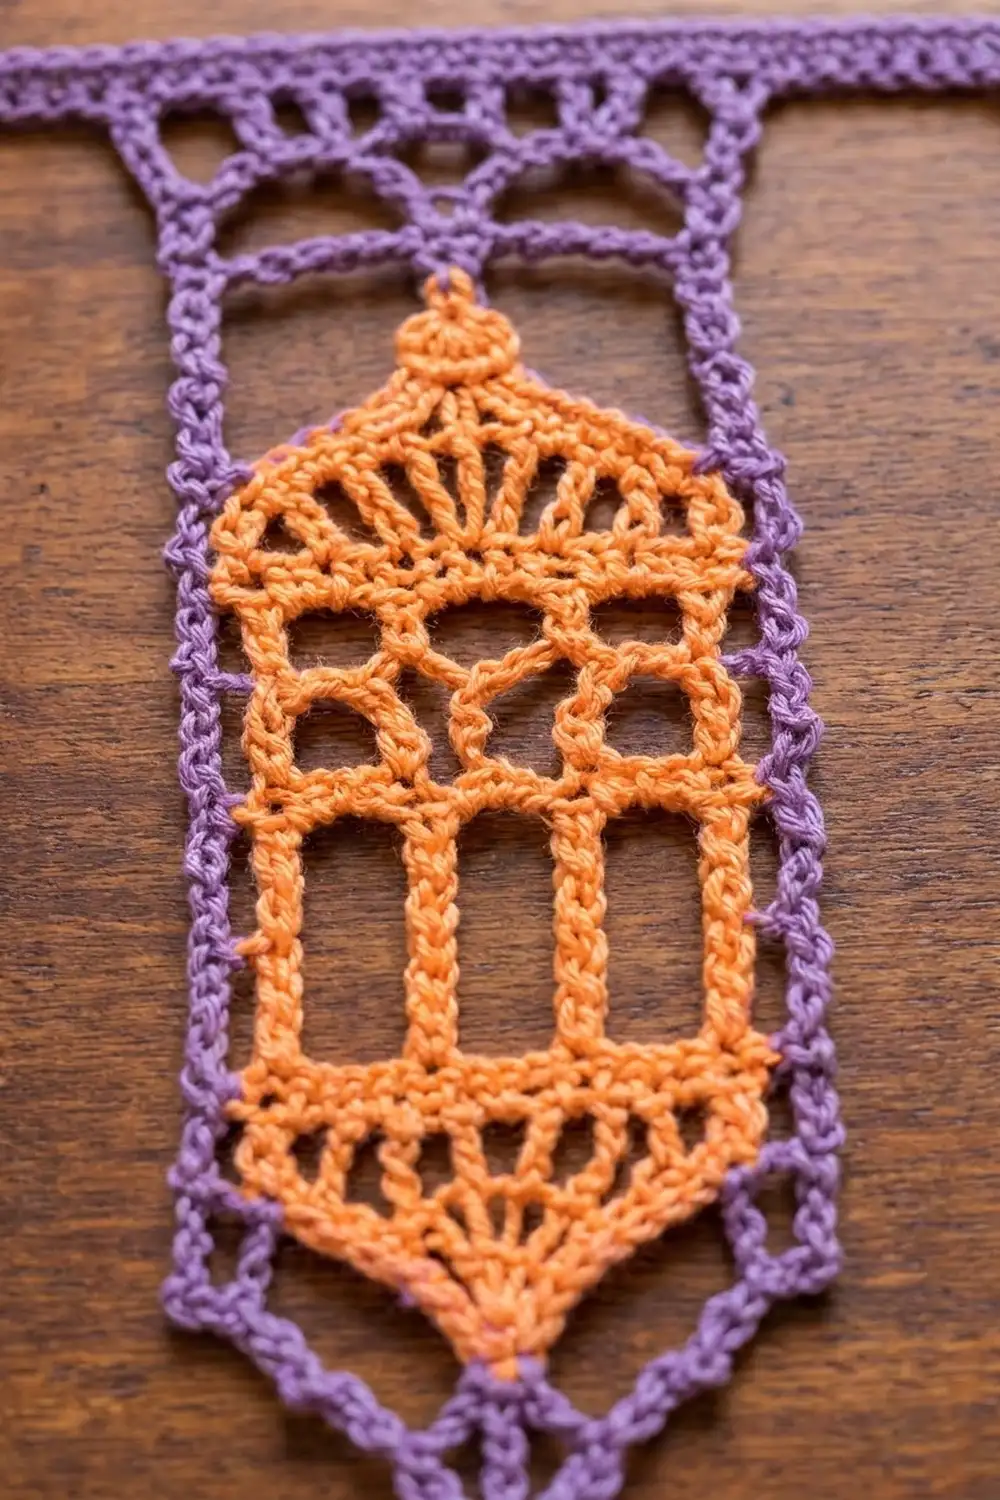
Lantern (Color A, Orange)
The lantern is worked top-down in turned rows. The beginning ch-3 counts as a dc throughout, except where it says “ch 2 (does not count)”.
Row 1 (finial knob): Ch 4. Work 3 dc in the 4th ch from the hook. Turn. (4 sts)
Row 2: Ch 3, dc in the first st, 2 dc in each of the next 3 sts. Turn. (8 sts)
Row 3 (dome): Ch 3, dc in the first st, [dc in the next st, 2 dc in the next st] 3 times, 2 dc in the last st. Turn. (13 sts)
These three rows fan out into the solid domed cap.
Row 4 (dome band): Ch 1, sc in each st across. Turn. (13 sc)
Row 5 (small windows): Ch 3, [ch 1, sk 1 st, dc in the next st] 6 times. Turn. (13 sts: 7 dc and 6 ch-1 sps)
Row 6 (middle band): Ch 1, sc in each dc and each ch-1 sp across. Turn. (13 sc)
Row 7 (tall windows begin): Ch 3, [ch 2, sk 2 sts, dc in the next st] 4 times. Turn. (13 sts: 5 dc and 4 ch-2 sps)
Rows 8–9: Ch 3, [ch 2, dc in the next dc] 4 times, working the last dc in the top of the turning ch. Turn. (13 sts per row)
Rows 7–9 stack the five dc posts into five straight vertical bars with four tall rectangular windows between them.
Row 10 (lower band): Ch 1, sc in the first dc, [2 sc in the next ch-2 sp, sc in the next dc] 4 times. Turn. (13 sc)
Row 11 (base band): Ch 3, dc in each st across. Turn. (13 dc)
Checkpoint: 2.6 in x 3.8 in (6.6 cm x 9.7 cm).
Row 12 (cone): Ch 2 (does not count), dc2tog, dc in the next 9 sts, dc2tog. Turn. (11 sts)
Row 13: Ch 2 (does not count), dc2tog, dc in the next 7 sts, dc2tog. Turn. (9 sts)
Row 14: Ch 2 (does not count), dc2tog, dc in the next 5 sts, dc2tog. Turn. (7 sts)
Row 15: Ch 2 (does not count), dc2tog, dc in the next 3 sts, dc2tog. Turn. (5 sts)
Row 16 (point): Ch 2 (does not count), dc5tog. (1 st)
Fasten off and weave in the ends.
Row-end tally (you need this for the frame): The lantern has 13 dc rows (1, 2, 3, 5, 7, 8, 9, 11, 12, 13, 14, 15 and 16) and 3 sc rows (4, 6 and 10).
Frame and Header (Color B, Purple)
Border Gauge
Along the finished outer rail (Round 3), the sc run at about 6 sc per inch (2.5 cm).
Round 1: Edging
Hold the lantern with the finial at the top. Join B in the foundation ch at the tip of the finial.
- Top: Ch 1, then work 3 sc in the foundation ch. These are sts 1–3, and the middle one is the top center.
- First side: Work down the side along the row ends. Work 2 sc in each dc row-end and 1 sc in each sc row-end. That gives (13 x 2) + 3 = 29 sc.
- Bottom: Work 3 sc in the dc5tog point. The middle one is the bottom center.
- Second side: Work 29 sc up the second side the same way.
Join with a sl st to the first sc.
Count: 3 + 29 + 3 + 29 = 64 sc.
Round 2: Lattice Loops
Sl st in the next sc, which is the top center. Ch 1 and sc in the same st. Then [ch 5, sk 3 sc, sc in the next sc] 15 times. Ch 5, sk 3 sc, and join with a sl st to the first sc.
Count: 16 ch-5 loops.
Why it works: 64 ÷ 4 = 16 loops exactly. The top center (st 2) and the bottom center (st 34) are 32 sts apart, and 32 is a multiple of 4. That puts one sc at each center, so the lattice is symmetrical. The loops form the purple chain spokes that link the lantern to the outer frame.
Round 3: Outer Rail
Sl st into the first loop and ch 1.
- Work 7 sc in each of loops 1–8. This takes you down to the bottom point.
- Ch 2 for the point.
- Work 7 sc in each of loops 9–16.
Join with a sl st to the first sc.
Count: 112 sc plus 1 ch-2 point space.
Place markers so you can count each section:
– Header: loops 15, 16, 1 and 2 = 28 sc
– First side: loops 3–8 = 42 sc
– Second side: loops 9–14 = 42 sc
Check: 28 + 42 + 42 = 112, so every stitch is assigned once.
Size check: about 4.5 in x 7.75 in (11.4 cm x 19.7 cm). Fasten off.
Header: Squaring the Top
Join B in the first sc of loop 15. You will work across the 28 header sts only, in rows.
Row 1: Ch 4 (counts as tr), then work:
– tr in each of the next 3 sts
– dc in each of the next 3 sts
– hdc in each of the next 3 sts
– sc in each of the next 8 sts
– hdc in each of the next 3 sts
– dc in each of the next 3 sts
– tr in each of the last 4 sts
Turn. (28 sts)
Tall stitches at the ends and short ones in the middle fill the dip on each side of the lantern’s knob. This turns the rounded top into a straight line.
Row 2: Ch 1, sc in each st across. Turn. (28 sc)
Row 3 (arches): Ch 1, sc in the first st, [ch 3, sk 2 sts, sc in the next st] 9 times. (9 arches)
Why it works: Each arch uses 3 sts, and 1 + (9 x 3) = 28. The row ends exactly in the last stitch.
Fasten off. The center of the header adds about 0.75 in (1.9 cm). The total height is now 8.5 in (21.6 cm).
Drop and Ball (Color A, Orange)
Join A in the ch-2 point space at the bottom. Sc in the space, then ch 6.
The ball is worked in a continuous spiral, without joining. Place a marker in the first st of each round.
- Ball Round 1: Work 6 sc in the 2nd ch from the hook. (6 sc)
- Ball Round 2: 2 sc in each st around. (12 sc)
- Ball Round 3: Sc in each st around. (12 sc)
- Ball Round 4: Sc2tog 6 times. (6 sts)
Stuff the ball firmly with fiberfill or scraps. Fasten off, leaving a tail. Thread the tail through the front loops of the last 6 sts and pull tight to close.
The remaining 5 ch form a cord about 1 in (2.5 cm) long, and the ball is about 0.75 in (1.9 cm) across. Together the drop adds 1.75 in (4.4 cm), for a total length of 10.25 in (26.0 cm).
Final Blocking
- Weave in all the ends on the back. Run each tail along a solid band rather than across a window.
- Soak the strip in cool water for 10 minutes, then press out the water in a towel. Do not wring it.
- Pin the strip on a mat to 4.5 in x 8.5 in (11.4 cm x 21.6 cm). Measure the width at the widest point.
- Pin the header straight first. Then pin both side rails parallel, and pull the bottom point to a sharp tip.
- Pin each of the four tall windows open into a clean rectangle. Use one pin at each corner.
- Ease the lattice loops so the spokes all look about the same length.
- Let the drop hang off the edge of the mat so the ball keeps its round shape.
- Let it dry completely, which takes about 12–24 hours, before unpinning.
Final Quality-Control Checklist
- Lantern counts: 4, 8, 13, 13, 13, 13, 13, 13, 13, 13, 13, 11, 9, 7, 5, 1.
- There are 4 tall windows with 5 straight bars, and 6 small windows above them.
- Round 1 has 64 sc, with 29 sc on each side.
- Round 2 has 16 loops, with an sc at both the top center and the bottom center.
- Round 3 has 112 sc: a 28-st header and 42 sc on each side.
- The header has 9 arches and a straight top edge.
- The finished size is 4.5 in x 8.5 in (11.4 cm x 21.6 cm), plus a 1.75 in (4.4 cm) drop.
- The ball is closed tight, with no stuffing showing.
- All ends are woven in invisibly.
Troubleshooting
- The windows look slanted: You likely worked a dc into a ch-2 space instead of into the dc post. Every dc in Rows 8–9 must go into the dc below it.
- The dome cups or ruffles: Your tension on the increase rows is too loose. Redo Row 3 a little tighter, or go down half a hook size for Rows 1–3 only.
- Round 1 puckers or flares: Recount the row ends. Each dc row-end gets 2 sc and each sc row-end gets 1 sc, so each side has 29.
- The lattice is off-center: Round 2 must start in the top-center sc of Round 1, which is st 2.
- The header bows upward: Check that you placed the tr groups at the ends and the sc group in the middle, not the other way around.
- The point is blunt: Pin it sharply while blocking. You can also add 1 extra ch in the point space (ch 3 instead of ch 2).
- The ball is lumpy: Add more stuffing before Round 4, and pull the closing tail firmly.
Care
Hand wash in cool water with a mild soap, and lay flat to dry. If the strip loses its shape, re-pin the windows and the point while it is damp.
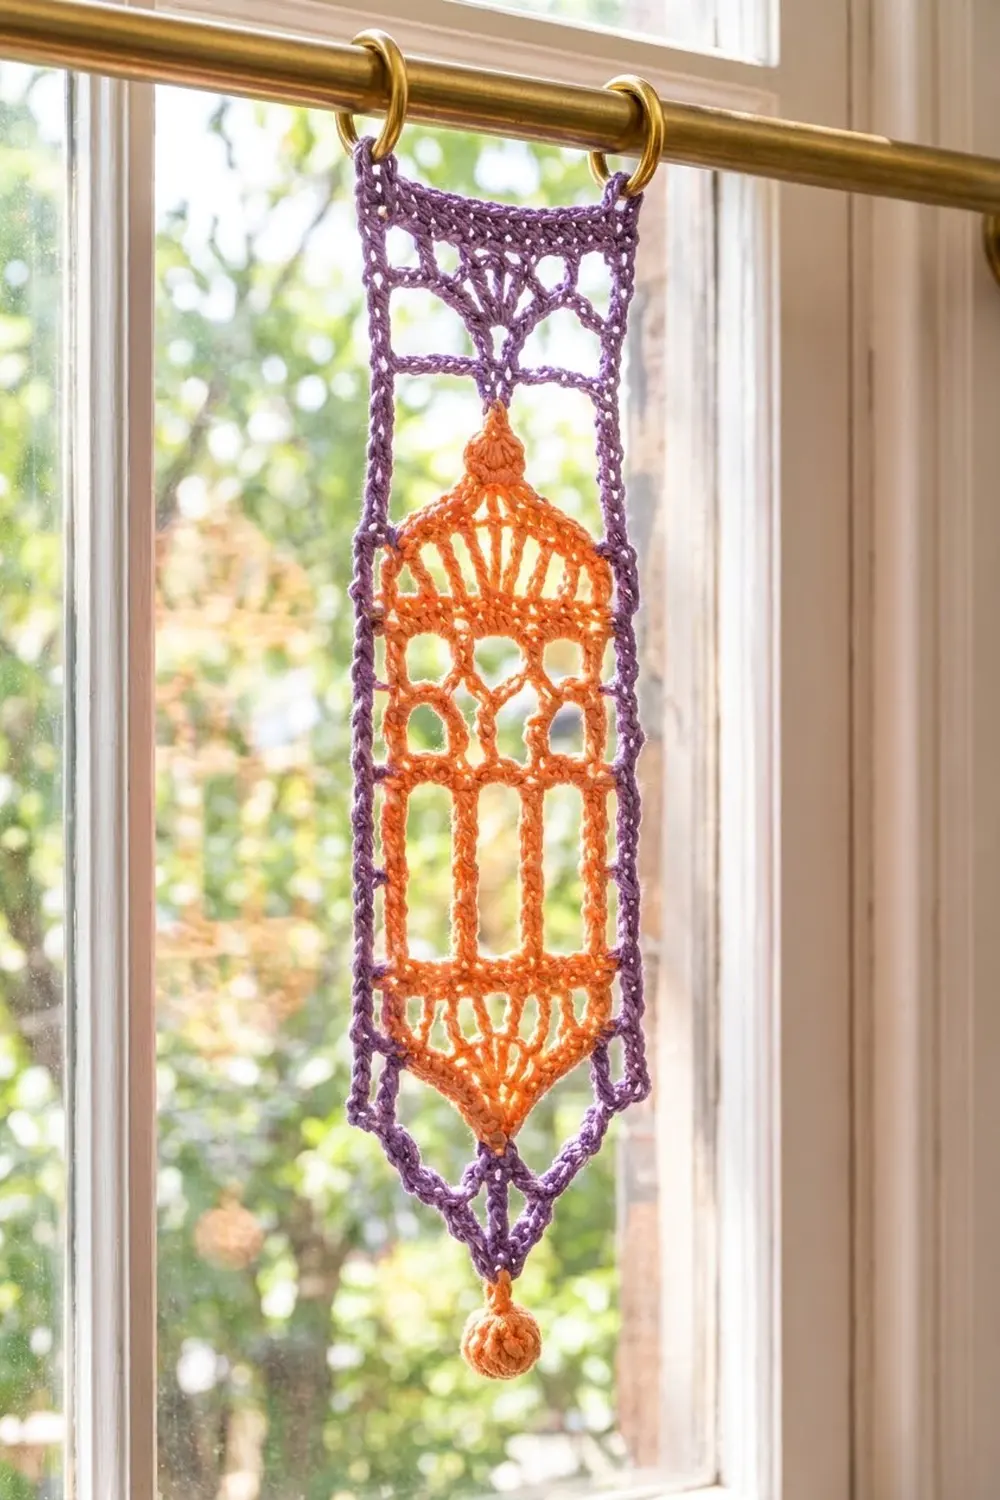
Final Notes
Here is the measurement chain from start to finish:
– A lantern 13 sts wide measures 2.6 in (6.6 cm), with 13 dc rows and 3 sc rows.
– The lantern is 5.75 in (14.6 cm) tall.
– Round 1 has 64 sc and brings the piece to 3 in (7.6 cm) wide.
– Round 2 has 16 loops and brings it to 4 in (10.2 cm) wide.
– Round 3 has 112 sc, split 28 + 42 + 42, and brings it to 4.5 in (11.4 cm) wide.
– The header adds 0.75 in (1.9 cm), for a height of 8.5 in (21.6 cm).
– The drop adds 1.75 in (4.4 cm), for a total length of 10.25 in (26.0 cm).
If each checkpoint matches, the next stage will fit without forcing. Measure as you go, block with patience, and your lantern will hold its shape.
Happy crocheting!