

The Little Regatta Sailboat is a light, lacy ornament with bright colors. A cobalt-blue hull sits under two triangular sails, one coral red and one sunny yellow. A slim blue mast runs between the sails and ends in a teardrop hanging loop. It looks good on a Christmas tree, a nursery mobile or a gift tag.
Everything is openwork. The hull has graduated posts and two V-stitches, and the sails have ladder-style posts with horizontal bars. Thick single crochet outlines give the shape crisp edges, so it reads clearly even from across the room.
This pattern uses US crochet terms. The finished ornament measures 4.25 in (10.8 cm) wide by 4.75 in (12.1 cm) tall, including the loop.
Construction is all one piece. You work the hull from the deck rail downward and outline it in blue. Then you work each sail in rows directly off the rail and outline it in its own color. Last, you chain the mast and loop and slip stitch the mast down and back up, which fastens both sails to it.
Finished Size and Construction
- Finished size: 4.25 in (10.8 cm) wide x 4.75 in (12.1 cm) tall
- Skill level: Intermediate (easy shaping, careful counting)
- Terminology: US crochet terms
- Yarn weight: Sport-weight cotton (#2 Fine)
- Hook: 3.0 mm
- Number of pieces: 1 (worked continuously, no sewing of separate pieces)
- Layout: Crescent hull at the bottom, center mast, red sail on the left, yellow sail on the right
- Piece size: Hull 4.25 in (10.8 cm) wide x 1.25 in (3.2 cm) deep at center; each sail 1.8 in (4.6 cm) at the base
- Size before border: 4.25 in (10.8 cm) wide x 3.5 in (8.9 cm) tall (hull plus sails, no loop)
- Border depth: About 0.125 in (0.3 cm) of sail outline, plus a 1 in (2.5 cm) hanging loop
Materials
Use a smooth, mercerized sport-weight cotton. It gives crisp stitch definition and holds the open sections flat. Acrylic works, but the posts will look softer and you may need to block more firmly.
- Cobalt blue (hull, mast, loop): 6 g, about 18 m
- Coral red (left sail): 3 g, about 9 m
- Sunny yellow (right sail): 3 g, about 9 m
Tools:
– 3.0 mm crochet hook
– Tapestry needle
– Scissors
– Stitch markers (2–3)
– Blocking mat and rust-proof pins
– Spray bottle with water
These quantities include a margin of roughly 30% for your gauge swatch and weaving in ends.
Abbreviations (US Terms)
- ch: chain
- sl st: slip stitch
- sc: single crochet
- hdc: half double crochet
- dc: double crochet
- tr: treble crochet
- sk: skip
- sp: space
- st(s): stitch(es)
- RS / WS: right side / wrong side
- sc3tog: single crochet 3 together
Special stitch: tr2tog with a skip (V-stitch). Yarn over twice and insert your hook in the next st. Pull up a loop, then [yarn over, pull through 2 loops] twice; 2 loops stay on the hook. Skip 1 st. Yarn over twice and insert your hook in the next st. Pull up a loop and [yarn over, pull through 2 loops] twice; 3 loops are on the hook. Yarn over and pull through all 3. Together this uses 3 stitch positions and makes 1 stitch. The hull is worked from the top down, so the two legs spread at the rail and meet at the bottom, which makes a “V” when the boat is upright.
Gauge and Checkpoints
Gauge: 12 sc x 14 rows = 2 in (5.1 cm) square. One dc row is about 0.4 in (1.0 cm) tall.
Make a small swatch first. The ornament is small, so if your gauge is a little off, the whole boat changes size and the sails may not line up with the mast.
Checkpoints:
– After Hull Row 1: 4 in (10.2 cm) wide.
– After Hull Row 3: about 0.85 in (2.2 cm) deep at the center, tapering to the tips.
– After the hull outline: 4.25 in (10.8 cm) x 1.25 in (3.2 cm).
– After Sail Row 9: 1.8 in (4.6 cm) at the base x 2.25 in (5.7 cm) tall.
– After the sail outline: 2.5 in (6.4 cm) tall.
Too big? Go down to a 2.75 mm hook. Too small? Go up to a 3.25 mm hook. Don’t change the stitch counts. The symmetry depends on them.
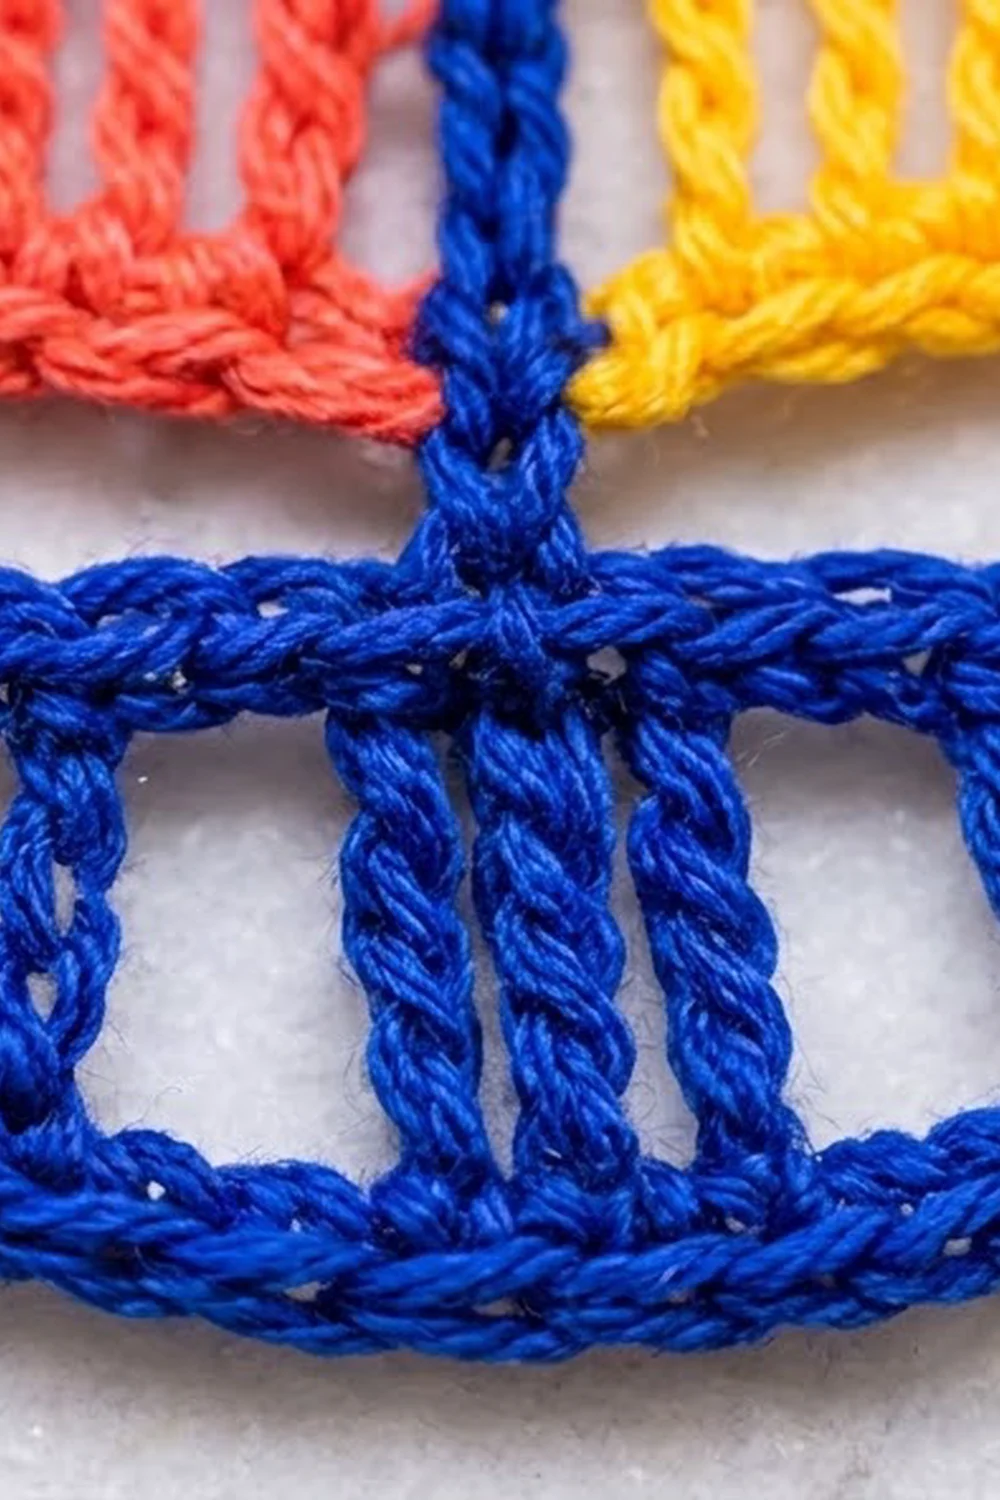
Hull (Cobalt Blue)
The hull is worked from the deck rail downward. The stitch heights increase toward the center (sc, hdc, dc, tr), which gives the bottom its curve without any extra shaping.
Row 1 (RS): Ch 25. Sc in the 2nd ch from the hook and in each ch across. Turn. (24 sc)
Checkpoint: 4 in (10.2 cm) wide.
Row 2 (WS): Ch 1. Then work these stitch positions, numbered 1–24 across Row 1:
– Sc in st 1, ch 1, sk st 2.
– Hdc in st 3, ch 2, sk sts 4–5.
– Dc in st 6, ch 1, sk st 7.
– tr2tog using sts 8 and 10 (skipping st 9), ch 1.
– Tr in each of sts 11, 12, 13 and 14 (center post cluster).
– Ch 1, tr2tog using sts 15 and 17 (skipping st 16).
– Ch 1, sk st 18, dc in st 19.
– Ch 2, sk sts 20–21, hdc in st 22.
– Ch 1, sk st 23, sc in st 24.
Turn.
(12 sts + 10 ch = 22 positions)
Count check: the left half has 4 sts (sc, hdc, dc, tr2tog) and 5 ch. The center has 4 tr. The right half mirrors the left with 4 sts and 5 ch. That gives 8 + 4 = 12 sts and 10 ch.
Row 3 (RS): Ch 1. Sc in each st and in each ch across, including the top of each tr2tog. Do not turn. (22 sc)
Checkpoint: about 0.85 in (2.2 cm) deep at the center. The sc at each end should sit almost on the rail, which forms the pointed tips.
Rnd 4, Hull Outline (RS): Continue with blue and work around the whole hull.
– First tip: Work 3 sc evenly into the side of the tip, covering the ends of Rows 3, 2 and 1.
– Deck rail: Work 1 sc into each free loop of the foundation chain. (24 sc)
– Second tip: Work 3 sc evenly into the side of the tip.
– Bottom: Sc in each sc of Row 3. (22 sc)
– Sl st to the first sc. Fasten off.
(52 sc: 3 + 24 + 3 + 22)
Number the 24 deck-rail sc from 1 to 24 in the order you worked them. Stitch 1 is next to the right tip and stitch 24 is next to the left tip when the RS faces you. Put markers in sts 12 and 13. That’s where the mast goes.
Checkpoint: 4.25 in (10.8 cm) wide x 1.25 in (3.2 cm) deep. The rail now has a double line, the same as the bottom.
Sails
The two sails are identical right triangles. Each one is worked in rows off the deck-rail outline, using the 11 sts on its side of the mast. The vertical edge sits next to the mast. All the decreases happen on the outer, slanted edge, so the dc posts stack straight up in neat ladders.
Left Sail (Coral Red)
Row 1 (RS): With the RS facing, join red in rail st 14. Ch 1, sc in the same st and in each st through st 24. Turn. (11 sc) This row starts at the mast and ends at the outer edge.
Row 2: Sl st in the first 3 sc. Ch 3 (counts as dc here and throughout), ch 1, sk next sc, dc in next sc; repeat from * to the end. Turn. (5 dc + 4 ch-1 sps = 9 sts)*
Row 3: Ch 1, sc in each dc and each ch-1 sp across, ending in the top of the turning ch. Turn. (9 sc)
Row 4: Sl st in the first 3 sc, ch 3, ch 1, sk next sc, dc in next sc; repeat from * to the end. Turn. (4 dc + 3 ch-1 sps = 7 sts)*
Row 5: Ch 1, sc in each st across. Turn. (7 sc)
Row 6: Sl st in the first 3 sc, ch 3, ch 1, sk next sc, dc in next sc; repeat from * to the end. Turn. (3 dc + 2 ch-1 sps = 5 sts)*
Row 7: Ch 1, sc in each st across. Turn. (5 sc)
Row 8: Sl st in the first 3 sc, ch 3, ch 1, sk next sc, dc in the last sc. Turn. (2 dc + 1 ch-1 sp = 3 sts)
Row 9: Ch 1, sc3tog. (1 st) Don’t fasten off. Go straight on to the sail outline in the Border section.
Why the ladders line up: every dc row starts 2 sts in from the outer edge. Each dc then lands on a sc that sits right above an earlier dc, so the posts form straight vertical columns. The post next to the mast runs the full height of the sail.
Checkpoint: 1.8 in (4.6 cm) at the base x 2.25 in (5.7 cm) tall.
Right Sail (Sunny Yellow)
Turn the hull over so the WS faces you. Join yellow in rail st 11, the stitch next to the mast, and work Row 1 into sts 11 down to 1. (11 sc) Working from the WS means the row still runs right to left, from the mast out to the tip.
Work Rows 2–9 exactly as for the left sail. The sc and dc fabric looks nearly the same on both sides, so the two sails will match.
Border: Sail Outlines, Mast and Loop
Border gauge: Along row ends, work 1 sc per sc row and 2 sc per dc row. This matches the 7 sc rows per inch gauge, so the edge doesn’t ripple or pucker.
Part A: Sail Outline (each sail, in its own color)
Continue from Row 9.
Outline: Ch 1. Work down the slanted edge:
– 1 sc in the side of Row 9.
– 2 sc in the end of each dc row (Rows 8, 6, 4 and 2).
– 1 sc in the end of each sc row (Rows 7, 5, 3 and 1).
(13 sc: 1 + 8 + 4)
Finish with a sl st in the next tip st of the hull outline. Fasten off.
The outline skips over the sl st steps, which lie flat underneath and leave a smooth slanted edge. You don’t outline the base, because Row 1 already gives a solid line along the rail. You don’t outline the mast edge either, because the mast covers it.
Repeat for the second sail.
Why the math works: each sail has 5 sc rows (Rows 1, 3, 5, 7, 9) and 4 dc rows (Rows 2, 4, 6, 8). Using the border gauge, that’s 5 x 1 + 4 x 2 = 13 sc. That’s the right number for an edge about 2.25 in (5.7 cm) long.
Checkpoint: each sail is 2.5 in (6.4 cm) tall.
Part B: Mast and Hanging Loop (Cobalt Blue)
- Join blue in rail st 12. Ch 20 for the mast, about 2.5 in (6.4 cm).
- Ch 14 more. Sl st in the 20th mast chain (the last mast chain before the loop chains) to close the loop.
- Ch 1 and work 20 sc into the loop. Sl st into the same 20th mast chain.
- Down pass: Sl st into the back bump of each of the 19 remaining mast chains. On each one, insert your hook through the mast-side edge of the red sail as well, wherever the sail lies level with the chain. That’s about 2 of every 3 sl sts. Finish with a sl st in rail st 13. (19 sl st + 1)
- Up pass: Sl st into the front loop of each of the 20 mast chains, catching the mast-side edge of the yellow sail the same way. Sl st at the base of the loop. (20 sl st)
- Fasten off and weave in the end through the loop sc.
Why the math works: the mast covers rail sts 12 and 13, the two center stitches. The sails use 11 sts on each side, and 11 + 2 + 11 = 24, the full rail count. The mast also sits directly above the 4 center treble posts in the hull, so the mast line looks like it runs right through the boat.
Final Blocking
- Weave in all ends along stitches of the same color.
- Lightly mist the ornament with water until it’s damp but not wet.
- Pin it flat, RS up, to 4.25 in (10.8 cm) wide at the hull tips.
- Pin the mast straight and vertical. Check it with a ruler from the center of the rail to the base of the loop.
- Pin each sail apex to the mast and pin the slanted edges straight.
- Open the hull spaces with pins so the V-stitches and posts sit evenly.
- Shape the loop into a teardrop about 1 in (2.5 cm) tall.
- Let it dry completely, at least 6 hours.
- If you want it stiffer, brush on a diluted fabric stiffener and dry it pinned again.
Final Quality-Control Checklist
- Hull Row 1 has 24 sc, Row 2 has 22 positions and Row 3 has 22 sc.
- The hull outline has 52 sc (3 + 24 + 3 + 22).
- Each sail has 11 sts at the base and narrows to 1 st at the apex.
- Each sail outline has 13 sc.
- The mast sits on rail sts 12 and 13, centered over the 4 trebles.
- Both sails are fastened to the mast with no gaps.
- The finished size is 4.25 in (10.8 cm) x 4.75 in (12.1 cm).
- The loop is firm and teardrop-shaped.
- All ends are woven in and invisible from the RS.
Troubleshooting
- Hull bottom looks flat, not curved: Check that the center stitches really are tr and the ends are sc. Block with the center pinned lower.
- Hull tips flare or curl: Use only 3 sc in each tip; adding more makes them flare.
- Sail posts lean: You probably started a dc row in the wrong stitch. Every dc row starts 2 sts in from the outer edge.
- Sail is shorter than the mast: Your dc rows are too short. Pull up a slightly taller first loop, or shorten the mast by 1–2 ch.
- Slanted edge ripples: Use exactly 13 sc and go down a hook size for the outline only.
- Mast twists: Make sure the mast chain isn’t twisted before the down pass, and keep the sl sts loose.
- Loop is floppy: Pack the 20 sc tightly, or stiffen the loop only.
Care
Hand wash in cool water, press out the water in a towel, and dry flat while pinned to shape. Store flat or hanging, away from heavy ornaments that could bend the mast.

Final Notes
Each step builds on the previous measurement:
– Hull Row 1 is 24 sc = 4 in (10.2 cm).
– The outline brings the hull to 4.25 in (10.8 cm) x 1.25 in (3.2 cm).
– Each sail starts on 11 rail sts, is 1.8 in (4.6 cm) wide and 2.25 in (5.7 cm) tall, and becomes 2.5 in (6.4 cm) tall after the 13-sc outline.
– The 20-ch mast is 2.5 in (6.4 cm) and the loop adds 1 in (2.5 cm).
Altogether, that gives a 4.25 in (10.8 cm) x 4.75 in (12.1 cm) ornament. If you hit each checkpoint, the sails will meet the mast cleanly and the boat will hang straight.
Happy crocheting!