

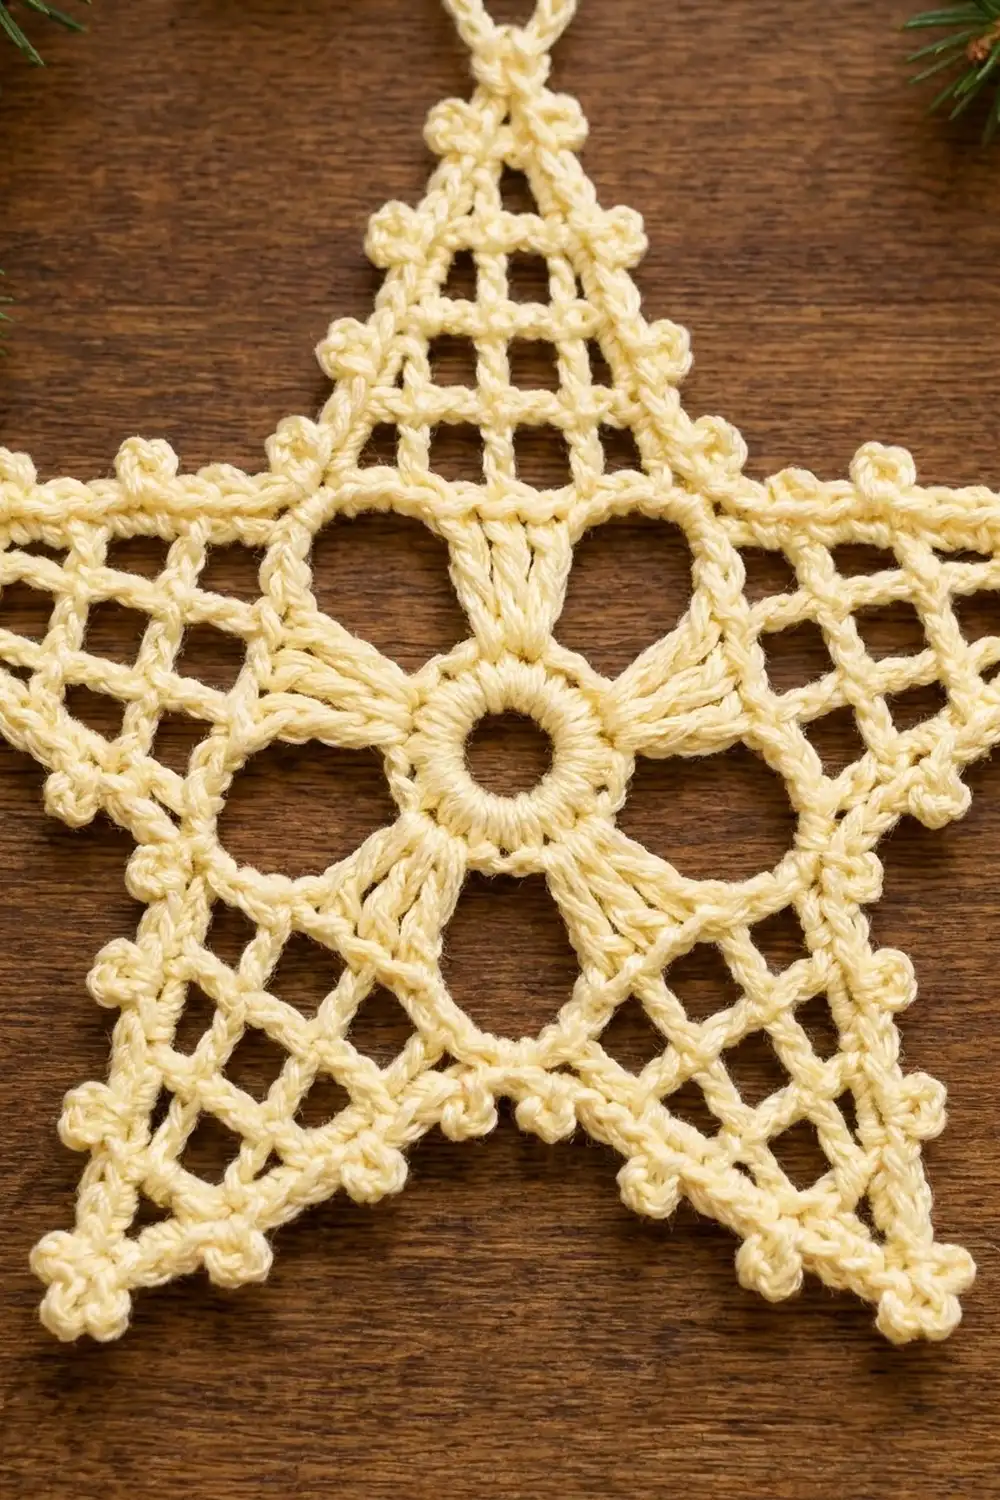
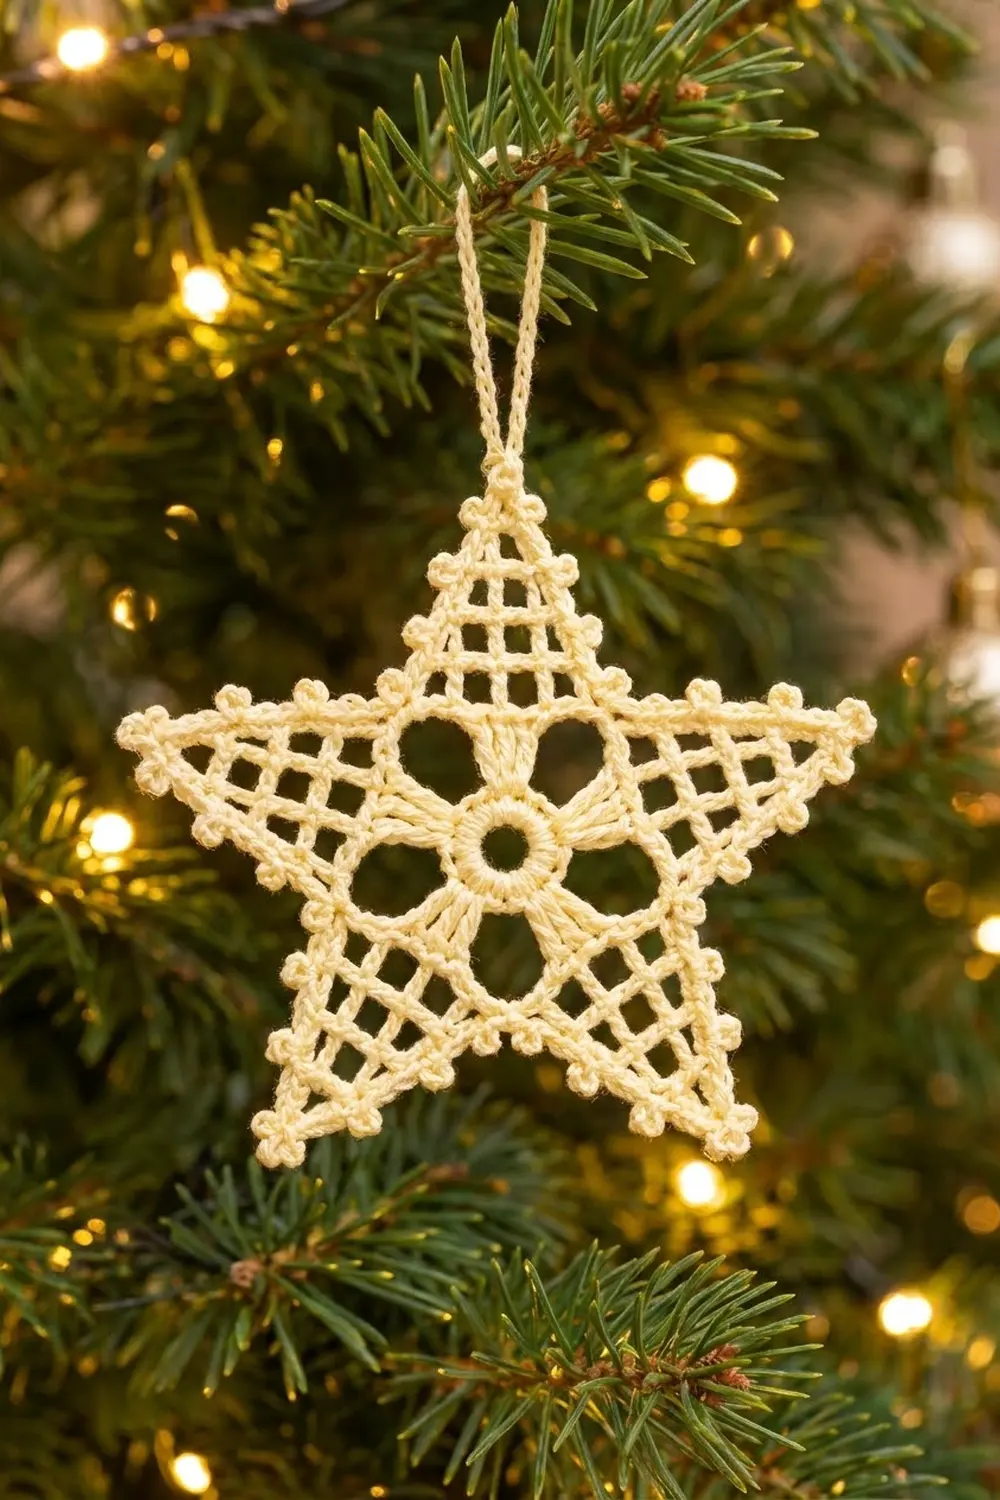
The Candlelight Lace Star is a delicate thread ornament made to catch the glow of tree lights. A tiny flower sits at its heart: a tight center ring, five open petal loops, and slim spokes that run out toward each point. Around the flower, five filet mesh points taper to crisp tips, and a picot-dotted border finishes the edge.
The sample is worked in a single soft cream / butter-yellow cotton thread, which suits the vintage, heirloom look of the lace. Off-white, ivory, metallic gold, or bright white would work just as well.
This pattern uses US crochet terms. The finished star measures about 4.5 in (11.4 cm) wide from tip to tip and 4.25 in (10.8 cm) tall, not counting the hanging loop.
Construction is simple. You work the flower center in joined rounds, then a mesh round that sets the base of all five points. Each point is worked separately in short turned rows that shrink by one mesh space per row. A single border round outlines the whole star, adds the picots, and forms the hanging loop at the top tip.
Finished Size and Construction
- Finished size: 4.5 in (11.4 cm) wide tip to tip × 4.25 in (10.8 cm) tall
- Skill level: Intermediate (thread work, row-end edging)
- Terminology: US crochet terms
- Yarn weight: Size 10 cotton crochet thread (Lace / 0)
- Hook: 1.5 mm steel hook
- Number of pieces: 1
- Layout: Single five-pointed star motif
- Piece size: 4.5 in (11.4 cm) wide after border
- Size before border: 4.25 in (10.8 cm) wide × 4 in (10.2 cm) tall
- Border depth: about 0.125 in (0.3 cm) per edge, plus picots
- Hanging loop: chain-15 loop, hangs about 0.75 in (1.9 cm) above the top tip
Materials
Yarn advice: Choose a firm, mercerized size 10 cotton thread. Mercerized thread holds a crisp edge, shows the mesh clearly, and takes starch well. Avoid fuzzy or very soft cotton, because it blurs the grid and the picots.
- Cream / butter yellow: 5 g, about 26 m (28 yd)
Tools:
- 1.5 mm steel crochet hook
- Fine tapestry needle
- Small sharp scissors
- Stitch marker
- Rustproof pins and a foam blocking board
- Fabric stiffener or spray starch
- Plastic wrap
The quantity includes a safety margin of about 20% for your gauge swatch, the joining tails, and minor tension differences.
Abbreviations (US Terms)
- ch – chain
- sl st – slip stitch
- sc – single crochet
- hdc – half double crochet
- dc – double crochet
- sk – skip
- sp – space
- st(s) – stitch(es)
- RS – right side
Special stitch – picot: Ch 3, sl st in the 3rd ch from the hook (the first ch made).
Gauge and Checkpoints
Thread gauge varies a lot from one crocheter to the next, so make one complete star as your test piece before you start a batch. Measure at each of these stages, lying the piece flat and unstretched:
- After Rnd 1: the ring is about 0.5 in (1.3 cm) across.
- After Rnd 2: about 1.25 in (3.2 cm) across.
- After Rnd 3 (flower): about 1.75 in (4.4 cm) across.
- After Rnd 4 (mesh base): about 2.25 in (5.7 cm) across. This is the main gauge.
- After each point: the point stands about 1.1 in (2.8 cm) above the Rnd 4 edge, which is about 0.22 in (0.6 cm) per row.
- Before border: 4.25 in (10.8 cm) wide.
- After border: 4.5 in (11.4 cm) wide.
If your piece is too big: go down to a 1.25 mm hook, or tighten your chain spaces.
If your piece is too small: go up to a 1.75 mm hook.
If the flower cups or ruffles at Rnd 3, fix that first. Every later round depends on Rnd 3 lying flat.
Flower Center
Work in joined rounds with the RS facing. Do not turn.
Rnd 1: Ch 8, then sl st to the first ch to form a ring. Ch 1, work 20 sc into the ring, and sl st to the first sc to join. (20 sc)
Pack the stitches snugly so the ring stays round and open in the middle.
Rnd 2: Ch 3 (counts as dc), dc in the next st, ch 7, sk 2 sts. Dc in each of the next 2 sts, ch 7, sk 2 sts; repeat from * 3 more times. Sl st to the top of the beginning ch-3 to join. (10 dc in 5 pairs, 5 ch-7 loops)*
Check: each repeat covers 4 sts (2 worked + 2 skipped), and 5 repeats × 4 = 20 sts. The dc pairs are the spokes, and the ch-7 loops become the petals.
Rnd 3: Sl st in the next dc, then sl st into the next ch-7 loop. Ch 1. In the ch-7 loop work (2 sc, hdc, 5 dc, hdc, 2 sc); then sc in the sp between the 2 dc of the next spoke; repeat from * 4 more times. Sl st to the first sc to join. (60 sts)*
Count: 5 petals × 11 sts = 55, plus 5 spoke sc = 60. That makes 12 sts per petal-and-spoke repeat. The petal stitches wrap the outside of each chain loop, so the center of every petal stays open, giving the five rounded windows.
Mesh Base Round
Rnd 4: Sl st in each of the next 5 sts. You are now in the center (3rd) dc of the first petal. Ch 5 (counts as dc + ch 2). Sk 1 st, dc in the next st, ch 2; repeat from * 28 more times, then sk 1 st and sl st to the 3rd ch of the beginning ch-5 to join. (30 dc, 30 ch-2 sps)*
Check: there are 60 sts, and one dc in every 2nd st gives 30 dc. Counting from the center dc of one petal, dcs land on sts 2, 4, 6, 8, 10, and 12. St 6 is the spoke sc, and st 12 is the center dc of the next petal. Each petal-center dc is a valley dc. Between two valley dcs there are exactly 6 ch-2 sps, and those 6 spaces form the base of one star point. Fasten off.
Star Points
Each point is worked separately in turned rows. Each row places one dc in every ch-2 sp of the row below, so the posts stagger like bricks and every row is one space narrower than the last. That gives the clean, tapered mesh shown on the star.
Work all five points the same way.
Row 1 (RS): Join the thread with a sl st in the first ch-2 sp after any valley dc. Ch 5 (counts as dc + ch 2). Dc in the next ch-2 sp, ch 2; repeat from * 3 more times, then dc in the 6th (last) ch-2 sp before the next valley dc. Do not ch after the last dc. (6 dc, 5 ch-2 sps)*
Row 2: Turn. Sl st in the first ch-2 sp, ch 5 (counts as dc + ch 2), [dc in the next ch-2 sp, ch 2] 3 times, then dc in the last ch-2 sp. (5 dc, 4 ch-2 sps)
Row 3: Turn. Sl st in the first ch-2 sp, ch 5, [dc in the next ch-2 sp, ch 2] 2 times, then dc in the last ch-2 sp. (4 dc, 3 ch-2 sps)
Row 4: Turn. Sl st in the first ch-2 sp, ch 5, dc in the next ch-2 sp, ch 2, then dc in the last ch-2 sp. (3 dc, 2 ch-2 sps)
Row 5: Turn. Sl st in the first ch-2 sp, ch 5, then dc in the last ch-2 sp. (2 dc, 1 ch-2 sp) Fasten off.
The single ch-2 sp of Row 5 is the tip of the point. Repeat Rows 1–5 on the next 6 spaces of Rnd 4, and keep going until all 5 points are done. Each valley dc stays unworked between two neighboring points.
Checkpoint: each point is about 1.1 in (2.8 cm) tall above Rnd 4. The star is about 4.25 in (10.8 cm) wide and 4 in (10.2 cm) tall. Weave in all ends now so the border covers them.
Border
Border gauge: one dc row end is about the height of 3 sc, so 3 sc per row-end post keeps the edges flat. Choose one point to be the top, and place a stitch marker in its tip space.
Border Rnd (RS): Join the thread with a sc in the top of the valley dc just to the right of any point. Then work around that point and every point after it:
- Up the first side: around each of the 5 row-end posts (Rows 1–5), work (2 sc, picot, 1 sc). (15 sc, 5 picots)
- Tip: in the Row 5 ch-2 sp, work (2 sc, picot, 2 sc). (4 sc, 1 picot)
- Down the second side: around each of the 5 row-end posts (Rows 5–1), work (1 sc, picot, 2 sc). (15 sc, 5 picots)
- Valley: sc in the top of the next valley dc. (1 sc)
Per point: 15 + 4 + 15 + 1 = 35 sc and 11 picots.
At the marked top tip, replace the tip picot with the hanging loop: in the ch-2 sp work (2 sc, ch 15, 2 sc).
Repeat around all 5 points. On the last point, skip step 4 and sl st to the first sc instead, because that valley dc already holds the joining sc.
Final count: 5 × 35 = 175 sc, plus 54 picots and 1 ch-15 hanging loop. Fasten off and weave in the ends.
Why the math works: each side has exactly 5 row ends, one per point row, and 3 sc per post matches the dc height, so the edge neither ruffles nor pulls. The 4 sc at each tip give the extra fullness a sharp point needs. The single sc at each valley lets the inner angle close neatly. Placing one picot per row puts a picot at each mesh row, so they sit evenly along every edge.
Final Blocking
- Soak the star in cool water for a few minutes, then roll it in a towel to remove the excess water.
- Cover the blocking board with plastic wrap.
- Lay the star flat with the RS up. Pin the 5 tips so the star is 4.5 in (11.4 cm) wide and 4.25 in (10.8 cm) tall.
- Pin the 5 valleys at equal distances from the center ring.
- Open each petal window into a round shape with a pin through the center.
- Straighten the mesh lines in each point so the spaces look like even squares.
- Brush or spray on the stiffener, soaking the whole piece evenly.
- Pin out any picots that curl inward.
- Let the star dry fully, ideally for 12–24 hours, before removing the pins.
Final Quality-Control Checklist
- Rnd 1 has 20 sc and the center ring is open.
- Rnd 3 has 60 sts, and all 5 petal windows are open and the same size.
- Rnd 4 has 30 dc, with 6 spaces between each pair of valley dcs.
- Each point tapers through 6, 5, 4, 3, and 2 dc and ends in a single ch-2 tip.
- The border has 35 sc per point, 175 sc in total.
- There are 54 picots plus 1 hanging loop, and the loop sits on the top tip.
- The star measures 4.5 in (11.4 cm) wide and 4.25 in (10.8 cm) tall.
- All ends are woven in and hidden.
- The stiffened star lies flat and the points are sharp.
Troubleshooting
Flower cups after Rnd 3: the ch-7 loops are too short or tight. Chain more loosely, or go up a hook size for Rnd 2 only.
Flower ruffles after Rnd 3: the loops are too loose. Chain more tightly, or work (2 sc, hdc, 4 dc, hdc, 2 sc) and use a sc instead of the spoke st count change only if you also recount Rnd 4. Retensioning is the better fix.
Wrong count in Rnd 4: recount Rnd 3 first. It must have 60 sts for the 6-space point bases to come out right.
Points lean sideways: you probably started a row in the wrong space. Every row must begin with a sl st into the first ch-2 sp.
Points look blunt: make sure the tip gets all 4 sc, and pin the tips firmly while blocking.
Wavy border edge: you have too many sc per post. Keep exactly 3 sc per row end.
Edge pulls in or cups: you have too few sc, or they are worked too tightly. Loosen your sc and keep 3 sc per row end.
Picots disappear: chain them a little more firmly, and pin them open during blocking.
Care
Hand wash in cool water with mild soap, then reshape, re-stiffen, and dry flat. Store flat or hanging, away from heat and humidity.
Final Notes
The measurement chain is easy to follow. Rnd 1 has 20 sc and is 0.5 in (1.3 cm) across. Rnd 3 has 60 sts and is 1.75 in (4.4 cm) across. Rnd 4 has 30 mesh spaces and is 2.25 in (5.7 cm) across. Each point adds 5 rows, or 1.1 in (2.8 cm). The unbordered star is 4.25 in (10.8 cm) wide. The border round has 175 sc and 54 picots and brings the star to 4.5 in (11.4 cm). If each checkpoint matches, the finished star will too.
Happy crocheting!