

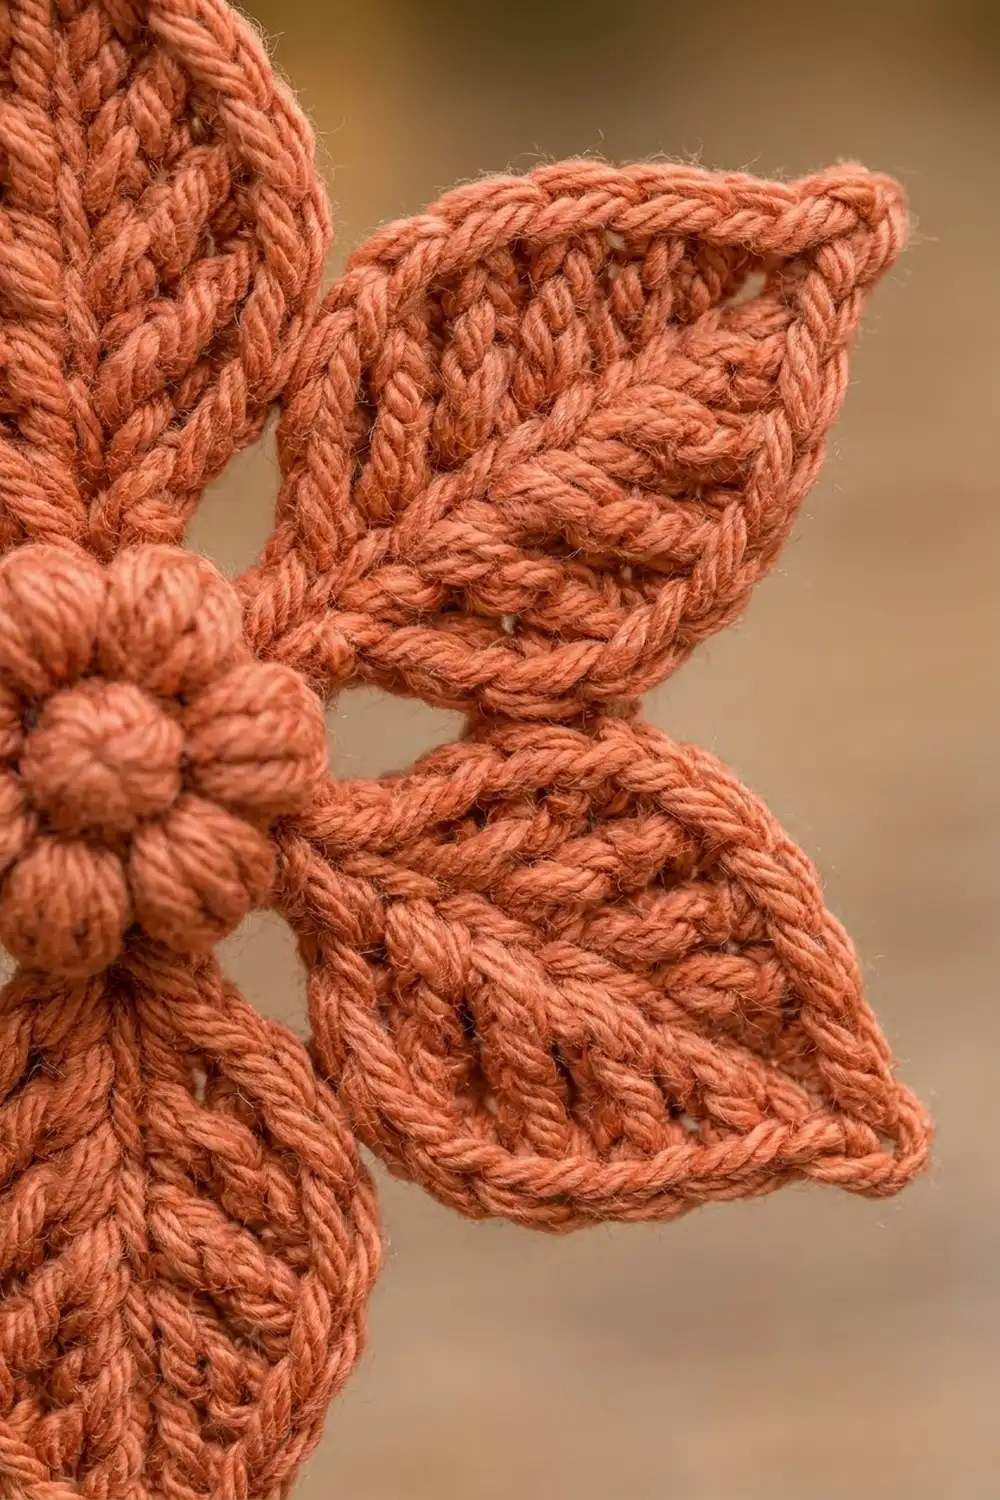
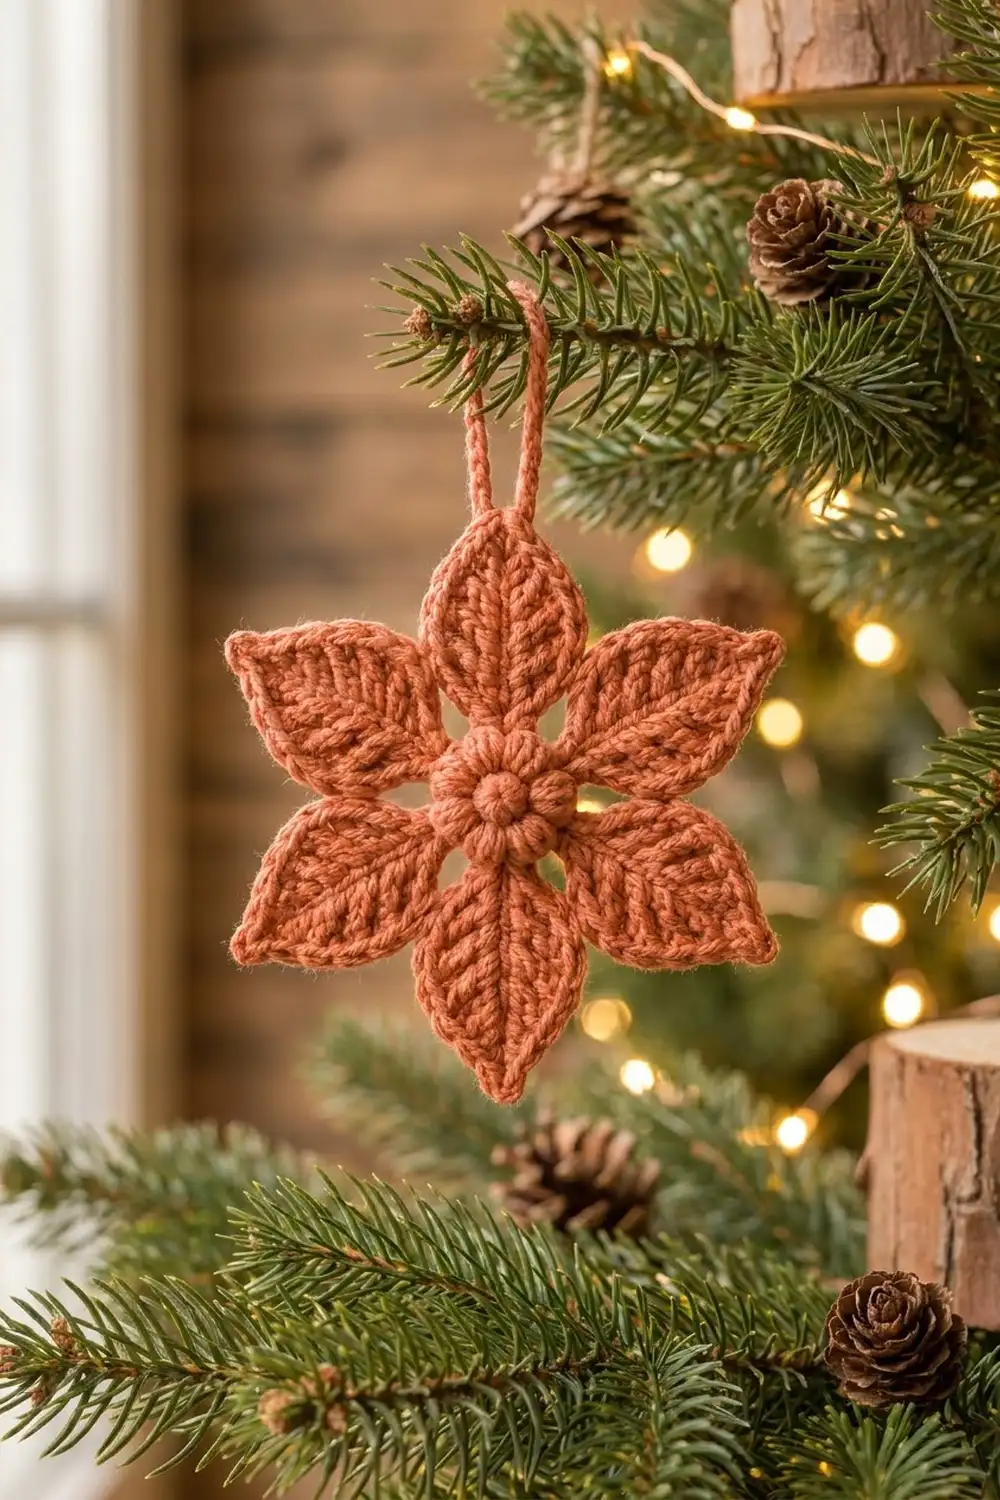
The Cinnamon Star Flower is a six-petal crochet ornament with pointed, leaf-shaped petals around a small domed puff-stitch center. Each petal has a raised center vein and a corded edge. The finished ornament looks almost carved, like a little wooden star, but it’s soft and light enough to hang on a thin tree branch.
The ornament is worked in one color: a warm terracotta, somewhere between rust and soft coral. One solid color lets the texture do the work, so the petal ridges and center puffs show clearly. It suits rustic, Scandinavian, or natural-tone holiday decor, and it also works as a gift topper or a bag charm.
This pattern uses US crochet terms. The finished ornament measures 4.5 in (11.4 cm) from petal tip to opposite petal tip, plus a 1.5 in (3.8 cm) hanging loop.
Construction is continuous, with no sewing. You make a 12-stitch puff center, then work six petals one at a time around a short foundation chain. A slip-stitch vein brings you back to the center after each petal. A final border round outlines every petal, and the hanging loop is built into that round.
Finished Size and Construction
- Finished size: 4.5 in (11.4 cm) tip to tip, plus a 1.5 in (3.8 cm) loop
- Skill level: Easy-intermediate
- Terminology: US crochet terms
- Yarn weight: DK (light, #3)
- Hook: 3.5 mm (E-4)
- Number of pieces: 1 (single motif, worked continuously)
- Layout: 6 petals radiating evenly from a round center
- Center size: 1.25 in (3.2 cm) across after Round 3
- Petal size: 1.625 in (4.1 cm) long and 1 in (2.5 cm) wide after the border
- Size before border: 4.25 in (10.8 cm) tip to tip
- Border depth: 0.125 in (0.3 cm), one round of single crochet
Materials
Yarn: Choose a smooth DK yarn with good stitch definition. Cotton, cotton blends, and firm acrylic all work well. Fuzzy or very loosely plied yarns hide the vein and the corded edge, so avoid them.
- Terracotta (main and only color): about 12 g / 28 m (31 yd) per ornament
The quantity includes a margin of roughly 30% for your gauge swatch, yarn tails, and the occasional frogged petal. A 50 g ball makes at least four ornaments.
Tools:
- 3.5 mm (E-4) crochet hook
- Tapestry needle
- Scissors
- Stitch marker
- Ruler or tape measure
- Blocking mat and rust-proof pins
- Spray bottle with water
Abbreviations (US Terms)
- ch – chain
- sl st – slip stitch
- sc – single crochet
- hdc – half double crochet
- dc – double crochet
- BLO – back loop only
- sp – space
- st(s) – stitch(es)
- MR – magic ring
Special stitch – Puff stitch (puff): [Yarn over, insert hook in the indicated stitch, yarn over, pull up a loop to the height of a dc] 3 times (7 loops on hook). Yarn over and pull through all 7 loops. The ch-1 that follows each puff in Round 2 closes it, and that ch-1 is counted separately.
Surface slip stitch: Hold the working yarn behind the petal. Insert the hook from front to back through the center of the foundation chain, yarn over behind, and pull a loop through the fabric and through the loop on the hook.
Gauge and Checkpoints
Gauge: 22 sc and 24 rows = 4 in (10.2 cm) in sc with a 3.5 mm hook. Exact gauge isn’t critical for an ornament, but it does control the final size and how sharp the petal points are.
Make one complete ornament first and measure at each stage:
- After Round 3 (center): 1.25 in (3.2 cm) across, lying flat with a gentle dome.
- After Petal 1: 1.5 in (3.8 cm) from the base at the center edge to the tip, and 0.75 in (1.9 cm) across at the widest point.
- After all six petals: 4.25 in (10.8 cm) from tip to opposite tip.
- After the border: 4.5 in (11.4 cm) from tip to opposite tip.
If your piece is too big (more than 0.25 in / 0.6 cm over at any checkpoint), go down to a 3.25 mm hook. If it’s too small or stiff, go up to a 3.75 mm hook. Don’t change the stitch counts. The petal shape depends on the exact sc-hdc-dc sequence, and the border math depends on the side counts.
Center
Round 1: Make a MR. Ch 1 (does not count as a st), work 6 sc into the ring. Pull the ring fully closed. Sl st to the first sc to join. (6 sts)
Round 2: Ch 1 (does not count). [Puff in next sc, ch 1] 6 times. Sl st to the top of the first puff to join. (12 sts: 6 puffs + 6 ch-1 sps)
The puffs push outward and form the raised, domed ring at the middle of the flower. If they lean, nudge them upright with your fingertip.
Round 3: Ch 1 (does not count). [Sc in top of next puff, sc in next ch-1 sp] 6 times. Sl st to the first sc to join. Place a marker in this first sc and call it sc #1. (12 sc)
Round 3 is a conversion round: 12 sts worked one-per-stitch, plus 0 added. It turns the puff ring into a firm base with 12 anchor points, two for each petal.
Checkpoint: The center measures 1.25 in (3.2 cm) across.
Petals
Each petal uses two center stitches. The petal’s foundation chain grows from the first stitch, and the petal is anchored to the second. Do not fasten off between petals.
Petal 1:
- Foundation: Ch 9 from sc #1. The first ch from the hook is the turning chain and becomes the tip. The other 8 chains form the spine.
- Side A (tip to base): Working in the back bumps of the chain, starting in the 2nd ch from hook: sc in next ch, hdc in next ch, dc in next 3 ch, hdc in next ch, sc in next 2 ch. (8 sts)
- Anchor: Sl st in the next center sc (sc #2).
- Side B (base to tip): Rotate the petal and work along the free loops of the same 8 chains: sc in next 2 ch, hdc in next ch, dc in next 3 ch, hdc in next ch, sc in next ch. (8 sts)
- Tip: (Sc, ch 2, sc) in the turning chain at the tip. Sl st in the first sc of Side A to close the point.
- Vein: Drop the yarn behind the petal. Work 8 surface sl sts down the middle of the petal, one through the center of each foundation chain, ending at the base.
- Move over: Sl st in the next center sc (sc #3).
Petal 1 count: 8 sts on Side A + 8 sts on Side B + 2 tip sc + 1 ch-2 tip sp, with 8 vein sl sts on the surface.
The two sides mirror each other: short stitches at the base, tall dc across the middle, short stitches again at the point. That gives the classic pointed-leaf outline. The vein sl sts sit over the chain where the two sides meet, so they read as a raised midrib, and the dc lean toward it in the feathered pattern.
Checkpoint: Petal 1 measures 1.5 in (3.8 cm) long and 0.75 in (1.9 cm) wide.
Petals 2–6: Repeat Steps 1–7. Petal 2 uses sc #3 and sc #4, Petal 3 uses sc #5 and sc #6, and so on. On Petal 6, Step 3 anchors into sc #12, and Step 7 is a sl st into sc #1 (the marked stitch). You’re now in the valley between Petal 6 and Petal 1, ready for the border.
Total after petals: 6 petals, each with 8 + 8 side sts and a (sc, ch 2, sc) tip. All 12 center sts are used.
Checkpoint: The piece measures 4.25 in (10.8 cm) from tip to opposite tip. The petals should lie flat with a small gap of about 0.125 in (0.3 cm) between neighbors at the base.
Border
Border gauge: One sc per edge stitch, worked in BLO. The round adds 0.125 in (0.3 cm) all around, including at each tip.
On each petal side, the border stitches are counted as 9 sc: the 8 side sts plus the tip sc on that side. The tip group is counted separately as (sc, ch 2, sc) in the ch-2 sp, so no stitch is counted twice.
Border Round: Ch 1 (does not count). Working in BLO throughout, except at the tip spaces:
Up Side B of the petal: Sc in each of the 8 Side B sts, then sc in the first tip sc. (9 sc)
Tip: (Sc, ch 2, sc) in the ch-2 tip sp. (2 sc + ch-2 sp)
Down Side A: Sc in the second tip sc (skip the closing sl st), then sc in each of the 8 Side A sts. (9 sc)
Valley: Sl st into the base sl st between this petal and the next one. (1 sl st)
Repeat around all 6 petals, with one change on the first petal you work (Petal 1). At its tip, work (sc, ch 16, sc) in the ch-2 sp instead of (sc, ch 2, sc). That forms the hanging loop.
Sl st to the first sc to join. Fasten off, leaving a 6 in (15.2 cm) tail.
Per petal: 9 + 2 + 9 = 20 sc, plus 1 tip sp (ch-2, or ch-16 on Petal 1) and 1 valley sl st.
Round total: 6 × 20 = 120 sc, plus 6 valley sl sts, 5 ch-2 sps, and 1 ch-16 loop.
Why the math works: Each petal side has exactly 8 body sts plus 1 tip sc, and the border puts exactly one sc on each. With one-for-one coverage, the edge can’t ruffle or cup. The extra (sc, ch 2, sc) at each tip turns the point without rounding it, and the valley sl st pulls the edge tight between petals so the star silhouette stays sharp. Working in BLO leaves the front loops as a fine raised line around every petal, which gives the corded outline.
Checkpoint: The ornament measures 4.5 in (11.4 cm) from tip to opposite tip. Hanging flat, the loop measures 1.5 in (3.8 cm) tall.
Final Blocking
- Weave in both tails, hiding them inside the base of a petal and the back of the center.
- Spritz the ornament with water until it’s damp but not dripping. For acrylic, use light steam held 1 in (2.5 cm) above the piece and never touch it with the iron.
- Lay it face up on the blocking mat.
- Pin the center first so it sits round, 1.25 in (3.2 cm) across.
- Pin each petal tip through the ch-2 sp, pulling straight out from the center. Space the tips evenly, 60 degrees apart, with opposite tips 4.5 in (11.4 cm) apart.
- Run a finger down each vein to straighten it, and pinch each tip to a point.
- Lay the hanging loop straight above Petal 1.
- Let it dry completely, usually 4 to 6 hours, before unpinning.
Final Quality-Control Checklist
- Six petals, evenly spaced, all the same length
- Center puffs raised and evenly spaced in a domed ring
- Each petal has a straight, centered vein running from base to tip
- Every petal ends in a sharp point, with no rounding or curling
- Border is 120 sc in total, 20 per petal, with sharp valleys
- Tip-to-tip measurement is 4.5 in (11.4 cm)
- Hanging loop is 1.5 in (3.8 cm), secure, and centered on one tip
- All tails are woven in and invisible from the front
Troubleshooting
Petals curl forward: Your foundation chains are too tight. Chain with a hook one size larger, then switch back for the petal stitches.
Petals look rounded, not pointed: Make sure the tip is (sc, ch 2, sc), not (sc, ch 1, sc) or 3 sc. Pin firmly at the ch-2 sp when blocking.
Center won’t lie flat: Your puffs may be too tall. Pull each loop up only to dc height, and close the magic ring completely.
Vein is crooked: Keep each surface sl st in the exact middle of a foundation chain, and keep it loose. Tight vein stitches pucker the petal.
Border ruffles: You’ve added extra sc. Count 9 per side and check that you skipped the closing sl st at each tip.
Gaps at the valleys: Make the valley sl st firmly, and insert the hook under both strands of the base sl st.
Loop twists: Make sure the ch-16 isn’t twisted before you work the second sc of that tip.
Care
Hand wash in cool water with mild soap, press out the water in a towel, and dry flat, re-pinning the tips if needed. Store flat or loosely wrapped in tissue so the petals keep their points.
Final Notes
The size depends on each stage measuring correctly. The 12-stitch center measures 1.25 in (3.2 cm). Each 8-plus-8 petal reaches 1.5 in (3.8 cm), so the body measures 4.25 in (10.8 cm) tip to tip. The 120-sc border adds 0.125 in (0.3 cm) at each tip, so the finished ornament measures 4.5 in (11.4 cm) with a 1.5 in (3.8 cm) loop. If each checkpoint measures correctly, the finished ornament will too.
Happy crocheting!