

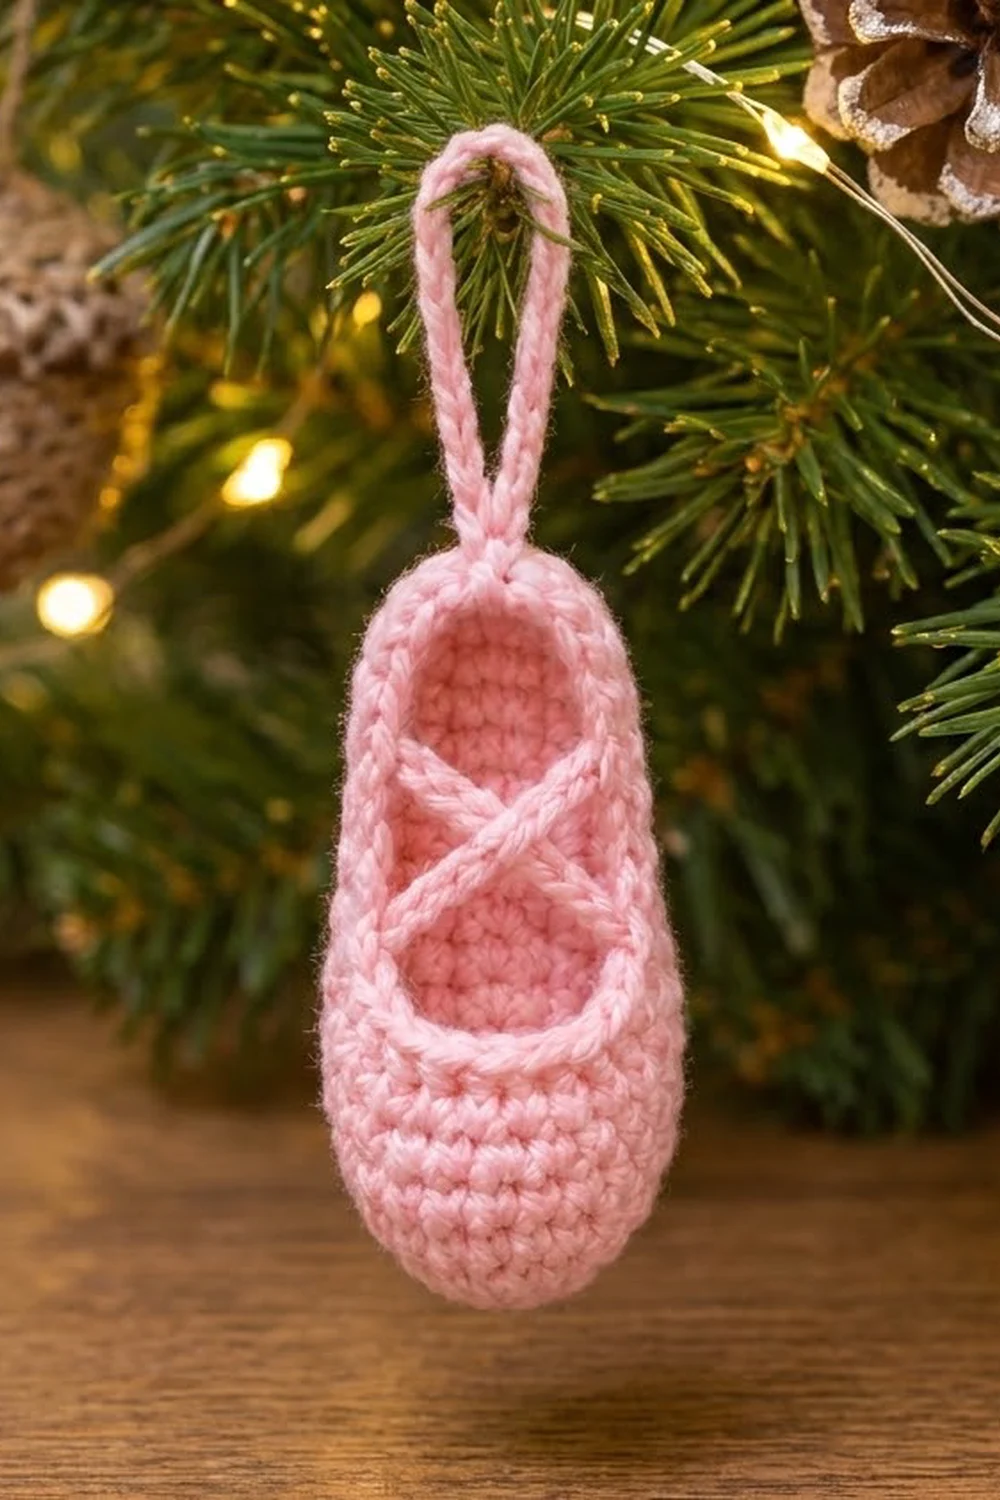
This tiny ballet slipper is a sweet, quick ornament for a Christmas tree, a gift topper, or a dancer’s bag. It has a smooth oval sole, low rounded walls, a softly curved toe, and two crossed chain straps over the opening, just like a real ballet shoe.
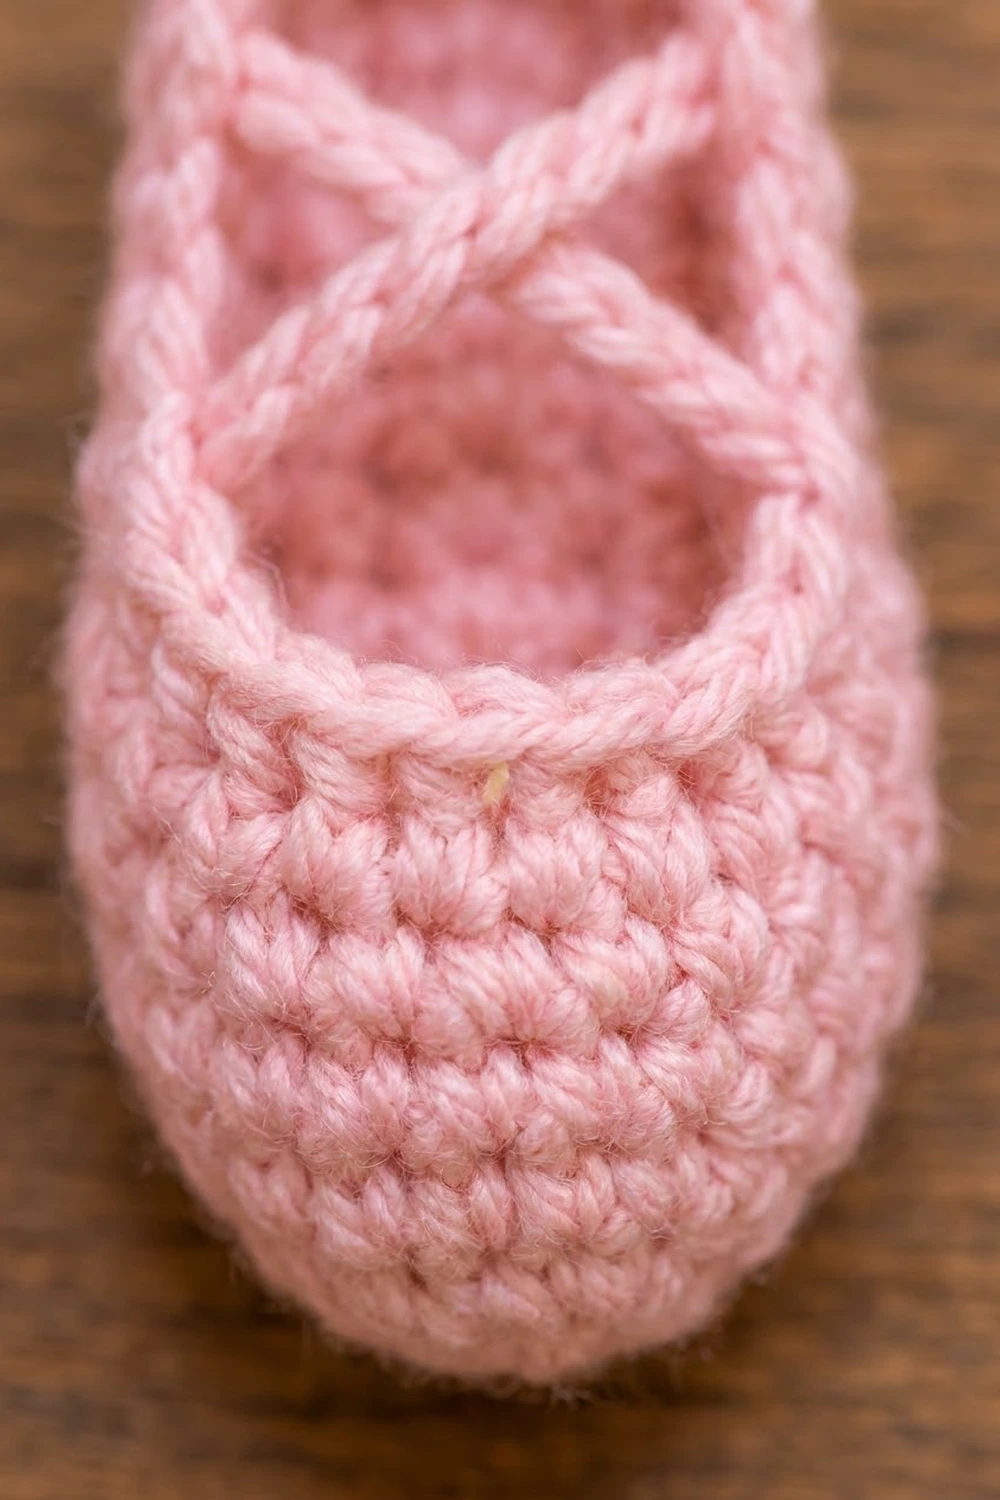
The sample uses one soft pastel pink yarn, so the texture does all the work: tight single crochet, a crisp ridge where the walls start, and a raised rope-like rim around the opening. The style is clean and classic, and it looks lovely in groups on a tree.
This pattern uses US crochet terms. The finished slipper measures about 2.25 in (5.7 cm) long and 1.25 in (3.2 cm) wide, and about 3.5 in (8.9 cm) long including the hanging loop.
Construction is simple. You work an oval sole in joined rounds, turn the walls up with a back-loop round, shape the toe with a few decreases, and finish the opening with a reverse single crochet rim. The crossed straps and the hanging loop are chained and attached at the end.
Finished Size and Construction
- Finished size: about 2.25 in (5.7 cm) long x 1.25 in (3.2 cm) wide x 0.85 in (2.2 cm) tall at the heel
- Length with loop: about 3.5 in (8.9 cm)
- Skill level: Easy
- Terminology: US crochet terms
- Yarn weight: DK / light worsted (#3)
- Hook: 3.0 mm
- Number of pieces: 1 (one slipper, worked in one piece)
- Layout: single ornament, hung from the heel loop
- Sole size (after Rnd 3): 2 in (5.1 cm) x 1 in (2.5 cm)
- Size before rim: about 2.25 in (5.7 cm) x 1.25 in (3.2 cm), walls about 0.75 in (1.9 cm) tall
- Rim depth: one round of reverse single crochet, adding about 0.1 in (0.3 cm)
Materials
Choose a smooth cotton or cotton-blend DK yarn. Cotton shows each stitch clearly and holds the slipper shape without stuffing. Avoid fuzzy yarn or yarn that splits easily, because the straps are only a single chain and should look clean.
- Pink (main color): 8 g, about 18 m (20 yd)
That is enough for one slipper, including the straps and loop. If you plan a set of five, as shown on the tree, 40 g (about 90 m / 98 yd) covers all of them.
Tools:
- 3.0 mm crochet hook
- Tapestry needle
- Stitch marker
- Scissors
- Ruler or tape measure
- Spray bottle or steam iron for blocking
- Optional: a small dowel, pen cap, or rolled paper to shape the slipper while it dries
Yarn quantities include a small margin for your gauge check and for weaving in ends.
Abbreviations (US Terms)
- ch – chain
- sl st – slip stitch
- sc – single crochet
- sc2tog – single crochet 2 together (decrease)
- BLO – back loop only
- rev sc – reverse single crochet
- st(s) – stitch(es)
- Rnd – round
Special stitch – Reverse single crochet (rev sc): Working from left to right (right-handed), insert hook into the next stitch to the right, yarn over and pull up a loop, then yarn over and pull through both loops. This twists each stitch and creates the rope-like rim.
Gauge and Checkpoints
Gauge: 6 sc and 6 rounds = 1 in (2.5 cm) in tight sc with a 3.0 mm hook.
The best gauge test here is the sole itself. Work Rnds 1–3 and measure before you go further.
Checkpoint 1 – foundation: The 8 working chains of the starting chain (ch 9) should measure about 1.25 in (3.2 cm).
Checkpoint 2 – sole (after Rnd 3): The oval should measure 2 in (5.1 cm) long and 1 in (2.5 cm) wide, and lie flat without ruffling or cupping.
Checkpoint 3 – walls (after Rnd 6): The walls should stand about 0.5 in (1.3 cm) tall, straight up from the sole.
Checkpoint 4 – finished (after rim): The slipper should be about 2.25 in (5.7 cm) long and 1.25 in (3.2 cm) wide across the top.
If the sole is too big: Go down to a 2.75 mm hook, or tighten your tension. Loose stitches also leave gaps that show through the opening.
If the sole is too small: Go up to a 3.25 mm hook.
If the sole ruffles: Your increases are too tight for your tension; try one hook size up. If it cups: Check that you worked every increase in Rnds 2 and 3.
Pattern
All rounds are joined. Each round starts with ch 1, which does not count as a stitch. The join sits at the toe, where it is least visible.
To keep track of the shape, think of every round in five sections: toe start, side 1, heel, side 2, toe end.
Sole
Ch 9.
Rnd 1: Sc in 2nd ch from hook, sc in next 6 ch, 3 sc in last ch (heel end). Working along the other side of the foundation chain, sc in next 6 ch, 2 sc in last ch (the same ch as the first sc). Join with sl st to first sc. (18 sts)
Sections: toe start 1, side 6, heel 3, side 6, toe end 2.
Rnd 2: Ch 1, 2 sc in first st, sc in next 6 sts, 2 sc in each of next 3 sts, sc in next 6 sts, 2 sc in each of next 2 sts. Join. (24 sts)
Sections: toe start 2, side 6, heel 6, side 6, toe end 4.
Rnd 3: Ch 1, sc in first st, 2 sc in next st, sc in next 6 sts, (sc in next st, 2 sc in next st) 3 times, sc in next 6 sts, (2 sc in next st, sc in next st) 2 times. Join. (30 sts)
Sections: toe start 3, side 6, heel 9, side 6, toe end 6.
Six increases in each of Rnds 2 and 3 keep the oval flat: three at the heel and three at the toe. Check Checkpoint 2 now.
Walls
Rnd 4: Ch 1, sc in BLO of each st around. Join. (30 sts)
The unused front loops form a neat ridge around the sole, and the work starts to turn upward.
Rnd 5: Ch 1, sc in each st around. Join. (30 sts)
Rnd 6: Ch 1, sc in each st around. Join. (30 sts)
The sections stay the same: toe start 3, side 6, heel 9, side 6, toe end 6. Check Checkpoint 3 now. Place your marker in the 12th stitch of Rnd 6, which is the 3rd heel stitch, so you can find your sections easily.
Toe Shaping
These two rounds pull the toe inward to form the shallow vamp. All decreases sit in the toe sections, so the sides and heel stay straight.
Rnd 7: Ch 1, sc2tog, sc in next st, sc in next 6 sts, sc in next 9 sts, sc in next 6 sts, (sc in next st, sc2tog) 2 times. Join. (27 sts)
Sections: toe start 2, side 6, heel 9, side 6, toe end 4. That is 30 − 3 decreases = 27.
Rnd 8: Ch 1, sc2tog, sc in next 6 sts, sc in next 9 sts, sc in next 6 sts, sc2tog 2 times. Join. (24 sts)
Sections: toe start 1, side 6, heel 9, side 6, toe end 2. That is 27 − 3 decreases = 24.
The walls now stand about 0.75 in (1.9 cm) at the heel. Do not fasten off. Push the toe out from the inside with your finger so the curve is smooth.
Rim (Border)
The rim is the finishing border of this single piece. It is one round of reverse single crochet, worked 1 stitch into each of the 24 stitches of Rnd 8.
Rim gauge: rev sc sits at the same 6 sts per 1 in (2.5 cm) as the body, so it does not tighten or flare the opening.
Rnd 9 (rim): Ch 1, rev sc in each st around, working backward from the join. Join with sl st to the first rev sc. Fasten off, leaving a 4 in (10.2 cm) tail. (24 sts)
Counts per section:
- Toe: 3 rev sc (toe start 1 + toe end 2)
- Side 1: 6 rev sc
- Heel: 9 rev sc
- Side 2: 6 rev sc
- Total: 3 + 6 + 9 + 6 = 24
Why the math works: The rim is a conversion round with no added stitches: 24 stitches worked 1 per existing stitch, plus 0 extra. Because the rev sc matches the body gauge, the opening keeps its oval shape. The long sides (6 sts each) and the wide heel (9 sts) give the classic open slipper look.
Crossed Straps
Number the 24 stitches of Rnd 8 starting from the toe join:
- st 1 is the toe start
- sts 2–7 are side 1 (st 2 is nearest the toe)
- sts 8–16 are the heel
- sts 17–22 are side 2 (st 22 is nearest the toe)
- sts 23–24 are the toe end
Work into the Rnd 8 stitches just under the rim, so the rim stays smooth.
Strap 1: Join yarn with sl st in st 6 (side 1, toward the heel). Ch 10. Carry the chain across the opening and sl st in st 21 (side 2, toward the toe). Fasten off.
Strap 2: Join yarn with sl st in st 3 (side 1, toward the toe). Ch 10. Carry the chain across the opening, laying it over Strap 1, and sl st in st 18 (side 2, toward the heel). Fasten off.
The two straps cross in the middle of the opening to form the X. Each chain of 10 is about 1.25 in (3.2 cm), a little longer than the 1 in (2.5 cm) inside width. That way the straps curve gently instead of pulling the sides in.
Hanging Loop
Join yarn with sl st in st 12 (the center heel stitch of Rnd 8). Ch 20, then sl st in the same st 12. Fasten off and weave the tail into the heel.
The loop stands about 1.25 in (3.2 cm) above the heel, which brings the total hanging length to about 3.5 in (8.9 cm).
Weave in all ends inside the slipper. Run them through the wall stitches so they don’t show through the opening.
Final Blocking
- Lightly mist the slipper with water, or hold a steam iron just above it without touching.
- Slip a small dowel, pen cap, or rolled paper inside to support the walls.
- Shape the sole into a smooth oval, 2 in (5.1 cm) x 1 in (2.5 cm).
- Press the walls upright and round out the toe curve.
- Straighten the crossed straps so they meet in the center of the opening.
- Straighten the hanging loop and let it lie flat.
- Let the slipper dry completely, then remove the support.
- Measure: about 2.25 in (5.7 cm) long and 1.25 in (3.2 cm) wide.
Final Quality-Control Checklist
- Sole measures 2 in (5.1 cm) x 1 in (2.5 cm) and lies flat.
- The back-loop ridge is visible all around the base of the walls.
- Walls stand straight, about 0.75 in (1.9 cm) tall before the rim.
- Toe curves in smoothly, with no bumps from the decreases.
- Rim has exactly 24 rev sc and an even rope look.
- Straps cross in the middle and are the same length.
- Hanging loop is centered on the heel.
- All ends are hidden inside the walls.
- Finished size is about 2.25 in (5.7 cm) x 1.25 in (3.2 cm).
Troubleshooting
The sole is egg-shaped, not an even oval. Check that the heel got 3 increases and the toe got 3 increases in each of Rnds 2 and 3. A missing increase shows quickly.
The walls flare outward. Rnds 5–6 are too loose. Go down a hook size for the walls only.
The ridge is hard to see. Make sure Rnd 4 is worked in the back loop only, not both loops.
Holes appear at the toe decreases. Use an invisible decrease: insert the hook into the front loops only of both stitches, then complete the sc.
The rim twists or looks messy. Keep the rev sc loose and even. Don’t skip stitches; you need exactly 24.
The straps pull the sides inward. Add 1 or 2 chains to each strap. If they sag, remove 1 chain from each.
The ornament hangs crooked. Move the loop to the true center heel stitch, st 12.
Care
Spot clean with cool water and mild soap, then reshape and dry flat. Store it with your ornaments in a small box so the walls don’t get crushed.
Final Notes
The measurements build step by step:
- The 8 foundation chains measure about 1.25 in (3.2 cm).
- The 30-stitch sole measures 2 in (5.1 cm) x 1 in (2.5 cm).
- The walls rise to about 0.75 in (1.9 cm).
- The toe shaping brings the opening down to 24 stitches.
- The 24-stitch rim finishes the slipper at about 2.25 in (5.7 cm) x 1.25 in (3.2 cm).
- Two 10-chain straps cross over the opening.
- A 20-chain loop brings the hanging length to about 3.5 in (8.9 cm).
Once you have made one, the next ones go fast. A row of pink slippers on the tree makes a lovely gift for any young dancer.
Happy crocheting!