

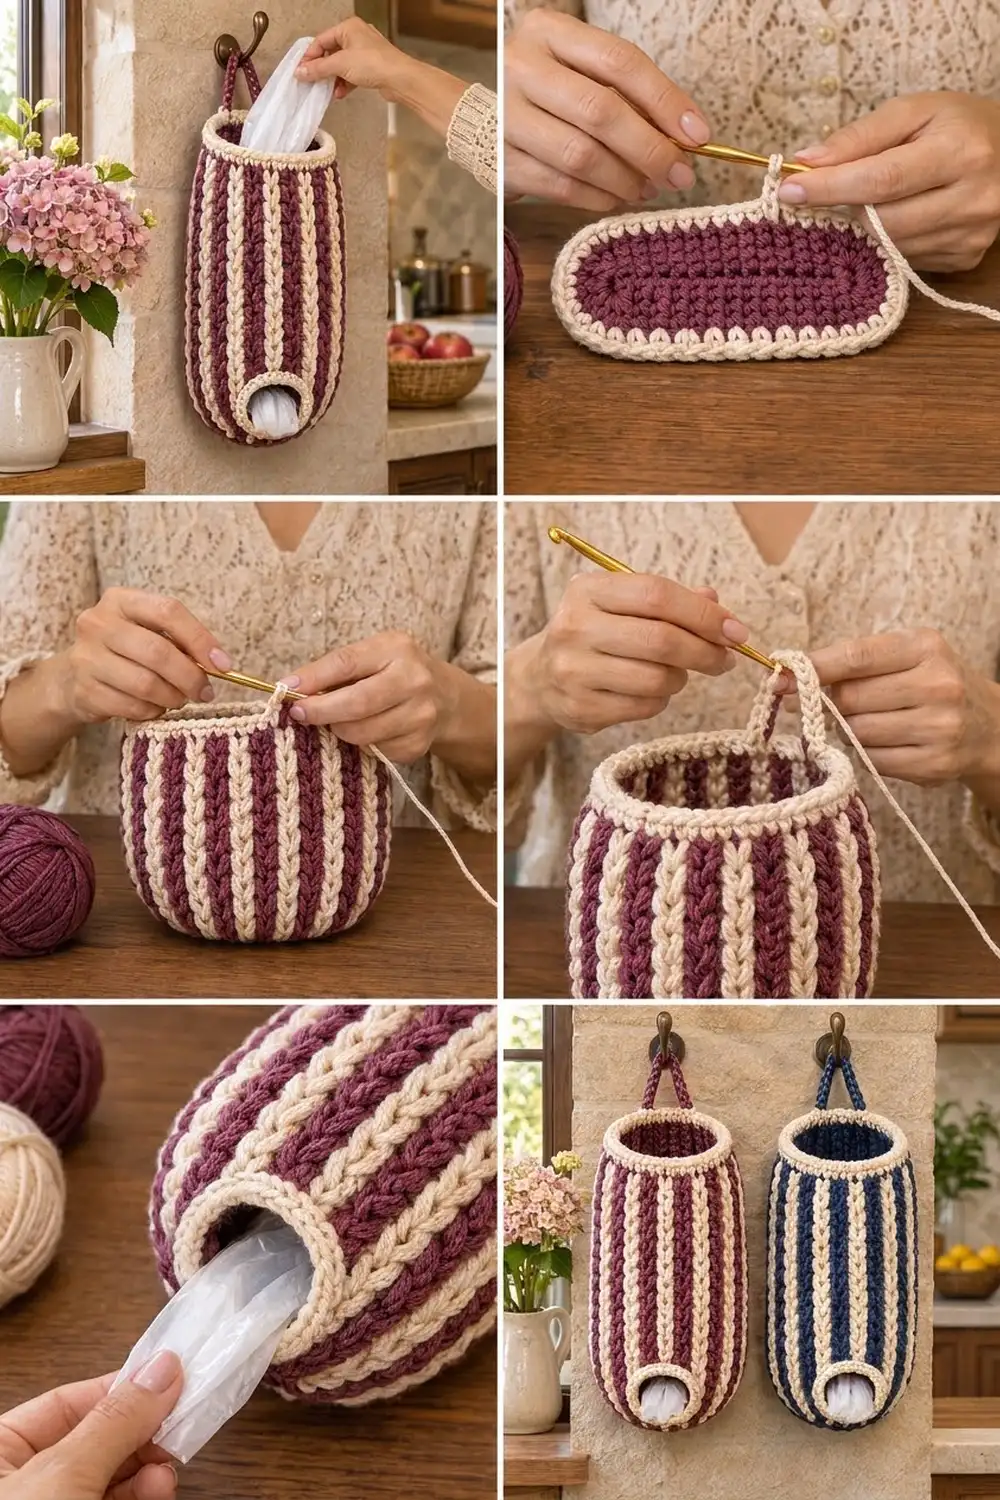
This holder keeps a pile of loose grocery bags in one neat, good-looking tube. You stuff bags in through the open top and pull them out one at a time through a round opening near the bottom. It hangs from a wall hook by a short strap at the back.
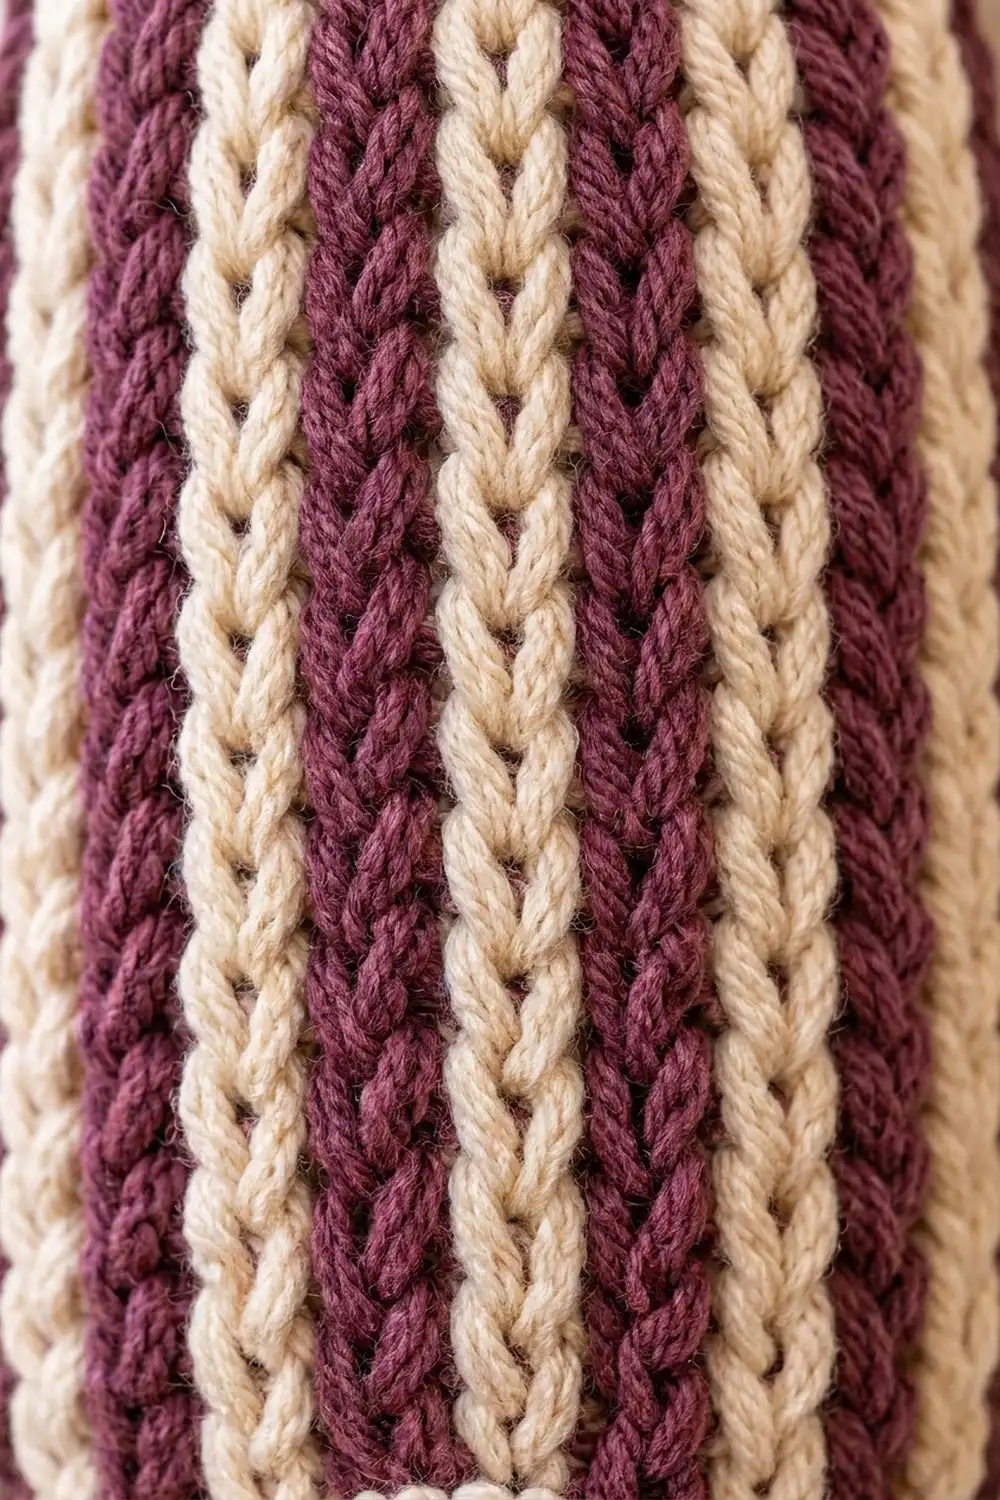
The Plum Braid design uses two colors: deep plum and soft cream. The body is worked in waistcoat stitch with tapestry color changes, so each color stacks into a vertical column of V-shaped stitches that looks like a braid. A solid plum oval base, a cream rim, and a cream-edged dispenser hole finish the cozy farmhouse look.
The pattern uses US crochet terms. The finished holder is 7.5 in (19.1 cm) wide when laid flat at the widest point, 6 in (15.2 cm) wide at the rim, and 14.5 in (36.8 cm) tall, not counting the strap.
Here’s the order of work. You start with a flat oval base, add a cream turning round, and then work the body upward in a continuous spiral. The hole is a chain gap made low on the front, and a few rounds near the top taper the body. To finish, you add a cream rim, work the strap directly off the rim, and edge the hole. Nothing is sewn.
Finished Size and Construction
- Finished size: 7.5 in (19.1 cm) wide flat at the widest point × 14.5 in (36.8 cm) tall; the strap rises about 3.5 in (8.9 cm) above the rim
- Skill level: Intermediate (tapestry color changes, waistcoat stitch)
- Terminology: US
- Yarn weight: Worsted (#4)
- Hook: 5.0 mm (H-8)
- Number of pieces: 1 (base, body, rim and strap are worked continuously)
- Layout: single tube hung vertically from a strap
- Base size: 6.75 × 2.25 in (17.1 × 5.7 cm), 60 sts around
- Size before border: 6 in (15.2 cm) wide flat at the top, 13.75 in (34.9 cm) tall
- Border depth: 0.75 in (1.9 cm) rim band; the hole edging is 0.5 in (1.3 cm) wide
Materials
Choose a smooth worsted-weight cotton or cotton blend. Cotton holds its shape when the holder is full and shows the braided V’s clearly. These amounts assume a yarn of about 85 m per 50 g.
- Plum (P): 130 g, about 221 m
- Cream (C): 120 g, about 204 m
The quantities include a margin of roughly 15%. Tapestry crochet uses more yarn than plain crochet because the unused color is carried inside every stitch.
Tools:
– 5.0 mm (H-8) crochet hook
– 3–4 locking stitch markers
– Tapestry needle
– Scissors
– Measuring tape
– Spray bottle and pins for blocking
Abbreviations (US Terms)
- ch – chain
- sc – single crochet
- sc2tog – single crochet 2 together
- sl st – slip stitch
- BLO – back loop only
- st(s) – stitch(es)
- rnd(s) – round(s)
- P / C – plum / cream
- PM – place marker
Waistcoat stitch (wst): Insert the hook between the two legs of the “V” of the stitch below, under the horizontal bars, not through the top loops. Yarn over, pull up a loop, yarn over, and pull through both loops. Each new stitch sits exactly on top of the one below, which is what makes the straight braided columns.
Waistcoat sc2tog (wst-dec): Insert the hook into the center of the next st, yarn over and pull up a loop. Insert into the center of the following st, yarn over and pull up a loop. Yarn over and pull through all 3 loops.
Tapestry color change: Work the last stitch of the old color until 2 loops remain on the hook, then finish it with the new color. Carry the unused color along the tops of the stitches and work over it.
Gauge and Checkpoints
Body gauge: 16 sts and 16 rnds of waistcoat tapestry = 4 in (10.2 cm) square.
Base gauge: 16 sc = 4 in (10.2 cm).
Before you begin, make a swatch tube: ch 32, join into a ring, and work 10 rnds of the stripe pattern. Measure it flat. It should be 4 in (10.2 cm) wide and 2.5 in (6.4 cm) tall.
Checkpoints:
– After Base Rnd 4: 6.75 × 2.25 in (17.1 × 5.7 cm)
– After Body Rnd 12: the flat width is 7.5 in (19.1 cm)
– After Body Rnd 48: 12 in (30.5 cm) of body above the turning round
– After Body Rnd 54: 13.5 in (34.3 cm) of body; 6 in (15.2 cm) flat at the top
If your piece is too big, go down 0.5 mm in hook size. If it is too small, go up 0.5 mm. Waistcoat stitch tends to tighten up, so keep each loop pulled up to the full width of the hook shaft.
Base
Work with P only. The base is worked in a continuous spiral; place a marker in the first st of each rnd.
Rnd 1: Ch 21. Work 3 sc in the 2nd ch from hook, sc in each of the next 18 ch, and 3 sc in the last ch. Rotate the work and, along the other side of the foundation chain, sc in each of the next 18 ch. (42 sts)
Rnd 2: [2 sc in each of the next 3 sts, sc in each of the next 18 sts] twice. (48 sts)
Rnd 3: [(sc, 2 sc in next st) 3 times, sc in each of the next 18 sts] twice. (54 sts)
Rnd 4: [(sc in each of the next 2 sts, 2 sc in next st) 3 times, sc in each of the next 18 sts] twice. (60 sts)
Each rnd adds 3 sts at each curved end, which is 6 per rnd. That keeps the oval flat while the two straight sides stay at 18 sts each. Check the size: 6.75 × 2.25 in (17.1 × 5.7 cm). Fasten off P.
Rnd 5 (turning rnd): Join C in any st. Sc in the BLO of each st around, then join with a sl st to the first sc. (60 sts) Fasten off C.
The unworked front loops form a ridge, and the work now turns upward to become the walls.
Mark the layout: Fold the base flat so the curved ends sit at the left and right. Choose one straight side as the front. Count to the 2nd of its 18 sts and PM: Body Rnd 1 starts here. On the opposite straight side, PM in the 9th of its 18 sts to mark the back center for the strap.
Body
Join P and C together in the marked front st. Work in a continuous spiral, carrying the unused color the whole time, and move the beginning-of-round marker up every rnd.
Stripe repeat: 3 P wst, 2 C wst (5 sts).
Rnds 1–3: [3 P wst, 2 C wst] 12 times. (60 sts) On Rnd 1, work the wst into the cream sc of the turning rnd.
Rnd 4 (hole rnd): Chain in the stripe colors as follows: [ch 3 with P, ch 2 with C] 3 times, for 15 ch. Skip the first 15 sts of the rnd. Then [3 P wst, 2 C wst] 9 times across the remaining 45 sts. (45 wst + 15 ch = 60 sts)
Rnd 5: [3 P sc, 2 C sc] 3 times, worked into the back bumps of the 15 chains. Then [3 P wst, 2 C wst] 9 times. (60 sts)
Plain sc is used across the chains because chains have no V to work into. From Rnd 6 on, the wst sits on these sc as usual.
Rnds 6–48: [3 P wst, 2 C wst] 12 times. (60 sts per rnd)
Check: the body measures 12 in (30.5 cm) and is 7.5 in (19.1 cm) wide flat. The 15-st slit is centered on the front, 1 in (2.5 cm) above the base.
Rnd 49 (first taper): [P wst-dec, 1 P wst, 2 C wst, 3 P wst, 2 C wst] 6 times. (54 sts)
This rnd starts with 60 sts and removes 6. It works out as 6 repeats of (2 P + 2 C + 3 P + 2 C), which is 6 × 9 = 54.
Rnd 50: [2 P wst, 2 C wst, 3 P wst, 2 C wst] 6 times. (54 sts)
Rnd 51 (second taper): [2 P wst, 2 C wst, P wst-dec, 1 P wst, 2 C wst] 6 times. (48 sts)
This rnd works out as 6 repeats of (2 + 2 + 2 + 2), which is 6 × 8 = 48.
Rnds 52–54: [2 P wst, 2 C wst] 12 times. (48 sts per rnd)
Sl st in the next st to smooth the spiral step. Fasten off P and continue with C only.
Check: the body measures 13.5 in (34.3 cm) above the turning rnd and 6 in (15.2 cm) wide flat.
Border
Border gauge: 16 sc and 4 rnds = 4 in × 1 in (10.2 × 2.5 cm), so each sc rnd adds 0.25 in (0.6 cm).
Top Rim
Rnd 1: With C, ch 1. Sc in each st around and join with a sl st to the first sc. (48 sts)
Rnds 2–3: Ch 1, sc in each st around, join. (48 sts)
The rim keeps the same 48 sts as Body Rnd 54, one sc on top of each wst, so it stays the same width as the top of the body and doesn’t flare. Three rnds × 0.25 in = 0.75 in (1.9 cm).
Strap
Sl st along the rim until you reach the st directly above the back-center marker (st A).
Row 1: Ch 30. Skip the next 3 rim sts and sl st into the 4th st (st B). Turn.
Row 2: Sc in each of the 30 ch, then sl st in the rim st next to st A. Turn. (30 sc)
Row 3: Sc in each of the 30 sc, then sl st in the rim st next to st B. (30 sc) Fasten off.
The strap is 7.5 in (19.1 cm) long and 0.75 in (1.9 cm) wide. When it’s folded into a loop, it rises about 3.5 in (8.9 cm) above the rim.
Hole Edging
Rnd 1: Join C at the right-hand end of the slit. Work 15 sc along the bottom edge, 1 sc in the side gap, 15 sc along the underside of the Rnd 5 sts, and 1 sc in the other side gap. Join. (32 sts)
Rnd 2: Ch 1, sc in each st around, join. (32 sts) Fasten off.
Here’s why the slit becomes a round hole. Its edge measures 3.75 in (9.5 cm) on each side, about 7.5 in (19.1 cm) in total, and a circle with that perimeter is about 2.4 in (6.1 cm) across. The firm 32-st ring holds the hole in that rounded shape.
Final Blocking
- Weave in all ends on the inside, running each one along a column of the same color.
- Mist the holder evenly with water until it is damp but not wet.
- Stuff it firmly with plastic bags or a rolled towel so it holds a full, rounded shape.
- Shape the base into a flat oval measuring 6.75 × 2.25 in (17.1 × 5.7 cm).
- Line up the stripes so they run straight up and down, and nudge the hole into a circle.
- Pin the rim flat at 6 in (15.2 cm) wide and check that the height is 14.5 in (36.8 cm).
- Let it dry completely before you take out the stuffing.
Final Quality-Control Checklist
- The base is flat, with no cupping or ruffling
- The cream turning ridge goes all the way around
- The stripes are vertical and evenly spaced: 12 repeats on the lower body, then 12 narrower repeats after the taper
- The hole is centered on the front, 1 in (2.5 cm) above the base, with an even 32-st cream ring
- The rim is 48 sts and 0.75 in (1.9 cm) deep
- The strap is centered at the back and attached securely at both ends
- No carried yarn shows on the outside
- All ends are woven in securely
Troubleshooting
The base is cupping: You’re working too tightly. Go up a hook size for the base only.
The base is ruffling: Recount the increases. There should be exactly 6 per rnd.
The stripes lean or zigzag: Check that you’re inserting the hook into the center of the V, not between stitches.
Carried yarn shows through: Keep the strand you’re carrying slightly loose, and work over it at every stitch.
The fabric feels stiff: Pull each loop up taller before you finish the stitch.
The hole is lopsided: Recount the edging so each long side has exactly 15 sts.
The rim flares: You probably added stitches. The rim must stay at 48 sts.
Care
Hand wash in cool water and lay flat to dry, stuffed so it keeps its shape. Avoid the dryer, because heat can shrink the cotton and distort the stripes.
Final Notes
Here is the measurement chain:
– The 60-st base measures 6.75 × 2.25 in (17.1 × 5.7 cm).
– The 60-st body is 7.5 in (19.1 cm) wide flat.
– The taper rnds bring it to 48 sts and 6 in (15.2 cm) at the top.
– The 54 body rnds plus the turning rnd and the 3-rnd rim give a total height of 14.5 in (36.8 cm).
If you check each of these numbers as you go, the holder will hang straight and dispense bags smoothly. For a cooler look, swap the plum for navy blue. The stitch counts stay the same.
Happy crocheting!