

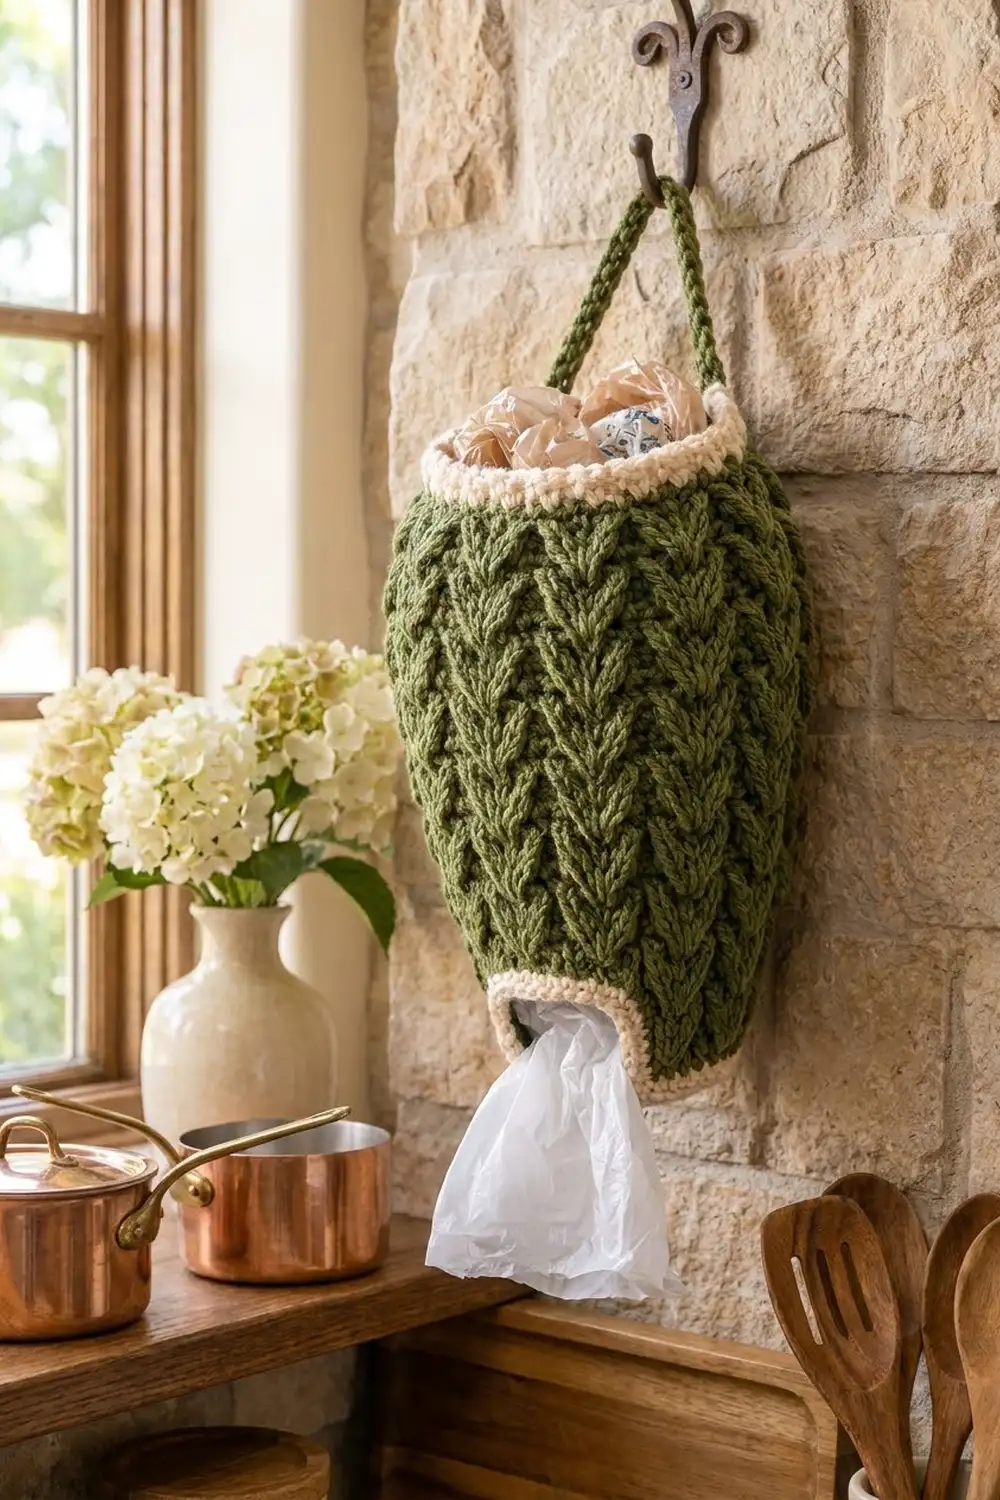
This grocery bag holder is a tall, teardrop-shaped tube that hangs from a hook and keeps plastic bags in one tidy place. You push bags in at the wide top and pull them out one at a time through the small opening at the bottom.
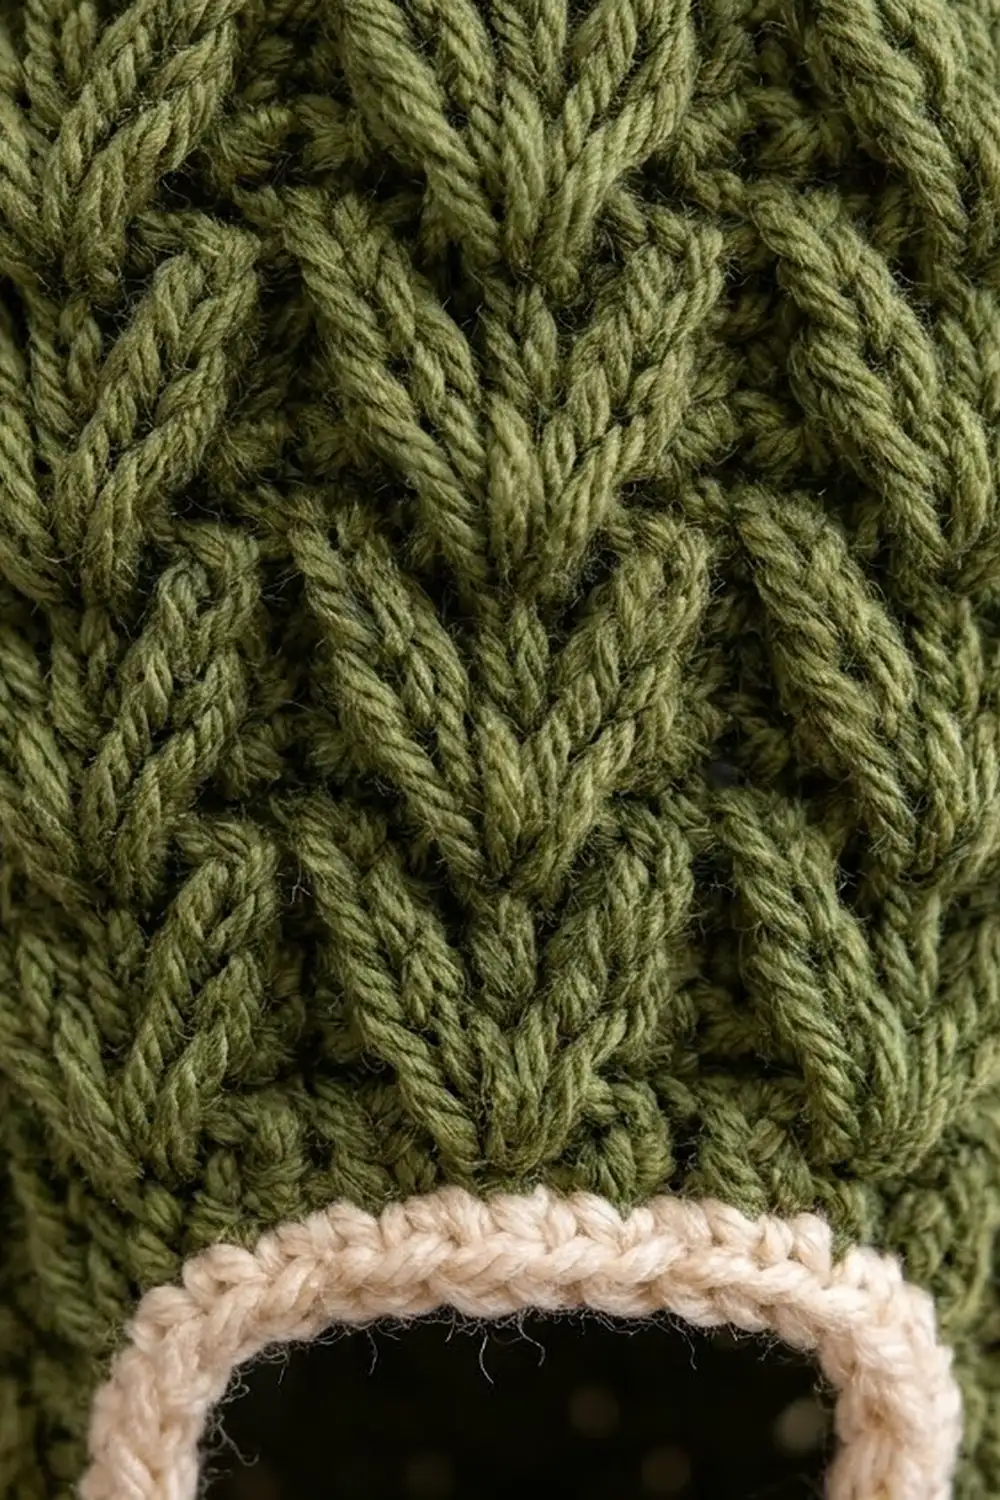
The body is worked in moss green and covered with raised columns of wheat cables. Each column is a stack of V-shaped chevrons that looks almost knitted. Cream bands with a crab-stitch edge frame both openings, and a firm green cord forms the hanging loop. A deep burgundy body with the same cream rims also works well.
The pattern uses US crochet terms. The finished holder is 14.5 in (36.8 cm) tall without the cord and 7 in (17.8 cm) wide at its widest point when laid flat. The top opening measures 6 in (15.2 cm) across when flat, and the bottom opening measures 4 in (10.2 cm).
The holder is made in one piece, from the bottom up. You start with a cream chain ring, change to green, and set up 8 cable panels. You shape the body by adding stitches to the gutters between the panels, then taking some away near the top. The piece finishes with a cream top rim, crab-stitch edges at both openings, and a chained hanging cord.
Finished Size and Construction
- Finished size: 14.5 in (36.8 cm) tall, 7 in (17.8 cm) wide flat at the widest point
- Skill level: Intermediate (post stitches and simple crossed cables)
- Terminology: US crochet terms
- Yarn weight: Worsted (#4)
- Hook: 5.0 mm (H-8)
- Number of pieces: 1 (seamless tube with an attached cord)
- Layout: Worked in joined rounds, right side always facing
- Piece size: 14 in (35.6 cm) circumference at the widest point
- Size before border: Green body 12.5 in (31.8 cm) tall
- Border depth: 1 in (2.5 cm) cream rim at each opening
Materials
Use a smooth acrylic or acrylic-blend worsted yarn. Smooth yarn shows the cables clearly and stands up to bags being pulled through it every day. Avoid fuzzy or very splitty yarns, because they hide the chevrons and catch on the post stitches.
- Color A, moss green: 140 g / 250 m (body and cord)
- Color B, cream: 25 g / 45 m (rims and edges)
Tools:
- 5.0 mm (H-8) crochet hook
- Locking stitch markers (at least 9)
- Tapestry needle
- Scissors
- Measuring tape
- Spray bottle and a rolled towel for blocking
These quantities include a margin of about 15%. Post stitches use much more yarn than flat stitches.
Abbreviations (US Terms)
- ch – chain
- sl st – slip stitch
- st(s) – stitch(es)
- sc – single crochet
- hdc – half double crochet
- hdc2tog – half double crochet 2 together
- FPdc – front post double crochet
- FPtr – front post treble crochet
- rev sc – reverse single crochet (crab stitch)
- sk – skip
Special stitch: Wheat Cable (worked over 4 posts)
1. Sk the first post and work FPtr around the second post.
2. Working in front of the stitch you just made, work FPtr around the skipped post. This is the right cross.
3. Sk the third post and work FPtr around the fourth post.
4. Working behind the stitch you just made, work FPtr around the skipped third post. This is the left cross.
The two crosses lean away from each other and form one V. Stacking these Vs every other round builds the wheat column. One Wheat Cable counts as 4 sts.
Joining rounds: Begin each round with ch 2. This ch 2 does not count as a stitch. Join each round with a sl st to the first stitch. Do not turn.
Gauge and Checkpoints
Gauge in pattern: 16 sts and 8 rounds = 4 in (10.2 cm). Measure the gauge on the tube itself, with 4 rounds counted as 2 cable rounds plus 2 set-up rounds.
Gauge in sc: 16 sts = 4 in (10.2 cm), and 4 rounds = 1 in (2.5 cm).
Because this is a single piece, the first 10 rounds act as your gauge swatch. Stop and measure at each checkpoint below:
- After Round 4: 10 in (25.4 cm) circumference, or 5 in (12.7 cm) flat.
- After Round 10: 4.25 in (10.8 cm) tall from the foundation edge, and 6 in (15.2 cm) flat.
- After Round 24: 11.25 in (28.6 cm) tall, and 7 in (17.8 cm) flat.
- After Round 28: 13.25 in (33.7 cm) tall, and 6 in (15.2 cm) flat.
- Finished: 14.5 in (36.8 cm) tall.
If your piece is bigger than these numbers, go down half a hook size. If it is smaller, go up half a size. Post stitches pull the fabric in sideways, so check the width with the tube laid flat and relaxed, not stretched.
Pattern
Bottom Rim (Color B, cream)
Foundation: Ch 32. Join with a sl st to the first ch to form a ring, taking care not to twist the chain.
Round 1: Ch 1. Sc in each ch around and join. (32 sc)
Rounds 2–3: Ch 1. Sc in each st around and join. (32 sc)
The ring should measure 8 in (20.3 cm) around and 0.75 in (1.9 cm) tall. Fasten off Color B.
Body (Color A, green)
Round 4 (increase round): Join Color A in any st. Ch 2. Hdc in each of the next 3 sts, 2 hdc in the next st. Repeat from * 8 times in total and join. (40 hdc)
Round 5 (set-up round): Ch 2. Hdc in each of the next 4 sts, hdc in the next st. Repeat 8 times and join. (40 sts)
This round places the panels: in each repeat, the first 4 hdc are the cable base and the fifth is the gutter. Place a marker in each gutter stitch and move the markers up as you work.
Round 6 (cable round): Ch 2. Work 1 Wheat Cable over the next 4 sts, hdc in the next gutter st. Repeat 8 times and join. (40 sts: 8 cables of 4 sts + 8 gutter sts)
Round 7 (set-up round with increase): Ch 2. FPdc around each of the next 4 posts, 2 hdc in the next gutter st. Repeat 8 times and join. (48 sts: 32 posts + 16 gutter sts)
Round 8 (cable round): Ch 2. Wheat Cable over the next 4 posts, hdc in each of the next 2 gutter sts. Repeat 8 times and join. (48 sts)
Round 9 (set-up round): Ch 2. FPdc around each of the next 4 posts, hdc in each of the next 2 sts. Repeat 8 times and join. (48 sts)
Round 10: Repeat Round 8. (48 sts)
Checkpoint: The piece should be 6 in (15.2 cm) wide flat and 4.25 in (10.8 cm) tall.
Round 11 (set-up round with increase): Ch 2. FPdc around each of the next 4 posts, hdc in the next st, 2 hdc in the next st. Repeat 8 times and join. (56 sts: 32 posts + 24 gutter sts)
Round 12 (cable round): Ch 2. Wheat Cable over the next 4 posts, hdc in each of the next 3 gutter sts. Repeat 8 times and join. (56 sts)
Round 13 (set-up round): Ch 2. FPdc around each of the next 4 posts, hdc in each of the next 3 sts. Repeat 8 times and join. (56 sts)
Rounds 14–24: Alternate Round 12 and Round 13, starting with Round 12. Even-numbered rounds are cable rounds and odd-numbered rounds are set-up rounds. Finish after Round 24, which is a cable round. (56 sts in every round)
Checkpoint: The piece should be 7 in (17.8 cm) wide flat and 11.25 in (28.6 cm) tall. This is the fullest part of the teardrop.
Round 25 (set-up round with decrease): Ch 2. FPdc around each of the next 4 posts, hdc in the next st, hdc2tog over the next 2 sts. Repeat 8 times and join. (48 sts: 32 posts + 16 gutter sts)
Round 26 (cable round): Repeat Round 8. (48 sts)
Round 27 (set-up round): Repeat Round 9. (48 sts)
Round 28 (cable round): Repeat Round 8. (48 sts)
Checkpoint: The piece should be 6 in (15.2 cm) wide flat and 13.25 in (33.7 cm) tall. Fasten off Color A.
Border (Cream Rims and Hanging Cord)
Border gauge: 16 sc = 4 in (10.2 cm), and 4 rounds = 1 in (2.5 cm). Each rim adds 1 in (2.5 cm) of height, made of 3 rounds of sc (0.75 in / 1.9 cm) plus 1 round of rev sc (0.25 in / 0.6 cm).
The holder is a tube, so each rim is one continuous edge with no corners. “Per side” here means the full stitch count around each opening.
Top Rim
Round 29: Join Color B in the first st of any cable panel. Ch 1. Sc in each st around, working into the tops of the cable stitches and the gutter hdc alike, and join. (48 sc: 0 extra stitches added)
Rounds 30–31: Ch 1. Sc in each st around and join. (48 sc)
Round 32: Ch 1. Rev sc in each st around, working from left to right. Join and fasten off. (48 rev sc)
Bottom Edge
Bottom Round: With the bottom opening facing you, join Color B in any remaining loop of the foundation chain. Ch 1. Rev sc in each loop around (32 rev sc). Join and fasten off.
Hanging Cord
- Hold Color A double. Join it with a sl st through st 1 of Round 31, working from the inside of the tube just below the crab edge.
- Ch 36. The cord should be about 12 in (30.5 cm) long.
- Sl st through st 25 of Round 31. This is the stitch directly opposite where you started, since 48 ÷ 2 = 24 stitches apart.
- Sl st in the back bump of each chain back to the start. This firms the cord into a rope.
- Sl st into the starting stitch and fasten off.
The finished loop rises about 5.5 in (14.0 cm) above the rim.
Why the Math Works
The bottom rim has 32 sts. Round 4 increases once in every 4 sts, which gives 32 + 8 = 40 stitches. That is exactly 8 panels × (4 cable sts + 1 gutter st).
Every later change happens only in the gutters:
– Round 7 adds 8 sts, giving gutters of 2 (48 sts).
– Round 11 adds 8 more, giving gutters of 3 (56 sts).
– Round 25 removes 8, bringing the gutters back to 2 (48 sts).
The 32 cable stitches never change, so the columns stay straight and unbroken.
The top rim works 1 sc into each of the 48 body stitches with no increases. At 16 sts per 4 in, 48 sts gives a 12 in (30.5 cm) circumference, or 6 in (15.2 cm) flat, which matches the body below. The bottom opening of 32 sts gives 8 in (20.3 cm) around and 4 in (10.2 cm) flat. That is small enough to hold bags in but large enough to pull one out.
Final Blocking
- Weave in all ends on the inside of the tube, following the post stitches so the ends stay hidden.
- Mist the whole holder lightly with water until it is damp but not soaked.
- Roll a towel into a cylinder about 4.5 in (11.4 cm) across and slide it inside the tube.
- Shape the teardrop by hand. Ease the widest point out to 7 in (17.8 cm) flat and keep the top at 6 in (15.2 cm).
- Pinch each wheat cable gently so the V shapes stand up, and straighten the columns so they run vertically.
- Flatten the crab-stitch edges with your fingers so they roll evenly outward.
- Let it dry completely, standing upright, then remove the towel.
Final Quality-Control Checklist
- 8 straight wheat-cable columns, each with matching right and left crosses
- Gutters of 1, 2, 3, then 2 hdc, in the correct rounds
- Stitch counts: 32, 40, 48, 56, 48, and 48 at the top rim
- 14.5 in (36.8 cm) total height
- 7 in (17.8 cm) widest flat width
- Crab-stitch edges even all the way around both openings
- Cord attached to stitches directly opposite each other, so the holder hangs straight
- All ends secured inside
Troubleshooting
- The columns spiral to one side: You may be missing the ch 2 or joining in the wrong stitch. Always join to the first real stitch, not into the ch 2.
- The V shapes look flat: Check that you work in front for the right cross and behind for the left cross.
- The tube is too narrow: Post stitches are pulling it in. Go up half a hook size, or loosen the FPtr stitches.
- The top rim ruffles: You have added stitches. Recount and make sure there are exactly 48 sc.
- The bottom opening is too loose for bags: Work a fourth sc round in Color B before the crab stitch, decreasing evenly to 28 sts.
- The holder hangs crooked: Move one end of the cord so the two ends are exactly 24 sts apart.
Care
Hand wash in cool water, press out the excess, and dry flat or reshape over a rolled towel. Do not wring the holder, as that can distort the cables.
Final Notes
The measurement chain is simple. A 32-st cream ring becomes 40 green sts, which grow to 56 sts at the widest point and narrow back to 48 sts at the top. The rims never add or remove stitches beyond those set by the body. If you check your gauge at Rounds 4, 10, 24, and 28, the holder will finish at 14.5 in (36.8 cm) tall and 7 in (17.8 cm) wide, ready to hang by the door and fill with bags.
Happy crocheting!