

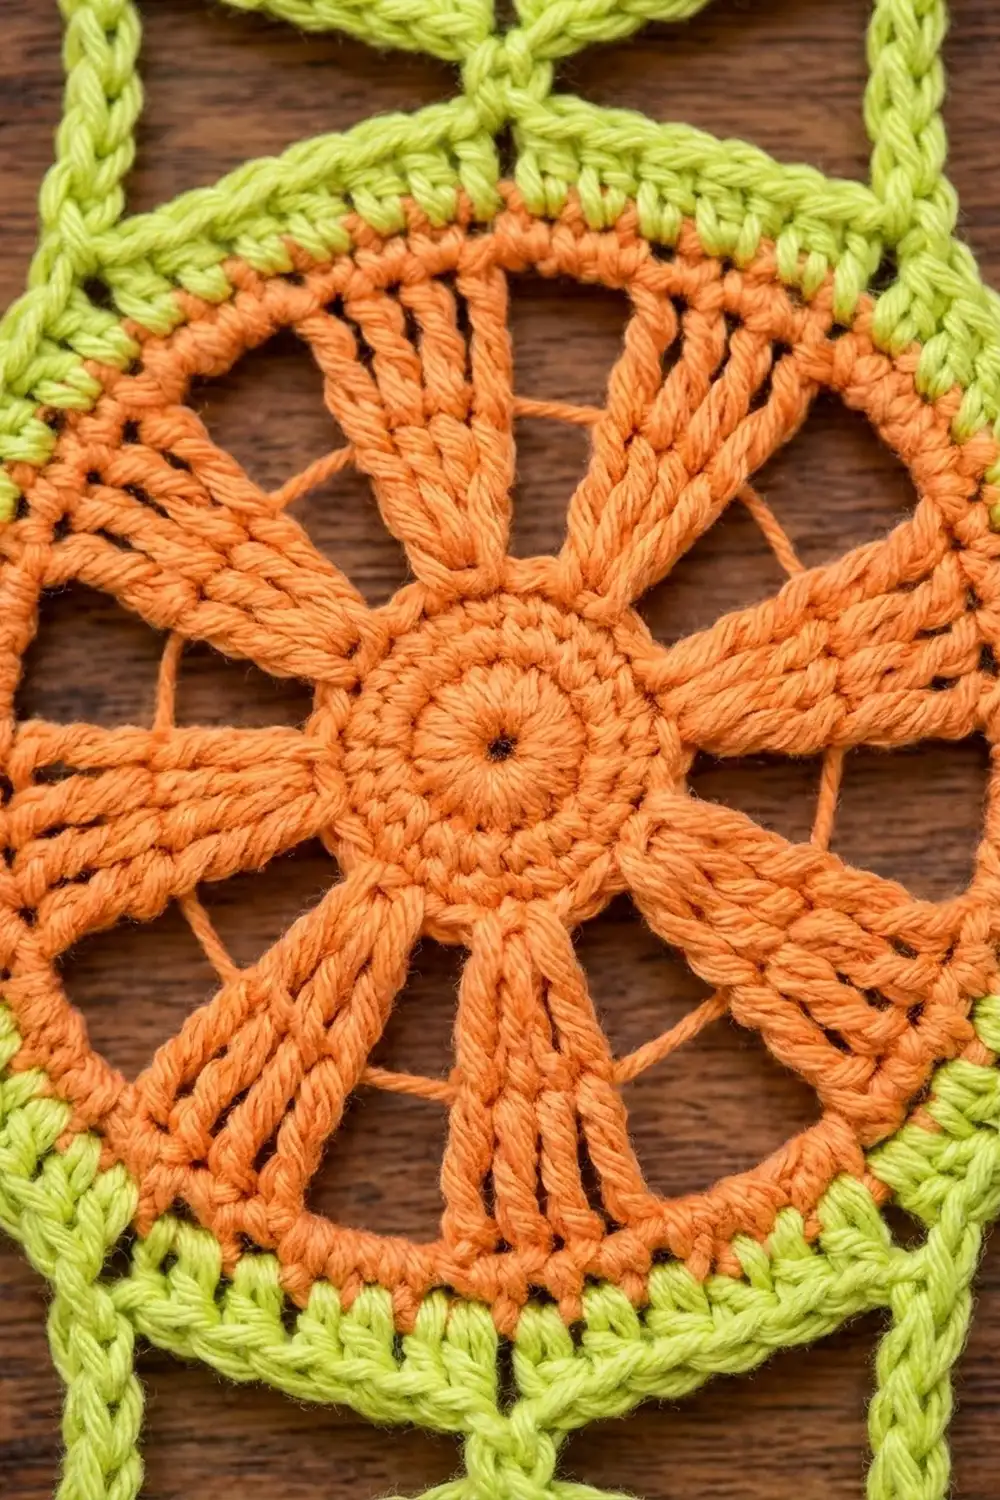
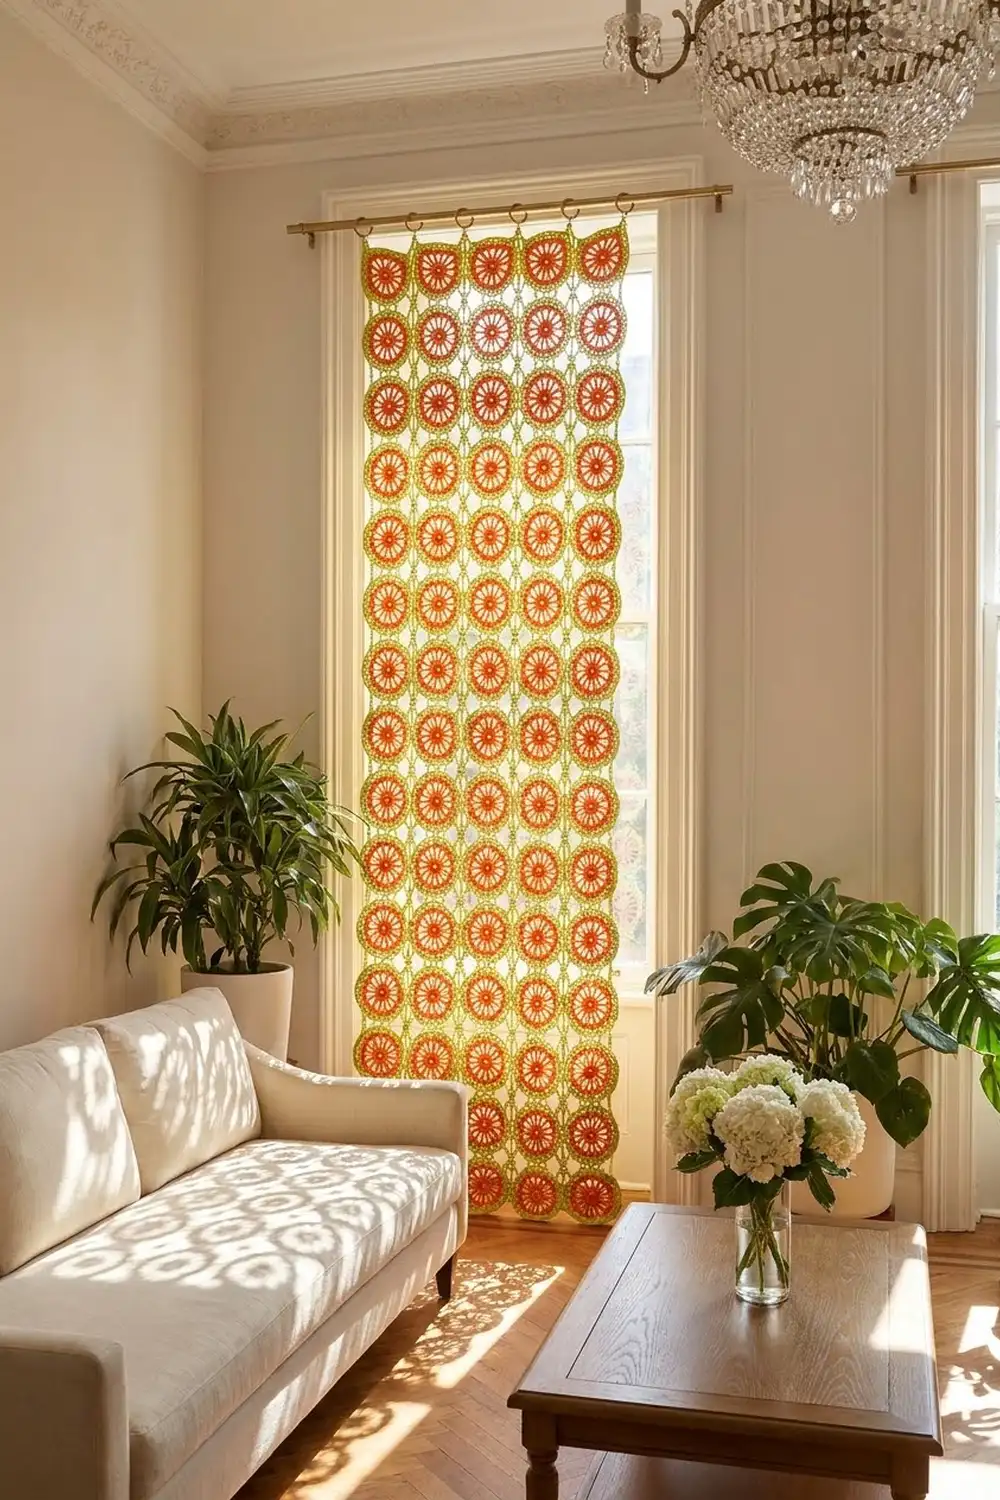
The Citrus Wheel Lace Curtain is a light, airy panel made from round motifs joined into a grid. Each wheel has a bright orange center with twelve fanned spokes, a solid orange band, and a crisp lime-green edge. Short green bars link the wheels at four points, so light passes through the open spokes and the small diamonds between the circles.
The colors look like sliced citrus: warm tangerine against fresh lime. Hung in a window, the panel works as a sheer curtain or room divider. It reads as cheerful but still graphic and tidy.
This pattern uses US crochet terms. The finished panel measures 29.5 in (74.9 cm) wide by 49.5 in (125.7 cm) tall before the hanging loops, or 51 in (129.5 cm) with them. Each motif is 4.5 in (11.4 cm) across.
You’ll work 60 identical motifs in orange, finishing each with a green round. From the second motif on, you join each one to its neighbors while you work that green round. A short row of hanging loops finishes the top edge.
Finished Size and Construction
- Finished size: 29.5 in × 49.5 in (74.9 cm × 125.7 cm); 51 in (129.5 cm) tall including loops
- Skill level: Easy-intermediate
- Terminology: US crochet terms
- Yarn weight: DK (weight 3) cotton
- Hook: 3.5 mm (E-4)
- Number of pieces: 60 motifs
- Layout: 6 motifs wide × 10 motifs tall
- Motif size: 4.5 in (11.4 cm) diameter
- Size before border: 29.5 in × 49.5 in (74.9 cm × 125.7 cm)
- Border depth: No surrounding border. The green motif round is the edge, and the top hanging loops add 1.5 in (3.8 cm).
Materials
Choose a smooth, mercerized or combed cotton in DK weight. Cotton holds the spokes crisp, resists stretching when the panel hangs, and survives sunlight better than most acrylics. This pattern assumes yarn of about 115 m per 50 g ball.
- Orange (Color A): 300 g / about 690 m (6 balls), Rounds 1–5 of every motif
- Lime green (Color B): 150 g / about 345 m (3 balls), Round 6, joining bars and hanging loops
Tools:
– 3.5 mm (E-4) crochet hook
– Tapestry needle
– 4 locking stitch markers
– Measuring tape
– Blocking mats and rustproof pins
– Spray bottle
– Curtain rod with 6 ring clips
The quantities include a margin of about 20% for gauge swatches, weaving in ends and small tension differences. One motif uses about 4 g (9.2 m) of orange and 1.5 g (3.5 m) of green.
Abbreviations (US Terms)
- ch – chain
- sl st – slip stitch
- sc – single crochet
- hdc – half double crochet
- dc – double crochet
- tr – treble crochet
- sp – space
- st(s) – stitch(es)
- MR – magic ring
Special stitch – Joining bar (JB): After working the hdc at a join point, ch 2, sl st into the matching join-point hdc on the neighboring finished motif, ch 2, then sl st into the top of the hdc you just made. This makes a short double bar about 0.5 in (1.3 cm) long. It does not change your hdc count.
Gauge and Checkpoints
Make one complete motif before starting the panel and block it lightly. Every measurement in the curtain depends on this one circle.
Motif checkpoints (measured flat, edge to edge):
– After Round 2: 1.25 in (3.2 cm)
– After Round 3: 2.75 in (7.0 cm)
– After Round 4: 3.25 in (8.3 cm)
– After Round 5: 4 in (10.2 cm)
– After Round 6: 4.5 in (11.4 cm)
If your motif is too big: go down to a 3.25 mm hook. Also check that your treble crochets aren’t loose and loopy.
If your motif is too small: go up to a 3.75 mm hook.
If the motif cups or ruffles: see Troubleshooting. Don’t change the stitch counts, because the joining positions depend on them.
Motif Pattern
Work with Color A (orange). Join each round with a sl st to the top of the beginning chain. Don’t turn.
Round 1: MR, ch 1, 12 sc into the ring. Pull the ring closed and join. (12 sc)
Round 2: Ch 3 (counts as dc), dc in the same st, then 2 dc in each remaining st around. Join. (24 dc)
This is the solid center ring.
Round 3 (spokes begin): Ch 4 (counts as tr), tr in the next dc, ch 2. Tr in each of the next 2 dc, ch 2. Repeat from * to * 10 more times. Join to the top of the beginning ch-4. (24 tr in 12 pairs, 12 ch-2 sps)
The tall tr pairs fan outward and leave open triangular gaps between them. These gaps form the wheel’s open spaces.
Round 4 (widen the wedges): Ch 3 (counts as dc), dc in the same st, 2 dc in the next tr, ch 1, skip the ch-2 sp. 2 dc in each of the next 2 tr, ch 1, skip the ch-2 sp. Repeat from * to * 10 more times. Join. (48 dc in 12 wedges of 4, 12 ch-1 sps)
Each spoke is now a wedge: narrow at the center and wide at the edge.
Round 5 (orange band, conversion round): Ch 3 (counts as dc), dc in each of the next 3 dc, 2 dc in the ch-1 sp. Dc in each of the next 4 dc, 2 dc in the ch-1 sp. Repeat from * to * 10 more times. Join. Fasten off Color A.
Count: 48 dc worked one per existing st + 24 dc worked into spaces = 72 dc.
Round 6 (green edge, first motif only): Join Color B in any dc. Ch 2 (doesn’t count). Hdc in the same st, then hdc in each of the next 7 dc and 2 hdc in the next dc. Hdc in each of the next 8 dc, 2 hdc in the next dc. Repeat from * to * 6 more times. Join to the first hdc. Fasten off.
Count: 72 sts worked one per existing st + 8 increases = 80 hdc.
Mark the join points. Number the hdc from the first one of Round 6. Place markers in hdc 1, 21, 41 and 61. This divides the edge into four equal 20-stitch quarters. With hdc 1 at the top, the other points fall at left, bottom and right as you look at the right side. These four stitches are the only places where motifs connect.
Make All Pieces
Each motif uses Rounds 1–5 in orange, then Round 6 in green. Make Round 6 in full only on the first motif. On all others, work Round 6 with joins as described in Joining.
Quantities:
– 60 orange centers (Rounds 1–5)
– 60 green Round 6 edges: 1 worked plain and 59 worked with joins
Layout grid (6 wide × 10 tall), motifs numbered in working order:
Row 1:   1   2   3   4   5   6    <- top (hanging loops)
Row 2:   7   8   9  10  11  12
Row 3:  13  14  15  16  17  18
Row 4:  19  20  21  22  23  24
Row 5:  25  26  27  28  29  30
Row 6:  31  32  33  34  35  36
Row 7:  37  38  39  40  41  42
Row 8:  43  44  45  46  47  48
Row 9:  49  50  51  52  53  54
Row 10: 55  56  57  58  59  60    <- bottom
Making all 60 orange centers first is efficient. Then work the green rounds in grid order.
Joining
Method: Join-as-you-go during Round 6, using the Joining bar (JB).
Stitch-to-stitch logic: Every motif has exactly four join points: top (hdc 1), left (hdc 21), bottom (hdc 41) and right (hdc 61).
- A motif’s left point joins its left neighbor’s right point.
- A motif’s top point joins the bottom point of the motif above it.
Because there are 20 hdc between points, the bars always land at the same compass positions. The circles stay square to each other.
Working order:
– Motif 1: plain Round 6.
– Motifs 2–6: work Round 6 and add a JB at the left point.
– Motif 7 (first in each new row): add a JB at the top point only.
– Every other motif: add a JB at the top point and at the left point.
Start Round 6 so that hdc 1 sits at the top of the motif. Work around normally, and add a JB right after each join-point hdc that has a finished neighbor.
Join count:
– Horizontal: 5 per row × 10 rows = 50
– Vertical: 9 per column × 6 columns = 54
– Total: 104 JBs
Tension advice: Keep both ch-2 sections of each bar the same length. Don’t pull the sl st tight. Bars that are too short make the motifs crowd and buckle. Bars that are too long let the grid sag when it hangs.
Size checkpoint:
– Two joined motifs: 4.5 + 0.5 + 4.5 = 9.5 in (24.1 cm).
– A vertical strip of three: 14.5 in (36.8 cm).
– Full width: 6 × 4.5 in + 5 × 0.5 in = 29.5 in (74.9 cm).
– Full height: 10 × 4.5 in + 9 × 0.5 in = 49.5 in (125.7 cm).
Border
This design has no surrounding border. The green Round 6 already finishes every outer edge, and the scalloped silhouette is part of the look. The only edge work is along the top, where you add one hanging loop per column for the ring clips.
Border gauge: ch 10 in Color B measures about 1.5 in (3.8 cm), so each loop folds to roughly 0.75 in (1.9 cm). With a clip, the panel’s hanging height is about 51 in (129.5 cm).
Hanging loops (motifs 1–6): Join Color B with a sl st in the top-point hdc (hdc 1) of the motif. Ch 10, then sl st into the same hdc. Next, work 12 sc over the ch-10 loop to firm it up. Sl st in the same hdc again and fasten off.
Counts per side:
– Top: 6 loops, one per column (12 sc each, 72 sc total)
– Left and right sides: 0 stitches added. The 10 free side points of the outer columns stay plain.
– Bottom: 0 stitches added. The 6 free bottom points stay plain.
Why the math works: The loops sit on the same top-point stitches that the vertical joins use further down. Each clip therefore hangs directly above a column of bars, and the weight passes straight down through those 54 vertical bars. The loops are 5 in (12.7 cm) apart (4.5 in motif + 0.5 in bar), which matches standard ring-clip spacing on most rods.
Final Blocking
- Weave in all ends along the back of the solid rounds, never across the open spokes.
- Lay the panel face up on blocking mats.
- Pin the four outer corners to exactly 29.5 in × 49.5 in (74.9 cm × 125.7 cm).
- Pin each outer motif at its free side or bottom point so the edges run straight.
- Spray the panel evenly until it is damp, not soaked.
- Gently spread each spoke so the 12 wedges are evenly spaced, and press the green rounds flat.
- Leave it to dry completely, which usually takes 12–24 hours.
- Unpin and check one motif: it should measure 4.5 in (11.4 cm).
Final Quality-Control Checklist
- [ ] All 60 motifs measure 4.5 in (11.4 cm) after blocking
- [ ] Every motif has 12 spokes and 80 hdc in Round 6
- [ ] All 104 joining bars are present and similar in length
- [ ] No bar is attached to a non-point stitch
- [ ] Rows and columns line up straight
- [ ] Panel measures 29.5 in × 49.5 in (74.9 cm × 125.7 cm)
- [ ] 6 hanging loops are present and evenly spaced 5 in (12.7 cm) apart
- [ ] All ends are secure and hidden in solid stitches
Troubleshooting
Motif cups like a bowl: Your Round 3 trebles are too short or tight. Lengthen the first wrap of each tr, or go up a hook size for Round 3 only.
Motif ruffles: Your Round 5 is too loose. Work that round with a hook 0.25 mm smaller.
Join point is off-center: You miscounted Round 6. Recount from hdc 1 and move the markers before joining.
Grid leans diagonally: A left join was attached to the neighbor’s top or bottom point instead of its right point. Undo that bar and rejoin it.
Panel sags in the middle: Your bars are too loose. Re-block the panel, and on any future panels shorten the bars to ch 1 + sl st + ch 1.
Spokes look uneven: Pin each wedge during blocking. Cotton holds shaped spokes well once it’s dry.
Care
Hand wash in cool water with mild soap, press out the water in a towel, and dry the panel flat in its blocked shape. Rehang it only when completely dry so it doesn’t stretch.
Final Notes
The whole curtain follows one measurement chain. Rounds 1–5 build a 4 in (10.2 cm) orange wheel with 72 dc. Round 6 brings it to 4.5 in (11.4 cm) with 80 hdc and four join points 20 stitches apart. The 0.5 in (1.3 cm) bars set a 5 in (12.7 cm) pitch, and 6 × 10 motifs give 29.5 in × 49.5 in (74.9 cm × 125.7 cm). If your first motif hits its checkpoints, the rest of the panel will measure correctly.
Happy crocheting!