
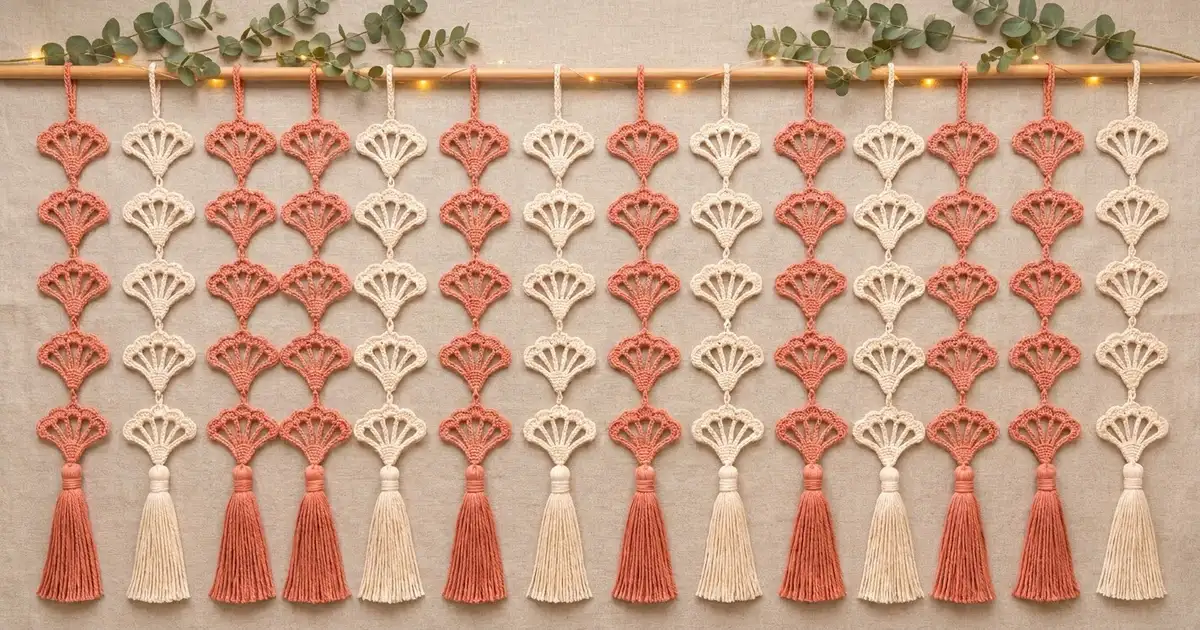
The Coral Tide Curtain is a light, open hanging made of small seashell fans. Each fan starts as a solid wedge at the bottom. Six slim spokes fan out from the wedge, and five rounded scallops close off the top. A neat single crochet edging traces the whole outline, so the shell shape stays crisp when light comes through the windows.
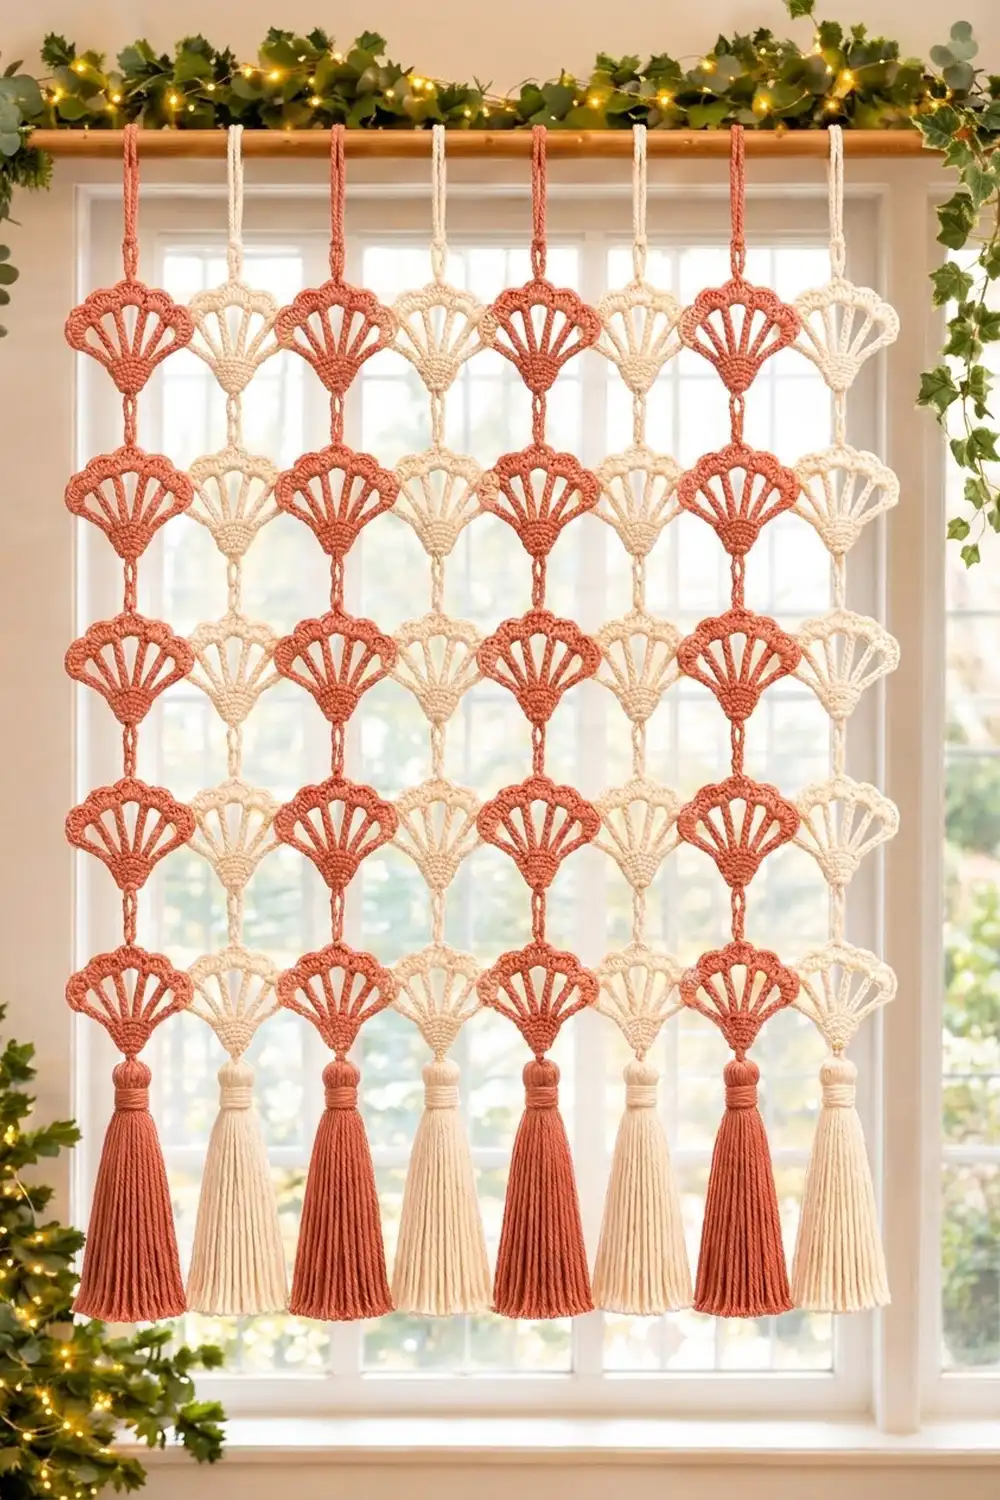
The sample uses two colors: a warm coral and a soft cream. Strands alternate color across the rod, and each strand ends in a full tassel that matches its motifs. The look is coastal and a little boho, and it suits a window, a closet opening, or a wall.
This pattern uses US crochet terms. The finished curtain measures about 31.75 in (80.6 cm) wide and 28 in (71.1 cm) long. Each fan motif is 3.75 in (9.5 cm) wide and 3 in (7.6 cm) tall.
To build it, you crochet 40 separate fan motifs and edge each one. Then you link them into eight strands of five with short chain connectors, add a hanging loop to the top of each strand, and tie a tassel to the bottom.
Finished Size and Construction
- Finished curtain: 31.75 in (80.6 cm) wide × 28 in (71.1 cm) long
- Skill level: Easy–Intermediate
- Terminology: US crochet terms
- Yarn weight: Worsted (#4) cotton
- Hook: 4.0 mm (G-6)
- Number of pieces: 40 fan motifs and 8 tassels
- Layout: 8 strands × 5 motifs, strands alternating coral and cream
- Motif size: 3.75 in (9.5 cm) wide × 3 in (7.6 cm) tall
- Motif size before border: 3.25 in (8.3 cm) wide × 2.75 in (7.0 cm) tall
- Border depth: 0.25 in (0.6 cm)
- Connector length: 1 in (2.5 cm)
- Hanging loop: 2 in (5.1 cm) tall
- Tassel length: 6 in (15.2 cm)
- Strand spacing on rod: 4 in (10.2 cm) center to center
Materials
Use a smooth, mercerized or combed worsted-weight cotton. Cotton holds the spokes straight and the scallops round, and it doesn’t stretch much under the weight of the tassels. Avoid fuzzy or very soft acrylics, because the windows will sag.
- Coral: 150 g / about 255 m (279 yd)
- Cream: 150 g / about 255 m (279 yd)
These amounts assume a cotton of about 85 m per 50 g. Each motif uses about 4 g, and each tassel uses about 6 g. Quantities include a safety margin of roughly 30%, so you can make a test motif and redo a tassel if needed.
Tools:
– 4.0 mm (G-6) crochet hook
– Tapestry needle
– Sharp scissors
– Stiff card cut to 6 in (15.2 cm) tall for the tassels
– Wooden rod or dowel, at least 36 in (91.4 cm) long and up to 1.25 in (3.2 cm) in diameter
– Rust-proof pins and a blocking mat
– Spray bottle
– Measuring tape
Abbreviations (US Terms)
- ch – chain
- sl st – slip stitch
- sc – single crochet
- dc – double crochet
- tr – treble crochet
- sp – space
- st(s) – stitch(es)
Special stitch – Shell: Work 9 dc in the same chain space. The center dc of the shell is the 5th dc.
Peak sc: The middle sc of a 3-sc group in the border. The top peak of a motif is the peak sc on the 3rd (center) scallop. The bottom peak is the middle sc of the 3 sc worked at the point.
Gauge and Checkpoints
Gauge: 16 dc = 4 in (10.2 cm) worked flat. Exact gauge matters less than matching size from motif to motif, but the strand length depends on it.
Make one test motif first. Edge it, block it, and measure it before you start the full set. Check it against each stage below:
- After Row 1: fan is 1.75 in (4.4 cm) wide and 0.75 in (1.9 cm) tall.
- After Row 2: wedge is 2.5 in (6.4 cm) wide and 1.25 in (3.2 cm) tall.
- After Row 3: 3 in (7.6 cm) across the spoke tops and 2.25 in (5.7 cm) tall.
- After Row 4: 3.25 in (8.3 cm) wide and 2.75 in (7.0 cm) tall.
- After the border: 3.75 in (9.5 cm) wide and 3 in (7.6 cm) tall.
If the motif is too big, go down to a 3.75 mm hook, or pull the tr spokes a little shorter. If it’s too small, go up to a 4.5 mm hook. If only the windows look squat, wrap your yarn a little looser on the tr.
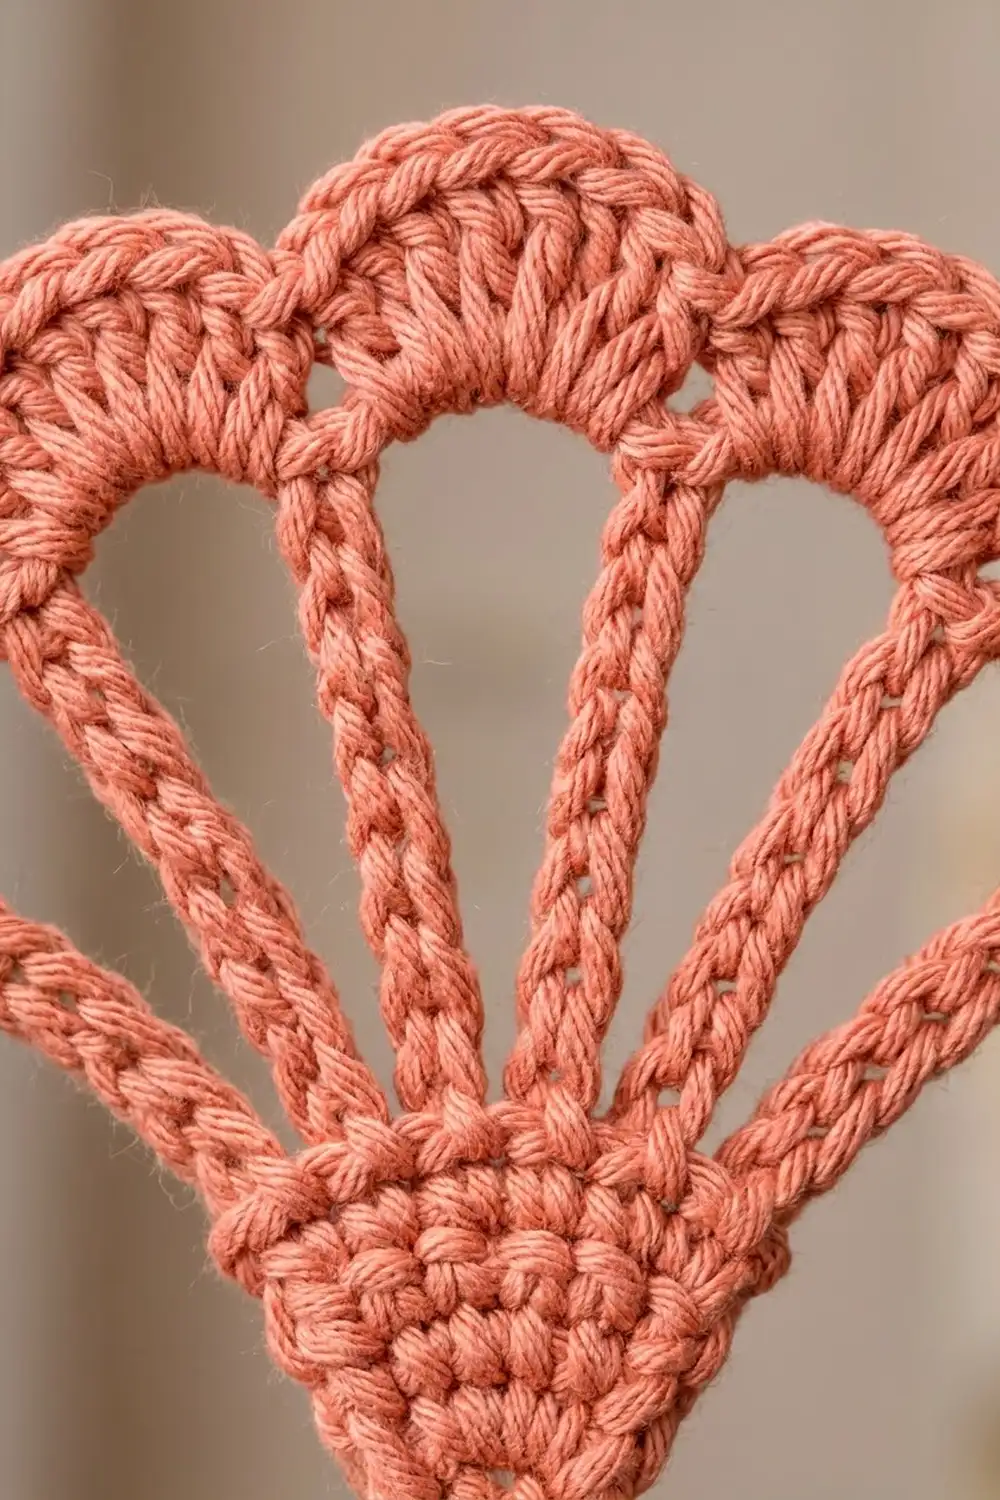
Fan Motif (Make 40)
Each motif is worked flat in rows, starting at the bottom point. Don’t turn after Row 4 until the instructions tell you to.
Row 1: Ch 4. Work 7 dc in the 4th ch from hook (the skipped ch-3 counts as the first dc). Turn. (8 dc)
All 8 stitches meet at one point, which forms the narrow bottom tip of the shell.
Row 2: Ch 3 (counts as dc), dc in the same st, 2 dc in each st across, working the last pair into the top of the turning ch. Turn. (16 dc)
This finishes the solid wedge at the base.
Row 3 (spoke row): Ch 4 (counts as tr), ch 3, skip next 2 dc, tr in next dc; repeat from * 4 more times. Turn. (6 tr, 5 ch-3 sps)
Check your placement. The spokes sit on dc 1, 4, 7, 10, 13 and 16, and the last tr goes into the top of the turning ch. Together they make 6 spokes and 5 open windows.
Row 4 (scallop row): Ch 1, sc in the first tr, Shell in next ch-3 sp, sc in next tr; repeat from * 4 more times, working the final sc into the top of the turning ch-4. (6 sc + 45 dc = 51 sts; 5 shells)
Each shell caps one window. The ch-3 underneath stays hidden inside the shell, so the window reads as a tall open arch.
Don’t fasten off. Go straight on to the border.
Border (Each Motif)
Border gauge: about 4.5 sc per 1 in (2.5 cm) along straight edges, with extra stitches at the curves.
Border round: Ch 1, turn.
- Top edge: Sc in next sc, sc in each of next 4 dc, 3 sc in the center dc of the shell, sc in each of next 4 dc; repeat from * 4 more times, then sc in the last sc. (61 sc)
- First side, working down the row ends: 4 sc around the post of the end tr (Row 3), 3 sc around the end st of Row 2, 3 sc around the end st of Row 1. (10 sc)
- Point: 3 sc in the base of the Row 1 fan, where all the Row 1 stitches meet. (3 sc)
- Second side, working up the row ends: 3 sc around Row 1, 3 sc around Row 2, 4 sc around the end tr of Row 3. (10 sc)
- Join with a sl st to the first sc. Fasten off and weave in the ends. (84 sc total)
Why the math works:
– Top edge: each scallop takes 11 border stitches. That is 9 stitches worked one into each dc (4 + 1 + 4) plus 2 extra at the peak, because the center dc gets 3 sc instead of 1. Five scallops give 55 stitches, and the 6 sc worked into Row 4’s sc bring the top to 61.
– Sides: each side is about 2.25 in (5.7 cm) of row ends. At 4.5 sc per inch, that calls for 10 sc.
– Point: 3 sc turn the corner without puckering.
Total: 61 + 10 + 3 + 10 = 84 sc.
The extra stitches add 0.25 in (0.6 cm) all around. Width grows from 3.25 in (8.3 cm) to 3.75 in (9.5 cm). Height grows from 2.75 in (7.0 cm) to 3 in (7.6 cm), because the border sits flat along the top and point.
Make All Pieces
- Coral: 20 motifs and 4 tassels
- Cream: 20 motifs and 4 tassels
Every strand uses one color only. Strands alternate across the rod. In this layout grid, C = coral and W = cream (white):
Strand:   1  2  3  4  5  6  7  8
Loop:     o  o  o  o  o  o  o  o
Row 1:    C  W  C  W  C  W  C  W
Row 2:    C  W  C  W  C  W  C  W
Row 3:    C  W  C  W  C  W  C  W
Row 4:    C  W  C  W  C  W  C  W
Row 5:    C  W  C  W  C  W  C  W
Tassel:   C  W  C  W  C  W  C  W
Block all motifs before you join them (see Final Blocking). Joining flat, same-size motifs makes even strands.
Joining (Building the Strands)
Method: Chain connectors worked in the strand’s own color. Each connector runs from the bottom peak of one motif to the top peak of the motif below.
Connector:
1. Join yarn with a sl st in the bottom peak sc of Motif 1.
2. Ch 6. This should measure 1 in (2.5 cm).
3. Sl st in the top peak sc of Motif 2.
4. Fasten off.
Repeat to link Motif 2 to 3, 3 to 4, and 4 to 5. Each strand gets 4 connectors between motifs.
Stitch-to-stitch logic: Always join peak to peak. That keeps every motif centered under the one above, and the strand hangs straight instead of twisting.
Hanging loop: Join yarn with a sl st in the top peak sc of Motif 1. Ch 24, then sl st in the same peak sc. Fasten off. The loop stands 2 in (5.1 cm) tall and slides over a rod up to 1.25 in (3.2 cm) across.
Tassel connector: Join yarn at the bottom peak of Motif 5, ch 6, and fasten off, leaving a 6 in (15.2 cm) tail for tying on the tassel.
Tension advice: Chain at the same tension you use for your motifs. Tight connectors bunch the motifs together, and loose ones stretch under the tassel’s weight. If your ch-6 comes out longer than 1 in (2.5 cm), work ch 5 on every connector so all strands still match.
Tassel:
1. Wrap yarn 40 times around the 6 in (15.2 cm) card.
2. Thread the tassel connector’s tail under the wraps at the top and tie it tight.
3. Cut the wraps at the bottom.
4. Wrap a separate strand 6 times around the tassel 0.75 in (1.9 cm) below the top to form a rounded head, then knot it and bury the ends inside.
5. Trim the tassel to an even 6 in (15.2 cm).
Size checkpoint, per strand:
| Part | Length |
|---|---|
| Hanging loop | 2 in (5.1 cm) |
| 5 motifs × 3 in | 15 in (38.1 cm) |
| 4 connectors × 1 in | 4 in (10.2 cm) |
| Tassel connector | 1 in (2.5 cm) |
| Tassel | 6 in (15.2 cm) |
| Total | 28 in (71.1 cm) |
Lay all eight strands side by side and check that they match within 0.25 in (0.6 cm).
Hanging the strands: Space the strands 4 in (10.2 cm) apart, center to center. The span is 7 gaps × 4 in = 28 in (71.1 cm), plus half a motif width at each end, 3.75 in (9.5 cm) in total. That gives a curtain 31.75 in (80.6 cm) wide.
Final Blocking
- Before joining, mist each motif lightly until it’s damp, not dripping.
- Pin it face up on the mat. Pin the bottom point first.
- Pin the five scallop peaks in an even arc. The outer two peaks should sit 3.75 in (9.5 cm) apart.
- Straighten each spoke so the five windows match in height.
- Check the motif height: 3 in (7.6 cm) from the point to the top peak.
- Let the motifs dry fully, usually 4–6 hours.
- After assembly, hang the curtain, mist the tassels, and comb the strands straight with your fingers. Let them dry while hanging.
Final Quality-Control Checklist
- 40 motifs, each 3.75 in × 3 in (9.5 cm × 7.6 cm)
- Every motif has 6 spokes, 5 windows, 5 scallops and an 84-sc border
- All connectors are 1 in (2.5 cm) long and join peak to peak
- Eight strands, each 28 in (71.1 cm) long
- Hanging loops are all 2 in (5.1 cm) tall
- Tassels are trimmed evenly to 6 in (15.2 cm), with neat heads
- Colors alternate coral and cream across the rod
- All ends are woven in securely
Troubleshooting
- Windows are uneven: You skipped the wrong number of dc in Row 3. Recount to 16 dc and place the spokes on dc 1, 4, 7, 10, 13 and 16.
- Scallops look flat: Make sure you work 3 sc into each shell’s center dc on the border.
- Edge ruffles: Your border is too loose. Use 3 sc instead of 4 around the end tr.
- Edge cups or pulls in: Your border is too tight. Go up 0.5 mm for the border only.
- Strand twists: A connector is off-center. Rejoin it at the true peak sc.
- Strands differ in length: Your chain tension varies. Count chains and measure each connector.
- Tassel flares out: Tighten the neck wrap and steam-mist the tassel straight.
Care
Hand wash in cool water with mild soap. Press out the water in a towel, then rehang the curtain or lay it flat to dry. Keep it away from strong direct sun, which can fade the coral.
Final Notes
The whole curtain depends on a short chain of measurements:
- 16 dc = 4 in (10.2 cm)
- The motif measures 3.25 in × 2.75 in (8.3 cm × 7.0 cm) before the border and 3.75 in × 3 in (9.5 cm × 7.6 cm) after it.
- Five motifs, five 1 in (2.5 cm) connectors, a 2 in (5.1 cm) loop and a 6 in (15.2 cm) tassel make each 28 in (71.1 cm) strand.
- Eight strands spaced 4 in (10.2 cm) apart make a curtain 31.75 in (80.6 cm) wide.
If your test motif matches its checkpoints, everything after it falls into place.
Happy crocheting!