

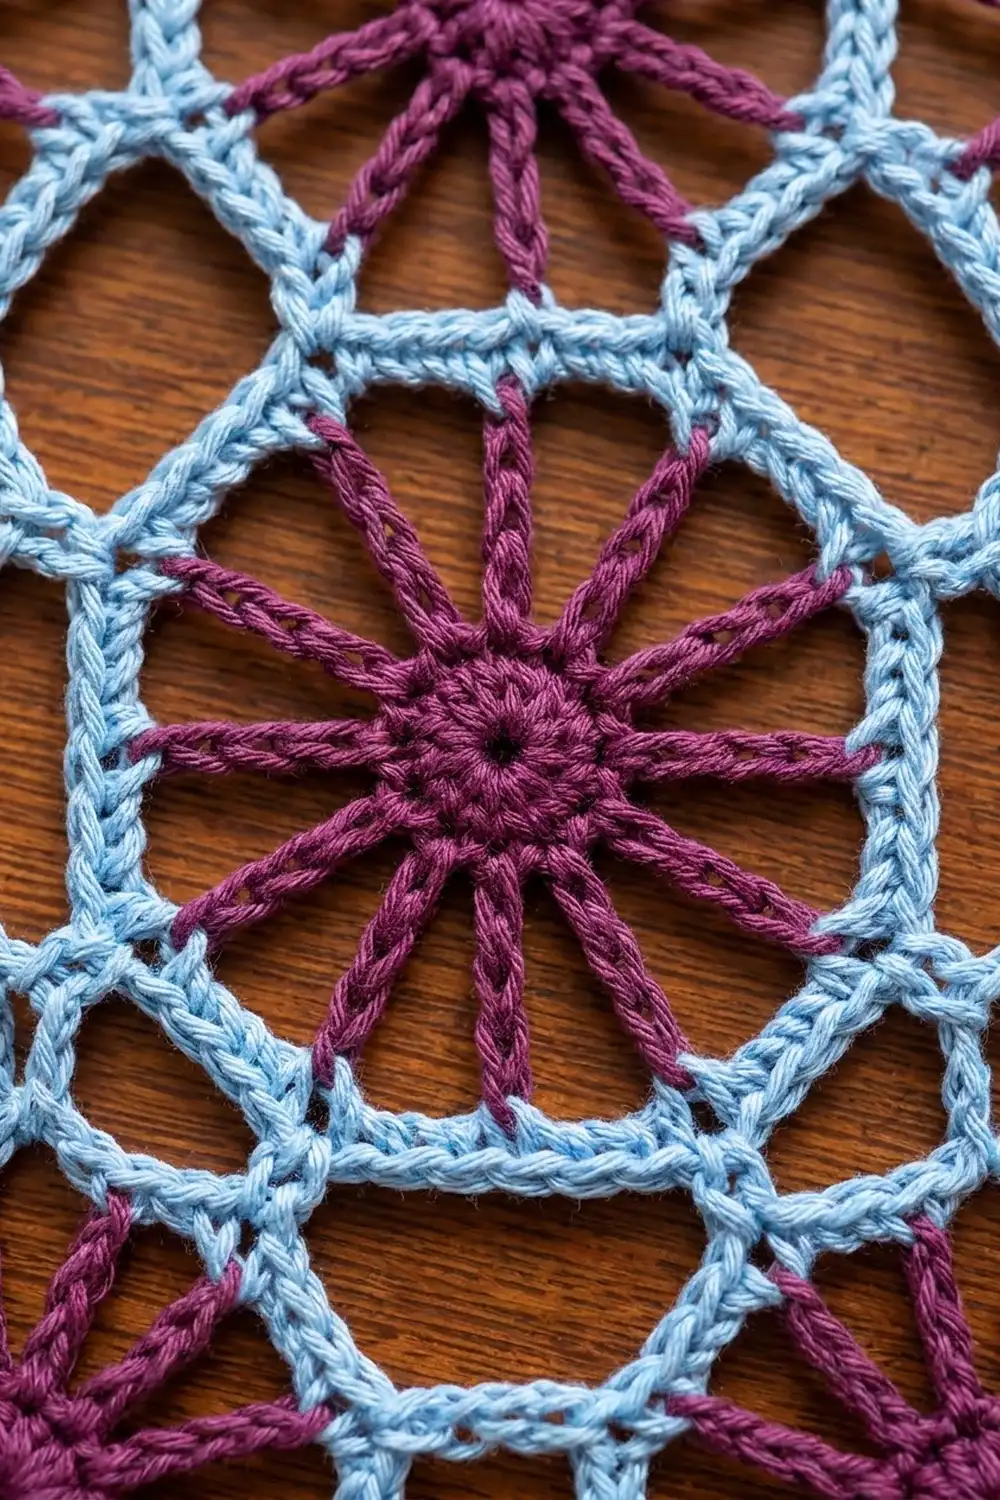
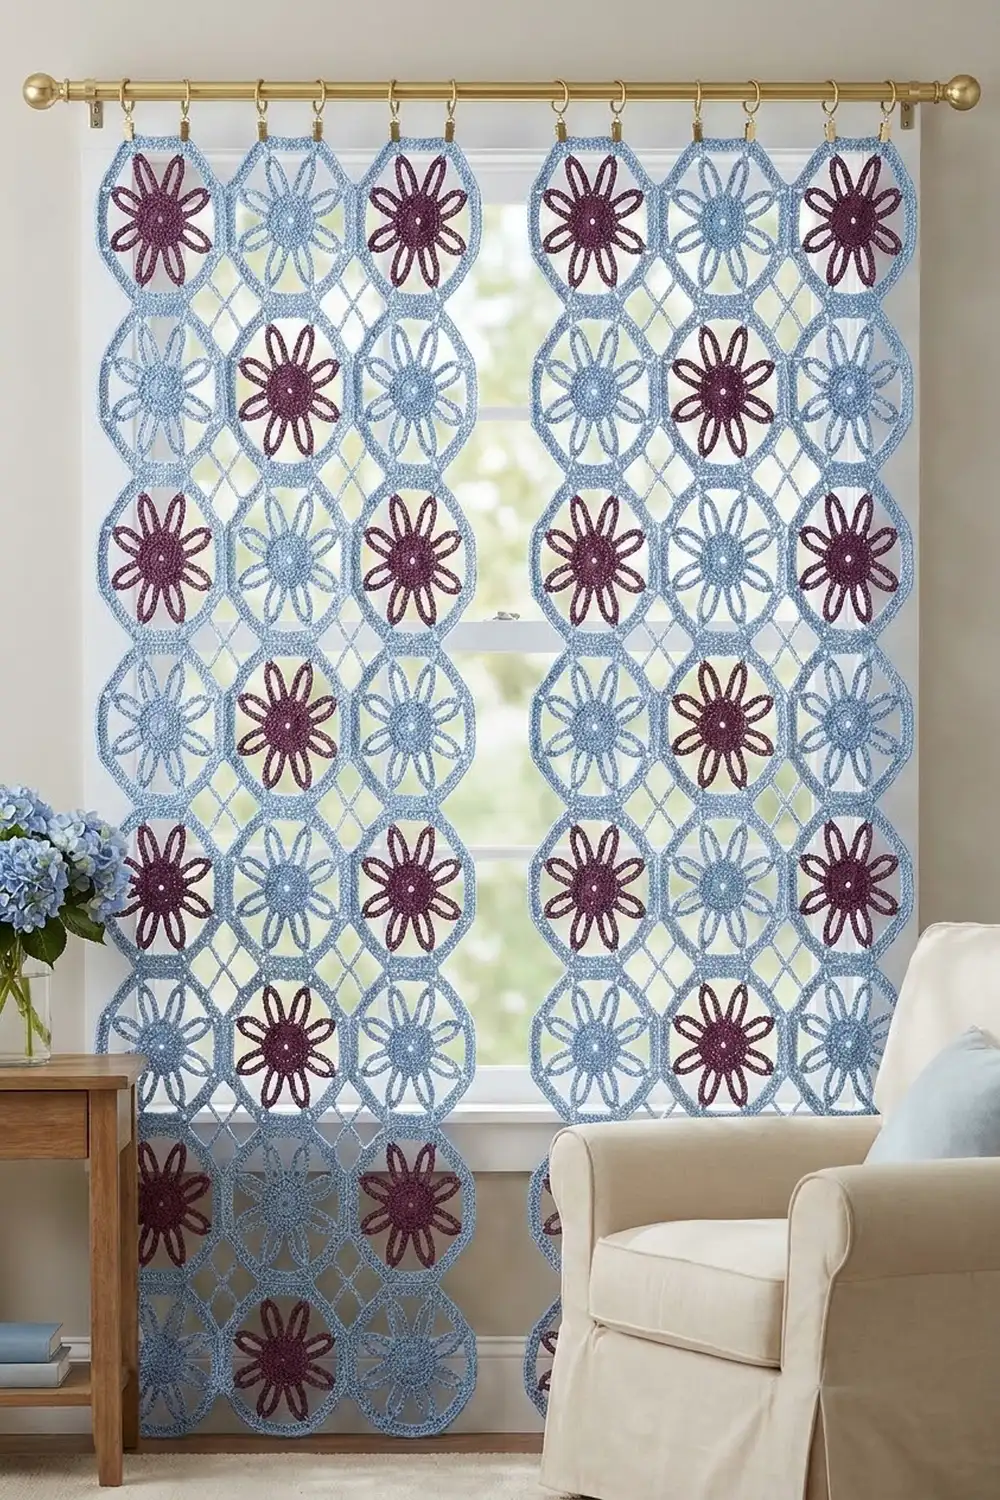
This curtain is an open, airy lattice of joined lace octagons. Each motif has a small, solid round center with eight chain “petal” spokes radiating out to a fine chain frame. Joined in a grid, the frames make a geometric web with small open diamonds between the motifs, so plenty of light comes through.
The palette is soft and simple: every frame is Light Blue, and the centers alternate between deep Plum and Light Blue in a checkerboard. The Plum stars stand out against the window, and the blue ones sit back into the lattice.
This pattern uses US crochet terms. Each finished panel is 21 in wide x 71 in long (53.3 cm x 180.3 cm), and the curtain is made of two identical panels hung from clip rings on a rod.
Construction is modular. You crochet each motif in the round, join it to its neighbors as you go in the final round, and then work a two-round border around each panel to straighten the edges and give the clip rings something firm to grip.
Finished Size and Construction
- Finished size (one panel): 21 in x 71 in (53.3 cm x 180.3 cm)
- Skill level: Intermediate (easy stitches; joining as you go takes some focus)
- Terminology: US
- Yarn weight: DK / light (#3) mercerized cotton
- Hook: 3.5 mm (E-4)
- Number of pieces: 112 motifs (56 per panel), joined into 2 panels
- Layout per panel: 4 motifs wide x 14 motifs tall
- Motif size: 5 in (12.7 cm) flat side to flat side
- Panel size before border: 20 in x 70 in (50.8 cm x 177.8 cm)
- Border depth: 1/2 in (1.3 cm) on every side
Materials
Use a smooth mercerized cotton or cotton blend. It shows the chain lines clearly, holds its shape on a window, and blocks crisply. Avoid fuzzy or very stretchy yarns, because long chain spokes on a hanging piece will sag.
- Light Blue (frames, half of the centers, border): 250 g / 550 m
- Plum (half of the centers): 100 g / 220 m
These amounts assume balls of 50 g / 110 m and include a margin of about 25% for gauge swatches, tails, and differences in tension.
Tools:
- 3.5 mm (E-4) crochet hook
- Tapestry needle
- Stitch markers
- Blocking mats and rustproof pins
- Spray bottle
- Measuring tape
- 18 curtain clip rings (9 per panel) and a curtain rod
Abbreviations (US Terms)
- ch – chain
- sc – single crochet
- sl st – slip stitch
- sp – space
- st(s) – stitch(es)
- rnd – round
- rep – repeat
- RS – right side
Special stitch – Standing sc: With a slipknot on the hook, insert the hook into the indicated stitch or space, yarn over and pull up a loop, yarn over and pull through both loops. This joins a new color without a slip stitch and chain.
Magic ring: Wrap the yarn into an adjustable loop, work the first round into it, then pull the tail to close the center.
Gauge and Checkpoints
Single crochet gauge: 21 sc = 4 in (10.2 cm). You need this for the border.
Motif gauge: One motif measures 5 in (12.7 cm) from flat side to flat side after Rnd 4, lightly blocked.
Make and block one complete motif before you start. Check it at each stage:
- After Rnd 2: the solid center is 1.25 in (3.2 cm) across.
- After Rnd 3: the star is about 4.5 in (11.4 cm) from tip to opposite tip. The loops will curl before blocking.
- After Rnd 4: the motif is 5 in (12.7 cm) flat to flat, and each straight side is about 2.1 in (5.3 cm) long.
If your motif is too big, go down to a 3.25 mm hook or chain more firmly. If it is too small, go up to a 3.75 mm hook. Just 1/4 in (0.6 cm) of difference per motif adds up to 3.5 in (8.9 cm) over a 14-motif panel, so fix gauge now rather than later.
Motif
Each motif has a center (Rnds 1–3) in either Plum (Motif A) or Light Blue (Motif B) and a frame (Rnd 4) that is always Light Blue.
Rnd 1 (center color): Make a magic ring, ch 1, 8 sc in the ring, sl st to the first sc. (8 sc)
Rnd 2: Ch 1, 2 sc in each st around, sl st to the first sc. (16 sc)
The center is now a flat, solid disc 1.25 in (3.2 cm) across.
Rnd 3 (spokes): Ch 1, sc in the first st, ch 16, skip the next st, sc in the next st, ch 16, skip the next st; rep from * 6 more times, sl st to the first sc. (8 sc and 8 ch-16 loops)*
Each ch-16 loop folds in half into a narrow, double-strand petal spoke about 2 in (5.1 cm) long. Fasten off and weave in the center-color tails.
Rnd 4 (frame, Light Blue): Join Light Blue with a standing sc into the tip of any ch-16 loop. Insert the hook through the loop at its fold, between the 8th and 9th ch, so the sc pinches the tip together. Ch 9, sc into the tip of the next ch-16 loop; rep from * 6 more times, ch 9, sl st to the first sc. (8 sc and 8 ch-9 arcs = 80 sts)*
The 8 sc sit at the corners of an octagon, and the 8 ch-9 arcs are its straight sides. Fasten off.
Side count: Each side of the motif counts as 10 sts, which is the 9 ch of its arc plus the 1 corner sc that follows it. Each corner sc is counted once, so 8 sides x 10 sts = 80 sts.
Arc numbering (for joining): Hold the motif RS up with the first ch-9 arc you worked across the top. Working in the direction of the round, the arcs are:
- Arc 1 – top
- Arc 2 – upper diagonal
- Arc 3 – side
- Arc 4 – lower diagonal
- Arc 5 – bottom
- Arcs 6–8 – the remaining diagonal, side, and diagonal
Arcs 1, 3, 5, and 7 are the four straight sides that touch neighbors. Diagonal arcs stay free and frame the open diamonds.
Make All Pieces
For the whole curtain (2 panels), make:
- Motif A (Plum center): 56 total, 28 per panel
- Motif B (Light Blue center): 56 total, 28 per panel
Work Rnds 1–3 of all 112 centers first. Then work Rnd 4 on each one as you join it into the layout.
Layout for one panel (4 wide x 14 tall, checkerboard):
Row  1:  B  A  B  A
Row  2:  A  B  A  B
Row  3:  B  A  B  A
Row  4:  A  B  A  B
Row  5:  B  A  B  A
Row  6:  A  B  A  B
Row  7:  B  A  B  A
Row  8:  A  B  A  B
Row  9:  B  A  B  A
Row 10:  A  B  A  B
Row 11:  B  A  B  A
Row 12:  A  B  A  B
Row 13:  B  A  B  A
Row 14:  A  B  A  B
Each row has 2 A and 2 B, so 14 rows x 2 = 28 of each per panel.
Joining (Join-As-You-Go on Rnd 4)
Neighboring motifs connect along their straight sides only. On a shared side, two parallel ch-9 arcs are tied together at two points. The diagonal arcs stay free, so a small open diamond forms wherever four motifs meet.
Joined arc (replaces one “ch 9”): Ch 2, sl st into the 3rd ch of the neighbor’s matching arc, ch 3, sl st into the 7th ch of the neighbor’s arc, ch 2. That makes 2 + 1 + 3 + 1 + 2 = 9 sts, so the arc still counts as 9 sts. The 3rd and 7th ch each sit 3 ch in from either end, so the two arcs line up evenly whichever direction the neighbor was worked.
Joining order:
- Column 1: Complete Rnd 4 on the top motif with no joins. For each motif below it, work its Arc 1 (top) as a joined arc into the Arc 5 (bottom) of the motif above. Continue until the column is 14 motifs long.
- Columns 2–4: Hold each new motif to the right of the previous column. For the top motif of the column, work Arc 1 plain and Arc 3 joined to the left neighbor’s Arc 7. For every motif after that, join both Arc 1 (to the motif above) and Arc 3 (to the left neighbor).
Because Arc 1 and Arc 3 are the first sides you work, every join happens early in the round, while the motif is still easy to position.
Tension: Keep the joining chains the same tension as the free arcs. If a joined side is tighter than a free one, it will pucker the panel. Do not pull the sl st joins tight, because they should only tie the arcs together, not gather them.
Size checkpoint: A strip of 3 motifs measures 15 in (38.1 cm) long. A finished, unbordered panel measures 20 in x 70 in (50.8 cm x 177.8 cm). Measure each column when it is complete and lay it flat before starting the next one.
Border
Border gauge: 26 border sts = 5 in (12.7 cm), or 1 motif width. This matches the sc gauge of 21 sc = 4 in (10.2 cm).
The panel edge is not straight. Each edge motif shows one flat side, and there is a V-shaped notch between neighbors. Border Rnd 1 works sc into the flat sides and bridges each notch with a chain.
Rnd 1 (Light Blue): Start at the top-left corner. Join with a standing sc in the 5th ch (the center) of the top-left motif’s free corner diagonal arc, ch 2, sc in the same ch (corner made).
Along each side:
- Ch 7.
- For the next edge motif: sc in its corner sc, 9 sc in its straight edge arc, sc in the next corner sc (11 sc).
- Between motifs: ch 15 to bridge the notch.
- After the last motif on that side: ch 7.
- At the corner motif: (sc, ch 2, sc) in the 5th ch of the free diagonal arc.
Work the same way around all four sides and sl st to the first sc.
Rnd 1 counts (each count includes that side’s own 2 corner sc):
- Top and bottom (4 motifs): 1 + 7 + (4 x 11) + (3 x 15) + 7 + 1 = 105 sts
- Long sides (14 motifs): 1 + 7 + (14 x 11) + (13 x 15) + 7 + 1 = 365 sts
- Total: 940 sts plus 4 corner ch-2 sps
Rnd 2: Ch 1, sc in each st around. In each corner ch-2 sp work (sc, ch 2, sc). Sl st to the first sc.
Rnd 2 counts:
- Top and bottom: 105 (one sc per existing st) + 2 (new corner sc) = 107 sc
- Long sides: 365 + 2 = 367 sc
- Total: 948 sc plus 4 corner ch-2 sps
Fasten off.
Why the math works: Each motif is 5 in (12.7 cm) wide, and the border gauge puts 26 sts in 5 in. The 11 sc across a flat side plus one 15-ch bridge equal 26 sts per motif. The two 7-ch half-bridges at the ends add up to 14, one short of a full bridge, and the extra corner sc makes up that last stitch. So 4 motifs x 26 = 104 + 1 = 105, and 14 x 26 = 364 + 1 = 365. The border lies flat without ruffling or pulling in. Two rounds add 1/2 in (1.3 cm) on every side, which brings the panel from 20 in x 70 in to 21 in x 71 in (53.3 cm x 180.3 cm).
Make the second panel the same way.
Final Blocking
- Weave in all remaining ends along the frame chains or into the solid centers, never across an open space.
- Soak each panel in cool water for 15 minutes, then gently press out the water. Do not wring.
- Roll the panel in a towel to remove excess moisture.
- Lay it flat on blocking mats. Pin the four corners first to 21 in x 71 in (53.3 cm x 180.3 cm).
- Pin along the border every 2 in (5.1 cm), keeping the edges straight.
- Open each motif. Pin the spoke tips outward so the petals lie straight, and check that each motif reads 5 in (12.7 cm) flat to flat.
- Spray lightly if needed and leave the panel until it is completely dry.
Final Quality-Control Checklist
- Each panel has 56 motifs in a 4 x 14 checkerboard of Plum and Light Blue centers.
- Every center has 8 evenly spaced spokes, each pinched at the tip by a frame sc.
- Every joined side is tied at two points, and all diagonal arcs are free.
- Border Rnd 2 counts 107 sc on the top and bottom and 367 sc on each long side.
- Each panel measures 21 in x 71 in (53.3 cm x 180.3 cm).
- There are no loose ends or visible knots on the RS.
- Attach 9 clip rings to each top edge: one above each motif center, one at each bridge center, and one at each corner.
Troubleshooting
- Spokes twist or lie unevenly: Check that each ch-16 is not twisted before you work the frame sc. Block the tips outward.
- Motif cups: The Rnd 4 arcs are too tight. Chain more loosely or go up a hook size for Rnd 4 only.
- Motif ruffles: The arcs are too loose. Chain more firmly, or check that you made ch 9 and not ch 10.
- Panel leans or skews: A joined arc was probably attached to the wrong arc on its neighbor. Check that every Arc 1 meets an Arc 5 and every Arc 3 meets an Arc 7.
- Border waves: The notch bridges are too long for your tension. Try ch 14 per bridge and ch 6 per half-bridge, and recalculate the counts.
- Border pulls in: The chains are too tight. Use a hook one size larger for the bridge chains.
Care
Hand wash in cool water with mild soap and dry flat, reblocking if needed. Keep the panels out of strong, direct midday sun for long periods so the Plum doesn’t fade.
Final Notes
The measurement chain is simple. A 1.25 in (3.2 cm) center grows into a 5 in (12.7 cm) motif. Fourteen motifs make a 70 in (177.8 cm) column, and four columns make a 20 in (50.8 cm) panel. The border adds 1/2 in (1.3 cm) all around, for a finished 21 in x 71 in (53.3 cm x 180.3 cm) panel. If the first motif is right, everything after it will fall into place.
Happy crocheting!