

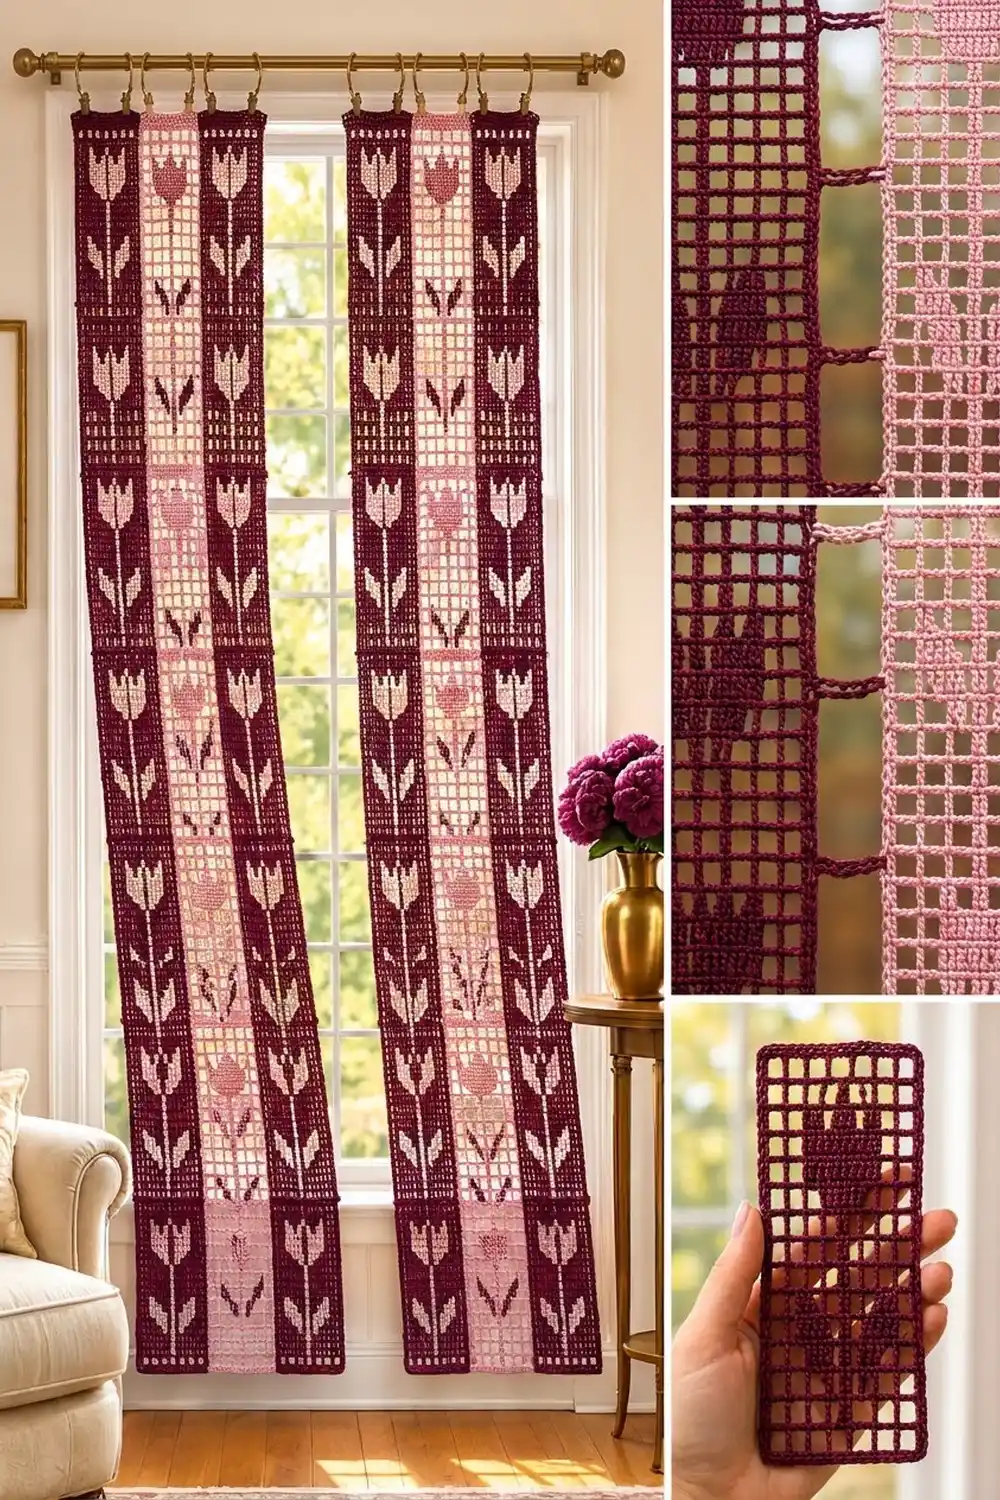
This curtain is a pair of panels, and each panel is made of three long filet crochet strips: burgundy, blush pink, burgundy. Each strip has a column of tulips in solid blocks: a cup with three pointed petals, a straight stem, and two leaves that open into a V. The rest of the strip is open square mesh, so light comes through the grid and the tulips show up as solid shapes.
The strips are not sewn together edge to edge. Short double-chain bars link them like the rungs of a ladder, leaving a narrow open channel between neighbors. That gap keeps the curtain light and adds a vertical rhythm when it hangs from a rod with rings.
This pattern uses US crochet terms. Each finished strip measures 6 in (15.2 cm) wide by 65.5 in (166.4 cm) long. One joined panel is 19 in (48.3 cm) wide by 65.5 in (166.4 cm) long, and the pair uses six strips in total.
Construction is simple. Work each strip flat in rows of classic filet mesh, add a single crochet edging round, then join the strips with ladder bars as you work the second edging round on Strips 2 and 3.
Finished Size and Construction
- Finished panel size: 19 in x 65.5 in (48.3 cm x 166.4 cm); make 2 panels
- Skill level: Intermediate
- Terminology: US crochet terms
- Yarn weight: Sport weight (#2) mercerized cotton
- Hook: 3.25 mm (US D-3)
- Number of pieces: 6 strips (4 burgundy, 2 pink), joined into 2 panels of 3
- Layout: each panel is 3 strips side by side: Burgundy / Pink / Burgundy
- Strip size before border: 5.5 in x 65 in (14.0 cm x 165.1 cm), 11 squares x 130 rows
- Border depth: 2 rounds of sc, 0.25 in (0.6 cm) per side
- Strip size after border: 6 in x 65.5 in (15.2 cm x 166.4 cm)
- Gap between strips: 0.5 in (1.3 cm), spanned by chain ladder bars
Materials
Use a smooth, mercerized sport weight cotton. Cotton gives crisp, square mesh and holds the tulip blocks flat, which matters on a piece that hangs. Avoid fuzzy or very stretchy yarns, because a 65 in (165.1 cm) strip will lengthen under its own weight.
- Burgundy: 255 g / about 765 m (4 strips)
- Blush pink: 130 g / about 390 m (2 strips)
Each strip uses about 55 g (165 m). The quantities above include a margin of roughly 15% for your gauge swatch and small differences in tension.
Tools:
- 3.25 mm (US D-3) crochet hook
- Tapestry needle
- Stitch markers (at least 4)
- Measuring tape
- Rust-proof pins and a blocking surface at least 66 in (167.6 cm) long, or a clean floor with towels
- Spray bottle
- 12 curtain rings with clips (2 per strip) and a curtain rod
Abbreviations (US Terms)
- ch – chain
- sl st – slip stitch
- sc – single crochet
- dc – double crochet
- sp – space
- st(s) – stitch(es)
- RS / WS – right side / wrong side
Special stitches:
- Mesh (M): ch 2, skip the next 2 sts (or the ch-2 sp), dc in the next dc.
- Block (B): dc in each of the next 3 sts. When working a block over a mesh below it, work 2 dc in the ch-2 sp, then dc in the next dc.
- Ladder bar: ch 3, sl st in the matching sc on the neighboring strip, ch 3, sl st in the same sc you started from on the working strip. This makes a doubled chain about 0.5 in (1.3 cm) long.
Each square, mesh or block, uses 3 sts. Every filet row has 11 squares plus the first dc: 11 x 3 + 1 = 34 sts. The turning ch-3 counts as the first dc.
Gauge and Checkpoints
Gauge: 1 filet square = 0.5 in (1.3 cm) wide and 0.5 in (1.3 cm) tall. That means 12 dc = 2 in (5.1 cm) and 6 rows = 3 in (7.6 cm).
Make a full-width test piece before you start: ch 36, work Row 1, then work 8 rows of chart row A1 (all mesh). It should measure 5.5 in (14.0 cm) wide by 4.5 in (11.4 cm) tall. Block it with a light mist and measure it dry.
Checkpoints:
- After Row 1: 5.5 in (14.0 cm) wide.
- After Row 17 (first tulip done): 8.5 in (21.6 cm) long.
- After Row 33: 16.5 in (41.9 cm) long.
- After Row 130: 65 in (165.1 cm) long.
- After border Rnd 2: 6 in x 65.5 in (15.2 cm x 166.4 cm).
If your squares are too big, go down a hook size. If they are too small, go up a hook size. If only the height is off, change how far you pull up the first loop of each dc instead of changing the hook. Over 130 rows, a difference of just 1/16 in (0.2 cm) per row adds up to more than 8 in (20.3 cm).
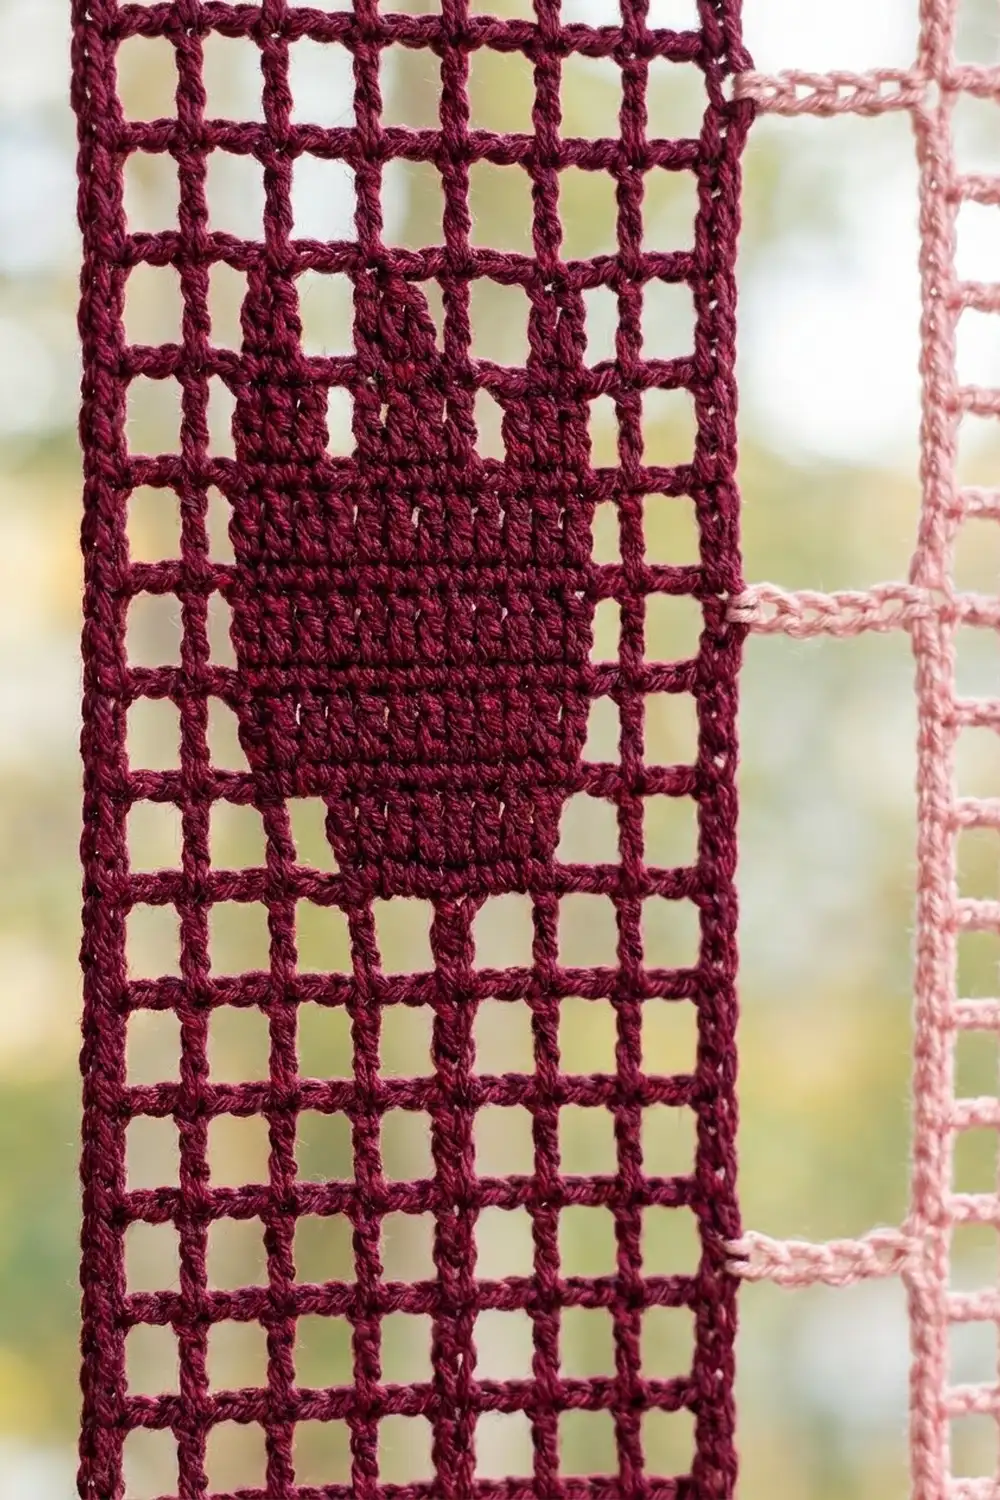
Strip Pattern (Make 6)
Work flat in rows. The tulip is symmetrical, so every row reads the same in both directions and you never need to reverse the chart.
Foundation: Ch 36.
Row 1 (RS, solid frame row): Dc in 4th ch from hook (skipped ch count as first dc) and in each ch across. Turn. (34 sts)
Rows 2–129: Work chart rows A1 to A16 eight times in total. Begin each row with ch 3 (counts as first dc), then work the squares listed. Turn at the end of each row. Every row = 34 sts.
Tulip repeat (16 rows, 8 in / 20.3 cm tall):
- A1: 11 M.
- A2: 5 M, 1 B, 5 M.
- A3: 4 M, 3 B, 4 M.
- A4: 3 M, 1 B, 1 M, 1 B, 1 M, 1 B, 3 M.
- A5: 2 M, 2 B, 1 M, 1 B, 1 M, 2 B, 2 M.
- A6: 2 M, 1 B, 2 M, 1 B, 2 M, 1 B, 2 M.
- A7–A9: 5 M, 1 B, 5 M.
- A10: 3 M, 5 B, 3 M.
- A11–A13: 2 M, 7 B, 2 M.
- A14: 2 M, 2 B, 1 M, 1 B, 1 M, 2 B, 2 M.
- A15: 2 M, 1 B, 2 M, 1 B, 2 M, 1 B, 2 M.
- A16: 11 M.
Rows A2 to A6 build the base of the stem and the two leaves, which rise and spread outward. Rows A7 to A9 are the plain stem. Rows A10 to A13 form the solid cup, and A14 and A15 split the top into three petal points. A16 and the next A1 leave two open rows between tulips.
Each row adds up to 11 squares. For example, A4 is 3 + 1 + 1 + 1 + 1 + 1 + 3 = 11.
Row 130 (WS, solid frame row): Ch 3, dc in each st across (2 dc in each ch-2 sp, dc in each dc). (34 sts) Do not fasten off.
Row count: 1 frame row + (8 x 16) chart rows + 1 frame row = 130 rows, which is 130 x 0.5 in = 65 in (165.1 cm).
Make All Pieces
- Burgundy: 4 strips
- Blush pink: 2 strips
Work border Rnd 1 on all six strips. Work Rnd 2 in full only on the two Strip 1s (the left burgundy strip of each panel). Strips 2 and 3 get their Rnd 2 during joining.
Layout (each panel, RS facing, tops up):
| Strip 1  |gap| Strip 2  |gap| Strip 3  |
| Burgundy |   |  Pink    |   | Burgundy |
Make two panels with the same layout.
Joining
You join the strips with ladder bars while you work border Rnd 2 on the strip being added. Read the Border section first, because the stitch positions come from its counts.
Stitch-to-stitch logic: After Rnd 2, each long side has a corner center sc at each end and 392 straight sc in between. Number those 392 sc from 1 to 392, starting at the top. Bars sit on sc 4, then every 11th sc after that (15, 26, and so on), ending on sc 389. That gives 36 bars per seam, about 1.8 in (4.6 cm) apart.
The bar positions are symmetrical: sc 389 is the 4th sc from the bottom (392 + 1 − 389 = 4), just as sc 4 is the 4th from the top. So the positions are the same whichever direction you work the side. On the strip being joined, sc in the numbered st, work a ladder bar into the sc with the same number on the neighbor, then continue Rnd 2.
Order: Join Strip 2’s left side to Strip 1’s right side, and leave Strip 2’s right side plain. Then join Strip 3’s left side to Strip 2’s right side.
Tension: Make each bar chain the same size as your normal chain and don’t stretch it. Lay both strips flat with the tops lined up, and place a marker every 10 bars to check alignment. Tight bars make the panel pucker, and loose bars let the strips sag apart.
Size checkpoint: A joined panel measures 6 + 0.5 + 6 + 0.5 + 6 = 19 in (48.3 cm) wide by 65.5 in (166.4 cm) long.
Border
Border gauge: 6 sc = 1 in (2.5 cm). Two rounds add 0.25 in (0.6 cm) on every side. The per-side counts below include both corner center sc.
Rnd 1: Turn after Row 130 so the RS faces you. Ch 1, 3 sc in first st (corner), sc in next 32 sts, 3 sc in last st (corner). Work 3 sc in each of the 130 row-ends down the side (390 sc). Along the foundation chain, work 3 sc in first ch, sc in next 32 ch, 3 sc in last ch. Work 3 sc in each row-end up the second side (390 sc). Join with sl st to first sc.
- Top and bottom: 36 sc each (1 center + 1 + 32 + 1 + 1 center)
- Long sides: 394 sc each (1 center + 1 + 390 + 1 + 1 center)
- Total: 4 corners x 3 + 2 x 32 + 2 x 390 = 856 sc
Rnd 2: Ch 1, sc in each sc around, working 3 sc in each corner center sc. Join with sl st. Each side gains 2 sts.
- Top and bottom: 38 sc each (1 center + 1 + 34 + 1 + 1 center)
- Long sides: 396 sc each (1 center + 1 + 392 + 1 + 1 center)
- Total: 4 corners x 3 + 2 x 34 + 2 x 392 = 864 sc (856 + 8)
On each long side, the 392 straight sc are the ones numbered for joining. For Strips 2 and 3, work ladder bars on the left long side as given under Joining. The bars don’t count as stitches. Fasten off and weave in the ends.
Why the math works: At 6 sts per inch, 390 sc fit 65 in (165.1 cm) exactly, so the long edges lie flat without ruffling or drawing in. Three sc per row-end match one 0.5 in (1.3 cm) dc row. Across the top and bottom, the 34 sts already fill the 5.5 in (14.0 cm) row, and the 3-sc corners turn cleanly without cupping.
Final Blocking
- Weave in all ends inside the solid blocks, where they hide best.
- Soak each panel in cool water for 10 minutes. Press the water out; don’t wring.
- Roll the panel in towels to remove extra moisture.
- Lay the panel flat, RS up. Pin the top edge straight first, then pin the bottom edge 65.5 in (166.4 cm) below it.
- Pin each strip to 6 in (15.2 cm) wide and open each ladder gap to 0.5 in (1.3 cm).
- Nudge the mesh squares square with your fingers, then straighten the tulip outlines.
- Let it dry completely, at least 24 hours, before you unpin.
Final Quality-Control Checklist
- Every filet row has 34 sts and 11 squares.
- Each strip has 8 full tulips, all pointing up.
- Each strip has 130 rows plus 2 border rounds.
- Each seam has 36 bars in matching positions.
- Each panel measures 19 in x 65.5 in (48.3 cm x 166.4 cm).
- The strip tops line up across each panel.
- Both panels use the color order Burgundy / Pink / Burgundy.
- Clip 2 rings to each strip, 0.75 in (1.9 cm) in from each side edge.
Troubleshooting
- The strip gets narrower: Your chains are tightening. Loosen your ch-2 meshes and count 34 sts every row.
- A tulip is off center: You miscounted a square in a row. Count the meshes on each side of the stem; they must match.
- The edges ruffle: Check that you have exactly 390 sc per side in Rnd 1. If the count is right, use a smaller hook for the border.
- The edges draw in: Your border is too tight. Go up one hook size for Rnds 1 and 2.
- The strips sit unevenly: A bar went into the wrong sc. Undo back to that bar and recount from the top.
- The panels are different lengths: Your row height drifted. Re-block the shorter panel and pin it to 65.5 in (166.4 cm).
Care
Hand wash in cool water, roll in a towel, and dry flat, pinned to size. Don’t hang a wet panel, because the weight of the water will stretch it.
Final Notes
The measurement chain is short and reliable. One square is 0.5 in (1.3 cm), so 11 squares make a 5.5 in (14.0 cm) strip and 130 rows make 65 in (165.1 cm). Two border rounds bring each strip to 6 in x 65.5 in (15.2 cm x 166.4 cm). Three strips plus two 0.5 in (1.3 cm) gaps make a 19 in (48.3 cm) panel. Check your gauge at each checkpoint and the tulips will line up, so both panels hang evenly.
Happy crocheting!