

This curtain is a column of soft puff flowers, each framed by lacy chain arches. Eight long strips alternate between deep plum and pale lilac and are linked side by side, so light comes through the open lattice and the flowers stand out.
The look is romantic and a little vintage, but the construction is simple. Each six-petal flower sits inside an oval cell made of chain arches. Straight chain rails run down both sides of each strip, and short chain links join the strips to each other. A plum header band with hanging loops goes across the top.
The pattern uses US crochet terms. The finished curtain measures 31.5 in (80.0 cm) wide and 47 in (119.4 cm) long to the top of the header. The hanging loops add another 1.5 in (3.8 cm).
You make the flowers in three short rounds, joining each new flower to the one above it as you go. Two edging rounds turn each column of flowers into a framed strip. You join the strips with chain links during the last edging round, then work the header across the top.
Finished Size and Construction
- Finished size: 31.5 in (80.0 cm) wide x 47 in (119.4 cm) long, plus 1.5 in (3.8 cm) hanging loops
- Skill level: Intermediate
- Terminology: US
- Yarn weight: Worsted (#4), cotton or cotton blend
- Hook: US H-8 (5.0 mm)
- Number of pieces: 8 strips, each with 18 flowers (144 flowers in total)
- Layout: 8 strips side by side, alternating plum and lilac, starting and ending with plum on the left
- Piece size: each strip is 3.5 in (8.9 cm) wide x 46 in (116.8 cm) long
- Size before border: 31.5 in (80.0 cm) x 46 in (116.8 cm)
- Border depth: a 1 in (2.5 cm) header band plus 1.5 in (3.8 cm) loops, top edge only
Materials
Choose a smooth, mercerized cotton or a cotton blend. Cotton holds the shape of the puffs and hangs straight. Fuzzy or very stretchy yarns blur the lattice and can make the strips sag.
- Plum (Color A): 475 g, approx. 800 m. This covers 4 strips plus the header.
- Lilac (Color B): 415 g, approx. 700 m. This covers 4 strips.
- US H-8 (5.0 mm) crochet hook
- Tapestry needle
- Stitch markers
- Blocking mats and rust-proof pins
- Spray bottle
- Measuring tape
These quantities include a margin of about 15% for gauge differences, swatching, and weaving in ends.
Abbreviations (US Terms)
- ch: chain
- sl st: slip stitch
- sc: single crochet
- st(s): stitch(es)
- sp: space
- rep: repeat
- RS: right side
Puff stitch (puff st): (Yarn over, insert hook in the indicated stitch, pull up a loop to about 0.5 in / 1.3 cm) 4 times. You now have 9 loops on the hook. Yarn over and draw through all 9 loops, then ch 1 to close. This closing ch-1 is the top of the puff.
Gauge and Checkpoints
Single crochet gauge: 14 sc and 16 rows = 4 in (10.2 cm).
Before you commit to the whole curtain, make one complete strip of 3 flowers and work both edging rounds on it. Check it against these measurements:
- Flower after Round 1: 1.25 in (3.2 cm) across
- Flower after Round 2: 2 in (5.1 cm) across
- Flower after Round 3: 2.5 in (6.4 cm) from tip to tip
- Strip after Edging Round 2: 3.5 in (8.9 cm) wide at the widest point
- Length: each flower adds 2.5 in (6.4 cm) to the strip
If your flowers come out bigger than 2.5 in (6.4 cm), go down a hook size. If they come out smaller, go up a hook size. If the flowers are the right size but the outer rails ripple, change the ch-9 rails to ch-8. If the rails pull the strip into a curve, change them to ch-10.
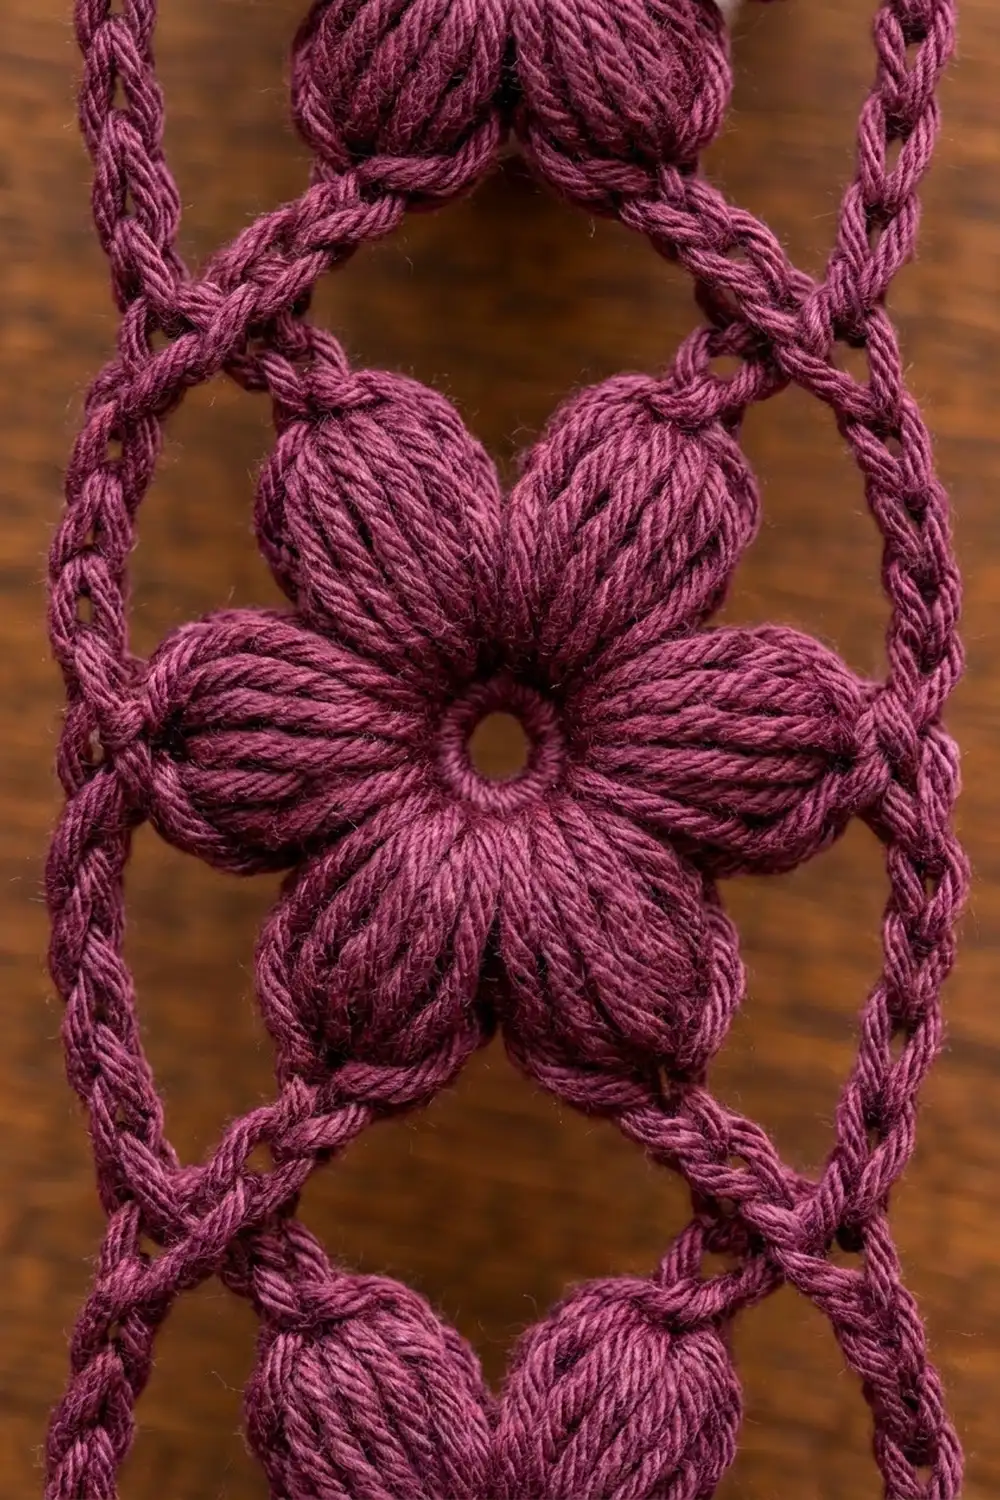
Flower (Make 144: 72 Plum, 72 Lilac)
Round 1: Make a magic ring, ch 1, work 12 sc into the ring, and join with a sl st to the first sc. Pull the ring closed, leaving a small open center. (12 sc)
Round 2: [Ch 2, puff st in next sc, ch 2, sl st in next sc] 6 times. The last sl st lands in the joining stitch. (6 puffs, 6 sl sts)
Round 3: Sl st in each of the next 2 ch and in the top of the next puff. Ch 1, then work 1 sc in the same stitch. Ch 5, [sc in the top of the next puff, ch 5] 5 times. Join with a sl st to the first sc. (6 sc, 6 ch-5 loops; 36 sts)
Fasten off the first flower of each strip.
Hold the flower RS up with the first sc of Round 3 at the top. This sc is the top tip, and the sc directly opposite it is the bottom tip. The six loops are named by their position:
- upper-right loop
- right-side loop (the widest point on the right)
- lower-right loop
- lower-left loop
- left-side loop (the widest point on the left)
- upper-left loop
Joining Flowers into a Column
Make flowers 2 to 18 for each strip the same way, but join each one to the flower above it in Round 3. Work the first sc of Round 3 (the top tip), then sl st into the bottom-tip sc of the previous flower. Then continue Round 3 as written.
The joining sl st is not counted, so each flower still has 6 sc and 6 ch-5 loops. Keep the joined flowers lined up straight, with their side loops facing left and right.
Checkpoint: a column of 18 flowers measures 45 in (114.3 cm).
Strip Edging
Work both edging rounds in the same color as the strip’s flowers.
Edging Round 1 (inner arches): With the RS facing, join yarn with a sc in the top tip of flower 1.
- Ch 4, sc in the upper-right loop, ch 4, sc in the right-side loop, ch 4, sc in the lower-right loop.
- Ch 4, sc in the upper-right loop of the next flower, ch 4, sc in its right-side loop, ch 4, sc in its lower-right loop. Rep from * down the strip (17 more times).
- Ch 4, sc in the bottom tip of flower 18.
- Ch 4, sc in the lower-left loop, ch 4, sc in the left-side loop, ch 4, sc in the upper-left loop.
- Rep step 4 up the strip for each remaining flower (17 more times).
- Ch 4 and join with a sl st to the first sc.
(110 sc, 110 ch-4 sps)
That is 3 sc per flower on each side (54 per side) plus the 2 tip sc. The ch-4 between one flower’s lower loop and the next flower’s upper loop spans the join point and forms the crossing arches.
Edging Round 2 (outer rails): Ch 1.
- Sc in the same st (the top tip), 4 sc in the next ch-4 sp, sc in the next sc, 4 sc in the next ch-4 sp, sc in the right-side sc of flower 1.
- Ch 9, skip the next 2 ch-4 sps and the 2 sc between them, then skip the third ch-4 sp. Sc in the right-side sc of the next flower. Rep from * 17 times.
- 4 sc in the next ch-4 sp, sc in the next sc, 4 sc in the next ch-4 sp, sc in the bottom tip, 4 sc in the next ch-4 sp, sc in the next sc, 4 sc in the next ch-4 sp, sc in the left-side sc of flower 18.
- Ch 9, skip to the left-side sc of the next flower up, sc in it. Rep from * 17 times.
- 4 sc in the next ch-4 sp, sc in the upper-left sc, 4 sc in the last ch-4 sp. Join with a sl st to the first sc.
(74 sc, 34 ch-9 rails)
Counts per edge:
- Top edge: 11 sc (upper-left sc, 4 sc, top tip, 4 sc, upper-right sc). It measures about 3.1 in (7.9 cm).
- Bottom edge: 11 sc
- Each long side: 26 sc and 17 ch-9 rails
- Check: 11 + 11 + 26 + 26 = 74 sc
Checkpoint: the strip measures 3.5 in (8.9 cm) x 46 in (116.8 cm).
Make All Pieces
- Plum: 4 strips (72 flowers)
- Lilac: 4 strips (72 flowers)
Work the full Edging Round 2 on Strip 1 only. On Strips 2 to 8, work Edging Round 2 with the joining links described in the next section.
Layout (RS facing, top edge up; numbers show the strip order):
| 1 P | 2 L | 3 P | 4 L | 5 P | 6 L | 7 P | 8 L |
| P   | L   | P   | L   | P   | L   | P   | L   |  x 18 flowers tall
P = Plum, L = Lilac. Strip 1 is on the left, Strip 8 on the right.
Joining
Join each new strip while you work its Edging Round 2. Its left side is linked to the right side of the strip before it, meeting at the 18 widest points.
Method: Lay the new strip to the right of the previous strip, RS up, with the top edges level. Work Edging Round 2 as written until you reach the left side (step 4 above). Each time you work a sc into a left-side sc:
- Ch 2.
- Sl st into the matching right-side sc of the previous strip.
- Ch 2.
- Sl st into the sc you just made.
Stitch logic: The links match stitch for stitch, flower 18 to flower 18 and up to flower 1. That gives 18 links per seam and 126 links in total. The links are extra and do not change the 74-sc count of either strip.
Tension: Keep the links relaxed so each one opens a gap of about 0.5 in (1.3 cm). If you pull them tight, the strips overlap. If they are too loose, the curtain droops sideways.
Checkpoint: 8 strips x 3.5 in (8.9 cm) = 28 in (71.1 cm). Add 7 gaps x 0.5 in (1.3 cm) = 3.5 in (8.9 cm). The total is 31.5 in (80.0 cm) wide at the flowers.
Border (Header Band, Top Edge Only)
The sides and bottom keep their open chain frame and get no border. Work the header in plum.
Border gauge: 14 sc = 4 in (10.2 cm), so 3.5 sc per inch.
Row 1 (RS): Join plum in the first top-edge sc of Strip 1. Sc in each of the 11 top-edge sc. Ch 3 across the gap, then sc in each of the 11 top-edge sc of the next strip. Rep from * across all strips. (88 sc + 21 ch = 109 sts)
Rows 2 to 4: Ch 1, turn, sc in each st (including each ch) across. (109 sc per row)
Row 5 (loops): Ch 1, turn. Sc in the first sc, [ch 15, skip 11 sc, sc in the next sc] 9 times. (10 sc, 9 ch-15 loops)
Row 6: Ch 1, turn. Sl st in the first sc, [20 sc in the next ch-15 loop, sl st in the next sc] 9 times. Fasten off. (180 sc, 10 sl sts)
Why the math works:
- Row 1: 8 strips x 11 sc = 88 sc. The 7 gaps each get exactly 3 ch, adding 21 more. 88 + 21 = 109.
- Width: at 3.5 sc per inch, 109 sts measures about 31.1 in (79.0 cm). That is within 0.5 in (1.3 cm) of the curtain width, and blocking evens out the difference.
- Row 5: 1 + (9 x 12) = 109, so the loops end exactly on the last stitch.
- Depth: Rows 1 to 4 add 1 in (2.5 cm), and the covered loops add 1.5 in (3.8 cm).
Final Blocking
- Weave in all the ends along the chain rails, where they will be hidden.
- Lay the curtain RS up on blocking mats.
- Pin the header straight to 31.5 in (80.0 cm).
- Pin each strip to 3.5 in (8.9 cm) wide, placing pins at the widest point of every flower.
- Pin each side rail straight, and pin the strips to 46 in (116.8 cm) long.
- Spray the curtain evenly until it is damp, but not soaked.
- Gently push each puff petal back into a rounded shape with your fingertips.
- Let it dry completely before you unpin it.
Final Quality-Control Checklist
- Each strip has 18 flowers, all joined tip to tip in a straight line.
- Each flower has 6 puffs and 6 ch-5 loops.
- Edging Round 1 has 110 sc, and Edging Round 2 has 74 sc and 34 rails.
- The top edge of every strip has exactly 11 sc.
- Each seam has 18 links, with matching flowers linked.
- The colors alternate plum, lilac, plum, lilac across the curtain.
- Header Rows 1 to 4 each have 109 sts, and there are 9 loops.
- The curtain measures 31.5 in (80.0 cm) x 47 in (119.4 cm).
Troubleshooting
- Puffs look flat: Pull each loop up to the full 0.5 in (1.3 cm), and always work the closing ch-1.
- The flower center won’t close: Pull the magic ring tight before you join Round 1.
- Strips twist: Check that every flower’s first Round 3 sc is at the top before you join it.
- Rails ripple: Use ch-8 rails instead of ch-9.
- Rails curve the strip: Use ch-10 rails instead of ch-9.
- The header is narrower than the strips: Relax your tension on the ch-3 gaps, or use ch-4 across the gaps. Then recount Row 1: 88 + 28 = 116 sts, and adjust Row 5 so its loops still end on the last stitch.
- Strips hang unevenly: Block again, pinning the bottom edges level.
Care
Hand wash in cool water with a mild detergent and roll it in a towel to remove water. Dry it flat in its blocked shape and don’t wring it, so the puffs stay full.

Final Notes
Each measurement depends on the one before it. A 2.5 in (6.4 cm) flower makes a 3.5 in (8.9 cm) strip, and 18 flowers make a 46 in (116.8 cm) strip. Eight strips with 0.5 in (1.3 cm) gaps make a 31.5 in (80.0 cm) panel. The 109-stitch header brings the curtain to 47 in (119.4 cm). If you check your first flower and first strip carefully, the rest of the curtain will come out the same size.
Happy crocheting!