

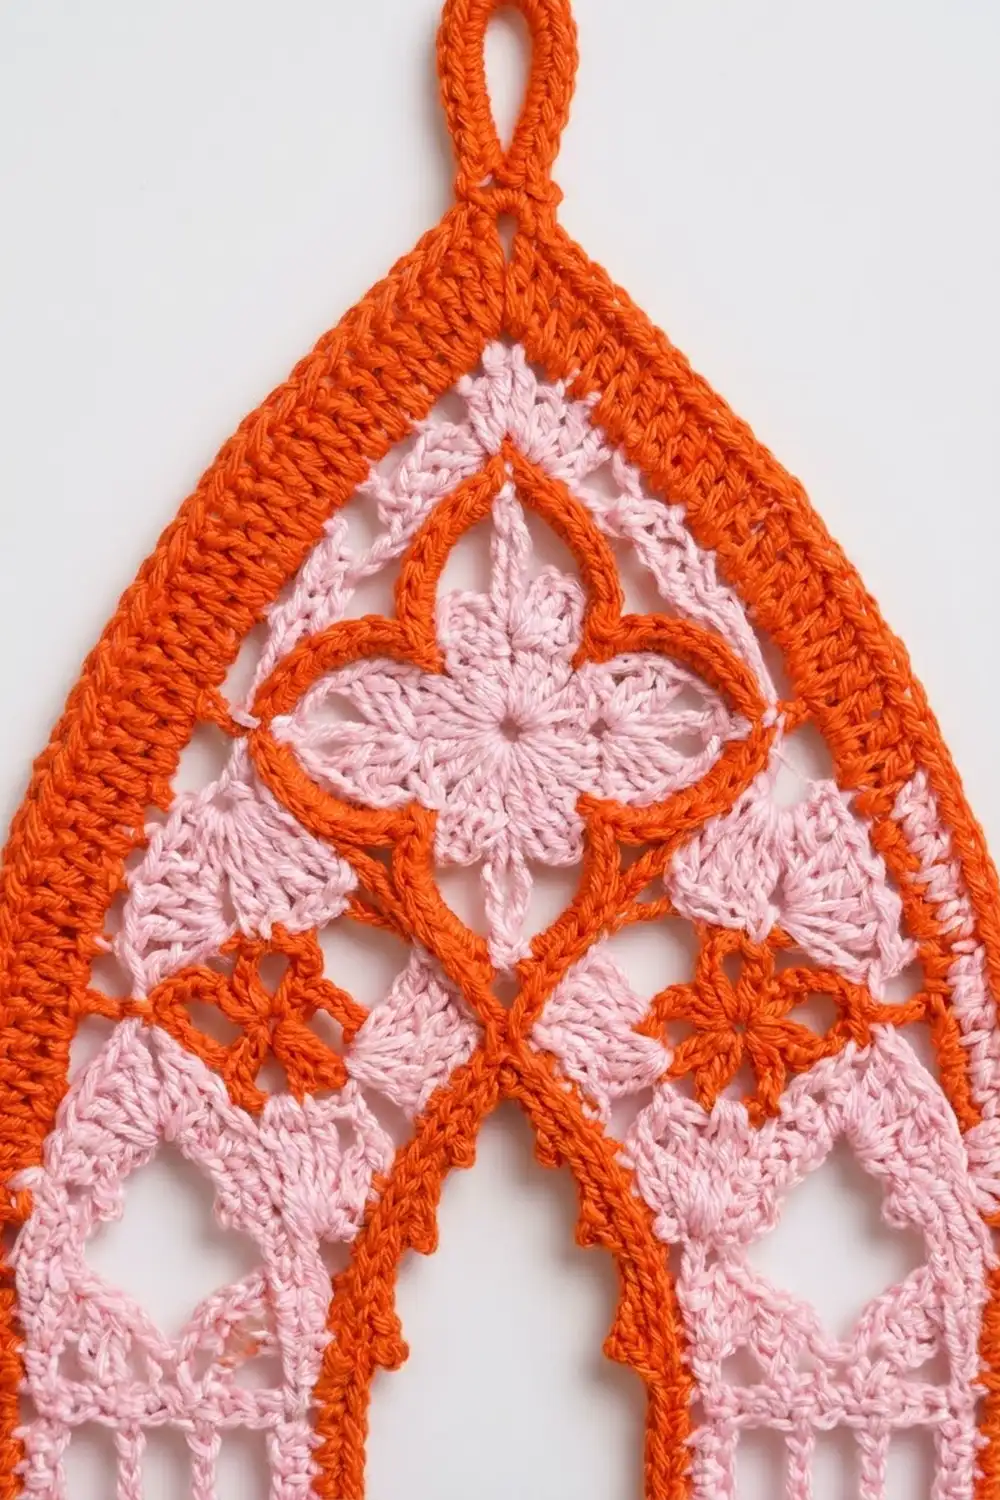
The Rose Lancet panel is a small piece of cathedral lace in crochet thread. It has a pointed Gothic arch outline, two slim pink mesh columns, and a tall open window between them. A quatrefoil “rose window” sits in the arch head.
There are two colors. Light pink is used for the filet body, the bottom fans, and the quatrefoil center. Bright orange-red is used for the outline, the scalloped hem, the window frame, and the small accent flowers. The orange makes the shape stand out, and the pink keeps the lace soft.
The pattern uses US crochet terms. After blocking, the panel is 5.4 in (13.7 cm) wide and 10.8 in (27.4 cm) tall, plus a hanging loop of about 0.5 in (1.3 cm).
The body is worked bottom-up in filet mesh. First you make a base band. Then you work two separate columns, which grow inward at the top to close the window in a stepped point. A joining row connects the columns, and the arch head is shaped with decreases. Last, you add a fan row, a two-round orange border, a window outline, and three small appliqués.
Finished Size and Construction
- Finished size: 5.4 in x 10.8 in (13.7 cm x 27.4 cm), plus the hanging loop
- Skill level: Intermediate
- Terminology: US
- Yarn weight: Size 10 crochet cotton (Lace, 0)
- Hook: 1.75 mm steel hook
- Number of pieces: 1 panel, plus 3 small appliqués sewn on
- Layout: Single panel: column, window, column (5 + 5 + 5 meshes)
- Panel size before border: 15 meshes x 35 rows = 5.0 in x 10.0 in (12.7 cm x 25.4 cm)
- Border depth: 0.2 in (0.5 cm) on the sides and top, 0.6 in (1.5 cm) at the bottom
Materials
Use a mercerized size 10 cotton thread. It gives crisp mesh and keeps a clean edge.
- Light pink: 10 g (about 52 m / 57 yd)
- Orange-red: 5 g (about 26 m / 28 yd)
- 1.75 mm steel crochet hook
- Fine tapestry needle
- Rust-proof pins and a blocking board
- Optional: spray starch
- Scissors
The thread amounts include a margin of about 30% for the gauge swatch and weaving in ends.
Abbreviations (US Terms)
- ch = chain
- sl st = slip stitch
- sc = single crochet
- dc = double crochet
- dtr = double treble crochet
- sk = skip
- sp = space
- st(s) = stitch(es)
- RS / WS = right side / wrong side
Special stitches
- Mesh: dc, ch 2, dc. Neighboring meshes share a dc. A row of m meshes has 3m + 1 sts.
- dtr: yo 3 times, insert the hook, pull up a loop, then (yo, draw through 2) 4 times.
- Beginning increase (inc at start): ch 7, dc in the first dc. The first 2 ch form the base of the new mesh, the next 3 ch count as its outer dc, and the last 2 ch form its top. In the next row, work the edge dc into the 5th ch of the ch-7.
- End increase (inc at end): ch 2, dtr in the same st as the last dc.
- Decrease row: At the start, turn, sl st in the next 2 ch and the next dc, then ch 5. At the end, leave the last mesh unworked.
Gauge and Checkpoints
Gauge: 12 meshes and 14 rows = 4 in (10.2 cm) square in filet mesh.
Swatch: Ch 39, dc in the 4th ch from the hook and in each ch across (37 sts). Then work 13 mesh rows. Block the swatch before you measure it.
It’s a good idea to work the base band (Rows 1-4) and measure before you go on.
Checkpoints:
- After Row 4: 5.0 in (12.7 cm) wide, 1.1 in (2.8 cm) tall
- Each column at Row 19: 1.7 in (4.3 cm) wide
- After Row 22: 5.0 in x 6.3 in (12.7 cm x 16.0 cm)
- After Row 35: 10.0 in (25.4 cm) tall at the peak
- After the border: 5.4 in x 10.8 in (13.7 cm x 27.4 cm)
If your piece is too big, change to a 1.5 mm hook. If it’s too small, change to a 2.0 mm hook. Don’t add or remove meshes, because the window, the columns, and the border counts all depend on 15 meshes.
Base Band
Use pink.
Row 1 (RS): Ch 48. Dc in the 4th ch from the hook and in each ch across. (46 sts)
Row 2 (WS): Ch 5 (counts as dc + ch 2), turn. Sk 2 sts, dc in the next st. Ch 2, sk 2, dc in the next st. Repeat from * across. (15 meshes, 46 sts)
Row 3: Ch 5, turn. Dc in the next dc, ch 2, dc in the next dc. Repeat from * across, ending with dc in the 3rd ch of the turning ch. (15 meshes)
Row 4: Ch 3 (counts as dc), turn. 2 dc in the next ch-2 sp, dc in the next dc. Repeat from * across. (46 sts, solid)
Row 4 is the solid bottom edge of the window.
Columns and Window
Count the sts of Row 4 from the edge where your hook is now. Sts 1-16 are Column A, sts 17-30 are the open window (14 sts), and sts 31-46 are Column B.
Column mesh row: Ch 5, turn. Dc in the next dc, (ch 2, dc in the next dc) 3 times, ch 2, dc in the 3rd ch of the turning ch. (5 meshes, 16 sts)
Column A
Row 5 (RS): Ch 5, turn. Sk 2 sts, dc in the next st, (ch 2, sk 2, dc in the next st) 4 times. (5 meshes, 16 sts) Leave the rest of the row unworked.
Rows 6-19: Work the column mesh row. On odd rows you finish at the window edge.
Row 20 (WS, inc): Ch 7, turn, dc in the first dc. (Ch 2, dc in the next dc) 4 times, ch 2, dc in the 3rd ch of the turning ch. (6 meshes, 19 sts)
Row 21 (RS, inc): Ch 5, turn. Dc in the next dc, (ch 2, dc in the next dc) 4 times, ch 2, dc in the 5th ch of the ch-7. Ch 2, dtr in the same ch. (7 meshes, 22 sts) Fasten off.
Column B
Row 5 (RS): With RS facing, join pink in st 31 of Row 4. Ch 5, sk 2, dc in the next st, (ch 2, sk 2, dc in the next st) 4 times. (5 meshes, 16 sts)
Rows 6-19: Work the column mesh row. On odd rows you finish at the outer edge.
Row 20 (WS, inc): Ch 5, turn. Dc in the next dc, (ch 2, dc in the next dc) 3 times, ch 2, dc in the 3rd ch of the turning ch. Ch 2, dtr in the same ch. (6 meshes, 19 sts)
Row 21 (RS, inc): Ch 7, turn, dc in the top of the dtr. (Ch 2, dc in the next dc) 5 times, ch 2, dc in the 3rd ch of the turning ch. (7 meshes, 22 sts) Don’t fasten off.
The window is 5 meshes wide through Row 19. It narrows to 3 meshes at Row 20 and to 1 mesh at Row 21, which gives its stepped pointed top.
Row 22 (WS, joining row): Ch 5, turn. Dc in the next dc, (ch 2, dc in the next dc) 5 times, ch 2, dc in the 5th ch of the ch-7. This is 7 meshes across Column B. Ch 2, dc in the top of the dtr at the inner tip of Column A to make the bridge mesh. Then (ch 2, dc in the next dc) 6 times, ch 2, dc in the 3rd ch of the turning ch. This is 7 meshes across Column A. (7 + 1 + 7 = 15 meshes, 46 sts)
Checkpoint: The piece is 5.0 in x 6.3 in (12.7 cm x 16.0 cm).
Arch Head
Plain row (m meshes): Ch 5, turn. Dc in the next dc, (ch 2, dc in the next dc) m − 2 times, ch 2, dc in the 3rd ch of the turning ch.
Decrease row (m meshes): Turn, sl st in the next 2 ch and the next dc, ch 5. Dc in the next dc, (ch 2, dc in the next dc) m − 1 times. Leave the last mesh unworked.
| Row | Type | Meshes | Sts |
|---|---|---|---|
| 23-24 | Plain | 15 | 46 |
| 25 | Dec | 13 | 40 |
| 26 | Plain | 13 | 40 |
| 27 | Dec | 11 | 34 |
| 28 | Plain | 11 | 34 |
| 29 | Dec | 9 | 28 |
| 30 | Plain | 9 | 28 |
| 31 | Dec | 7 | 22 |
| 32 | Plain | 7 | 22 |
| 33 | Dec | 5 | 16 |
| 34 | Dec | 3 | 10 |
| 35 | Dec | 1 | 4 |
For Row 35, turn, sl st in the next 2 ch and the next dc, ch 5, and dc in the next dc. Fasten off.
The arch decreases slowly at first and then faster near the top, so the sides curve in to a sharp Gothic point. The arch head is 13 rows, or 3.7 in (9.4 cm), so the body is 10.0 in (25.4 cm) tall.
Appliqués
Quatrefoil (make 1)
Rnd 1 (pink): Make a magic ring. Ch 3 (counts as dc), 15 dc in the ring, sl st to the top of the ch-3. (16 sts)
Rnd 2: Ch 1. Sc in the next st, 3 dc in each of the next 2 sts, sc in the next st. Repeat from * 3 more times, sl st to the first sc. (4 lobes of 8 sts = 32 sts) Fasten off.
Rnd 3 (orange): Join in the first sc of any lobe, ch 1. Sc in the sc, sc in the next 2 dc, 2 sc in each of the next 2 dc, sc in the next 2 dc, sc in the sc. Repeat from * 3 more times. (32 sts + 8 increases = 40 sts) Sl st to the first sc and fasten off.
The two sc between neighboring lobes make the dips of the quatrefoil. The finished motif is about 1.5 in (3.8 cm) across.
Small flower (make 2, orange)
Rnd 1: Make a magic ring. Ch 1, 5 sc in the ring, sl st to the first sc. (5 sts)
Rnd 2: (Sl st, ch 2, 2 dc, ch 2, sl st) in the next sc. Repeat from * 4 more times. (5 petals) Fasten off.
Each flower is about 0.6 in (1.5 cm) across.
Don’t sew the appliqués on yet. Attach them after the border.
Border
Border gauge: Work 2 sc around each row-end post and 3 sc across each exposed mesh step (1 in the dc, 2 in the ch-2 sp). Each sc round adds about 0.1 in (0.3 cm).
Fan Row (pink, bottom only): With RS facing, join pink in the first free loop of the foundation ch. Sc in that st. Sk 1, 3 dc in each of the next 2 sts, sk 1, sc in the next st. Repeat from * 8 more times. (9 fans: 10 sc + 54 dc = 64 sts) Fasten off.
The fan row works because 46 = 1 + (5 x 9), so the last sc lands on the last loop and both ends match.
Rnd 1 (orange): Join orange in a bottom corner, ch 1. Work sc around, placing the sts like this:
- Each bottom corner: 3 sc in the end sc of the fan row (6 total)
- Bottom between the corners: sc in each of the 62 fan-row sts
- Each side: 2 sc over the fan-row end, then 2 sc around each row end for Rows 1-24 (2 + 48 = 50 per side)
- Each arch side: 2 sc around each row end for Rows 25-35 (22), plus 3 sc across each of the 7 steps (21), for 43 per side
- Peak: sc in the dc, 3 sc in the ch-2 sp, sc in the 3rd ch of the ch-5 (5)
Rnd 1 total: 62 + 6 + (2 x 50) + (2 x 43) + 5 = 259 sts. Sl st to the first sc.
Rnd 2 (orange): Ch 1. Work the round like this:
- Each bottom corner: 3 sc in the center sc of the corner.
- Bottom: There are 64 sts between the corner centers. Work sk 1, 5 dc in the next st, sk 1, sc in the next st 16 times. (16 scallops = 96 sts) The last sc lands just before the next corner center.
- Each side and arch side: Sc in each st (1 corner st + 50 + 43 = 94 per side).
- Peak: Sc in the next 2 sts. In the center peak st, work (sc, ch 12, sc) for the hanging loop. Sc in the next 2 sts.
Rnd 2 total: 6 + 96 + 188 + 6 = 296 sts, plus the ch-12 loop. Sl st to the first sc and fasten off.
Window outline (orange): Join orange in st 17 of Row 4, ch 1. Work sc around the opening:
- Bottom: 14 sc along the bottom (sts 17-30)
- Each long side: 2 sc around each post of Rows 5-19 (30 per side)
- Each side’s stepped top: 2 sc under and 2 sc up each of the 2 increase meshes (8 per side)
- Top: 2 sc under the bridge mesh
Total: 14 + 60 + 16 + 2 = 92 sc. Sl st to the first sc and fasten off.
Why the math works: Every count comes from the 46-st body. The 46 sts give 9 symmetrical fans (1 + 5 x 9). The 2 corner sts plus 62 fan sts give 64 bottom sts, and 64 = 16 x 4 for the scallops. The sides follow the 35 rows exactly: 24 straight rows plus 11 shaped rows. Rnd 2 changes only the corners, scallops, and loop, so it can’t drift. The two sc rounds add 0.2 in (0.5 cm) at each side and at the top. At the bottom, the fans, Rnd 1, and the scallops add 0.6 in (1.5 cm). That gives 5.0 + 0.4 = 5.4 in (13.7 cm) and 10.0 + 0.6 + 0.2 = 10.8 in (27.4 cm).
Appliqués: Pin the quatrefoil at the center of the arch, covering Rows 26-30 and the middle 5 meshes. Pin one flower on Row 24, centered over the middle mesh of each column (meshes 3 and 13). Whipstitch around each motif’s outer round with matching thread.
Final Blocking
- Weave in all ends along solid sts or the border.
- Soak the panel in cool water for 10 minutes, then roll it in a towel to press out the water.
- Pin it RS up to 5.4 in x 10.8 in (13.7 cm x 27.4 cm).
- Pin the peak first, then the two bottom corners, then the sides, keeping them straight.
- Pin each of the 16 scallops and each of the 9 fans.
- Pin the window edges straight and square the stepped top.
- Mist with starch if you like, and let it dry completely before you unpin.
Final Quality-Control Checklist
- The body is 15 meshes wide, and the columns are 5 meshes each.
- The window narrows 5 → 3 → 1 → closed.
- The arch ends in a single mesh at Row 35.
- Border Rnd 1 has 259 sts and Rnd 2 has 296 sts.
- There are 16 orange scallops and 9 pink fans.
- The window outline has 92 sc and lies flat.
- The quatrefoil is centered and the flowers mirror each other.
- The finished size is 5.4 in x 10.8 in (13.7 cm x 27.4 cm).
Troubleshooting
- The columns are different heights: Recount the rows. Both columns need Rows 5-21.
- There’s a gap at the bridge: Your dc went into the wrong st. Work it into the top of the dtr, not its side.
- The arch leans: You decreased at one end only. Every decrease row loses one mesh at each end.
- The border ruffles: Use 2 sc per row end, not 3.
- The border cups: Use a 2.0 mm hook for the border only.
- The scallops are crowded at a corner: Recount Rnd 1. There must be 64 sts between the corner centers.
- The window outline puckers: Work the sc around the posts, not into them.
Care
Hand wash in cool water with a mild soap and lay flat to dry, pinning it back into shape. Press it lightly under a cloth if needed.

Final Notes
Each measurement depends on the one before it. A 4 in (10.2 cm) gauge of 12 meshes makes the 15-mesh body 5.0 in (12.7 cm) wide. Thirty-five rows make it 10.0 in (25.4 cm) tall. The border adds 0.4 in (1.0 cm) in width and 0.8 in (2.0 cm) in height, so the finished panel is 5.4 in x 10.8 in (13.7 cm x 27.4 cm). If you check your size at each checkpoint, the border counts will fit.
To make a curtain like the one in the photos, make several panels to the same size.
Happy crocheting!