

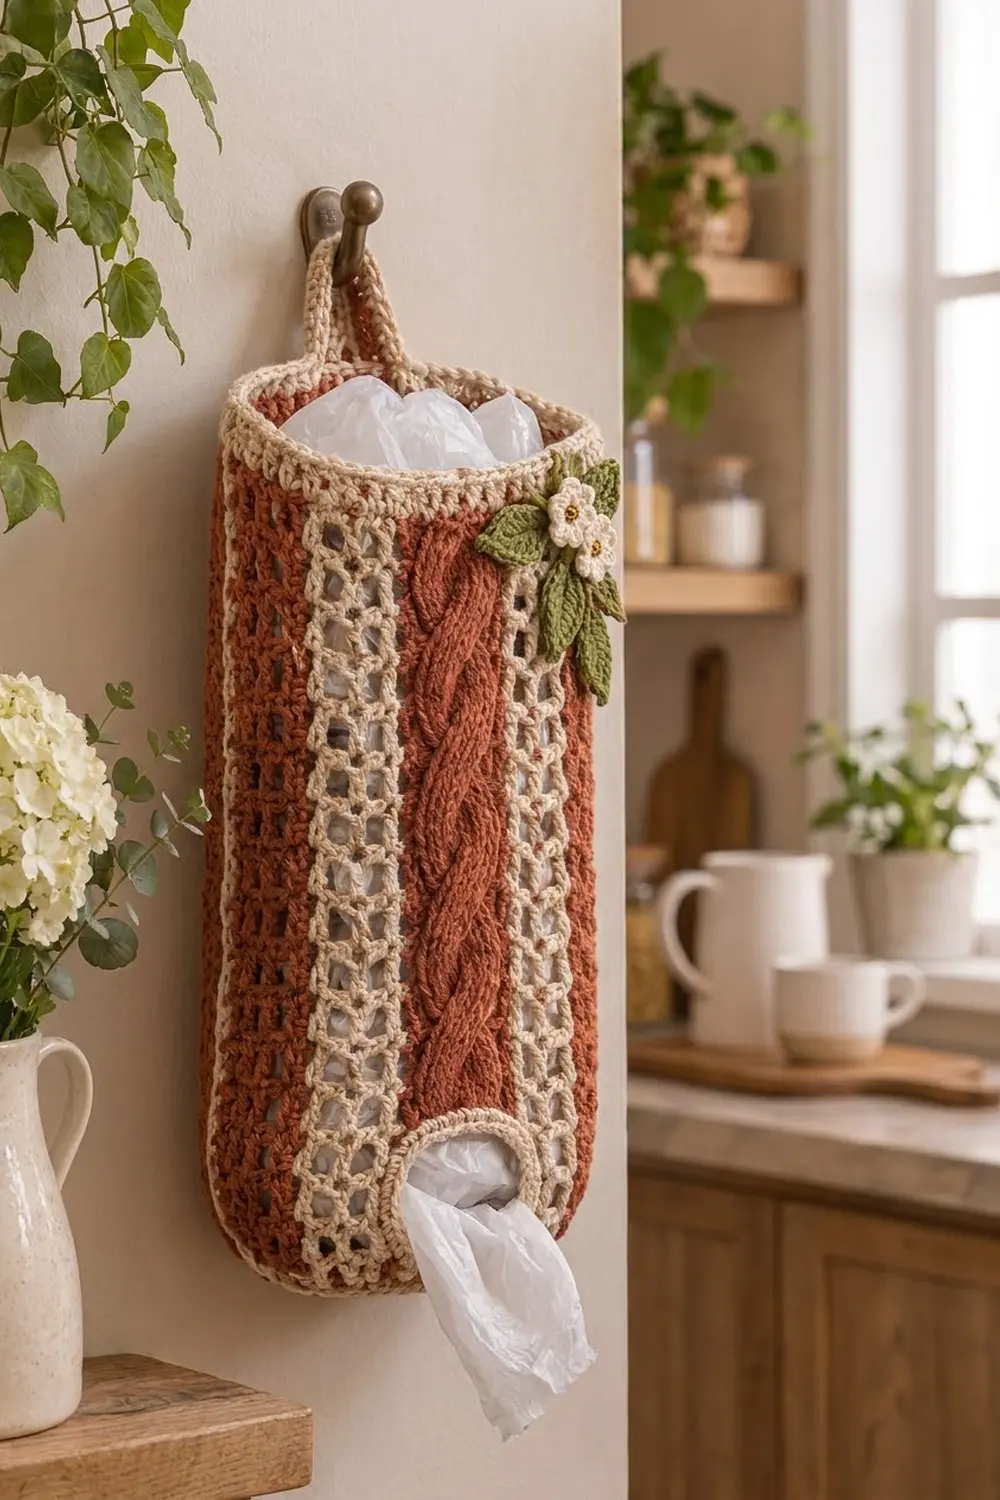
The Hearthside Cable Bag Holder is a slim hanging tube for plastic grocery bags. You push bags in at the top and pull them out one at a time from the opening at the bottom. It hangs flat from a small loop on a wall or cabinet door.
A wide rust rope cable runs down the center front. A cream mesh column sits on each side of it, with a thin rust strip at each outer edge. Cream bands finish the top rim and the rounded bottom. Two small cream flowers with gold centers and three sage leaves decorate the top right corner.
All instructions use US crochet terms. The finished holder measures 7 in (17.8 cm) wide when flattened and 18 in (45.7 cm) long. With the loop it is about 21.4 in (54.4 cm) long.
You work the body flat in double crochet rows, using intarsia for the stripes, then seam it into a tube. Cream rounds finish the top and shape the bottom opening. Last, you sew on the loop, flowers and leaves.
Finished Size and Construction
- Finished size: 7 in (17.8 cm) wide flattened × 18 in (45.7 cm) long, plus a 3.4 in (8.6 cm) loop
- Skill level: Intermediate (post-stitch cable, intarsia)
- Terminology: US
- Yarn weight: Worsted (#4)
- Hook: 5.0 mm (H-8)
- Number of pieces: 1 body, plus 1 loop, 2 flowers and 3 leaves
- Layout: A flat 56-stitch panel seamed into a tube, with the seam at center back
- Flat panel size: 14 × 16 in (35.6 × 40.6 cm)
- Size before border: 7 × 16 in (17.8 × 40.6 cm) flattened
- Border depth: 1 in (2.5 cm) at the top and 1 in (2.5 cm) at the bottom
Materials
Use a smooth worsted-weight cotton or cotton blend. Cotton keeps the cable crisp and resists stretching under a full load of bags.
- Color A, Rust: 85 g, about 170 m
- Color B, Cream: 45 g, about 90 m
- Color C, Sage Green: 5 g, about 10 m
- Color D, Mustard Gold: 2 g, about 4 m
These quantities include about a 15% margin for swatching and joins.
Tools: 5.0 mm (H-8) hook, 5 yarn bobbins, tapestry needle, 6 locking stitch markers, measuring tape, blocking mat, rust-proof pins and a spray bottle.
Abbreviations (US Terms)
- ch – chain
- sl st – slip stitch
- sc – single crochet
- hdc – half double crochet
- dc – double crochet
- sc2tog – single crochet 2 together
- FPdc / BPdc – front / back post double crochet
- FPtr – front post treble crochet
- rev sc – reverse single crochet (crab stitch)
- sk – skip
- sp – space
- RS / WS – right side / wrong side
- st(s) – stitch(es)
Special stitch – Cable Cross (CC): Sk the next 3 sts. FPtr around each of the next 3 sts. Then, working in front of those 3 FPtr, FPtr around each of the 3 skipped sts. This uses 6 sts.
Mesh note: Each ch-1 sp counts as 1 stitch in every count.
Gauge and Checkpoints
Gauge: 16 dc and 8 rows = 4 in (10.2 cm) in plain dc, after blocking.
Make a 20-stitch dc swatch about 5 in (12.7 cm) square, wet it and let it dry before you measure. The body is your test piece, so measure it after Row 1 before going further.
Checkpoints:
- After Row 1: the panel is 14 in (35.6 cm) wide.
- After Row 8: the panel is 4 in (10.2 cm) tall.
- After Row 32: the panel is 14 × 16 in (35.6 × 40.6 cm).
- After seaming: the tube is 7 in (17.8 cm) wide when flattened.
- After the top border: the holder is 17 in (43.2 cm) long.
- After the bottom closure: the holder is 18 in (45.7 cm) long, and the opening is 8 in (20.3 cm) around.
If your gauge is off: If Row 1 is wider than 14 in (35.6 cm), go down one hook size. If it is narrower, go up one size. If only the height is off, add or remove rows in sets of 4 so the cable crosses stay evenly spaced. Each set of 4 rows changes the length by 2 in (5.1 cm).

Body Panel
Wind 3 bobbins of A and 2 bobbins of B.
Row layout across 56 sts:
| Section | Color | Sts | Purpose |
|---|---|---|---|
| 1 | A | 17 | Half of back + front edge strip |
| 2 | B | 7 | Mesh column |
| 3 | A | 8 | Cable panel (1 dc + 6 cable + 1 dc) |
| 4 | B | 7 | Mesh column |
| 5 | A | 17 | Front edge strip + half of back |
17 + 7 + 8 + 7 + 17 = 56 sts.
Color changes: Work the last yarn over of the final old-color stitch with the new color. Drop the old color on the WS and twist the two yarns so no hole forms.
With A, ch 58.
Row 1 (RS):
- Section 1: Dc in 4th ch from hook (the skipped chs count as 1 dc) and in next 15 ch [17].
- Section 2: With B, dc in next ch, (ch 1, sk 1 ch, dc in next ch) 3 times [7].
- Section 3: With A, dc in next 8 ch [8].
- Section 4: With B, work as for Section 2 [7].
- Section 5: With A, dc in last 17 ch [17].
Turn. (56 sts)
Row 2 (WS):
- Section 5: Ch 3 (counts as dc), dc in next 16 sts [17].
- Section 4: With B, dc in next dc, (ch 1, sk ch-1 sp, dc in next dc) 3 times [7].
- Section 3: With A, dc in next st, BPdc around each of next 6 sts, dc in next st [8].
- Section 2: With B, work as for Section 4 [7].
- Section 1: With A, dc in each st across, ending in the top of the turning ch [17].
Turn. (56 sts)
Row 3 (RS): Ch 3, dc in next 16 sts. Mesh over 7 sts. Dc in next st, FPdc around each of next 6 sts, dc in next st. Mesh over 7 sts. Dc in last 17 sts. Turn. (56 sts)
Row 4 (WS): Repeat Row 2. (56 sts)
Row 5 (RS, cross row): Ch 3, dc in next 16 sts. Mesh over 7 sts. Dc in next st, CC over next 6 sts, dc in next st. Mesh over 7 sts. Dc in last 17 sts. Turn. (56 sts)
Rows 6–8: Repeat Rows 2, 3 and 4. (56 sts each)
Rows 9–32: Repeat Rows 5–8 six more times. (56 sts each)
The cable crosses on Rows 5, 9, 13, 17, 21, 25 and 29, for 7 twists in total. Fasten off all bobbins. Leave a 12 in (30.5 cm) tail of A for seaming.
Check: The panel measures 14 × 16 in (35.6 × 40.6 cm). A little puckering at the cable is normal and blocks out.
Seaming the Tube
Fold the panel RS out so the side edges of Sections 1 and 5 meet. Sew the two edges together with mattress stitch and the A tail, catching the edge stitch of all 32 rows.
Flatten the tube so the cable is centered on the front. The front shows 3 A + 7 mesh + 8 cable + 7 mesh + 3 A = 28 sts. The back holds the other 28 sts, with the seam in the middle.
Check: The tube is 7 in (17.8 cm) wide when flattened. Place one marker at the seam and one directly opposite it. These two markers divide the front and back for the border counts.
Borders
Border gauge: 16 sc and 16 rounds = 4 in (10.2 cm), so 4 rounds = 1 in (2.5 cm). The sc is the same width per stitch as the body dc, so working 1 sc per stitch keeps the edge from flaring or puckering.
Work in joined rounds with the RS facing, without turning. The beginning ch 1 does not count as a stitch. Join each round with a sl st to the first sc.
Top Border (Color B)
Rnd 1: Join B at the seam on the top of Row 32. Ch 1, sc in each st and each ch-1 sp around. Join. (56 sc: 28 front, 28 back)
Rnds 2–3: Ch 1, sc in each st around. Join. (56 sc: 28 front, 28 back)
Rnd 4: Ch 1, rev sc in each st around. Join. (56 sts: 28 front, 28 back) Fasten off.
Every round has 56 sts, so the rim stays 7 in (17.8 cm) wide and adds 1 in (2.5 cm) of height.
Bottom Closure (Color B)
Turn the holder upside down and work into the base of the foundation chain.
Rnd 1: Join B at the seam. Ch 1, sc at the base of each st around, including 1 sc at the base of the turning ch. Join. (56 sc: 28 front, 28 back)
Rnd 2: Ch 1, sc in each st around. Join. (56 sc: 28 front, 28 back)
Rnd 3: Ch 1, (sc in next 5 sts, sc2tog) 8 times. Join. (48 sc: 24 front, 24 back)
Rnd 4: Ch 1, (sc in next 4 sts, sc2tog) 8 times. Join. (40 sc: 20 front, 20 back)
Rnd 5: Ch 1, (sc in next 3 sts, sc2tog) 8 times. Join. (32 sc: 16 front, 16 back)
Rnd 6: Ch 1, rev sc in each st around. Join. (32 sts: 16 front, 16 back) Fasten off.
Why the math works: 56 divides into 8 repeats of 7 sts. Counting from the seam, 4 repeats fall on the front and 4 on the back. Each decrease round removes 1 st per repeat, which is 4 sts per side, so the bottom draws in evenly without twisting.
The final 32 sts measure 8 in (20.3 cm) around, which makes an opening about 2.5 in (6.4 cm) across. When the holder hangs flat, the opening shows as a cream oval about 4 in (10.2 cm) wide. The closure adds 1 in (2.5 cm) of length.
Hanging Loop (Color B)
Ch 36.
Row 1: Sc in 2nd ch from hook and in each ch across. Turn. (35 sc)
Row 2: Ch 1, sc in each st across. (35 sc) Fasten off and leave a 12 in (30.5 cm) tail.
The strip measures 8.75 in (22.2 cm). Fold it in half. Sew each end 1 in (2.5 cm) down inside the back border, centered on the seam. The loop rises about 3.4 in (8.6 cm) above the rim.
Flowers (make 2)
Rnd 1: With D, make a magic ring. Ch 1 and work 5 sc into the ring. Join. (5 sc) Fasten off.
Rnd 2: Join B in any sc. Work (sc, hdc, dc, hdc, sc) in each sc around. Join. (5 petals, 25 sts) Fasten off and leave a 6 in (15.2 cm) tail.
Each flower is about 1.25 in (3.2 cm) across.
Leaves (make 3)
With C, ch 8.
Rnd 1: Working along one side of the chain: sc in 2nd ch from hook, hdc in next ch, dc in next 2 ch, hdc in next ch, sc in next ch, and 3 sl st in the last ch for the tip. Working along the other side: sc in next ch, hdc in next ch, dc in next 2 ch, hdc in next ch, sc in last ch. Sl st to the first sc. Fasten off and leave a 6 in (15.2 cm) tail.
Each leaf is about 1.75 in (4.4 cm) long.
Placement: Sew the two flowers just below the top border, overlapping them on a diagonal over the right mesh column and the edge of the cable. Put one leaf above and to the left of the flowers, and angle the other two downward below them. Stitch through the back loops only so the stitching stays hidden.
Final Blocking
- Weave in all ends along color changes in matching colors.
- Spray the holder until it is evenly damp.
- Slide a rolled towel inside the tube and flatten it to 7 in (17.8 cm) wide with the cable centered.
- Pin the sides straight and check that the body measures 16 in (40.6 cm) between the borders.
- Ease the mesh holes square and smooth the cable.
- Shape the bottom opening into an even oval.
- Let it dry completely, then remove the towel.
Final Quality-Control Checklist
- [ ] Every body row has 56 sts.
- [ ] The cable has 7 crosses, all twisting the same way.
- [ ] Each mesh column has 3 holes per row, and they line up vertically.
- [ ] The seam is centered on the back and lies flat.
- [ ] Every top border round has 56 sts.
- [ ] The bottom rounds count 56, 56, 48, 40, 32 and 32.
- [ ] The holder measures 7 × 18 in (17.8 × 45.7 cm).
- [ ] The loop and appliqués are securely sewn on.
Troubleshooting
- Holes at color changes: Twist the yarns on the WS at every change.
- Front pulls narrow at the cable: Work the FPtr sts loosely, or use a hook one size larger for the CC only.
- Mesh leans: Make sure every dc lands in a dc and every ch-1 sits over a ch-1 sp.
- Bottom twists: Recount the Rnd 3 repeats from the seam. There should be 4 per side.
- Bags slip out: Before Rnd 6, add one round of (sc in next 2 sts, sc2tog) 8 times for 24 sts. Then work Rnd 6 over those 24 sts.
- Top flares: Rework the border with a hook one size smaller.
Care
Hand wash in cool water and lay flat to dry, reshaping the opening while the holder is damp. Do not tumble dry.
Final Notes
Each measurement builds on the one before. At 16 dc = 4 in (10.2 cm), 56 sts make a 14 in (35.6 cm) panel and a 7 in (17.8 cm) tube. Thirty-two rows give 16 in (40.6 cm) of body. The two 1 in (2.5 cm) borders bring the length to 18 in (45.7 cm), and the 32-stitch final bottom round leaves an 8 in (20.3 cm) opening. If each checkpoint matches, the finished holder will too.
Happy crocheting!