

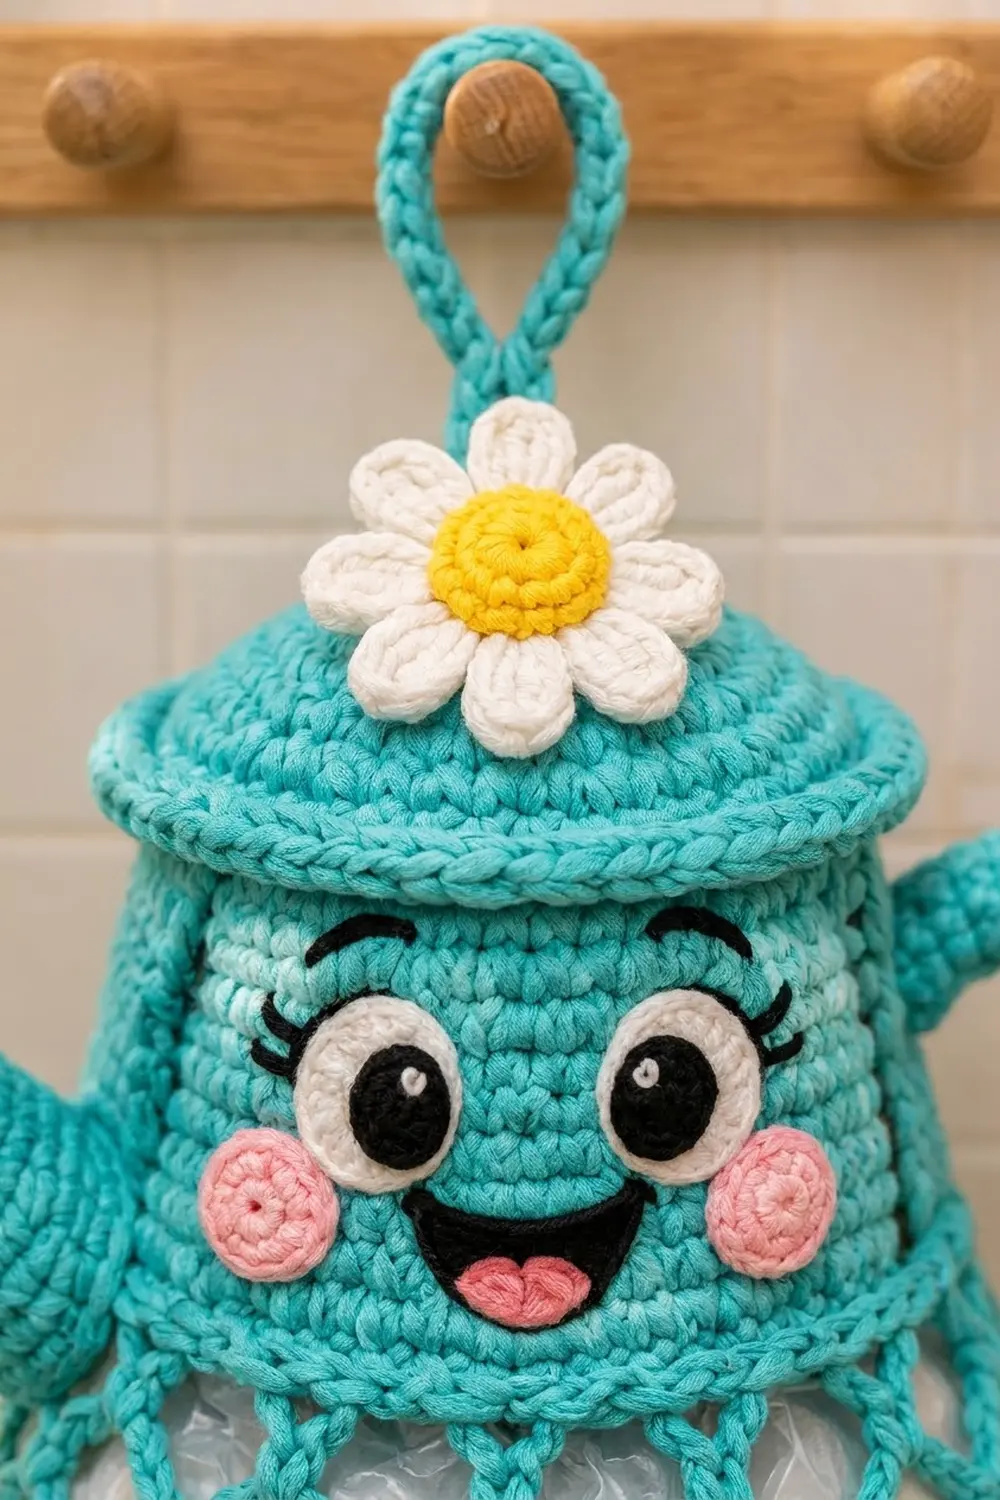
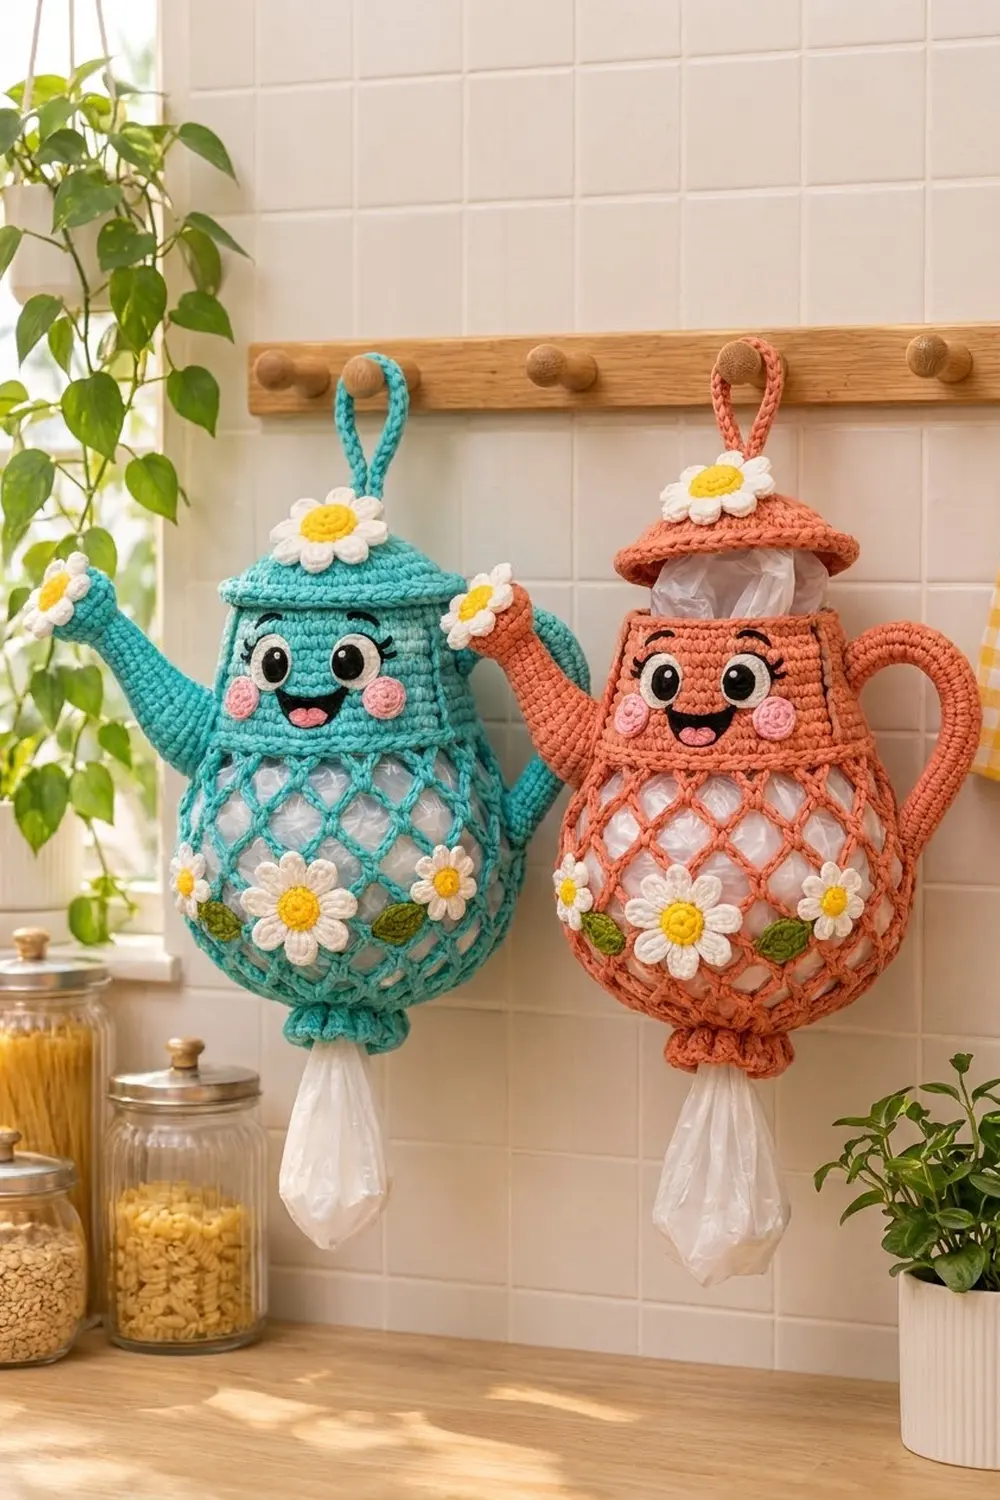
Meet Daisy Darling, a smiling turquoise teapot that hangs on a kitchen peg and quietly swallows your spare plastic bags. Her upper body is solid single crochet with a sweet appliqué face. Her round belly is an open diamond net, so you can see the bags packed inside.
The palette is bright and cheerful: turquoise body, white-and-yellow daisies, small green leaves, black eyes and mouth, and pink cheeks and tongue. The style is cozy amigurumi-meets-home-decor, with tight stitches and a clean finish.
This pattern uses US crochet terms. The finished holder measures about 11 in (27.9 cm) from top rim to bottom cuff. Hanging height with lid and loop is about 16 in (40.6 cm), and width from spout tip to handle is about 15 in (38.1 cm).
You’ll work the body in one piece from the top rim down: solid upper body, a raised belt ridge, net belly, gathered base and bottom dispensing cuff. Then you’ll make the lid, spout, handle and hanging loop, crochet the face and flower appliqués, and sew everything on. Stuff bags in through the top under the hinged lid, and pull them out one at a time through the bottom cuff.
Finished Size and Construction
- Finished size: body 11 in (27.9 cm) tall; 16 in (40.6 cm) hanging height; 15 in (38.1 cm) wide including spout and handle
- Skill level: Intermediate
- Terminology: US
- Yarn weight: worsted (#4) cotton
- Hook: 4.0 mm (G-6)
- Number of pieces: 1 finished holder, assembled from 17 small components
- Layout: single standalone holder, no blocks to arrange
- Piece size: body 9.3 in (23.6 cm) wide flattened at the face, 11 in (27.9 cm) tall
- Size before border: 10 in (25.4 cm) tall
- Border depth: bottom cuff, 1 in (2.5 cm)
Materials
Use a smooth worsted-weight cotton or cotton blend at about 1.7 m per gram (50 g = 85 m). Cotton holds the shape of the net and the face better than acrylic.
- Turquoise (main): 150 g, 255 m
- White (petals, eye whites): 15 g, 26 m
- Yellow (daisy centers): 8 g, 14 m
- Black (pupils, mouth, lashes): 5 g, 9 m
- Pink (cheeks, tongue): 3 g, 5 m
- Green (leaves): 4 g, 7 m
Tools:
- 4.0 mm (G-6) hook
- Tapestry needle
- Stitch markers (at least 4)
- Small amount of polyester fiberfill
- Straight pins
- Optional: 1 chenille stem for the handle
All quantities include about a 15% margin.
The photos also show a coral colorway. To make it, swap the turquoise for coral and keep the same accent colors.
Abbreviations (US Terms)
- ch – chain
- sl st – slip stitch
- sc – single crochet
- hdc – half double crochet
- dc – double crochet
- inc – 2 sc in the same stitch
- sc2tog – single crochet 2 together
- BLO / FLO – back loop only / front loop only
- MR – magic ring
- sp – space
- rev sc – reverse single crochet (crab stitch): work sc from left to right, inserting the hook into the next stitch to the right
Special stitch – net loop: ch the stated number, then sc in the next ch-sp of the round below. Each net round has 21 loops and 21 sc anchors.
Gauge and Checkpoints
Gauge: 18 sc and 20 rounds = 4 in (10.2 cm) in sc worked in the round.
Before starting the body, test with the spout, because it’s small and uses the same stitches. After Rnd 12, the spout should measure 4 in (10.2 cm) around (18 sts ÷ 4.5 sts per in).
Checkpoints:
- Body Rnd 1: 13.3 in (33.8 cm) around; 6.7 in (17.0 cm) flattened.
- Body Rnd 20: 9.3 in (23.6 cm) flattened; upper body 4.2 in (10.7 cm) tall after Rnd 21.
- Net (Rnds 22–31): about 5.2 in (13.2 cm) deep when relaxed.
- Before border (after Rnd 34): 10 in (25.4 cm) total height.
- Finished: 11 in (27.9 cm).
If any checkpoint is more than 0.25 in (0.6 cm) too big, go down a hook size. If it’s too small, go up a size. The opening at the rim needs to be a tight fit for the lid, so gauge matters most in the solid sections.
Body
Work in continuous rounds unless a round says to join. Mark the first stitch of each round.
Foundation: With turquoise, ch 60 and join with a sl st to the first ch without twisting.
Rnd 1: ch 1, sc in each ch around. (60)
Rnds 2–4: sc around. (60)
Rnd 5: (sc 9, inc) 6 times. (66)
Rnd 6: sc around. (66)
Rnd 7: (sc 10, inc) 6 times. (72)
Rnd 8: sc around. (72)
Rnd 9: (sc 11, inc) 6 times. (78)
Rnd 10: sc around. (78)
Rnd 11: (sc 12, inc) 6 times. (84)
Rnds 12–20: sc around. (84)
Rnd 21: working in BLO, sc around. (84) The front loops of Rnd 20 are left free for the belt ridge.
Place your end-of-round marker at the center back. The face goes on the side opposite the marker.
Net Belly
Rnd 22: ch 1, sc in first st, ch 5, sk 3, sc in next 20 times, ch 5, sk 3, sl st to first sc. (21 sc anchors and 21 ch-5 loops; 84 sts ÷ 4 sts per repeat = 21)
Begin each of the following rounds this way: sl st into the chains up to the center ch of the first loop, then ch 1 and sc in that same loop. Next, ch N, sc in next ch-sp 20 times. To finish, ch N and sl st to the first sc. Each round has 21 loops.
Rnds 23–24: N = 5. (21 loops)
Rnds 25–28: N = 7. (21 loops) This is the widest part of the belly.
Rnds 29–30: N = 5. (21 loops)
Rnd 31: N = 3. (21 loops)
Gathered Base
Rnd 32: ch 1, 2 sc in each ch-3 sp around. (21 sps × 2 sc = 42)
Rnd 33: (sc, sc2tog) 14 times. (28)
Rnd 34: sc around. (28)
Checkpoint: the body should now measure 10 in (25.4 cm) from the top rim. Continue to the Border below before fastening off.
Belt Ridge
With the rim up, join turquoise to any free front loop of Rnd 20. Sc in each free front loop around (84), sl st to the first sc and fasten off. This makes the raised band between the face and the net.
Lid
Rnd 1: MR, 6 sc. (6)
Rnd 2: inc around. (12)
Rnd 3: (sc, inc) 6 times. (18)
Rnd 4: (sc 2, inc) 6 times. (24) The flat top should be 1.6 in (4.1 cm) across.
Rnd 5: working in BLO, sc around. (24)
Rnd 6: sc around. (24)
Rnd 7: (sc 3, inc) 6 times. (30)
Rnd 8: (sc 4, inc) 6 times. (36)
Rnd 9: (sc 5, inc) 6 times. (42)
Rnd 10: (sc 6, inc) 6 times. (48)
Rnd 11: (sc 7, inc) 6 times. (54)
Rnd 12: (sc 8, inc) 6 times. (60)
Rnd 13: sc around. (60) This matches the 60-stitch body rim.
Rnd 14: working in FLO, (sc 9, inc) 6 times. (66) This forms the flared brim.
Rnd 15: sc around. (66)
Rnd 16: sl st around and fasten off, leaving a 20 in (50.8 cm) tail. The brim is about 4.7 in (11.9 cm) across.
Hanging Loop
Row 1: ch 36, sc in 2nd ch from hook and each ch across. (35)
Row 2: ch 1, turn, sc across. (35) Fasten off with a long tail.
The strip is 7.8 in (19.8 cm) long. Fold it into a loop, and sew both ends securely to the center of the lid top. About 3.5 in (8.9 cm) of loop stands above the lid.
Spout
Work from the tip toward the body.
Rnd 1: MR, 6 sc. (6)
Rnd 2: inc around. (12)
Rnd 3: (sc, inc) 6 times. (18)
Rnd 4: working in BLO, sc around. (18)
Rnds 5–12: sc around. (18)
Rnd 13: (sc 5, inc) 3 times. (21)
Rnds 14–16: sc around. (21)
Rnd 17: (sc 6, inc) 3 times. (24)
Rnds 18–20: sc around. (24)
Rnd 21: (sc 7, inc) 3 times. (27)
Rnds 22–23: sc around. (27)
Stuff lightly. The spout is 4.6 in (11.7 cm) long and 6 in (15.2 cm) around at the base. Leave a long tail.
Handle
Rnd 1: MR, 6 sc. (6)
Rnd 2: inc around. (12)
Rnds 3–40: sc around. (12)
The handle is 8 in (20.3 cm) long and 2.7 in (6.9 cm) around. Stuff firmly, adding the chenille stem if you’re using one, and leave a long tail.
Daisies
Large daisy (make 2): With yellow, MR, 6 sc. Rnd 2: inc around (12). Rnd 3: (sc, inc) 6 times (18). Fasten off yellow.
Join white in any st. Ch 7. Starting in the 2nd ch from hook, work sc, hdc, dc, dc, hdc, sc down the chain. Sk 1 center st and sl st in the next. Repeat 9 times. (9 petals; 18 center sts ÷ 2) Each large daisy is about 3.3 in (8.4 cm) across.
Small daisy (make 3): With yellow, MR, 6 sc. Rnd 2: inc around (12). Fasten off.
Join white. Ch 5. Starting in the 2nd ch from hook, work sc, hdc, dc, hdc down the chain. Sk 1 center st and sl st in the next. Repeat 6 times. (6 petals) Each small daisy is about 2 in (5.1 cm) across.
Leaves (make 2)
With green, ch 8. Starting in the 2nd ch from hook, work sc, hdc, dc, dc, hdc, sc, then 3 sc in the last ch. Working along the other side of the chain, work sc, hdc, dc, dc, hdc, sc, then sl st to the first sc. (15 sts) Each leaf is 1.6 in (4.1 cm) long.
Face
Eyes (make 2): With black, MR, 6 sc. Rnd 2: inc around (12). Fasten off.
With white, Rnd 3: (sc, inc) 6 times. (18) Each eye is 1.1 in (2.8 cm) across. Embroider a small white highlight on the pupil and 3 black lashes at the upper outer edge.
Cheeks (make 2): With pink, MR, 6 sc. Rnd 2: inc around (12). Each cheek is 0.8 in (2.0 cm) across.
Mouth: With black, MR, ch 1, 6 sc in the ring. Pull the ring closed but don’t join, so it forms a half circle.
Row 2: ch 1, turn, inc in each st. (12) The mouth is 1.2 in (3.0 cm) wide. Satin-stitch a pink tongue near the curved edge.
Assembly
- Face: Sew the eyes over Rnds 8–12, 10 sts apart. Add the cheeks just below and outside the eyes on Rnds 13–14. Sew the mouth, flat edge up, centered over Rnds 13–17.
- Spout: Pin the spout to the left side over Rnds 9–19, angled upward at about 45 degrees. Whipstitch it on through all 27 stitches.
- Handle: Sew one end to the right side at Rnd 6. Curve the handle out, and sew the other end to the sc anchors of net Rnd 27.
- Lid: Set the lid on the rim. Whipstitch the back 30 sts of lid Rnd 13 to the back 30 sts of the body rim to make a hinge. The front half lifts open for refilling.
- Daisies: Sew one large daisy over the loop seam on the lid and one small daisy on the spout tip. Sew the second large daisy to the center front of the net over Rnds 25–28. Sew the two small daisies to either side, tacking each petal to a net crossing.
- Leaves: Tuck one leaf under each small daisy, angled toward the center, and stitch them down.
Border
The border is the bottom dispensing cuff, worked from the live loop after Rnd 34. Border gauge is the same as the body: 4.5 sts per in.
Rnd 34 has 28 sts, or 14 per flattened side. That gives an opening 6.2 in (15.7 cm) around and about 2 in (5.1 cm) across.
Rnd 35: working in BLO, (sc, inc) 14 times. (28 worked 1-per-stitch + 14 added = 42; 21 per side)
Rnd 36: sc around. (42; 21 per side) The cuff bulb is 4.7 in (11.9 cm) wide flattened.
Rnd 37: (sc, sc2tog) 14 times. (28; 14 per side)
Rnd 38: sc around. (28; 14 per side) This section is 3.1 in (7.9 cm) wide flattened.
Rnd 39: rev sc around. (28; 14 per side) Sl st to first st and fasten off.
Why the math works: Rnd 35 adds exactly 1 st per 2 sts (14 total), and Rnd 37 takes exactly those 14 back out. The opening returns to the same 28 sts and 6.2 in (15.7 cm) circumference as Rnd 34. That’s snug enough to hold bags, but wide enough to pull them through one at a time. Five rounds at 5 rounds per inch gives the 1 in (2.5 cm) border depth.
Final Blocking
- Lightly mist the body with water. Don’t soak it, because the stuffed parts should stay dry.
- Fill the belly with crumpled bags or a towel to open the net evenly.
- Lay it flat on its back on a towel, and ease the diamonds so they’re even all around.
- Shape the lid brim and the bottom cuff with your fingers.
- Check the measurements: body 11 in (27.9 cm) tall and face section 9.3 in (23.6 cm) wide.
- Let it dry completely, then weave in all the ends.
Final Quality-Control Checklist
- Each net round has 21 loops, and none are twisted.
- The belt ridge is 84 sts and sits level all the way around.
- The lid closes flat on the 60-st rim, and the hinge holds.
- The loop is sewn through several stitches and carries weight without pulling.
- The face is centered and opposite the round marker.
- The bottom opening is 28 sts and lets one bag out at a time.
- No ends show on the outside.
Troubleshooting
- Net is lopsided: You started a round off-center. Always sl st to the center ch of the first loop.
- Lid is too loose: Redo Rnd 16 with a smaller hook, or work a second sl st round.
- Lid is too tight: Go up a hook size for lid Rnds 12–16.
- Spout droops: Add more stuffing near the base, or tack the underside to the body with 2–3 hidden stitches.
- Bags fall out of the cuff: Work Rnd 38 as (sc 5, sc2tog) 4 times for 24 sts, then work Rnd 39 over 24.
- Face looks puckered: You pulled the appliqué stitches too tight. Resew with relaxed tension.
Care
Hand wash in cool water, press out the water in a towel, and reshape to dry flat. Don’t put it in the dryer, because heat can distort the stuffing and the net.
Final Notes
The measurement chain runs like this. Gauge of 18 sc = 4 in (10.2 cm) makes a 60-st rim that’s 13.3 in (33.8 cm) around. That grows to an 84-st face section 9.3 in (23.6 cm) wide flattened, with a 21-loop net 5.2 in (13.2 cm) deep. Next comes a 28-st base at 10 in (25.4 cm), and the 1 in (2.5 cm) cuff brings the body to 11 in (27.9 cm). If each checkpoint matches, the lid, spout and handle will fit as written.
Happy crocheting!