

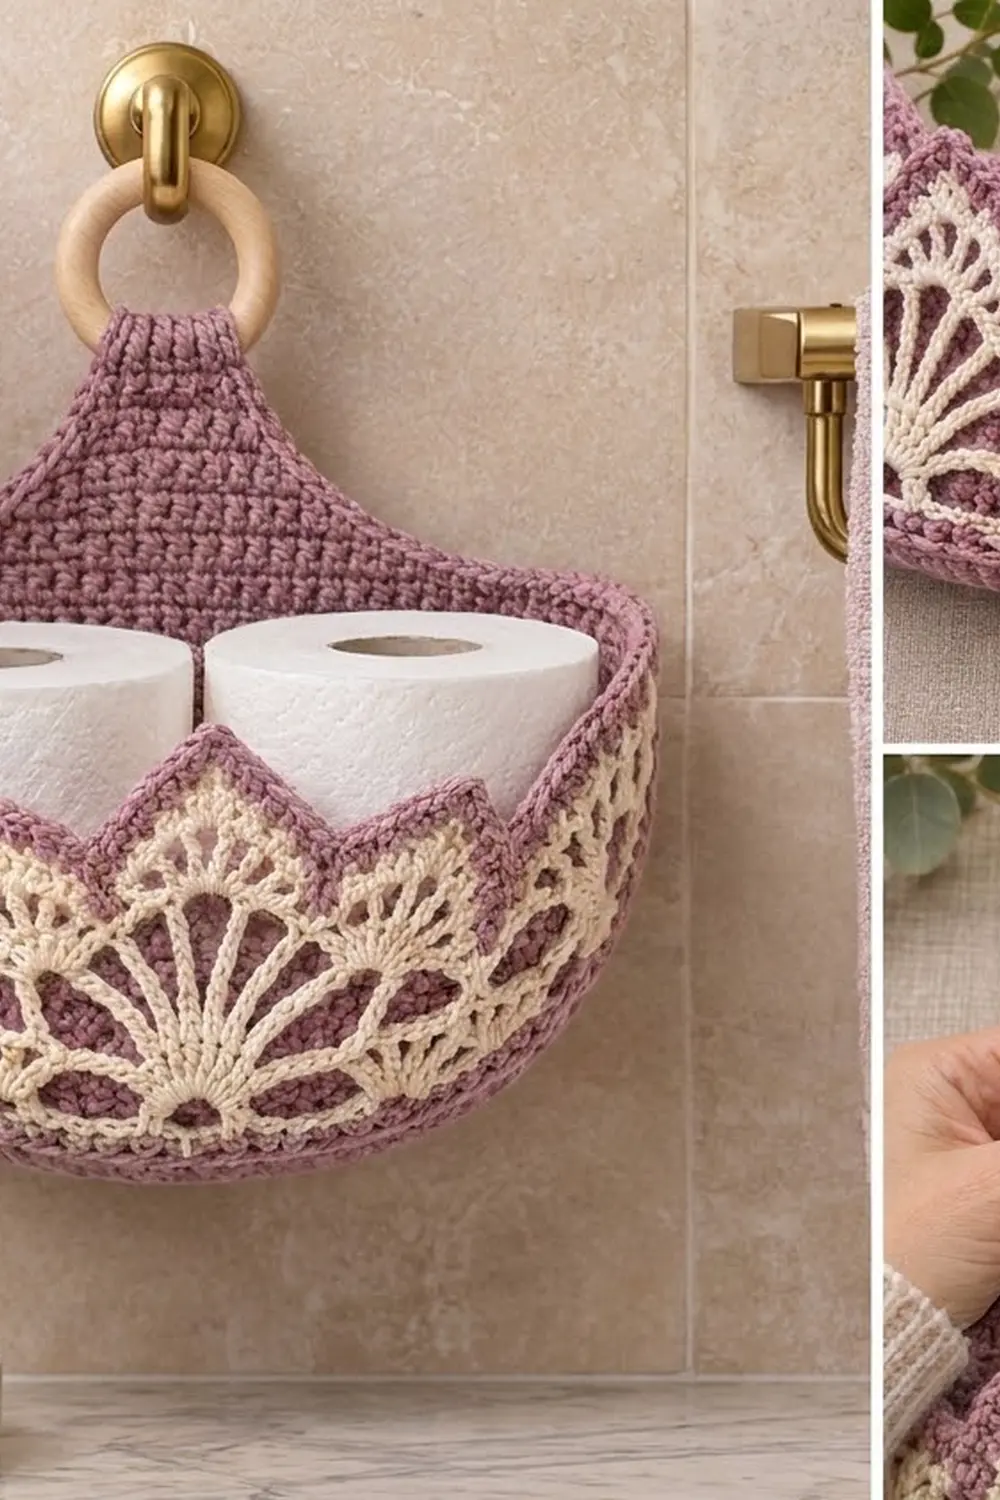
This hanging basket has a smooth mauve half-bowl, a cream fan-lace overlay with pointed peaks, and a tapered back panel that hangs from a wooden ring. It holds two standard toilet rolls side by side and also works for washcloths, soaps or small bathroom supplies.
The palette is soft: dusty mauve for the structure and warm cream for the lace. Each lace peak has a mauve outline, so the scallops stand out against the bowl behind them.
The pattern uses US crochet terms. The finished basket measures about 11 in (27.9 cm) wide, 10.5 in (26.7 cm) tall from the bottom seam to the fold of the tab, and 4.5 in (11.4 cm) deep.
You’ll make three pieces: a flat back panel with a tapered tab, a cupped front pocket, and a half-circle lace overlay. You sew the lace to the pocket, join the pocket to the back with a single crochet seam, and finish with a two-round border and the ring.
Finished Size and Construction
- Finished size: 11 in (27.9 cm) wide x 10.5 in (26.7 cm) tall x 4.5 in (11.4 cm) deep
- Skill level: Intermediate
- Terminology: US
- Yarn weight: Worsted (#4) cotton
- Hooks: 5.0 mm (H-8) for the body, 4.5 mm (US 7) for the lace
- Number of pieces: 3 crocheted pieces plus 1 wooden ring
- Layout: Back panel behind, pocket in front, lace laid over the front of the pocket
- Back panel: 10.7 in (27.2 cm) diameter half circle, plus a tapered top and tab
- Size before border: about 10.9 in (27.7 cm) wide at the rim
- Border depth: 2 rounds, about 0.4 in (1.0 cm)
Materials
Use a smooth worsted-weight cotton or cotton blend. Cotton holds the bowl’s shape and copes with bathroom humidity. Avoid fuzzy yarns, because they blur the lace.
- Mauve: 200 g, about 340 m
- Cream: 40 g, about 68 m
- 5.0 mm (H-8) and 4.5 mm (US 7) crochet hooks
- 1 wooden ring, 2.75 in (7.0 cm) across
- Tapestry needle
- Stitch markers
- Rustproof pins and a spray bottle for blocking
The quantities include a margin of about 15 percent for your gauge swatch and tension differences.
Abbreviations (US Terms)
- ch: chain
- sl st: slip stitch
- sc: single crochet
- dc: double crochet
- tr: treble crochet
- sc2tog: single crochet 2 together
- sc3tog: single crochet 3 together
- st(s): stitch(es)
- sp: space
- tch: turning chain
- RS / WS: right side / wrong side
- rev sc (reverse single crochet): work single crochet from left to right (right-handed). Insert the hook into the next stitch to the right, pull up a loop, yarn over and draw through both loops. This makes the rope-like edge.
Gauge and Checkpoints
Gauge: 14 sc and 15 rows = 4 in (10.2 cm) with the 5.0 mm hook.
Make the back panel first and treat it as your test piece. It is the simplest shape, and every later piece is measured against it.
- Back, after Row 10: straight edge 5.3 in (13.5 cm)
- Back, after Row 20: straight edge 10.7 in (27.2 cm)
- Pocket, after Row 8: straight edge 4.3 in (10.9 cm)
- Pocket, after Row 30: last row 15.4 in (39.1 cm) when laid relaxed along a tape
- Lace, after Row 4: base 5.25 in (13.3 cm)
- Lace, finished: 8.5 in (21.6 cm) across the base, 4.25 in (10.8 cm) tall at the center peak
If your back panel is too big, go down half a hook size. If it’s too small, go up half a size. Swatch again before you continue, because the pocket must match the back stitch for stitch.

Back Panel (Mauve, 5.0 mm hook)
Part 1: Half Circle
Row 1: Make a magic ring, ch 1, work 3 sc in the ring. Pull the ring closed. Turn. (3 sts)
Row 2: Ch 1, 2 sc in each st. Turn. (6 sts)
Row 3: Ch 1, sc in next st, 2 sc in next st; repeat 3 times. Turn. (9 sts)
Rows 4–20: Ch 1, sc in each of the next (row number minus 2) sts, 2 sc in next st; repeat 3 times. Turn. Each row has 3 times its row number in stitches: Row 4 has 12, Row 10 has 30 and Row 20 has 60.
Stagger the increases by a stitch or two on alternate rows so they don’t stack into corners. Do not fasten off.
Part 2: Tapered Top
Rotate the piece so the straight edge of row ends is on top.
Top Row 1: Ch 1. Work 1 sc in each row end down to the magic ring, skipping the Row 1 end (19 sc). Continue the same way along the second half (19 sc). Turn. (38 sts)
Top Rows 2–5: Ch 1, sc3tog, sc across to the last 3 sts, sc3tog. Turn. These rows have 34, 30, 26 and 22 sts.
Top Rows 6–11: Ch 1, sc2tog, sc across to the last 2 sts, sc2tog. Turn. These rows have 20, 18, 16, 14, 12 and 10 sts.
Top Row 12: Ch 1, sc in each st. Turn. (10 sts)
Top Row 13: Ch 1, sc2tog, sc in each of the next 6 sts, sc2tog. Turn. (8 sts)
Decreasing fast at first and slower later gives the top its gently curved bell shape. The top section is 13 rows, or 3.5 in (8.9 cm), tall.
Part 3: Tab
Tab Rows 1–12: Ch 1, sc in each st. Turn. (8 sts)
The tab is 2.3 in (5.8 cm) wide and 3.2 in (8.1 cm) long. Fasten off, leaving a 12 in (30.5 cm) tail.
Front Pocket (Mauve, 5.0 mm hook)
The pocket is worked like the back panel, but it increases more slowly after Row 8. This makes the half circle cup into a bowl.
Rows 1–8: Work exactly as Back Rows 1–8. (24 sts at the end of Row 8)
Rows 9–28:
– Odd rows (increase rows): Ch 1, sc in each st up to the last st of this repeat, 2 sc in that last st; repeat 3 times. Turn. Each repeat is one-third of the previous row’s count. Row 9 has 27 sts, then 30, 33, 36, 39, 42, 45, 48 and 51, and Row 27 has 54 sts.
– Even rows: Ch 1, sc in each st. Turn. Each even row has the same count as the row before it.
Rows 29–30: Ch 1, sc in each st. Turn. (54 sts)
Fasten off. The pocket has 30 row ends along each straight side, 60 in total, to match the back’s 60-stitch curve. Row 30 becomes the rim.
Lace Overlay (Cream, 4.5 mm hook)
Row 1 (RS): Ch 4, sl st to form a ring. Ch 3 (counts as dc), work 12 dc in the ring. Turn. (13 dc)
Row 2: Ch 1, sc in the first dc, ch 3, skip 1 dc, sc in next st; repeat 6 times, working the last sc in the top of the tch. Turn. (7 sc, 6 ch-3 sps)
Row 3: Ch 3 (counts as dc), 3 dc in the next ch-3 sp, dc in the next sc; repeat 6 times. Turn. (25 dc: 1 + 24)
Row 4: Ch 1, sc in the first dc, ch 5, skip 2 dc, sc in next st; repeat 8 times. Turn. (9 sc, 8 ch-5 arches)
Row 5: Ch 3 (counts as dc), dc in the same sc. Then ch 2, sc in the next arch, ch 2, 3 dc in the next sc; repeat 7 times. Ch 2, sc in the last arch, ch 2, 2 dc in the last sc. Turn.
(25 dc: 2 + 21 + 2; 8 sc)
Row 6: Ch 4 (counts as tr), tr in the next dc. Then ch 1, sc in the next sc, ch 1, tr in the next dc, (tr, ch 2, tr) in the next dc, tr in the next dc; repeat 7 times. Ch 1, sc in the next sc, ch 1, tr in the next dc, tr in the top of the tch.
(32 tr: 2 + 28 + 2; 7 ch-2 peaks; 8 sc)
Fasten off the cream and turn so the RS faces you.
Row 7 (mauve edging): Join mauve in the first tr. Ch 1, sc in each of the first 2 tr. Then sc in the next sc, sc in each of the next 2 tr, (sc, ch 2, sc) in the ch-2 sp, sc in each of the next 2 tr; repeat 7 times. Sc in the last sc, sc in each of the last 2 tr. Skip all ch-1 spaces.
(54 sc: 2 + 49 + 3; 7 ch-2 peaks)
Skipping the ch-1 spaces pulls each valley down, which sharpens the peaks. Fasten off and leave a 30 in (76.2 cm) mauve tail for sewing.
Make All Pieces
| Piece | Color | Quantity |
|---|---|---|
| Back panel with tab | Mauve | 1 |
| Front pocket | Mauve | 1 |
| Lace overlay | Cream with mauve edging | 1 |
| Wooden ring | Natural | 1 |
Layout, seen from the front:
        [ RING ]
        [ TAB  ]
     /  BACK TOP  \
  [ RIM ========= RIM ]
  [  LACE over POCKET ]
   \ POCKET + BACK   /
     \___ seam ____/
Joining
1. Sew the lace on. Lay the lace on the RS of the pocket, centered on the middle line. The ring of Row 1 should sit 3.5 in (8.9 cm) up from the pocket’s starting point, and the peak tips should touch Row 29.
Ease the straight base edge around the curve of the bowl and pin it. Whipstitch the base edge, every valley sc and the outer row-end tips in place, using the mauve tail on the edging and cream thread on the base. Leave the peaks free above their last 0.25 in (0.6 cm).
2. Join the pocket to the back. Hold the pieces with WS together, pocket in front. Start at the left rim corner and work through both layers with mauve and the 5.0 mm hook.
Work 1 sc through each pocket row end and the matching stitch of back Row 20. That gives 30 sc down to the magic ring and 30 sc up the other side, for 60 sc in total. No extra stitches are added at the bottom point, because the pocket’s ring meets the back between back stitches 30 and 31.
This sc seam forms the raised ridge around the outer curve. Keep your tension even so the seam neither pulls the bowl inward nor ruffles it.
Size checkpoint: The joined piece should measure 10.9 in (27.7 cm) across the rim, and the bowl should stand about 4.5 in (11.4 cm) away from the back.
Border
Use the 5.0 mm hook and mauve. Border gauge is the same as the body: 14 sc = 4 in (10.2 cm).
Round 1 (sc): Start at the left rim corner and work counterclockwise around the opening.
– Pocket rim: 1 sc in each st of Row 30 (54 sc).
– Right shaped edge of the back top: 20 sc. Work 1 sc in the Top Row 1 end, 2 sc in each of the Top Row 2–5 ends (8), and 1 or 2 sc alternately in the Top Row 6–11 ends (9). Then work 1 sc in each of the Top Row 12 and 13 ends.
– Right tab edge: 1 sc in each row end (12 sc).
– Tab top: 2 sc in the first st, sc in the next 6 sts, 2 sc in the last st. That is 8 sc worked one per stitch, plus 2 extra at the corners, for 10 sc.
– Left tab edge: 12 sc.
– Left shaped edge: 20 sc, mirroring the right edge.
Join with a sl st to the first sc. Round 1 total: 54 + 20 + 12 + 10 + 12 + 20 = 128 sc.
Round 2 (rev sc): Ch 1, rev sc in each sc around. (128 sts) Join and fasten off.
Why the math works:
– The rim gets one stitch per stitch, so it stays at 54 sts and 15.4 in (39.1 cm).
– Each sloped edge of the back top is about 5.7 in (14.5 cm) long. That length needs 20 sc at gauge, but there are only 13 row ends, so the extra stitches in the steep rows keep the edge from cupping.
– The tab edges are straight, so one sc per row end is enough.
Attach the ring: Fold the tab over the wooden ring toward the WS. Sew the last tab row flat across Top Row 13, so about 1.6 in (4.1 cm) of folded tab shows above the back.
Final Blocking
- Spray the whole basket until it is evenly damp, not soaked.
- Fill the bowl firmly with a rolled towel to set its 4.5 in (11.4 cm) depth.
- Lay it face up and pin each lace peak into a crisp point.
- Check the width across the rim (11 in / 27.9 cm) and adjust the pins if needed.
- Let it dry completely, usually 12–24 hours, then remove the towel.
Final Quality-Control Checklist
- [ ] The back measures 10.7 in (27.2 cm) across before the top section.
- [ ] The pocket rim has 54 sts.
- [ ] The lace has 7 full peaks, each outlined in mauve.
- [ ] The seam has 60 sc, 30 on each side.
- [ ] Border Round 1 has 128 sc.
- [ ] The tab is sewn securely and the ring turns freely.
- [ ] All ends are woven in on the WS.
- [ ] The basket holds two rolls without sagging.
Troubleshooting
- The back ruffles: Your tension is loose for the increases. Go down a hook size, or spread the increases more evenly.
- The pocket stays flat: You probably increased on even rows by mistake. Count again: after Row 8, only the odd rows increase.
- The pocket is too deep: Leave out Row 30, then work the seam with 29 sc per side and skip 1 back stitch on each side.
- The lace peaks are rounded: Make sure the edging skipped the ch-1 spaces, then block with pins at the tips.
- The shaped edges pucker: You worked too few border stitches along the slopes. Use exactly 20 per side.
- The tab stretches: Line the inside of the tab with a strip of felt before sewing it closed.
Care
Hand wash in cool water with mild soap, press out the water in a towel, and reshape the bowl over a rolled towel to dry. Don’t tumble dry.
Final Notes
Each stage is checked against the one before it:
– Gauge of 14 sc = 4 in (10.2 cm) gives a 60-stitch back curve 10.7 in (27.2 cm) across.
– The 30 rows on each side of the pocket match the back stitch for stitch in the 60-sc seam.
– The 54-stitch rim measures 15.4 in (39.1 cm).
– Border Round 1 has 128 sc and adds 0.4 in (1.0 cm) of edging.
– The finished basket is 11 in (27.9 cm) wide, 10.5 in (26.7 cm) tall and 4.5 in (11.4 cm) deep.
Measure at each checkpoint and the finished basket will come out at these sizes.
Happy crocheting!