

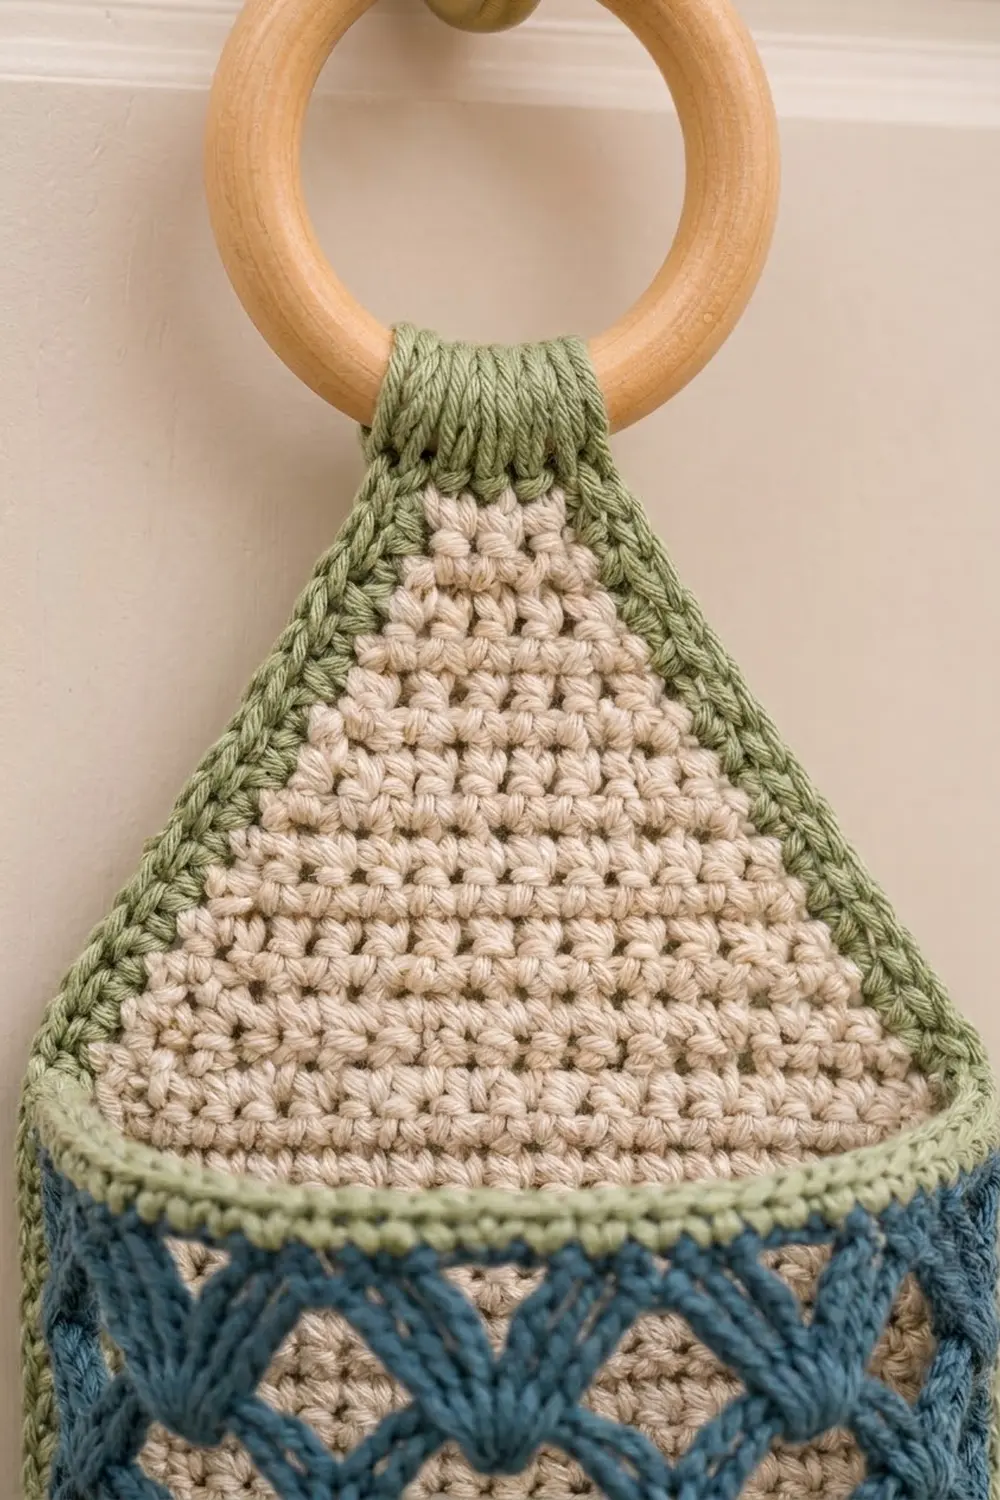
This hanging toilet paper holder pairs a long cream backing panel with three slate-blue lattice pockets, each trimmed with a sage-green rim. It hangs from a natural wooden ring, so you can hook it on the back of a door, a wall hook, or a towel bar and keep three spare rolls in easy reach.
The look is calm and coastal. The backing is plain, dense single crochet in cream with a green outline. The pockets carry the texture: a solid blue base band topped by an open trellis of fans and chain arches that forms rows of diamond-shaped windows. The white rolls showing through the lattice are part of the design.
This pattern uses US crochet terms. The finished holder measures 6.5 in wide x 26.7 in long (16.5 x 67.8 cm) without the tab and ring, and about 30 in (76.2 cm) from the top of the ring to the bottom edge. Each pocket has a base of about 6 x 3 in (15.2 x 7.6 cm) and a wall about 3.75 in (9.5 cm) high.
Construction is simple. You crochet the cream panel in rows, ending in a pointed taper. You work each pocket in the round as a small oval basket: an oval base, a solid band, the trellis, then a green rim. The pockets are sewn onto the panel stitch to stitch, then you add a green border, work a short tab, and wrap the tab around the ring.
Finished Size and Construction
- Finished size: 6.5 x 26.7 in (16.5 x 67.8 cm), about 30 in (76.2 cm) including ring
- Skill level: Intermediate
- Terminology: US
- Yarn weight: Worsted (#4), cotton or cotton blend
- Hook: 5.0 mm (H-8)
- Number of pieces: 4 (1 backing panel, 3 pockets), plus a tab worked from the panel
- Layout: 3 pockets stacked vertically on 1 panel
- Panel before border: 6 x 26.2 in (15.2 x 66.5 cm)
- Pocket: base about 6 x 3 in (15.2 x 7.6 cm), wall about 3.75 in (9.5 cm)
- Border depth: 0.25 in (0.6 cm) per edge
Materials
Pick a smooth worsted-weight cotton or cotton blend. Cotton holds its shape in a damp bathroom and shows the trellis clearly. Avoid fuzzy or very stretchy acrylics, because the pockets will sag.
- Cream (panel): 50 g / 95 m
- Slate blue (pockets): 60 g / 115 m
- Sage green (rims, border, tab, sewing): 25 g / 50 m
All quantities include a margin of roughly 20 percent for your swatch and for seaming.
Tools
- 5.0 mm (H-8) crochet hook
- 1 wooden ring, 2.5 in (6.4 cm) outside diameter
- Tapestry needle
- 6 locking stitch markers
- Scissors and tape measure
- Rust-proof pins for blocking
Abbreviations (US Terms)
- ch – chain
- sl st – slip stitch
- sc – single crochet
- dc – double crochet
- sc2tog – single crochet 2 together
- BLO – back loop only
- sk – skip
- st(s) – stitch(es)
- rnd – round
- RS / WS – right side / wrong side
Special stitches
- Shell: 5 dc worked in the same ch-5 arch.
- Arch: ch 5, then sc in the stated stitch.
Gauge and Checkpoints
Gauge: 16 sc and 18 rows = 4 in (10.2 cm) in sc worked in rows, with a 5.0 mm hook.
Make a 20-stitch swatch before you start. If you count more than 16 sc per 4 in (10.2 cm), go up a hook size. If you count fewer, go down a size. Gauge matters most for width, because the pockets are sewn across exactly 24 panel columns.
Before you make all three pockets, make one test pocket. Use these checkpoints:
- Pocket base after Rnd 7: about 6 x 3 in (15.2 x 7.6 cm), 64 sts.
- Wall after Rnd 15: about 3 in (7.6 cm) above the base edge.
- Finished wall after Rnd 18: about 3.75 in (9.5 cm).
- Panel after Row 108: 6 x 24 in (15.2 x 61.0 cm).
- Panel after Row 118: 6 x 26.2 in (15.2 x 66.5 cm).
If the pocket base is too big, your shells will flare and the pocket will gape. Go down a hook size. If it is too small, the roll will not fit. Go up a size. Stitch counts stay the same either way.
Backing Panel
Use cream.
Row 1 (RS): Ch 25. Sc in 2nd ch from hook and in each ch across. (24 sts)
Rows 2–108: Ch 1, turn. Sc in each st across. (24 sts)
Checkpoint: 6 x 24 in (15.2 x 61.0 cm).
Taper
Rows 109–118: Ch 1, turn. Sc2tog, sc in each st to last 2 sts, sc2tog.
Counts: Row 109: 22. Row 110: 20. Row 111: 18. Row 112: 16. Row 113: 14. Row 114: 12. Row 115: 10. Row 116: 8. Row 117: 6. Row 118: 4.
Fasten off. The taper adds about 2.2 in (5.6 cm), giving a pointed top over 6 in (15.2 cm) of width. Weave in the ends on the WS.
Pocket (make 3)
Use slate blue. Work in joined rounds with the RS facing. Do not turn. Join each round with a sl st to the first st, and start each round with ch 1 (the ch 1 does not count as a stitch).
Oval base
Rnd 1: Ch 14. Sc in 2nd ch from hook, sc in next 11 ch, 3 sc in last ch. Working along the underside of the chain, sc in next 11 ch, 2 sc in the same ch as the first sc. (28 sts: 11 per side, 3 at each end)
Rnd 2: 2 sc in first st, sc in next 11, 2 sc in each of next 3, sc in next 11, 2 sc in each of last 2. (34 sts)
Rnd 3: 2 sc in first st, sc in next 12, [2 sc in next, sc in next] 3 times, sc in next 11, [2 sc in next, sc in next] 2 times. (40 sts)
Rnd 4: 2 sc in first st, sc in next 13, [2 sc in next, sc in next 2] 3 times, sc in next 11, [2 sc in next, sc in next 2] 2 times. (46 sts)
Rnd 5: 2 sc in first st, sc in next 14, [2 sc in next, sc in next 3] 3 times, sc in next 11, [2 sc in next, sc in next 3] 2 times. (52 sts)
Rnd 6: 2 sc in first st, sc in next 15, [2 sc in next, sc in next 4] 3 times, sc in next 11, [2 sc in next, sc in next 4] 2 times. (58 sts)
Rnd 7: 2 sc in first st, sc in next 16, [2 sc in next, sc in next 5] 3 times, sc in next 11, [2 sc in next, sc in next 5] 2 times. (64 sts)
Each round adds 6 sts, 3 at each curved end. The straight sides stay at 11 sts. Checkpoint: about 6 x 3 in (15.2 x 7.6 cm).
Solid band
Rnd 8: Sc in BLO of each st. (64 sts) This turns the wall upward and leaves a neat ridge around the base.
Rnds 9–10: Sc in each st. (64 sts)
Trellis
Rnd 11 (net): Sc in first st, ch 5, sk 3 sts, sc in next st; repeat from * 14 more times, ch 5, sk 3 sts, join to first sc. (16 sc, 16 arches)
Rnd 12 (shells): Sl st into first arch, ch 3 (counts as dc), 4 dc in same arch, sc in next sc, 5 dc in next arch, sc in next sc; repeat from * 14 more times, join to top of ch-3. (16 shells, 16 sc = 96 sts)
Rnd 13 (net): Sl st in next 2 dc to reach the center dc of the first shell. Ch 1, sc in same st, ch 5, sc in center dc of next shell; repeat from * 14 more times, ch 5, join to first sc. (16 sc, 16 arches)
Each arch jumps over the sc between two shells. That half-repeat offset is what forms the diamond windows.
Rnd 14 (shells): Repeat Rnd 12. (96 sts)
Rnd 15 (net): Repeat Rnd 13. (16 sc, 16 arches)
Checkpoint: the wall is about 3 in (7.6 cm) tall.
Rnd 16 (conversion): Sc in each sc and 3 sc in each arch. (16 + 48 = 64 sts)
Fasten off blue.
Rim
Rnd 17: Join sage green in any st. Sc in each st. (64 sts)
Rnd 18: Sl st loosely in each st. (64 sts)
Fasten off, leaving a 30 in (76.2 cm) tail for sewing. Checkpoint: wall about 3.75 in (9.5 cm).
Make All Pieces
- Cream: 1 backing panel (Rows 1–118)
- Slate blue with sage green rim: 3 pockets (Rnds 1–18)
Layout (front view, top to bottom)
        [ wooden ring ]
            [ tab ]
           /       \
          /  taper  \
       | rows 94-108 |  open panel
       | TOP POCKET  |  base row 76, rim row 93
       | rows 58-75  |  open panel
       | MID POCKET  |  base row 40, rim row 57
       | rows 22-39  |  open panel
       | LOW POCKET  |  base row 4, rim row 21
       | rows 1-3    |
        -------------
Joining
Sew the pockets to the panel before you add the border, so the panel edges stay free for the border.
Mark the panel. With the RS facing, count rows from the bottom and place markers at Rows 4, 21, 40, 57, 76, and 93.
Choose the back of each pocket. Lay the pocket flat with its long straight sides at front and back. Pick the side with the color-change jog as the back. On that side, mark 24 consecutive sts of Rnd 7 (the ridge left by the BLO round) and the 24 rim sts directly above them.
Sew stitch to stitch. Thread the green tail. Whipstitch the 24 marked base sts to the 24 sts of the lowest marked row, one pocket stitch to one panel column. Then whipstitch the 24 marked rim sts to the 24 sts of the row 17 rows higher. Both seams span the full 24-column panel width, 6 in (15.2 cm).
- Low pocket: base on Row 4, rim on Row 21
- Middle pocket: base on Row 40, rim on Row 57
- Top pocket: base on Row 76, rim on Row 93
Each pocket spans 17 rows, about 3.8 in (9.7 cm), which matches its 3.75 in (9.5 cm) wall. Between pockets there are 19 rows, about 4.2 in (10.7 cm), so each roll can sit up above its rim. Above the top pocket, 15 rows, about 3.3 in (8.4 cm), stay open before the taper.
Tension: Pull each stitch snug but not tight. The panel must stay flat. If you see puckers, loosen the stitches. Do not sew the remaining 40 front sts of each round. They form the bulging front of the pocket.
Size checkpoint: The panel should still measure 6 in (15.2 cm) wide at every pocket seam.
Border
Use sage green. The border has 1 round of sc and 1 round of sl st.
Border gauge: 4 sc per inch (2.5 cm) along every straight edge, the same as the panel stitch gauge.
Rnd 1: With the RS facing, join green in the first foundation st at the bottom right corner. Ch 1.
- Bottom edge: 3 sc in first st, sc in next 22 sts, 3 sc in last st. (28 sts including both corner groups = 24 worked 1-per-st + 4 extra)
- Left side: Working into row ends, [sc in next 8 row ends, sk 1 row end] 12 times. (96 sts over 108 row ends)
- Left taper: [sc in next 2 row ends, 2 sc in next row end] 3 times, sc in last row end. (13 sts over 10 row ends)
- Top: 2 sc in first st, sc in next 2 sts, 2 sc in last st. (6 sts = 4 worked 1-per-st + 2 extra)
- Right taper: Work as the left taper. (13 sts)
- Right side: Work as the left side. (96 sts)
Join to the first sc. (28 + 96 + 13 + 6 + 13 + 96 = 252 sts)
Rnd 2: Sl st loosely in each st around. (252 sts) Join and fasten off.
Why the math works: At 4 sc per inch, 96 sc cover exactly 24 in (61.0 cm), the length of Rows 1–108. Working 8 sc over every 9 row ends matches the 16-stitch, 18-row gauge, so the sides do not ruffle or pull in. The taper edges are diagonals, so they need more stitches than rows, and 13 sc fill each edge. The 3-sc corner groups and the 2-sc top increases let the border turn without cupping. The border adds 0.25 in (0.6 cm) on each edge, so the panel grows from 6 x 26.2 in (15.2 x 66.5 cm) to 6.5 x 26.7 in (16.5 x 67.8 cm).
Tab: With the RS facing, join green in the 2nd of the 6 top sts.
- Row 1: Ch 1, sc in same st and in next 3 sts. (4 sts)
- Rows 2–14: Ch 1, turn, sc in each st. (4 sts)
The tab measures about 3.1 in (7.9 cm). Pass it through the wooden ring, fold it to the WS, and whipstitch the last row to the back of the taper, just below the base of the tab.
Final Blocking
- Weave in all ends on the WS, through solid sc only, not through the trellis.
- Pin the panel flat on a blocking board to 6.5 x 26.7 in (16.5 x 67.8 cm).
- Hold a steam iron 1 in (2.5 cm) above the fabric and steam lightly. Do not press.
- Put a rolled towel inside each pocket so the trellis opens into even diamonds, and steam the pockets.
- Let everything dry completely, about 2 hours, before you unpin.
- Remove the towels and add the rolls.
Final Quality-Control Checklist
- Panel measures 6.5 x 26.7 in (16.5 x 67.8 cm).
- Each pocket rim has 64 sts, with no skipped arches.
- Every pocket has 16 shells per trellis round.
- The three pockets are level and centered across the 24 panel columns.
- Border sides lie flat, with no ruffles or pulling.
- Tab seam is secure and the ring does not slide.
- All ends are woven in and invisible from the front.
Troubleshooting
- Pocket gapes or flares: Your dc are too tall. Go down a hook size, or make the ch-5 arches a little tighter.
- Roll does not fit: Go up a hook size for the base only, keeping the same stitch counts.
- Diamonds are uneven: Make sure each net round anchors in the center dc of each shell (the 3rd of 5).
- Panel sides wave: You worked too many sc into the row ends. Recount to 96 per side.
- Panel puckers at seams: Your sewing is too tight. Take out the seam and sew it again more loosely.
- Holder tilts: The tab is off center. Re-sew it to the 4 center top sts.
Care
Hand wash in cool water with mild soap, press out the water in a towel, and lay flat to dry. Reshape the pockets around a rolled towel while damp.

Final Notes
The measurement chain is short. A 16-stitch, 18-row gauge gives a 24-stitch panel 6 in (15.2 cm) wide. After 118 rows it is 26.2 in (66.5 cm) long, and the border brings it to 6.5 x 26.7 in (16.5 x 67.8 cm). Each pocket grows from a 28-stitch oval to 64 sts, keeps 16 trellis repeats, and closes at 64 sts again. Its 24 center-back sts sew to the panel’s 24 columns, one stitch to one stitch. Check your numbers at each step and the holder will hang straight and hold three rolls neatly.
Happy crocheting!