

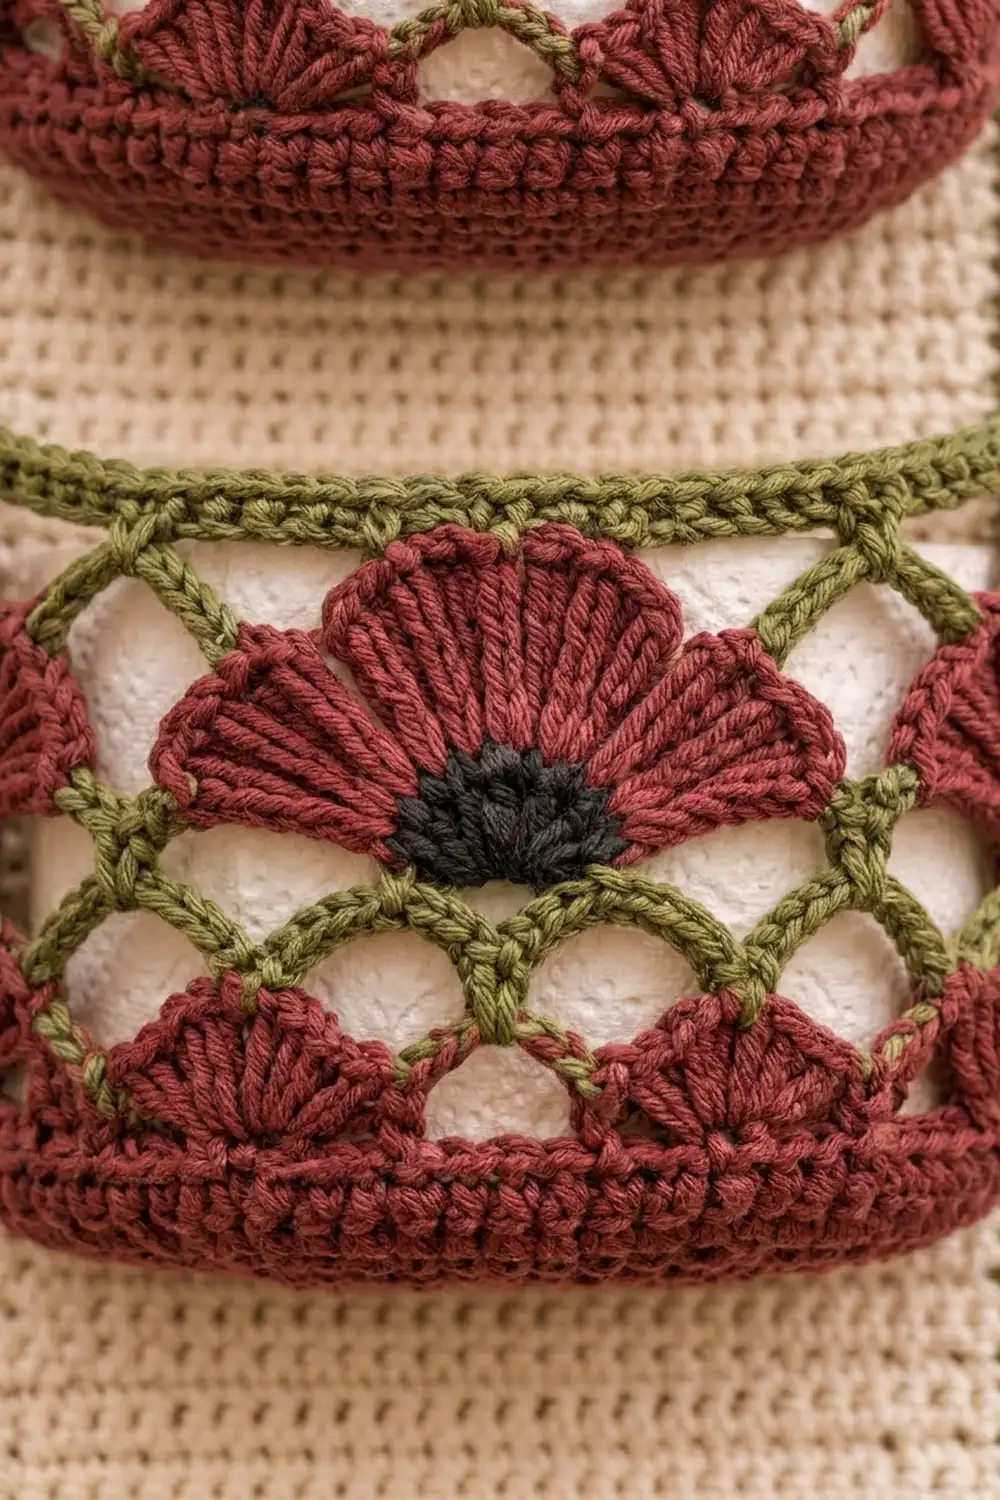
This hanging holder keeps three spare rolls tidy on the back of a bathroom door. A long cream panel hangs from a wooden ring, and three round pockets are stacked down the front, each with burgundy poppy fans, small black centers, and an open olive green lattice.
The palette is warm and a little vintage: cream for the backing panel, deep burgundy for the pocket bases and fans, soft olive for the lattice, edging, and hanging tab, and black for the flower centers. The panel is plain single crochet, so all the detail sits on the pockets.
This pattern uses US crochet terms. The finished panel measures 6 in wide x 22.5 in long (15.2 x 57.2 cm). With the tab and a 2 in (5.1 cm) ring, the holder hangs about 25 in (63.5 cm) from the top of the ring. Each pocket is 15 in (38.1 cm) around, about 7.5 in (19.1 cm) wide when flattened, and about 4.5 in (11.4 cm) tall.
Construction is simple. You work the panel flat in rows with a tapered top. Each pocket is a small basket worked in the round from a flat circular base. You sew the pockets to the panel, work one olive border around the panel, then add the tab and wrap it around the ring.
Finished Size and Construction
- Finished size: panel 6 x 22.5 in (15.2 x 57.2 cm); total hanging length about 25 in (63.5 cm)
- Skill level: Intermediate
- Terminology: US
- Yarn weight: worsted (#4) cotton
- Hook: 4.5 mm (US 7)
- Number of pieces: 4 (1 backing panel, 3 identical pockets), plus a tab worked onto the panel
- Layout: 3 pockets stacked in a single vertical column (1 x 3)
- Pocket size: base 4.75 in (12.1 cm) across; wall 15 in (38.1 cm) around and 4.5 in (11.4 cm) tall
- Panel size before border: 5.5 x 22 in (14.0 x 55.9 cm)
- Border depth: 1 round of sc, about 0.25 in (0.6 cm)
Materials
Use a smooth 100% cotton or cotton blend in worsted weight, about 85 m per 50 g. Cotton holds the pocket shape and doesn’t stretch much under the weight of the rolls.
- Cream (panel): 70 g, about 119 m
- Burgundy (pocket bases and fans): 65 g, about 111 m
- Olive green (lattice, rims, border, tab): 45 g, about 77 m
- Black (flower centers): 10 g, about 17 m
Tools:
- 4.5 mm (US 7) crochet hook
- 2 in (5.1 cm) unfinished wooden ring
- Tapestry needle
- Stitch markers (at least 6)
- Scissors and tape measure
- Rustproof pins and a blocking mat
These quantities include a margin of about 25% so you have room for a gauge swatch and small differences in tension.
Abbreviations (US Terms)
- ch – chain
- sl st – slip stitch
- sc – single crochet
- hdc – half double crochet
- dc – double crochet
- sc2tog – single crochet 2 together
- inc – 2 sc in the same stitch
- BLO – back loop only
- MR – magic ring
- sp(s) – space(s)
- st(s) – stitch(es)
Shell: 5 dc in the same stitch.
Gauge and Checkpoints
Gauge: 16 sc and 18 rows = 4 in (10.2 cm) in rows of sc.
Before you start the panel, make a swatch at least 5 x 5 in (12.7 x 12.7 cm). Then make one pocket first and check it against a roll before you make the rest.
Checkpoints:
- Pocket base, Rnd 10: 4.75 in (12.1 cm) across.
- Pocket wall, Rnd 14: 15 in (38.1 cm) around. The wall should stand up straight.
- Finished pocket: about 4.5 in (11.4 cm) tall. A standard roll should slide in easily, with the top of the roll just above the rim.
- Panel, Row 81: 5.5 in (14.0 cm) wide and 18 in (45.7 cm) long.
- Panel, Row 99: 22 in (55.9 cm) long.
If your pieces are too big, go down 0.5 mm in hook size. If they are too small, go up 0.5 mm. For the pocket, width matters most. A base that is too small won’t hold a roll, and one that is too large lets the pocket sag.
Pocket (Make 3)
Work in joined rounds with the right side facing. Don’t turn. Ch 1 at the start of a round doesn’t count as a stitch.
Base
With burgundy:
Rnd 1: MR, 6 sc in ring, sl st to first sc. (6 sts)
Rnd 2: Ch 1, inc in each st around. (12 sts)
Rnd 3: Ch 1, (sc 1, inc) 6 times. (18 sts)
Rnd 4: Ch 1, (sc 2, inc) 6 times. (24 sts)
Rnd 5: Ch 1, (sc 3, inc) 6 times. (30 sts)
Rnd 6: Ch 1, (sc 4, inc) 6 times. (36 sts)
Rnd 7: Ch 1, (sc 5, inc) 6 times. (42 sts)
Rnd 8: Ch 1, (sc 6, inc) 6 times. (48 sts)
Rnd 9: Ch 1, (sc 7, inc) 6 times. (54 sts)
Rnd 10: Ch 1, (sc 8, inc) 6 times. (60 sts)
Checkpoint: the base lies flat and measures 4.75 in (12.1 cm) across.
Burgundy Band
Rnd 11: Ch 1, sc in BLO of each st around. (60 sts) This turns the edge up to start the wall.
Rnds 12–14: Ch 1, sc in each st around. (60 sts)
Scallop Round
Rnd 15: Ch 1, sc in first st, skip 2 sts, shell in next st, skip 2 sts, sc in next st; repeat from * 8 more times, then skip 2 sts, shell in next st, skip 2 sts, sl st to first sc. (10 shells, 10 sc) Each repeat uses 6 sts, and 10 repeats use all 60. Fasten off.
Lower Lattice
Rnd 16: Join olive in the center dc of any shell. Ch 1, sc in same st, ch 5, sc in center dc of next shell; repeat from * 8 more times, ch 5, sl st to first sc. (10 sc, 10 ch-5 sps)
Rnd 17: Sl st in next 3 ch. Ch 1, sc in same sp, ch 5, sc in next ch-5 sp; repeat from * 8 more times, ch 5, sl st to first sc. (10 sc, 10 ch-5 sps) Fasten off.
Rnds 16 and 17 make the offset diamond net. Number the Rnd 17 loops 1 to 10 and place a marker in loops 1, 3, 5, 7, and 9.
Flower Centers
Rnd 18: In each marked loop, join black, work 5 hdc in the loop, and fasten off. (5 centers, 25 hdc) Working each center separately keeps black out of the lattice.
Poppy Fans
Rnd 19: Join burgundy in the first hdc of any center. 2 dc in each of the 5 hdc (10 dc), ch 2, sl st around the middle of the next unmarked ch-5 loop, ch 2; repeat from * 4 more times, sl st to first dc. (5 fans of 10 dc each = 50 dc) Fasten off.
The doubled stitches spread each fan into a half circle above its black center.
Upper Lattice and Rim
Rnd 20: Join olive in the 3rd dc of any fan. Ch 1, sc in same st, ch 5, sc in 8th dc of same fan, ch 5, sc in 3rd dc of next fan; end the last repeat with ch 5, sl st to first sc instead of working into the next fan. (10 sc, 10 ch-5 sps)
Rnd 21 (conversion round): Ch 1, sc in next sc, 5 sc in next ch-5 sp; repeat from * around, sl st to first sc. (10 sc worked into sc + 50 sc worked into spaces = 60 sts)
Rnd 22: Ch 1, sc in each st around, sl st to first sc. (60 sts) Fasten off, leaving a 30 in (76.2 cm) olive tail for sewing.
Checkpoint: the pocket is 15 in (38.1 cm) around and about 4.5 in (11.4 cm) tall.
Backing Panel (Make 1)
With cream, work in rows. Ch 1 at the start of a row doesn’t count as a stitch.
Row 1: Ch 23, sc in 2nd ch from hook and in each ch across. (22 sts)
Rows 2–81: Ch 1, turn, sc in each st across. (22 sts)
Checkpoint: 5.5 x 18 in (14.0 x 45.7 cm).
Tapered Top
Row 82: Ch 1, turn, sc2tog, sc to last 2 sts, sc2tog. (20 sts)
Row 83: Ch 1, turn, sc in each st across. (20 sts)
Rows 84–99: Repeat Rows 82–83 eight more times. That gives 9 decrease rows in total, and you lose 2 sts on each one. (Row 99 = 4 sts) Fasten off.
Checkpoint: 22 in (55.9 cm) long, and the taper is 4 in (10.2 cm) tall.
Make All Pieces
- Panel: 1 in cream
- Pockets: 3, each using burgundy for Rnds 1–15 and 19, olive for Rnds 16–17 and 20–22, and black for the 5 centers in Rnd 18
Layout, front view:
      [ ring ]
       [tab]
      / taper \
     |        |
     |Pocket 3|  base on Row 54
     |        |
     |Pocket 2|  base on Row 29
     |        |
     |Pocket 1|  base on Row 4
     |________|
Joining
Sew each pocket on with the olive tail and whipstitch. Mark the 14 rim stitches that will sit against the panel, centered at the back of the pocket. That’s 3.5 in (8.9 cm) of rim. Mark the 14 stitches of Rnd 10 directly below them.
- Base line: Lay the panel right side up. Pin the 14 marked base stitches across the center 14 stitches of the panel, along the row given in the layout: Row 4 (about 0.9 in / 2.3 cm up), Row 29 (about 6.4 in / 16.3 cm up), or Row 54 (about 12 in / 30.5 cm up). Leave 4 panel stitches free on each side.
- Rim line: Pin the 14 marked rim stitches across the same 14 center panel stitches, 20 rows higher (Rows 24, 49, and 74).
- Sew: Whipstitch one pocket stitch to one panel stitch along both lines, so you sew 14 stitches to 14. Then tack the back wall to the panel at the center, halfway between the lines.
Tension: pull each stitch snug, but don’t let it pucker. The panel should stay flat behind the pocket.
Checkpoint: the gap between pockets is about 1 in (2.5 cm), and about 1.5 in (3.8 cm) of plain panel is left above Pocket 3, below the taper.
Border
The border goes around the panel only. The pockets aren’t part of the edge, so no stitches are added at seams. Gauge: 4 sc per inch (2.54 cm) along the edge.
Round 1: With the right side facing, join olive in the first st of Row 99. Work as follows:
- Top: 2 sc in first st, sc 2, 2 sc in last st. (4 sts + 2 extra = 6)
- Left taper: 1 sc in each row end. (18)
- Left long side: sc in each of next 8 row ends, skip 1 row end; repeat 9 times. (72)
- Bottom: 3 sc in first ch, sc in next 20 ch, 3 sc in last ch. (22 sts + 4 extra = 26)
- Right long side: as left side. (72)
- Right taper: as left taper. (18)
Sl st to first sc. (212 sts total) Don’t fasten off.
Why the math works: each long side is 81 rows, which is 18 in (45.7 cm) at 4.5 rows per inch. At 4 sc per inch that edge needs 72 sc, so you skip 1 of every 9 row ends (81 x 8/9 = 72). The taper is 18 rows, and its edge is slightly longer than 4 in (10.2 cm), so 1 sc per row end fits with a little ease. The 3 sc at each bottom corner and the extra sts at the top keep the corners from cupping. The border adds about 0.25 in (0.6 cm) on every side, so 5.5 x 22 in becomes 6 x 22.5 in (15.2 x 57.2 cm).
Hanging Tab
Row 1: Sl st in next st. Ch 1, sc in this st and in the next 3 sts. These are the center 4 of the 6 top sts. (4 sts)
Rows 2–12: Ch 1, turn, sc 4. (4 sts)
The tab is about 2.7 in (6.9 cm) long. Pass it through the ring, fold it to the back, and sew the last row to the back of Row 95. Weave in all ends.
Final Blocking
- Wet the whole holder or spritz it until damp. Avoid soaking the black yarn if it’s prone to bleeding.
- Lay it face down on a mat and pin the panel to 6 x 22.5 in (15.2 x 57.2 cm).
- Fill each pocket with a roll, or a rolled towel 4.5 in (11.4 cm) across, so the wall dries round.
- Open the fans and square up the lattice diamonds with your fingers.
- Let it dry completely before you hang it.
Final Quality-Control Checklist
- The panel is 6 x 22.5 in (15.2 x 57.2 cm), with straight edges.
- The border count is 212, with 72 sts on each long side.
- Each pocket is 60 sts around, with 5 fans and 5 black centers.
- All 3 pockets are centered, with even 1 in (2.5 cm) gaps.
- The tab is sewn securely and the ring hangs straight.
- All ends are woven in on the wrong side.
Troubleshooting
- Pocket base ruffles: Your tension is loose. Go down a hook size or redo Rnds 8–10 tighter.
- Base cups: Your tension is tight. Go up a hook size.
- Fans lean to one side: Check that each center sits in an odd loop and that you have exactly 5 hdc.
- Lattice sags: Work the ch-5s tighter or use ch 4.
- Panel edge waves: You worked too many sc along the long side. Recount to 72.
- Edge pulls in: You skipped too often. Use 1 sc in every row end for the last section.
- Pocket droops forward: Add the center tack, or sew 2 more stitches on each line.
Care
Hand wash in cool water with mild soap, press out the water, and lay flat to dry, reshaping the pockets over rolls. Don’t tumble dry.

Final Notes
The measurement chain is short. A gauge of 16 sc and 18 rows = 4 in (10.2 cm) gives a base 4.75 in (12.1 cm) across and a wall 15 in (38.1 cm) around. The panel comes out at 5.5 x 22 in (14.0 x 55.9 cm), and the 212-stitch border brings it to 6 x 22.5 in (15.2 x 57.2 cm). If each checkpoint matches, the finished holder will too.
Happy crocheting!