

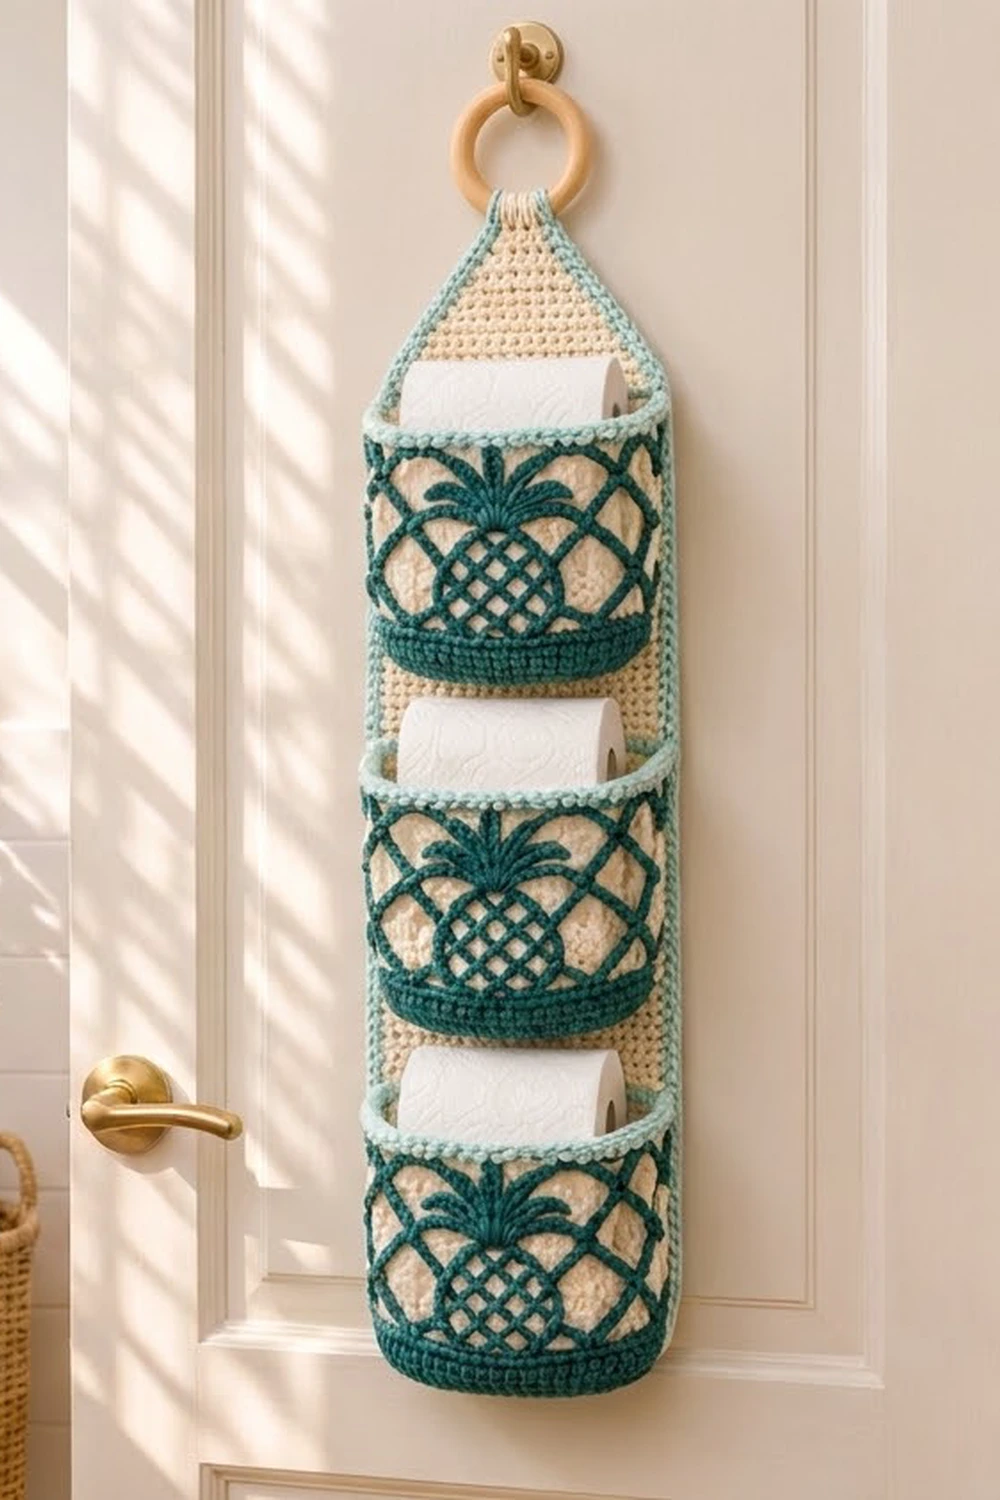
The Seaside Pineapple holder is a narrow wall organizer for three spare toilet rolls. A cream backing panel tapers to a point and hangs from a wooden ring. Three teal-trimmed pockets are stacked down its length.
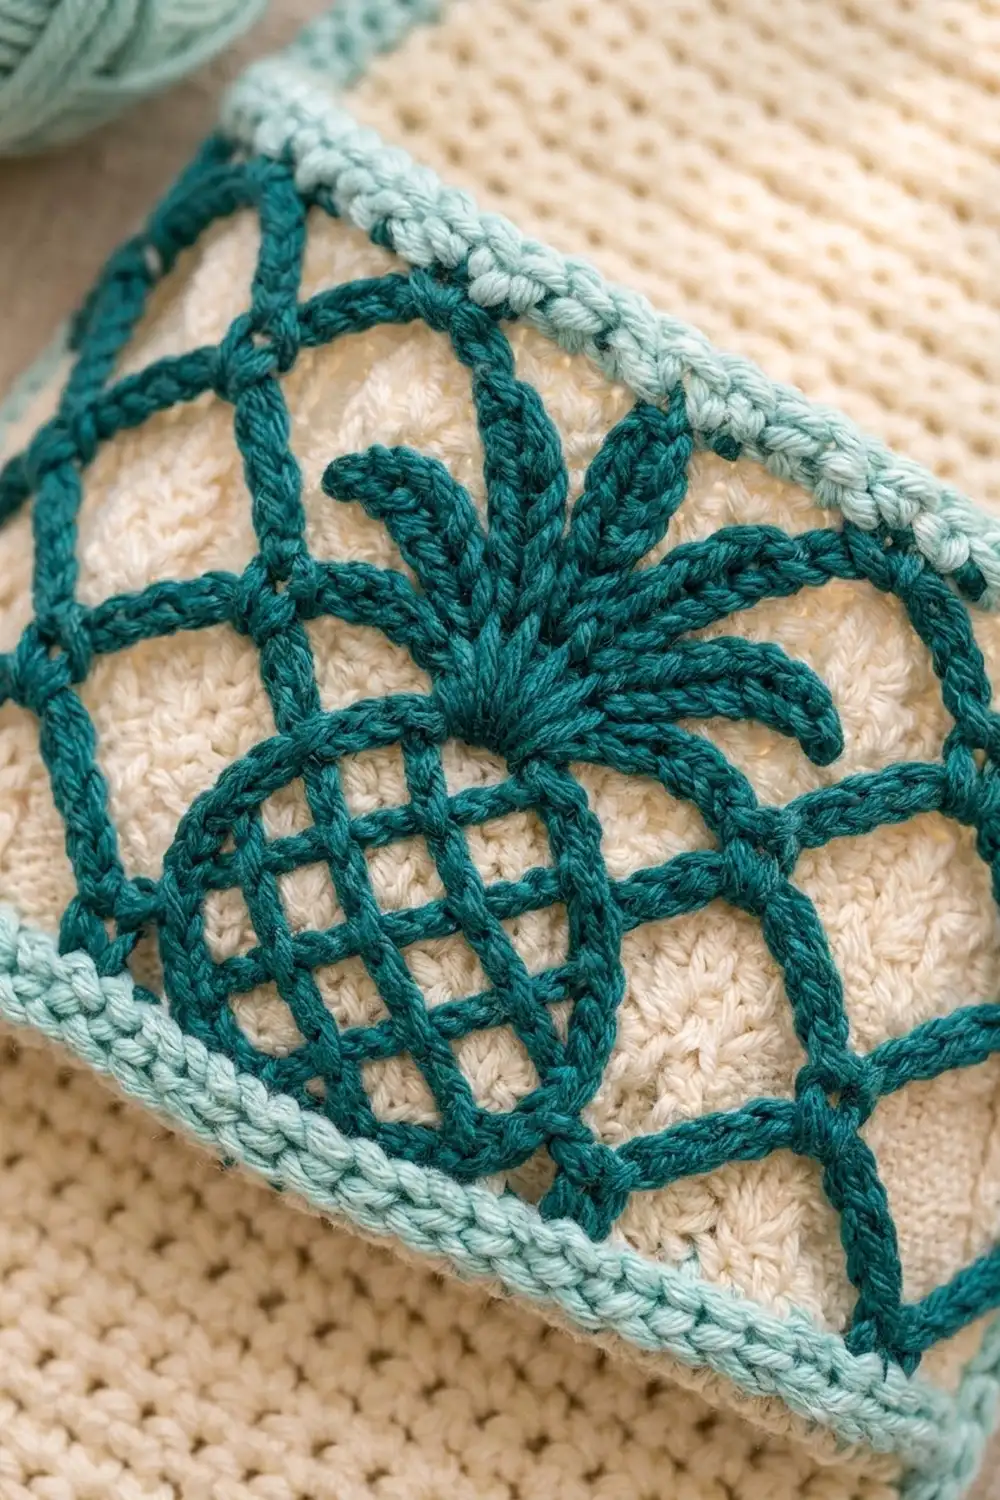
Each pocket has a solid teal base band and a raised teal diamond lattice. A pineapple sits in the center, with a crosshatched oval body and a fan of pointed leaves. Light aqua corded edging finishes the pocket rims and the panel. The three colors give it a fresh, coastal look.
This pattern uses US crochet terms. The finished panel measures 5.75 in (14.6 cm) wide by 24.5 in (62.2 cm) long. With the tab and ring, it hangs about 27 in (68.6 cm).
You will crochet one panel in rows, three basket pockets in joined rounds, a pineapple outline and leaf crown for each pocket, and one hanging tab. The lattice is surface slip stitch. You sew the pockets to the panel first, then work the border around the panel.
Finished Size and Construction
- Finished size: 5.75 in x 24.5 in (14.6 cm x 62.2 cm) panel; about 27 in (68.6 cm) hanging length
- Skill level: Intermediate
- Terminology: US
- Yarn weight: Worsted (#4) cotton
- Hook: 5.0 mm (H-8)
- Number of pieces: 1 panel, 3 pockets, 3 pineapple outlines, 3 leaf crowns, 1 tab
- Layout: 1 column of 3 pockets
- Pocket size: 5.25 in (13.3 cm) wide x 2.2 in (5.6 cm) deep x 4.9 in (12.4 cm) tall
- Panel size before border: 5.25 in x 24 in (13.3 cm x 61.0 cm)
- Border depth: 0.25 in (0.6 cm)
Materials
Use a smooth, firm worsted-weight cotton or cotton blend. Cotton holds its shape when the pockets are full, and it shows off the raised lattice.
- Cream: 200 g, about 320 m
- Teal: 100 g, about 160 m
- Light aqua: 50 g, about 80 m
These quantities include a margin of roughly 15 percent.
Tools:
– 5.0 mm (H-8) crochet hook
– Wooden ring, 2 in (5.1 cm)
– Tapestry needle
– 10 removable stitch markers
– Scissors, rustproof pins, and a blocking mat
Abbreviations (US Terms)
- ch: chain
- sl st: slip stitch
- sc: single crochet
- hdc: half double crochet
- sc2tog: single crochet 2 together
- BLO: back loop only
- rev sc: reverse single crochet (crab stitch)
- st(s): stitch(es)
- Rnd: round
- RS: right side
Surface slip stitch: Hold the yarn inside the pocket (WS). Insert the hook from the RS through the center of a stitch and pull up a loop. Insert the hook at the next point, pull up a loop, and draw it through the loop on your hook. Keep each loop the same length as one stitch.
Gauge and Checkpoints
Gauge: 16 sc and 18 rows = 4 in (10.2 cm) in sc. That works out to 4 sts and 4.5 rows per inch.
Make one pocket first. It is the best real-world gauge test, because it includes the rounds, the color changes, and the lattice.
- Pocket base: 5.25 in x 2.2 in (13.3 cm x 5.6 cm) after Row 10
- Teal band: about 0.9 in (2.3 cm) tall after Rnd 5
- Finished pocket wall: 4.9 in (12.4 cm) tall after Rnd 23
- Panel: 5.25 in (13.3 cm) wide and 4 in (10.2 cm) tall at Row 18; 10 in (25.4 cm) at Row 45; 20 in (50.8 cm) at Row 90
If your pieces are too large, go down 0.5 mm. If they are too small, go up 0.5 mm. Row gauge matters most here, because the pocket rounds are sewn row-for-row onto the panel.
Panel
Color: cream. Work in rows.
Row 1: Ch 22, sc in 2nd ch from hook and in each ch across. (21 sc)
Rows 2–90: Ch 1, turn, sc in each st across. (21 sc)
Check: The piece measures 5.25 in x 20 in (13.3 cm x 50.8 cm).
Taper
Row 91 (decrease): Ch 1, turn, sc2tog, sc 17, sc2tog. (19 sc)
Row 92: Ch 1, turn, sc in each st across. (19 sc)
Rows 93–108: Repeat Rows 91–92 eight more times, working 2 fewer sc between the sc2tog each time.
The decrease rows give 17, 15, 13, 11, 9, 7, 5, and 3 sc. Row 108 has 3 sc. Fasten off.
Check: The taper is 4 in (10.2 cm) tall. The full panel measures 5.25 in x 24 in (13.3 cm x 61.0 cm).
Pocket (Make 3)
Base (teal, worked in rows)
Row 1: Ch 22, sc in 2nd ch from hook and in each ch across. (21 sc)
Rows 2–10: Ch 1, turn, sc across. (21 sc)
Walls (worked in joined rounds)
Rnd 1 (teal): Ch 1, then work around the base:
– 21 sc across Row 10 (the back, sts 1–21)
– 9 sc down the 10 row-ends, skipping the 5th row-end (the side, sts 22–30)
– 21 sc along the foundation chain (the front, sts 31–51)
– 9 sc up the other row-ends, skipping the 5th row-end again (the side, sts 52–60)
Join with a sl st to the first sc. (60 sc)
Work 1 sc into each of the 3 corners only once. The next round turns the walls upward.
Rnd 2 (teal): Ch 1, sc BLO in each st, join. (60 sc)
Rnds 3–5 (teal): Ch 1, sc in each st, join. (60 sc)
Rnds 6–21 (cream): Ch 1, sc in each st, join. (60 sc)
Rnd 22 (light aqua): Ch 1, sc in each st, join. (60 sc)
Rnd 23 (light aqua): Ch 1, rev sc in each st, join. (60 rev sc) Fasten off.
The front center is st 41. The lattice covers sts 22–60, so it wraps around both sides and stops at the back corners.
Diamond Lattice
Use teal and surface slip stitch. Place markers in Rnd 6 at sts 23, 29, 35, 41, 47, 53, and 59. These 7 points sit 6 sts apart and mirror each other around st 41.
From each marker, work two lines:
– One line rises 1 round and moves 1 st toward higher stitch numbers with each step.
– The other line rises 1 round and moves 1 st toward lower stitch numbers.
Each line ends at Rnd 21, or earlier where it reaches st 22 or st 60. That makes 14 lines in total.
Neighboring lines cross 3 rounds above their start points. For example, the lines from sts 35 and 41 meet at st 38 in Rnd 9. This forms diamonds about 1.5 in (3.8 cm) wide by 1.3 in (3.3 cm) tall.
Pineapple
Oval outline (make 3, teal)
Ch 34 and sl st to the first ch to form a ring.
Rnd 1: Ch 1, sc in each ch, join. (34 sc) Fasten off, leaving a 12 in (30.5 cm) tail.
The outline measures about 8.5 in (21.6 cm) around.
Leaf crown (make 3, teal)
- Outer leaf: Ch 5. Sl st in 2nd ch from hook, sc, sc, sl st in the base ch.
- Middle leaf: Ch 6. Sl st in 2nd ch, sc, hdc, sc, sl st in the base ch.
- Center leaf: Ch 7. Sl st in 2nd ch, sc, hdc, hdc, sc, sl st in the base ch.
- Work another middle leaf, then another outer leaf.
Fasten off with a long tail. The leaves measure 0.8 in (2.0 cm), 1 in (2.5 cm), and 1.2 in (3.0 cm) long.
Placement
- Mark the oval on the pocket front. It is 3 in (7.6 cm) wide, spans sts 35–47, and sits in Rnds 6–16. That is about 2.4 in (6.1 cm) tall, with the bottom point at st 41.
- Inside the marked oval only, add surface sl st lines halfway between the existing parallel lines, 3 sts from each, in both directions. This gives the finer crosshatch.
- Whipstitch the outline over the marked oval.
- Fan the crown above the oval at st 41, Rnd 16. The center leaf should reach Rnd 21. Sew it along the base and the center of each leaf.
Make All Pieces
| Piece | Quantity | Color |
|---|---|---|
| Panel | 1 | Cream |
| Pockets | 3 | Teal, cream, and light aqua |
| Oval outlines | 3 | Teal |
| Leaf crowns | 3 | Teal |
| Tab | 1 | Light aqua |
Tab: Ch 4, sc in 2nd ch from hook and in each ch across. (3 sc) Work 15 more rows of 3 sc, for 16 rows. The tab is 0.75 in x 3.6 in (1.9 cm x 9.1 cm).
Layout (front view, top to bottom):
      [ ring ]
      [ tab  ]
     /  taper \
    | Rows 82-90 |
    | POCKET 3   |  Rows 59-81
    | gap        |  Rows 54-58
    | POCKET 2   |  Rows 31-53
    | gap        |  Rows 26-30
    | POCKET 1   |  Rows 3-25
    | Rows 1-2   |
Joining
Use whipstitch with matching yarn: teal for the lower edge, cream for the sides, and aqua for the rim. Sew through both loops of each pocket stitch and one strand of the panel.
Bottom edge: Sew back sts 1–21 of the pocket’s Rnd 1 to panel sts 1–21 of the starting row, 1 st to 1 st.
Sides: The two back corners rise along panel columns 1 and 21. Sew 1 pocket round to 1 panel row, for 23 rounds over 23 rows. Because the pocket and panel share the same row gauge, the seam lies flat.
Rim: Tack each of the 21 back sts of Rnd 23 to the panel.
Place the pockets so their bases start on Rows 3, 31, and 59. That leaves 5-row gaps of 1.1 in (2.8 cm).
Tension: Snug each stitch without pulling. If the panel puckers, your stitches are too tight.
Checkpoint: The panel should still measure 5.25 in x 24 in (13.3 cm x 61.0 cm), with each pocket 4.9 in (12.4 cm) tall.
Border
Border gauge: 4 sc per inch. Along row-ends, work 8 sc over every 9 rows (90 rows ÷ 9 = 10 groups, and 10 × 8 = 80).
Rnd 1 (light aqua): Join at the bottom right corner and work counterclockwise:
– Bottom: 3 sc in the first st, sc 19, 3 sc in the last st. (25 sc)
– Left side: 80 sc over Rows 1–90.
– Left taper: 1 sc in each row-end of Rows 91–108. (18 sc)
– Tip: 3 sc in the first st, sc 1, 3 sc in the last st. (7 sc)
– Right taper: 18 sc.
– Right side: 80 sc.
Join with a sl st. (228 sc)
Rnd 2 (light aqua): Ch 1, rev sc in each st, join. (228 rev sc) Fasten off.
Why the math works:
– The sides are 20 in (50.8 cm), and 20 × 4 = 80 sc.
– Each taper edge is a diagonal about 4.6 in (11.7 cm) long, so 18 sc fits.
– The corner groups of 3 sc keep the corners flat.
– Two border rounds add 0.25 in (0.6 cm) on each edge. That turns 5.25 in x 24 in (13.3 cm x 61.0 cm) into 5.75 in x 24.5 in (14.6 cm x 62.2 cm).
Hanging tab: Wrap the tab around the ring. Sew one end to the front of the tip and the other end to the back, overlapping the panel by 0.5 in (1.3 cm).
Final Blocking
- Mist the whole holder until it is evenly damp.
- Pin the panel flat at 5.75 in x 24.5 in (14.6 cm x 62.2 cm), with the taper straight and centered.
- Stuff each pocket lightly with a rolled towel so the wall dries at 4.9 in (12.4 cm) tall.
- Shape the pineapple ovals and fan out the leaves with your fingers.
- Leave it to dry completely before hanging it.
Final Quality-Control Checklist
- The panel has 21 sts, tapers to 3 sts, and measures 24 in (61.0 cm) before the border.
- Every pocket round has 60 sts, with the front center at st 41.
- The lattice has 14 lines from 7 start points, and the diamonds match on both sides.
- Each pineapple oval is centered, with the finer crosshatch inside.
- The pockets start on Rows 3, 31, and 59.
- Border Rnd 1 and Rnd 2 each have 228 sts.
- The ring hangs straight.
Troubleshooting
- The pocket walls flare outward: Work Rnd 2 in BLO only and tighten your tension.
- The lattice lines look tight: Pull each surface sl st loop up to the height of one stitch.
- The border ruffles: Check that you skipped every 9th row-end along the sides.
- The border cups: Add 1 sc on each taper edge.
- The panel is too long: Your row gauge is loose. Remove rows from the gaps above Row 82, not from inside the pocket placement areas.
- The pockets sag: Re-tack the back rim more firmly.
Care
Hand wash in cool water and lay flat to dry, reshaping the pockets while they are damp. Do not tumble dry.
Final Notes
The size of this holder depends on four measurements:
– Gauge of 4 sts and 4.5 rows per inch
– Pockets 5.25 in (13.3 cm) wide and 4.9 in (12.4 cm) tall
– Panel 5.25 in x 24 in (13.3 cm x 61.0 cm) before the border
– Border of 0.25 in (0.6 cm), for a finished panel of 5.75 in x 24.5 in (14.6 cm x 62.2 cm)
Check each one as you go, and the pockets will line up row for row.
Happy crocheting!