

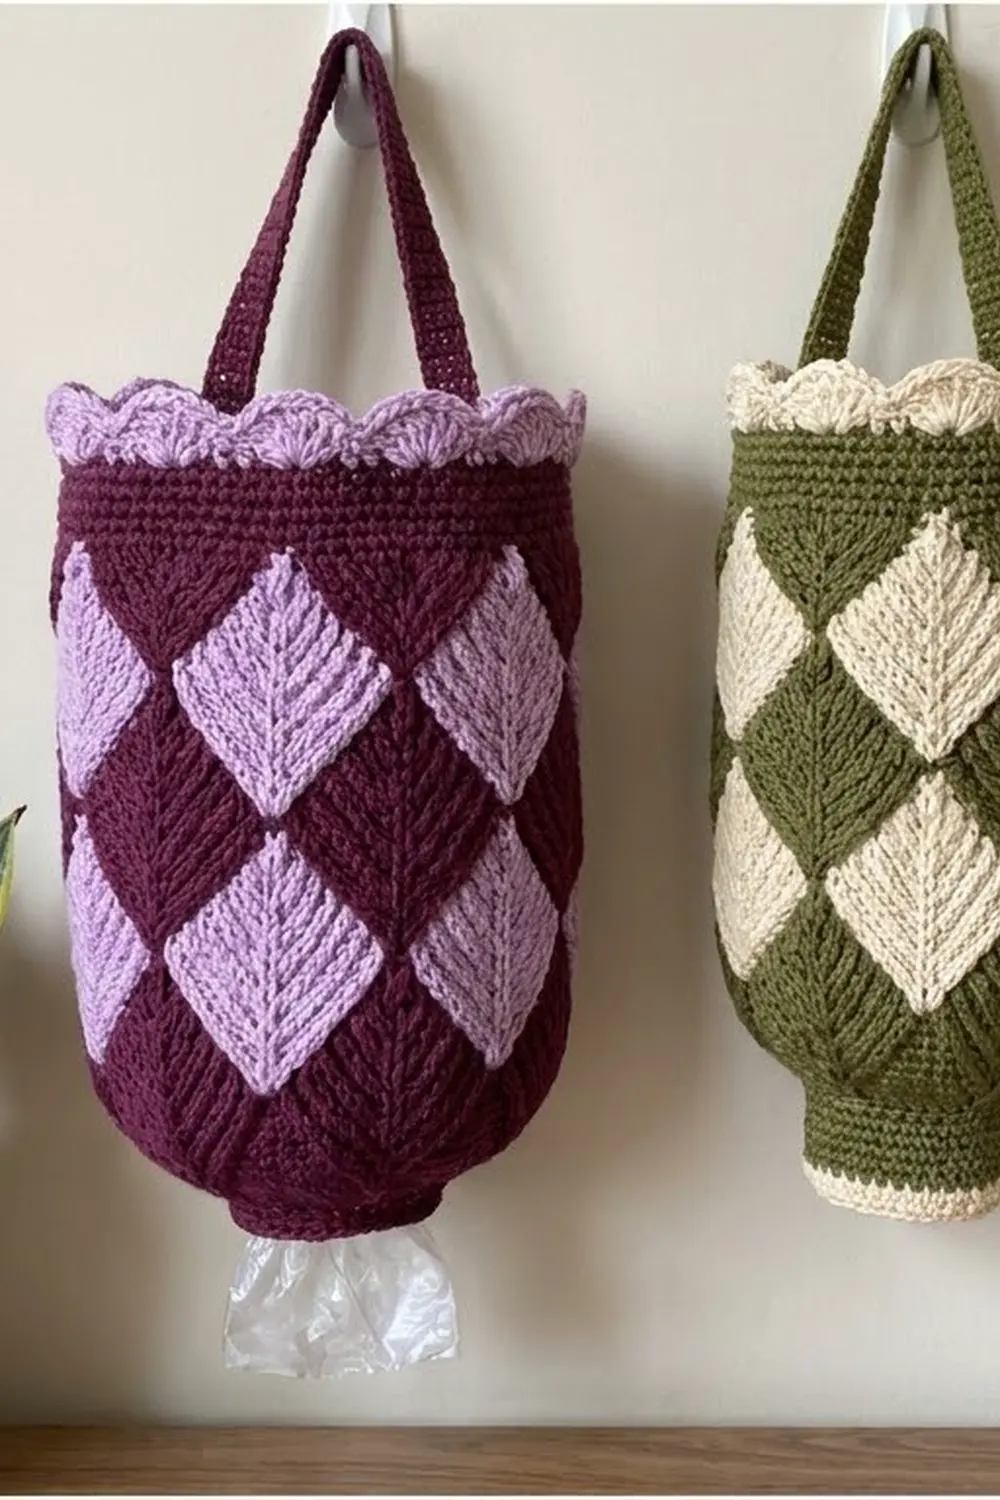
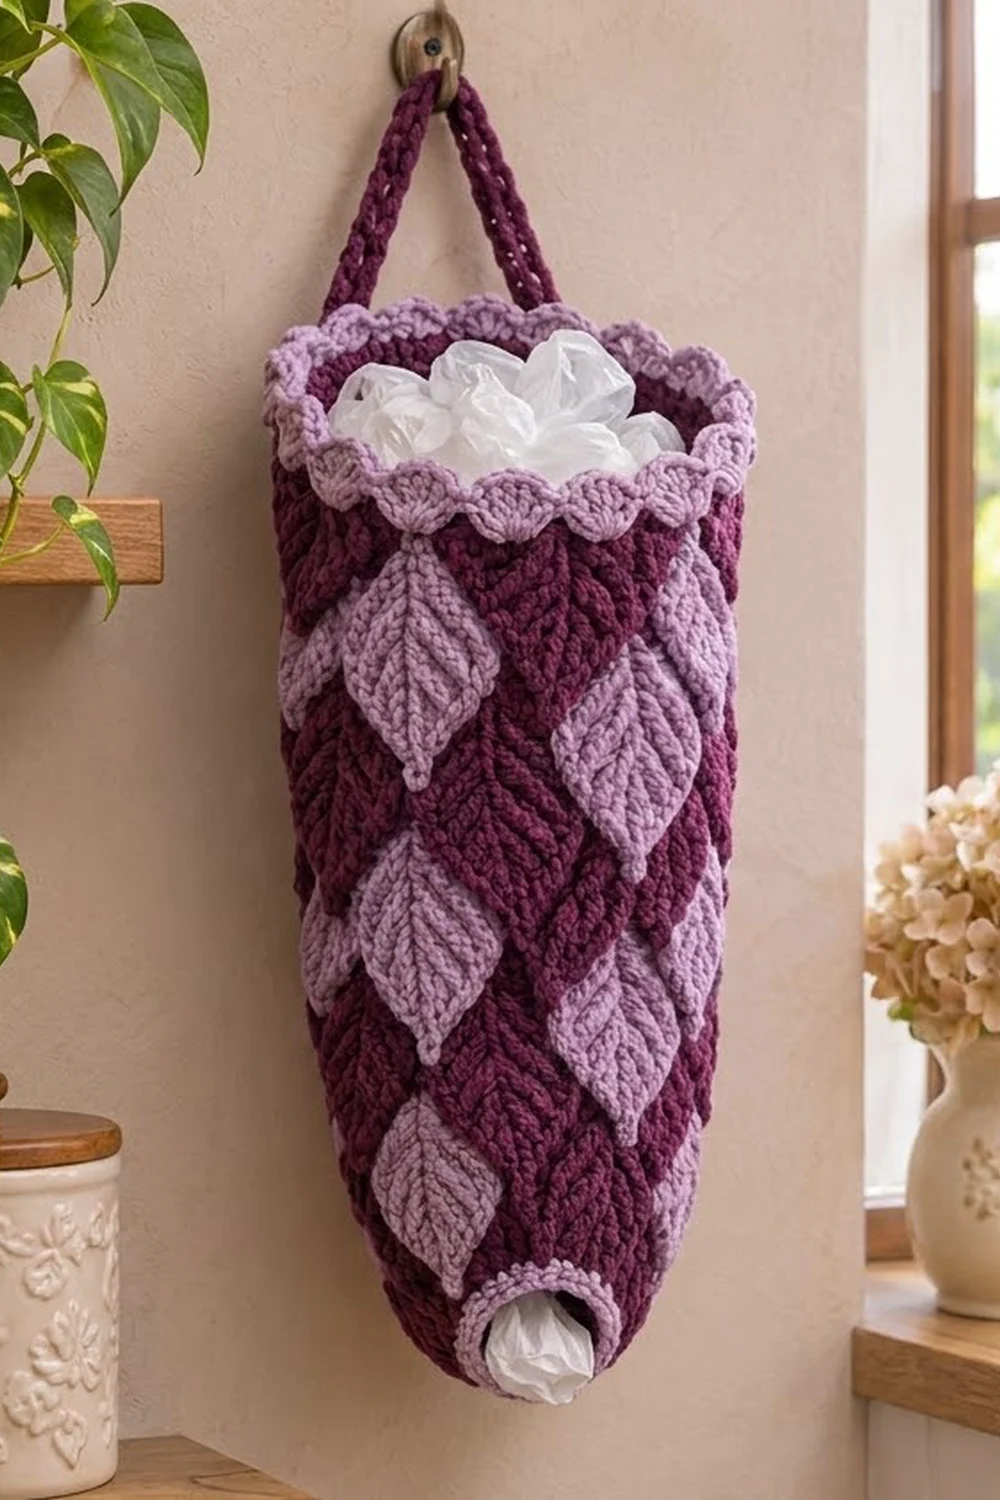
This holder turns a plain kitchen job into something you’ll want to leave on show. It’s one tapered tube covered in a lattice of pointed leaves. Lilac leaves and deep plum leaves alternate diagonally and fit together tip to tip, and the leaves get smaller as the tube narrows toward the bottom.
The leaves are worked in waistcoat stitch, a single crochet variation that looks like knitted V’s. It gives each leaf a fine ribbed texture and makes a dense fabric that holds its cone shape. A lilac shell-scallop rim finishes the top, a rolled lilac edge circles the bottom opening, and a plum strap hangs the holder from a hook.
The pattern uses US crochet terms. The finished holder measures 7.5 in (19.1 cm) wide at the top when flat, 2.25 in (5.7 cm) wide at the bottom opening, and 18.75 in (47.6 cm) tall, not counting the strap.
You work bottom up in a continuous spiral. Start with the lilac cuff, shape a short plum base, and then work three tapestry leaf zones. Each zone adds stitches so the leaves grow wider. Finish with the scalloped rim, the bottom edging and the strap.
Finished Size and Construction
- Finished size: 7.5 in (19.1 cm) flat width at top, 18.75 in (47.6 cm) tall
- Skill level: Intermediate (tapestry colorwork)
- Terminology: US
- Yarn weight: Worsted (#4)
- Hook: 5.0 mm (H-8)
- Number of pieces: 1 body plus 1 strap, sewn on
- Layout: Single tapered tube, worked in the round
- Top circumference: 15 in (38.1 cm), 60 sts
- Bottom opening circumference: 4.5 in (11.4 cm), 18 sts
- Size before border: 18 in (45.7 cm) tall after Rnd 72
- Border depth: about 0.75 in (1.9 cm) of lilac at the top
Materials
Use a smooth worsted yarn with good stitch definition. Acrylic or a cotton-acrylic blend works well because it’s washable and keeps its shape. Avoid fuzzy yarns, which blur the leaf edges.
- Color P (deep plum): 150 g, about 275 m (300 yd)
- Color L (lilac): 100 g, about 185 m (200 yd)
Both quantities include a margin of roughly 20 percent for your gauge swatch and the carried strands.
Tools:
– 5.0 mm (H-8) crochet hook
– Locking stitch marker
– Tapestry needle
– Scissors
– Measuring tape
– Blocking pins and a rolled towel or a tall bottle for shaping
Abbreviations (US Terms)
- ch: chain
- sc: single crochet
- dc: double crochet
- sl st: slip stitch
- st(s): stitch(es)
- sk: skip
- rnd(s): round(s)
- rev sc: reverse single crochet (crab stitch)
- P / L: plum / lilac
Waistcoat stitch (wst): Insert your hook through the center of the stitch below, between the two vertical legs of its V and under the top loops. Yarn over and pull up a loop, then yarn over and pull through both loops. Each new stitch stacks straight on top of the one below, which keeps the leaf columns vertical.
wst inc: Work 2 wst in the same stitch.
Tapestry color change: Work the last stitch of one color until 2 loops remain on the hook. Finish it with the new color. Carry the unused color along the top of the round below and work over it, keeping it slightly loose.
Gauge and Checkpoints
Gauge: 16 wst and 16 rnds = 4 in (10.2 cm) in the round, which is 4 sts and 4 rnds per inch.
Treat the bottom of the holder as your test piece. After Rnd 20 you’ll have the cuff, the base and the first leaf zone, which is enough to check gauge before you commit to the rest. Measure at each stage:
- After Rnd 8: circumference 9 in (22.9 cm), height 2 in (5.1 cm)
- After Rnd 20: circumference 9 in (22.9 cm), height 5 in (12.7 cm)
- After Rnd 38: circumference 12 in (30.5 cm), height 9.5 in (24.1 cm)
- After Rnd 70: circumference 15 in (38.1 cm), height 17.5 in (44.5 cm)
- After Rnd 72: height 18 in (45.7 cm)
If your piece is too big, go down 0.5 mm in hook size. If it’s too small, go up 0.5 mm. Waistcoat stitch tightens up when the strands are carried, so measure with both colors in use, not on plain plum rounds.
Pattern
Work in a continuous spiral and don’t join rounds. Place the marker in the first stitch of each round and move it up as you go. The small color jog this creates falls at the back of the holder, under the strap.
Bottom Cuff (Color L)
Foundation: With L, ch 18 and join with a sl st to the first ch to form a ring. Don’t twist it.
Rnd 1: Ch 1, sc in each ch around. (18 sts)
Rnd 2: Sc in each st around. (18 sts)
Base (Color P)
Change to P on the last stitch of Rnd 2. Cut L, leaving a 6 in (15.2 cm) tail.
Rnd 3: Wst in each st around. (18 sts)
Rnd 4: [Wst in next 2 sts, wst inc] 6 times. (24 sts)
Rnd 5: Wst in each st around. (24 sts)
Rnd 6: [Wst in next 3 sts, wst inc] 6 times. (30 sts)
Rnd 7: [Wst in next 4 sts, wst inc] 6 times. (36 sts)
Rnd 8: Wst in each st around. (36 sts)
Checkpoint: the circumference should be 9 in (22.9 cm) and the height 2 in (5.1 cm).
How the Leaf Chart Works
From here on, each round is split into 6 equal repeats. In every repeat, the lilac leaf sits in the center and the plum leaf sits across the edges where repeats meet. Each lilac section widens by 2 stitches per round, holds, then narrows by 2. The plum sections do the opposite, so the two leaf shapes always fill the round exactly with no background gaps.
Each round’s leaf repeat is worked 6 times. Join L at the start of Rnd 9 and carry both colors from now on.
Zone 1: Small Leaves (6 sts per repeat)
Rnd 9: [2P, 2L, 2P] 6 times. (36 sts)
Rnd 10: [1P, 4L, 1P] 6 times. (36 sts)
Rnd 11: [1P, 4L, 1P] 6 times. (36 sts)
Rnd 12: [2P, 2L, 2P] 6 times. (36 sts)
Rnds 13–20: Repeat Rnds 9–12 twice. (36 sts)
That completes 3 lilac leaves in each column. Checkpoint: the height should be 5 in (12.7 cm).
Zone 2: Medium Leaves (8 sts per repeat)
Rnd 21 (increase round): [In the first st work 2P (inc), 1P, 2L, 1P, in the last st work 2P (inc)] 6 times. Each repeat turns 6 sts into 8 and reads 3P, 2L, 3P. (48 sts)
Rnd 22: [2P, 4L, 2P] 6 times. (48 sts)
Rnd 23: [1P, 6L, 1P] 6 times. (48 sts)
Rnd 24: [1P, 6L, 1P] 6 times. (48 sts)
Rnd 25: [2P, 4L, 2P] 6 times. (48 sts)
Rnd 26: [3P, 2L, 3P] 6 times. (48 sts)
Rnd 27: [3P, 2L, 3P] 6 times. (48 sts)
Rnds 28–32: Repeat Rnds 22–26. (48 sts)
Rnds 33–38: Repeat Rnds 27 and 22–26. (48 sts)
That’s 18 rounds in Zone 2, or 3 leaf periods of 6 rounds. Checkpoint: the circumference should be 12 in (30.5 cm) and the height 9.5 in (24.1 cm).
Zone 3: Large Leaves (10 sts per repeat)
Rnd 39 (increase round): [In the first st work 2P (inc), 2P, 2L, 2P, in the last st work 2P (inc)] 6 times. Each repeat turns 8 sts into 10 and reads 4P, 2L, 4P. (60 sts)
Rnd 40: [3P, 4L, 3P] 6 times. (60 sts)
Rnd 41: [2P, 6L, 2P] 6 times. (60 sts)
Rnd 42: [1P, 8L, 1P] 6 times. (60 sts)
Rnd 43: [1P, 8L, 1P] 6 times. (60 sts)
Rnd 44: [2P, 6L, 2P] 6 times. (60 sts)
Rnd 45: [3P, 4L, 3P] 6 times. (60 sts)
Rnd 46: [4P, 2L, 4P] 6 times. (60 sts)
Rnds 47–70: Repeat Rnds 39–46 three more times. On these repeats, work Rnd 39 as [4P, 2L, 4P] with no increases. (60 sts)
That’s 32 rounds in Zone 3, or 4 periods of 8 rounds. Checkpoint: the circumference should be 15 in (38.1 cm) and the height 17.5 in (44.5 cm).
Top Band (Color P)
Cut L at the end of Rnd 70, leaving a 6 in (15.2 cm) tail.
Rnds 71–72: With P, wst in each st around. (60 sts)
At the end of Rnd 72, sl st into the next st to smooth the step in the spiral. Checkpoint: the height should be 18 in (45.7 cm).
Border
The holder is round, so the border has no corners or sides. Its counts are based on the full round instead. Border gauge is the body gauge, 4 sts per inch (2.54 cm), so 60 sts equal the 15 in (38.1 cm) top.
Rnd 73: Join L. Ch 1, sc in each st around and join with a sl st to the first sc. (60 sts)
This round is worked 1 st into each existing st, so it’s 60 + 0 added = 60.
Rnd 74 (scallops): Ch 1, sc in the first st. Sk 2 sts, 5 dc in the next st, sk 2 sts, sc in the next st. Repeat from * to * 8 more times. Then sk 2 sts, 5 dc in the next st, sk 2 sts, and join with a sl st to the first sc. (10 scallops, 10 sc)
Why the math works: each scallop uses exactly 6 stitches: 1 sc, 2 skipped, 1 shell base and 2 skipped. 60 ÷ 6 = 10 scallops with nothing left over, so the last shell meets the first sc evenly. Fasten off.
Bottom edge: Turn the holder upside down. Join L in any foundation chain loop on the bottom ring. Ch 1, then work rev sc into each foundation loop around (18 sts). Join and fasten off. This makes the rolled lilac rim around the bag opening.
Strap: With P, ch 4.
– Row 1: Sc in the 2nd ch from the hook and in the next 2 ch. (3 sts)
– Row 2: Ch 1, turn, sc in each st across. (3 sts)
Repeat Row 2 until the strap measures 9 in (22.9 cm). Fasten off, leaving a 12 in (30.5 cm) tail.
Find the color jog at the back. Sew one end of the strap to the inside of Rnds 71–72 at the jog. Sew the other end 8 sts (2 in, 5.1 cm) to the left of the first, at the same height. Stitch through both layers several times, because this point carries the full weight of the holder.
Final Blocking
- Weave in all ends inside the tube, keeping them within same-colored areas.
- Spritz the holder evenly with water until it’s damp but not wet.
- Slide a rolled towel or a tall bottle inside to round out the cone.
- Gently straighten the leaf columns so each lilac column runs vertically.
- Pin the scallops so they open evenly around the rim.
- Shape the bottom cuff into a neat circle.
- Let it dry completely, then check the final height of 18.75 in (47.6 cm).
Final Quality-Control Checklist
- 6 lilac leaf columns and 6 plum leaf columns, evenly spaced
- Leaves meet tip to tip with no plum gaps or stray stitches
- Round counts of 18, 36, 48 and 60 stitches confirmed
- Carried strands don’t show through on the front
- 10 even scallops around the top
- Bottom opening 2.25 in (5.7 cm) wide when flat
- Strap ends secure and the holder hangs straight
Troubleshooting
- Leaves slant sideways: you’re working into the top loops instead of through the center of the V. Go back to true waistcoat stitch.
- Carried yarn shows on the front: tension the carried strand more loosely, and keep it at the very top of the stitches you’re working into.
- Fabric puckers: the carried strand is too tight. Stretch the work flat every few stitches.
- Leaves don’t line up: recount each repeat. Every round of a zone has to total 6, 8 or 10 sts per repeat.
- Scallops don’t fit: confirm you have exactly 60 sts on Rnd 73.
- Bottom opening too tight: loosen your rev sc or skip it and just weave the cuff ends in.
Care
Hand wash in cool water and lay flat to dry, reshaping it over a towel roll. Don’t tumble dry, since heat can relax the cone shape.
Final Notes
The measurement chain is simple to track. The gauge is 4 sts and 4 rnds per inch. Each zone adds stitches and widens the tube: the 18-st cuff (4.5 in, 11.4 cm) grows to 36 sts (9 in, 22.9 cm), then 48 sts (12 in, 30.5 cm) and finally 60 sts (15 in, 38.1 cm). Over 72 rounds the height reaches 18 in (45.7 cm). The scallop rim adds 0.75 in (1.9 cm), for a finished height of 18.75 in (47.6 cm).
Check your measurements at each checkpoint and the holder will come out the right shape.
Happy crocheting!