

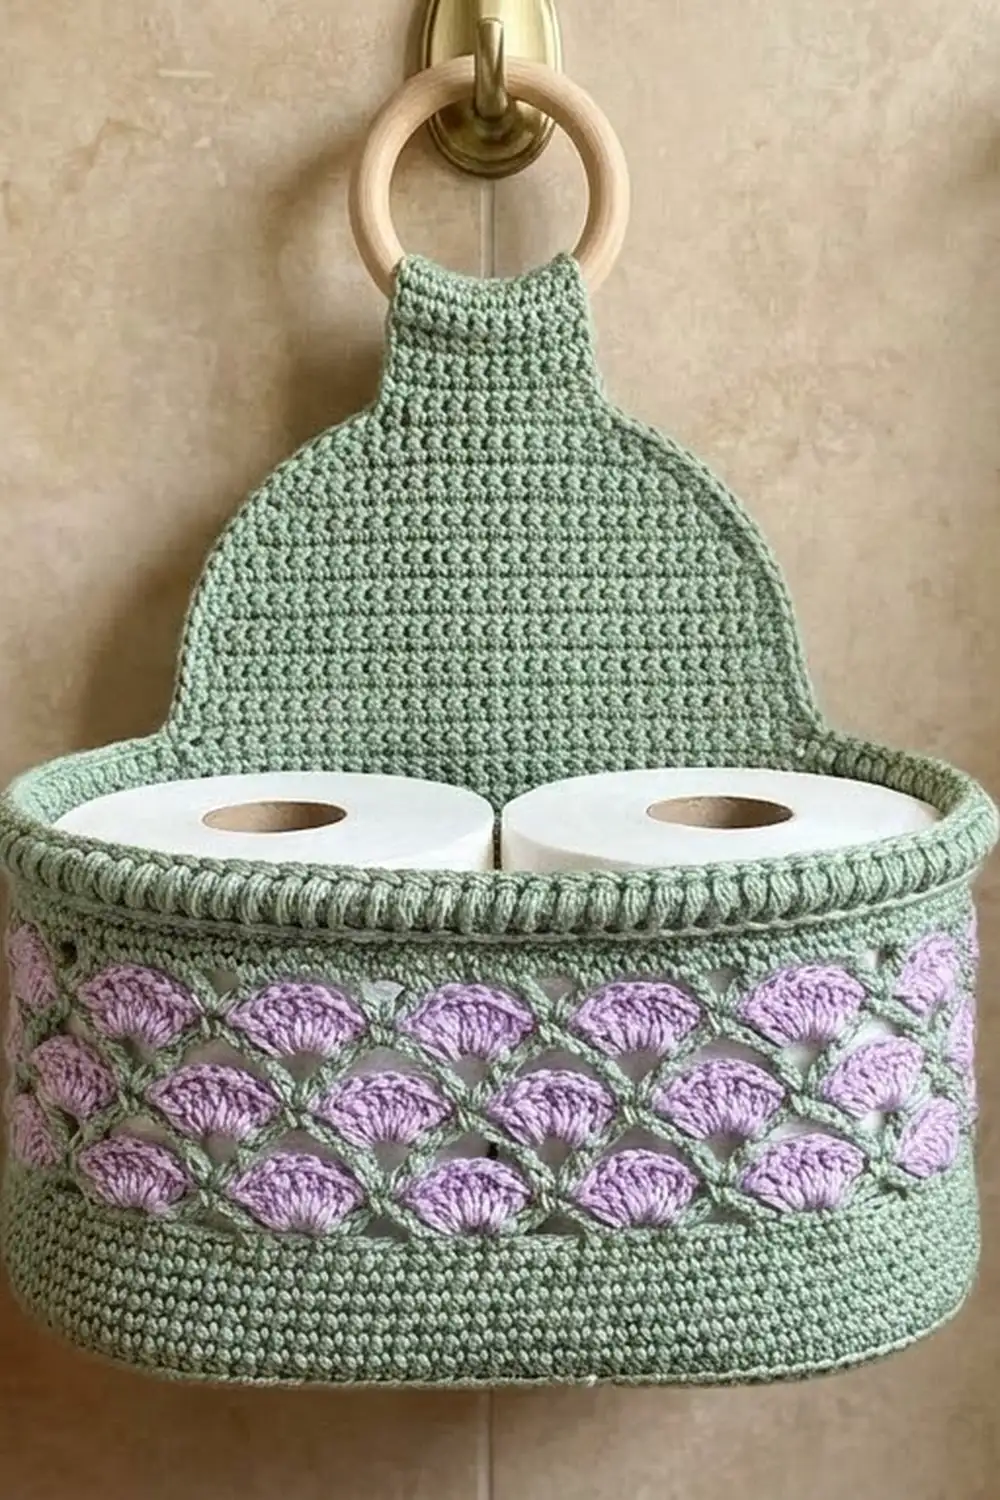
This hanging basket holds two spare toilet paper rolls and hangs from a simple wooden ring. It is useful and still looks soft and pretty. A dense sage-green base and rim give it structure. A lattice band with lilac fans gives it a light, garden-like look.
The green does most of the work, and the lilac appears only in the fan rounds. The rest of the basket is plain enough to suit almost any bathroom. A corded rim and a smooth back panel finish it off.
This pattern uses US crochet terms. The finished basket is 10.25 in (26.0 cm) wide, 4.75 in (12.1 cm) deep and 5.25 in (13.3 cm) tall at the wall. The overall height to the top of the folded strap is 10.8 in (27.4 cm), not counting the ring.
Construction is simple. You crochet an oval base in rounds and turn up the wall with a back-loop round. Then you work a solid band, the lattice band and a solid rim, all in the round. Next, you work the back panel in rows from the rim’s back stitches, shaping it into a bell with a strap on top. Finally, you add an edging round, fold the strap around the ring and sew it down.
Finished Size and Construction
- Finished size: 10.25 in (26.0 cm) wide × 4.75 in (12.1 cm) deep × 5.25 in (13.3 cm) wall height
- Overall height: 10.8 in (27.4 cm) with border, excluding ring
- Skill level: Intermediate
- Terminology: US
- Yarn weight: Worsted (#4), cotton or cotton blend
- Hook: 5.0 mm (H-8)
- Number of pieces: 1 (basket and back panel worked as one piece)
- Layout: Oval basket with a back panel and hanging strap rising from the back rim
- Piece size: Base 10.25 in × 4.75 in (26.0 cm × 12.1 cm); panel 10 in (25.4 cm) wide at the rim
- Size before border: 10.4 in (26.4 cm) overall height
- Border depth: 0.4 in (1.0 cm)
Materials
Use a worsted cotton or a cotton-acrylic blend. Cotton holds its shape well, stays firm under the weight of the rolls and copes with bathroom humidity. Avoid very drapey or fuzzy yarns, because the lattice loses its definition.
- Color A, sage green: 130 g (about 220 m)
- Color B, lilac: 35 g (about 60 m)
These quantities include a safety margin of about 15%.
Tools:
– 5.0 mm (H-8) crochet hook
– 1 wooden ring, 2 in (5.1 cm) outer diameter
– Tapestry needle
– 4 locking stitch markers
– Scissors and a tape measure
– Spray bottle and rustproof pins for blocking
Abbreviations (US Terms)
- ch – chain
- sl st – slip stitch
- sc – single crochet
- dc – double crochet
- sc2tog – single crochet 2 together
- BLO – back loop only
- rev sc – reverse single crochet (crab stitch)
- st(s) – stitch(es)
- sp – space
- rnd – round
Fan: 5 dc in the same stitch or space. When a round starts with a fan, the beginning ch 3 counts as the first dc.
Rev sc: Work single crochet from left to right (right to left if you crochet left-handed). Insert the hook in the next stitch to the right, yarn over, pull up a loop, then yarn over and pull through both loops. This creates a corded edge.
Gauge and Checkpoints
Gauge: 16 sc × 18 rnds = 4 in (10.2 cm) in sc worked in the round.
The base is your gauge test, so check it before you go on to the wall.
- After Rnd 5: The base measures about 7.8 in × 2.4 in (19.8 cm × 6.1 cm).
- After Rnd 10: The base measures 10.25 in × 4.75 in (26.0 cm × 12.1 cm) and has 104 sts. Its edge measures 26 in (66.0 cm).
- After the wall: The wall stands 5.25 in (13.3 cm) tall.
- After the panel (Row 20): The panel rises 4.4 in (11.2 cm) above the rim.
If your base is too big, go down half a hook size. If it is too small, go up half a size. Two rolls should fit side by side with about 0.4 in (1.0 cm) to spare. Don’t add stitches to fix the size, because the lattice needs a stitch count that is a multiple of 8.
Basket Base
With Color A, ch 24.
Rnd 1: Sc in 2nd ch from hook, sc in next 21 ch, 3 sc in last ch. Turn the chain and work along the other side of it: sc in next 21 ch, 2 sc in last ch (this is the same ch as the first sc). Join with sl st to first sc. (50 sts)
The base now has two straight sides of 22 sts each, with 3 sts at each end. 22 sc = 5.5 in (14.0 cm). From here on, add stitches only at the two curved ends. Place a marker at each end to help you keep track.
Rnd 2: Ch 1, sc in each st, working 2 sc in each of the 3 sts at each end. Join. (56 sts)
Rnd 3: Ch 1, sc in each st. At each end, work (sc, 2 sc in next) 3 times. Join. (62 sts)
Rnd 4: Same as Rnd 3, but at each end work (sc in next 2, 2 sc in next) 3 times. Join. (68 sts)
Rnds 5–10: Keep adding 3 sts at each end of every round, with one more sc between the increases each round. Shift the increases a little so the curves stay round and don’t form points. Every round adds exactly 6 sts.
- Rnd 5: 74 sts
- Rnd 6: 80 sts
- Rnd 7: 86 sts
- Rnd 8: 92 sts
- Rnd 9: 98 sts
- Rnd 10: 104 sts
Lay the base flat and check it against the measurements in the checkpoints.
Basket Wall
Rnd 11 (turning round): Ch 1, sc in BLO of each st around. Join. (104 sts) This round creates the crisp edge where the base meets the wall.
Rnds 12–15: Ch 1, sc in each st around. Join. (104 sts)
The solid bottom band is now about 1.1 in (2.8 cm) tall.
Lattice Band
From here on, join a new color at the start of every lattice round and fasten off at the end, until Rnd P5.
Rnd P1 (Color A): Ch 1, sc in first st, ch 5, skip 3 sts, sc in next st; repeat from * 24 more times, ch 5, skip 3 sts, sl st to first sc. Fasten off. (26 sc, 26 ch-5 loops)*
Check the math: 26 repeats × (1 sc + 3 skipped sts) = 104.
Rnd P2 (Color B): Join B with a sl st in any ch-5 loop. Ch 3, then 4 dc in the same loop (first fan). Sc in next loop, fan in next loop; repeat from * 11 more times, sc in next loop, sl st to top of ch-3. Fasten off. (13 fans, 13 sc)*
Rnd P3 (Color A): Join A with a sc in the 3rd dc of any fan. Ch 5, sc in next sc, ch 5, sc in 3rd dc of next fan; repeat from * around, ending with ch 5, sl st to first sc instead of the last sc. Fasten off. (26 sc, 26 ch-5 loops)*
The green chains now outline the top half of each lilac fan and form the diamond lattice.
Rnd P4 (Color B, offset fans): Join B with a sl st in any sc that sits above a Rnd P2 sc. Ch 3, then 4 dc in the same sc (first fan). Ch 2, sc in next sc (above a fan center), ch 2, fan in next sc; repeat from * 11 more times, ch 2, sc in next sc, ch 2, sl st to top of ch-3. Fasten off. (13 fans, 13 sc, 26 ch-2 sps)*
You work these fans into the green sc rather than into the loops. That way each fan sits exactly half a repeat over from the first row, which creates the staggered diamonds.
Rnd P5 (Color A): Join A with a sc in the 3rd dc of any fan. Ch 5, sc in next sc, ch 5, sc in 3rd dc of next fan; repeat from * around, ending with ch 5, sl st to first sc. Do not fasten off. (26 sc, 26 ch-5 loops)*
The lattice band now measures about 3.25 in (8.3 cm).
Top Rim
Rnd P6 (conversion round): Ch 1, sc in same sc, 3 sc in next loop, sc in next sc, 3 sc in next loop; repeat from * around. Join. (26 sc worked 1 per existing sc + 78 sc worked into the loops = 104 sts)*
Rnds R1–R3: Ch 1, sc in each st around. Join. (104 sts) Do not fasten off yet.
The top rim, including Rnd P6, is about 0.9 in (2.3 cm) tall. The total wall height is 1.1 + 3.25 + 0.9 = 5.25 in (13.3 cm).
Fasten off. Flatten the basket and find the center of one long side; this is now the back. Count 20 sts to each side of the center and mark the first and last of these 40 sts.
Back Panel and Strap
You work the panel in rows across the 40 marked sts. The inside of the basket faces you for Row 1. The ch 1 at the start of each row does not count as a stitch.
Row 1: Join A in the first marked st. Ch 1, sc in the same st and in the next 39 sts. Turn. (40 sts)
Rows 2–4: Ch 1, sc across. Turn. (40 sts)
Rows 5–8 (shoulders): Ch 1, sc2tog twice, sc to the last 4 sts, sc2tog twice. Turn.
– Row 5: 36 sts
– Row 6: 32 sts
– Row 7: 28 sts
– Row 8: 24 sts
Rows 9–14 (curve): Ch 1, sc2tog, sc to the last 2 sts, sc2tog. Turn.
– Row 9: 22 sts
– Row 10: 20 sts
– Row 11: 18 sts
– Row 12: 16 sts
– Row 13: 14 sts
– Row 14: 12 sts
Rows 15–20 (neck): In odd-numbered rows, ch 1 and sc across. In even-numbered rows, ch 1, sc2tog, sc to the last 2 sts, sc2tog.
– Rows 15–16: 12 sts, then 10 sts
– Rows 17–18: 10 sts, then 8 sts
– Rows 19–20: 8 sts, then 6 sts
The panel now rises 4.4 in (11.2 cm) above the rim.
Rows 21–34 (strap): Ch 1, sc across. Turn. (6 sts)
The strap is 1.5 in (3.8 cm) wide and 3.1 in (7.9 cm) long. Do not fasten off; go straight on to the border.
The overall height before the border is 10.4 in (26.4 cm), with the strap folded.
Border
Border gauge: Same as the main gauge, 4 sc per in (2.5 cm). Work 1 sc in each stitch along the rim and 1 sc in each row end along the panel.
Border Rnd 1 (Color A): Ch 1, then turn the piece so you can work down the side of the strap and panel.
- Down the side of the strap (row ends of Rows 34–21): 14 sc
- Down the side of the panel (row ends of Rows 20–1): 20 sc
- Along the front rim, 1 sc in each unworked Rnd R3 st: 64 sc
- Up the other side of the panel (Rows 1–20): 20 sc
- Up the other side of the strap (Rows 21–34): 14 sc
- Across the end of the strap: 3 sc in first st, sc in next 4 sts, 3 sc in last st: 10 sc (this count includes both corner stitches)
Join with sl st to the first sc. Total: 14 + 20 + 64 + 20 + 14 + 10 = 142 sts
Border Rnd 2: Ch 1, rev sc in each st around. Join. (142 sts) Fasten off and leave a 12 in (30.5 cm) tail.
Why the math works: The front rim has 104 − 40 = 64 sts, so it keeps the same 16 in (40.6 cm) length and won’t flare or pull in. On the panel, the shoulder rows step 2 sts inward per row, so the slanted edge is longer than the rows are tall. One sc per row end fills that extra length without making the edge ripple. The only increases are the two 3-sc corners at the end of the strap, so the corners stay square.
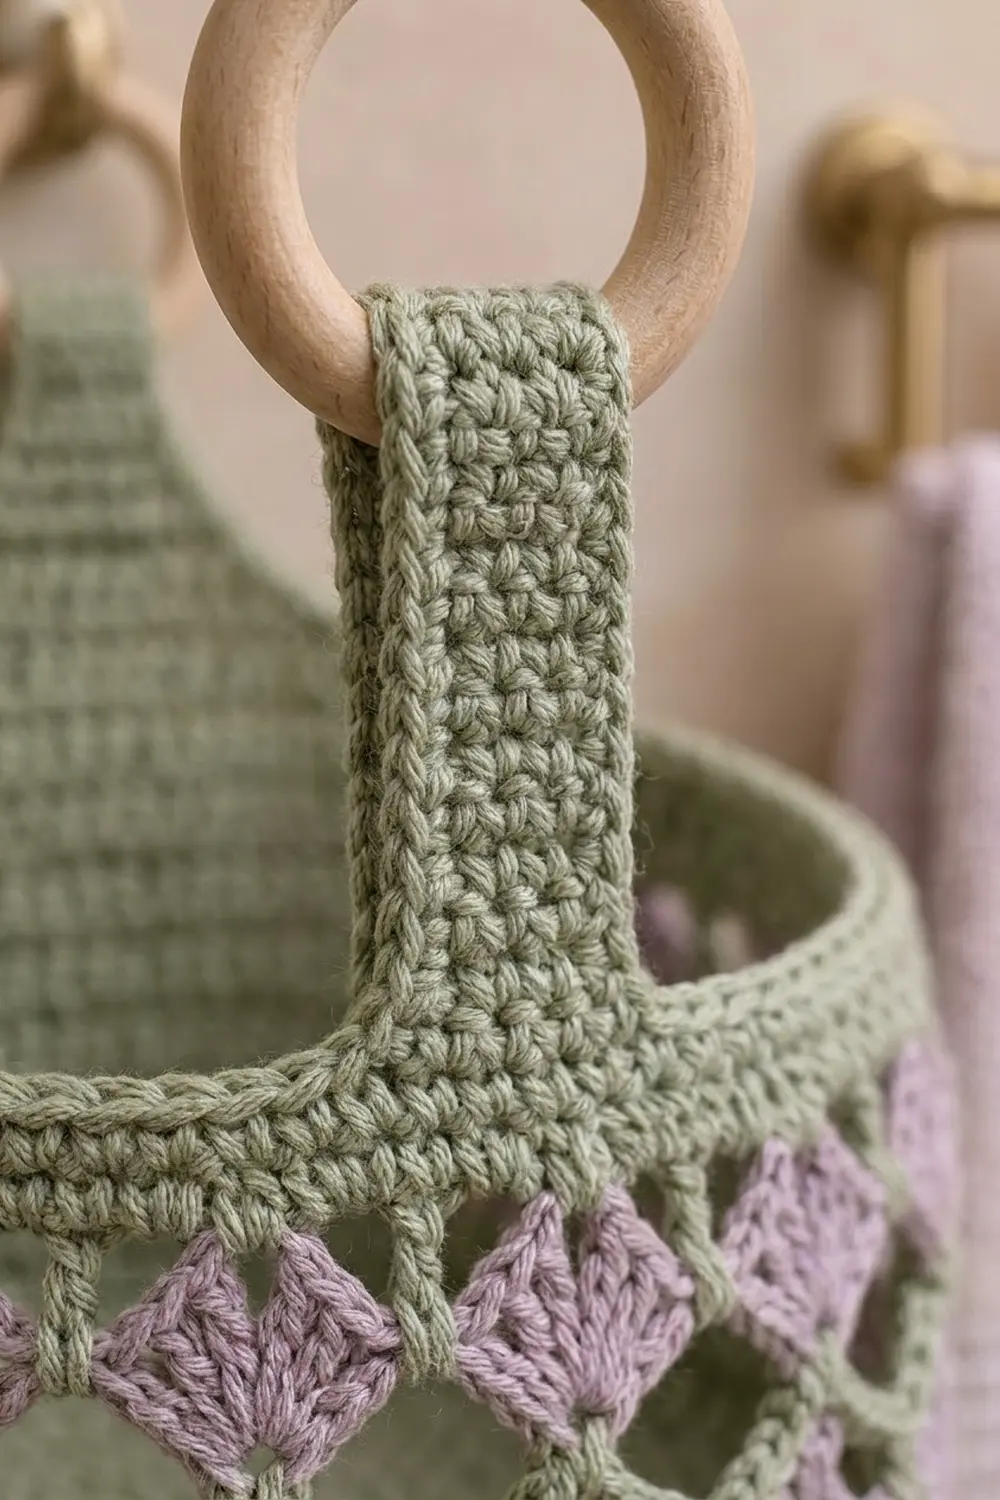
Hanging strap: Pass the strap through the wooden ring from front to back. Fold it down behind the panel so the end lies against Row 20. Using the tail, whipstitch the strap end and its side edges to the back of the panel. Weave in all ends.
Final Blocking
- Fill the basket with two rolls, or a folded towel shaped to the same size.
- Spray it evenly until damp, not soaked.
- Ease the lattice diamonds into even shapes and center each fan.
- Push the base corners out so the oval sits flat.
- Lay the basket on its back and pin the panel’s curve symmetrically.
- Leave it to dry completely, for 12–24 hours.
- Remove the pins and the filler, then hang the basket by the ring.
Final Quality-Control Checklist
- The base measures 10.25 in × 4.75 in (26.0 cm × 12.1 cm) and sits flat.
- The wall is 5.25 in (13.3 cm) tall all the way around.
- There are 13 lilac fans in each lattice round, with the second round offset by half a repeat.
- The panel is centered on the back and symmetrical.
- The border has exactly 142 sts, and the rev sc rim is smooth.
- The strap is sewn securely and the ring hangs straight.
- All ends are woven in on the inside.
Troubleshooting
- The base curls into a bowl: You didn’t add enough at the ends. Check that each round adds exactly 6 sts.
- The base ripples: You added too much, or the increases are stacking up. Stagger them.
- The lattice leans: The joins are drifting. Start each round in the place described, not at random.
- The fans don’t line up in Rnd P4: You joined in the wrong sc. Start in an sc that sits over a Rnd P2 sc.
- The panel tilts forward: The basket is pulling on it. Block the panel flat, or add a second row of sc to the rim.
- The rim flares: Your border tension is loose. Use a hook half a size smaller for Rnd 1 of the border.
Care
Hand wash in cool water and lay flat to dry, reshaping it around a filler. Don’t tumble dry; heat can shrink cotton and distort the lattice.
Final Notes
Each stage is built on the one before it. The 104-stitch base gives the right lattice repeat, 13 × 8 stitches. The conversion round brings the wall back to 104 stitches. The 40 back stitches set the panel’s width. The 142-stitch border finishes everything evenly. If you measure at each checkpoint, the basket will hold two rolls neatly and hang straight.
Happy crocheting!