

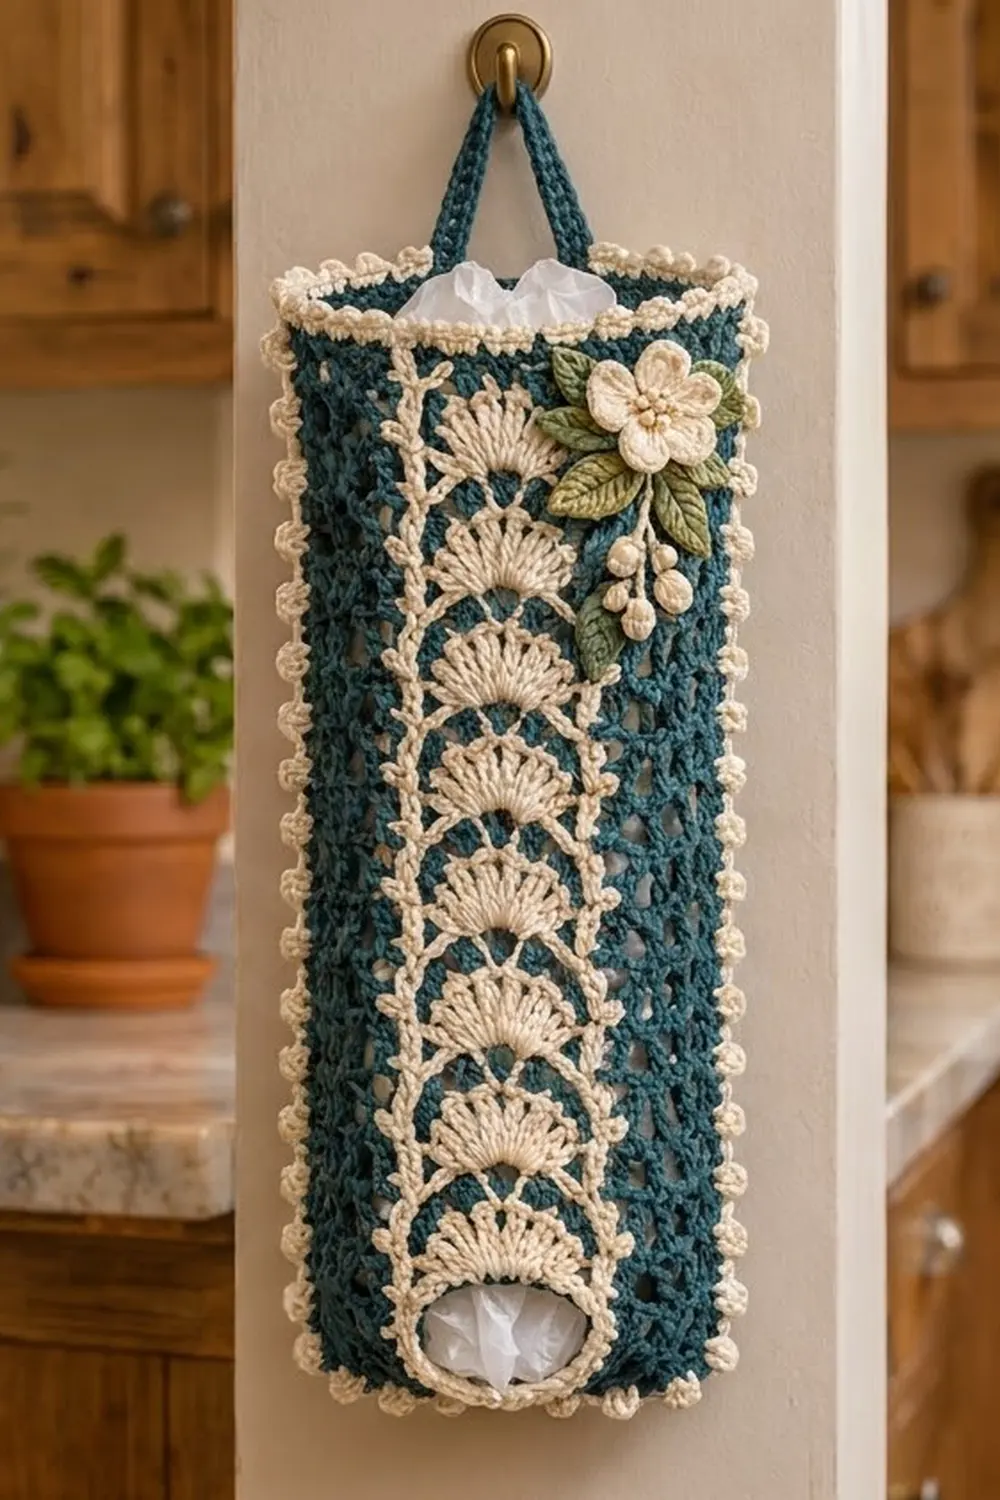
This Cottage Fan bag holder is a slim tube that hangs from a hook and keeps your plastic grocery bags tidy. You stuff bags in through the wide top and pull them out one at a time through the smaller opening at the bottom. It’s pretty enough to leave on display beside the pantry door.
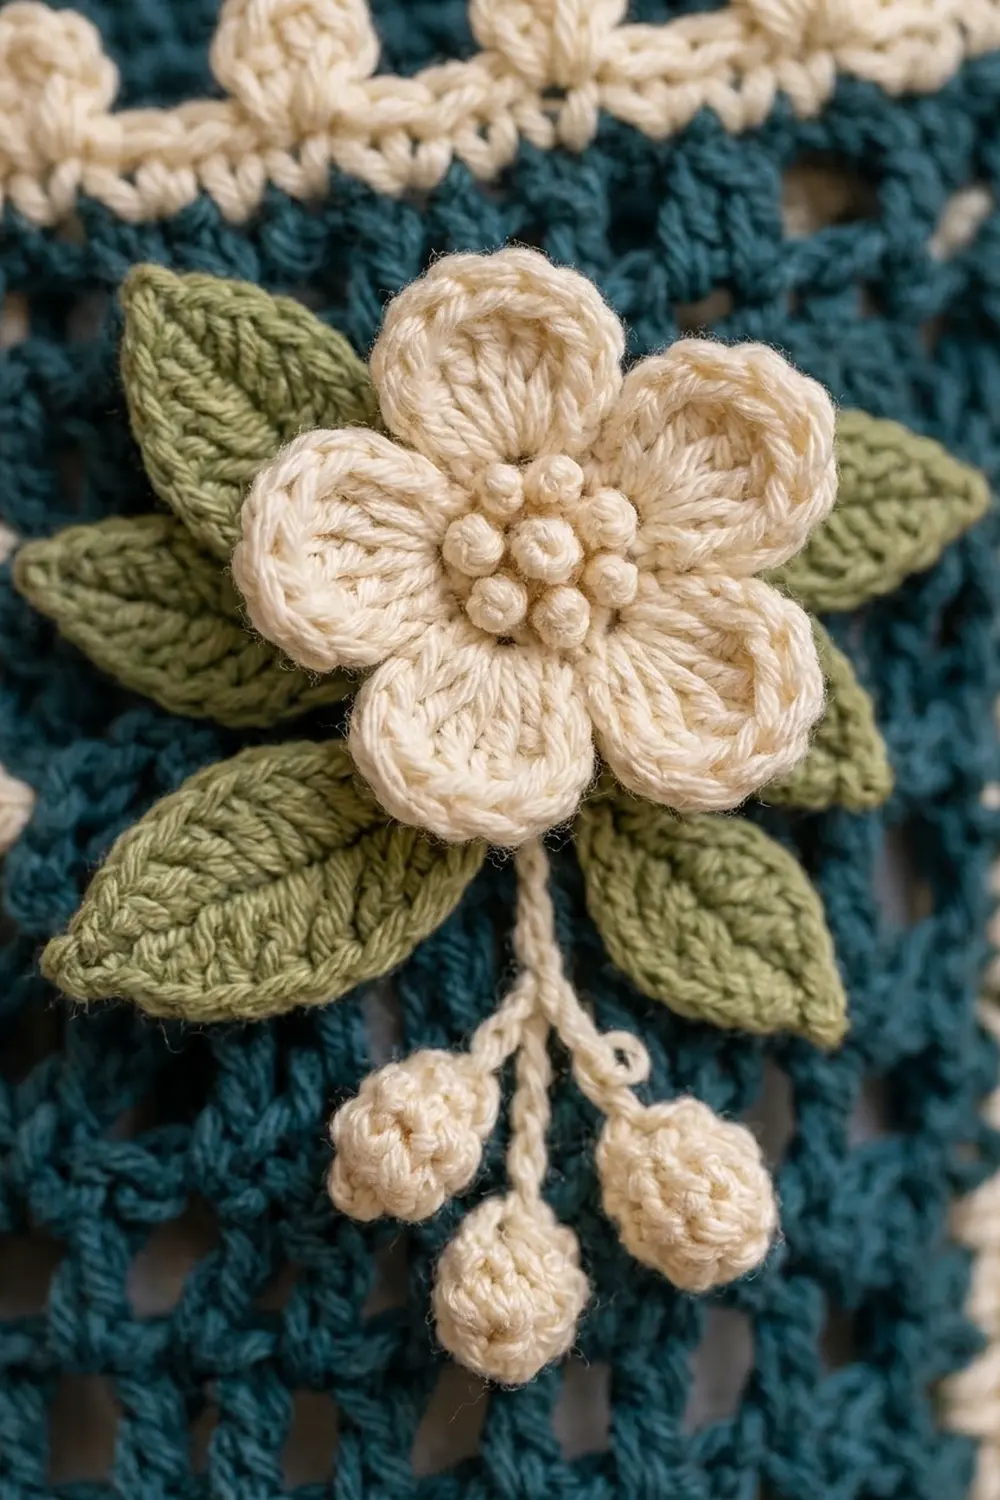
The body is an open teal mesh. A cream panel of stacked fan shells runs down the front, with little cream picot dots along both long edges. Matching picot rounds trim the top rim and the bottom opening. Near the top sits a raised cream five-petal flower with sage-green leaves and a spray of tiny cream berries. A teal strap forms the hanging loop. The style is cottage kitchen: soft colors, lacy texture and one sculptural accent.
This pattern uses US crochet terms. The finished holder is 6 in (15.2 cm) wide when flat and 18 in (45.7 cm) long, not counting the strap. It holds about 25 to 30 folded grocery bags.
Construction is simple. You work the mesh tube in joined rounds from the top down, then narrow it at the bottom. You crochet the fan panel separately in rows, edge it with picots and sew it onto the front. The strap, flower and top border go on last. There is no colorwork inside the tube, so you never carry two yarns at once.
Finished Size and Construction
- Finished size: 6 in (15.2 cm) wide flat x 18 in (45.7 cm) long, plus strap
- Skill level: Intermediate
- Terminology: US
- Yarn weight: Worsted (#4) cotton
- Hook: 4.5 mm (US 7); 4.0 mm (US G-6) for the flower parts
- Number of pieces: One finished holder: 1 tube body plus a sewn-on panel, strap and flower appliqué
- Layout: One vertical tube with the panel centered on the front
- Body circumference: 54 sts = 12 in (30.5 cm)
- Size before top border: 6 in (15.2 cm) x 17.5 in (44.5 cm)
- Border depth: Top band is 0.5 in (1.3 cm). The bottom picot round is already part of the 17.5 in (44.5 cm) body.
- Bottom opening: 36 sts, 4 in (10.2 cm) across when flat
Materials
Use a smooth worsted cotton, either mercerized or soft. Cotton holds its shape when the holder is full of bags, and it shows the fan shells clearly. Acrylic also works, but it stretches more under load and the fans look less crisp. Choose a teal dark enough that the cream panel stands out against it.
- Teal (Color A): 120 g / 200 m
- Cream (Color B): 60 g / 100 m
- Sage green (Color C): 10 g / 17 m
These quantities include about a 15 percent margin for your gauge swatch and yarn tails. For a second colorway, chocolate brown with dusty pink works well, using the same amounts.
Tools:
- 4.5 mm (US 7) hook
- 4.0 mm (US G-6) hook
- Tapestry needle
- 4 locking stitch markers
- Rust-proof pins
- Scissors
- Measuring tape
- Blocking mat or towel
Abbreviations (US Terms)
- ch: chain
- sl st: slip stitch
- sc: single crochet
- hdc: half double crochet
- dc: double crochet
- tr: treble crochet
- sc2tog: single crochet 2 together
- sk: skip
- sp: space
- st(s): stitch(es)
- Rnd: round
- RS: right side
- MR: magic ring
Picot: Ch 3, sl st in 3rd ch from hook.
Popcorn berry: Ch 2, then work 4 dc in 2nd ch from hook. Drop the loop from your hook and insert the hook front to back in the first dc. Pick up the dropped loop and pull it through.
Gauge and Checkpoints
Using the 4.5 mm hook:
- Mesh: 18 sts and 8 rnds = 4 in (10.2 cm)
- Single crochet: 18 sts and 20 rows = 4 in (10.2 cm)
- Fan panel: 13 sts = 2.9 in (7.4 cm) wide; one 2-row fan repeat = 1.1 in (2.8 cm) tall
Make a test piece first. Ch 24, work 10 rows of mesh flat, then measure across the center 4 in (10.2 cm). Next, work Rows 1–7 of the fan panel and check its width and repeat height. You can unravel the test panel and reuse the yarn.
Checkpoints:
- After Rnd 1: The ring lies flat at 6 in (15.2 cm) wide, or 12 in (30.5 cm) around.
- After Rnd 13: The tube measures 6.5 in (16.5 cm) from the foundation.
- After Rnd 33: The tube measures 16.5 in (41.9 cm).
- Finished panel: 2.9 in (7.4 cm) x 16.7 in (42.4 cm).
Too big? Go down a hook size. Too small? Go up a hook size. Always change the hook, not the stitch counts, because the border math depends on 54 and 36.
Body (Teal Mesh Tube)
With Color A and the 4.5 mm hook, ch 54. Make sure the chain is not twisted, then join with a sl st to the first ch. Place a marker at the join to mark center back.
Rnd 1: Ch 3 (counts as dc). Dc in each ch around, then join to top of ch-3. (54 dc)
Rnd 2: Ch 4 (counts as dc + ch 1), sk next dc. Dc in next dc, ch 1, sk next dc; repeat from * 26 times. Join to 3rd ch of beginning ch-4. (27 dc + 27 ch-1 sps = 54 sts)
Rnd 3: Sl st in first ch-1 sp, ch 4 (counts as dc + ch 1). Dc in next ch-1 sp, ch 1; repeat from * 26 times. Join to 3rd ch of beginning ch-4. (27 dc + 27 ch-1 sps = 54 sts)
Each new dc sits in a space, so the mesh shifts half a step every round. This offset creates the open lattice.
Rnds 4–33: Repeat Rnd 3. (54 sts each round)
Check that the tube measures 16.5 in (41.9 cm). Do not fasten off.
Bottom Shaping
Rnd 34 (conversion): Ch 1. Sc in each dc and each ch-1 sp around, then join. (27 + 27 = 54 sc)
Rnd 35 (decrease): Ch 1. Sc in next st, sc2tog; repeat from * 18 times, then join. (18 sc + 18 sc2tog = 36 sts)
Rnd 36: Ch 1. Sc in each st around, then join. (36 sc)
Fasten off Color A. The opening now measures 4 in (10.2 cm) across when flat. That’s small enough to hold the bags in but wide enough to pull one out easily.
Rnd 37 (Color B): Join cream in any st. Ch 1. Sc in next 3 sts, picot; repeat from * 12 times, then join. (36 sc + 12 picots)
Fasten off. The body now measures 17.5 in (44.5 cm) from the foundation.
Fan Panel (Cream)
With Color B and the 4.5 mm hook, work in rows.
Row 1 (RS): Ch 14. Sc in 2nd ch from hook and in each ch across, turn. (13 sc)
Row 2 (fan row): Ch 4 (counts as tr). Sc in next st, sk next 4 sts, work 9 tr in next st. Sk next 4 sts, sc in next st, tr in last st, turn. (1 tr + 1 sc + 9 tr + 1 sc + 1 tr = 13 sts)
The 9 tr open into a fan that fills the 9 center positions: the 8 skipped stitches plus the one you worked into. The sc on each side anchors the fan so it curves, and the tr at each edge keeps the sides straight.
Row 3: Ch 1. Sc in each st across, working the last sc into the top of the turning ch-4, then turn. (13 sc)
Rows 4–31: Repeat Rows 2–3 fourteen more times, ending with Row 31, an sc row. (15 fans; 13 sts per row)
The panel should measure 2.9 in (7.4 cm) x 16.7 in (42.4 cm): 0.2 in (0.5 cm) for Row 1 plus 15 fans at 1.1 in (2.8 cm) each.
Panel Picot Edges
Don’t fasten off. Turn to work down one long edge, working into the row ends:
- Work 1 sc into the end of each sc row.
- Work (sc, picot, sc) into the end of each tr row.
(46 sc + 15 picots)
Fasten off. Join cream at the opposite corner and repeat along the second long edge. (46 sc + 15 picots)
Strap (Teal)
With Color A and the 4.5 mm hook:
Row 1: Ch 55. Sc in 2nd ch from hook and in each ch across, turn. (54 sc)
Rows 2–3: Ch 1. Sc in each st across, turn. (54 sc each row)
The strap measures 12 in (30.5 cm) x 0.6 in (1.5 cm). Fasten off, leaving a 12 in (30.5 cm) tail for sewing.
Flower Appliqué
Use the 4.0 mm hook so the flower parts are firm and hold their shape.
Flower (Color B)
Rnd 1: Make an MR and work 10 sc in the ring, then join. (10 sc)
Rnd 2: (Hdc, 3 dc, hdc) in next st, sl st in next st; repeat from * 5 times. (5 petals)
The flower measures about 2 in (5.1 cm) across. Embroider 5 French knots in the center with cream to create the raised, dotted middle.
Leaves (Color C, make 3)
Ch 8. Working into the chain:
- Sc in 2nd ch from hook, hdc in next ch, dc in next 2 ch, hdc in next ch, sc in next ch, 3 sc in last ch.
- Rotate to work along the other side of the chain: sc in next ch, hdc in next ch, dc in next 2 ch, hdc in next ch, sc in last ch.
- Sl st to the first sc. (15 sts)
Each leaf is 1.5 in (3.8 cm) long.
Berry Spray
With Color B, make 5 popcorn berries, leaving 6 in (15.2 cm) tails. With Color C, ch 10 for the stem. Sew the berries along the stem in pairs, with one at the tip.
Assembly
- Panel: Lay the tube flat with the center-back marker underneath. Center the panel on the front, with its top end just below the foundation edge and its bottom end just above Rnd 34. Pin it in place. Whipstitch both long edges to the mesh with cream, sewing just inside the picots so they stay free.
- Strap: Find the two side folds of the flattened tube, 6 in (15.2 cm) apart. Overlap 1 in (2.5 cm) of each strap end inside the tube at one fold, 0.5 in (1.3 cm) below the rim, and sew securely. The 10 in (25.4 cm) of free strap forms a peak about 4 in (10.2 cm) above the rim.
- Flower: Sew one leaf to each side of the flower and one below it. Sew the cluster near the top right edge of the panel, about 2 in (5.1 cm) below the rim. Tack the berry spray so it hangs beneath the lower leaf.
Border
Work the top border with Color B and the 4.5 mm hook. The border gauge matches the sc gauge: 18 sts = 4 in (10.2 cm).
Top Rnd 1: Join cream in a foundation ch at center back. Ch 1, sc in each foundation ch around, then join. (54 sc; 27 sc per flattened side)
Top Rnd 2: Ch 1. Sc in next 3 sts, picot; repeat from * 18 times, then join. (54 sc + 18 picots; 27 sc and 9 picots per side)
Bottom (already worked as Rnd 37): 36 sc + 12 picots, which is 18 sc and 6 picots per flattened side.
The top band adds 0.5 in (1.3 cm), bringing the holder to 18 in (45.7 cm).
Why the math works:
- Top Rnd 1 places one sc in each of the 54 foundation chains, so no stitches are added or lost.
- Both 54 and 36 divide evenly by 3, so the sc 3, picot repeat closes neatly with no partial repeat.
- On each flattened face, 27 sc ÷ 3 = 9 picots at the top and 18 sc ÷ 3 = 6 picots at the bottom.
- On the panel, the 16 sc rows give 16 sc and the 15 tr rows give 30 sc, for 46 sc per side. Each picot lines up with one fan.
Final Blocking
- Weave in all ends on the inside of the tube.
- Soak the holder in cool water, then roll it in a towel to squeeze out the water.
- Slide a rolled towel inside so the tube holds its 12 in (30.5 cm) circumference.
- Pin it flat to 6 in (15.2 cm) wide x 18 in (45.7 cm) long.
- Pin the fan panel straight and open each picot with a pin.
- Shape the petals and leaves with your fingers.
- Let it dry completely before hanging.
Final Quality-Control Checklist
- Rnd 1 has 54 dc, and each mesh round has 27 dc and 27 spaces.
- The bottom round has 36 sc and 12 picots.
- The panel has 15 fans and 13 sts per row.
- Each panel edge has 46 sc and 15 picots.
- The top band has 54 sc and 18 picots.
- The holder measures 6 in (15.2 cm) x 18 in (45.7 cm).
- The strap is sewn securely and the flower is tacked flat.
- All ends are hidden on the inside.
Troubleshooting
- Mesh slants: This is normal for joined rounds. Block it straight, or turn your work at the end of each round.
- Fans ruffle: Your tr are too loose. Use a smaller hook for the fan rows only.
- Fans cup: Your tr are too tight. Go up half a hook size for the fan rows.
- Panel too long: Remove the last fan repeat, ending on an sc row. Each side then has 43 sc and 14 picots.
- Opening too tight: Work Rnd 35 as sc in next 4, sc2tog 9 times for 45 sts. Then work Rnd 37 as sc in next 3, picot 15 times. The opening becomes 5 in (12.7 cm) across when flat.
- Strap stretches: Add a fourth sc row, or sew a cotton ribbon to the back of the strap.
Care
Hand wash in cool water and lay flat to dry. Reshape the flower and picots while the holder is still damp.
Final Notes
Here is the measurement chain:
- The 54-st ring makes a 12 in (30.5 cm) tube.
- Rnd 1 plus 32 mesh rounds gives 16.5 in (41.9 cm).
- Bottom shaping and the picot round bring the body to 17.5 in (44.5 cm).
- The top border brings the holder to 18 in (45.7 cm).
- The 13-st panel is 2.9 in (7.4 cm) wide and holds 15 fans at 1.1 in (2.8 cm) each.
Check those numbers as you go and the holder will finish true to size.
Happy crocheting!