

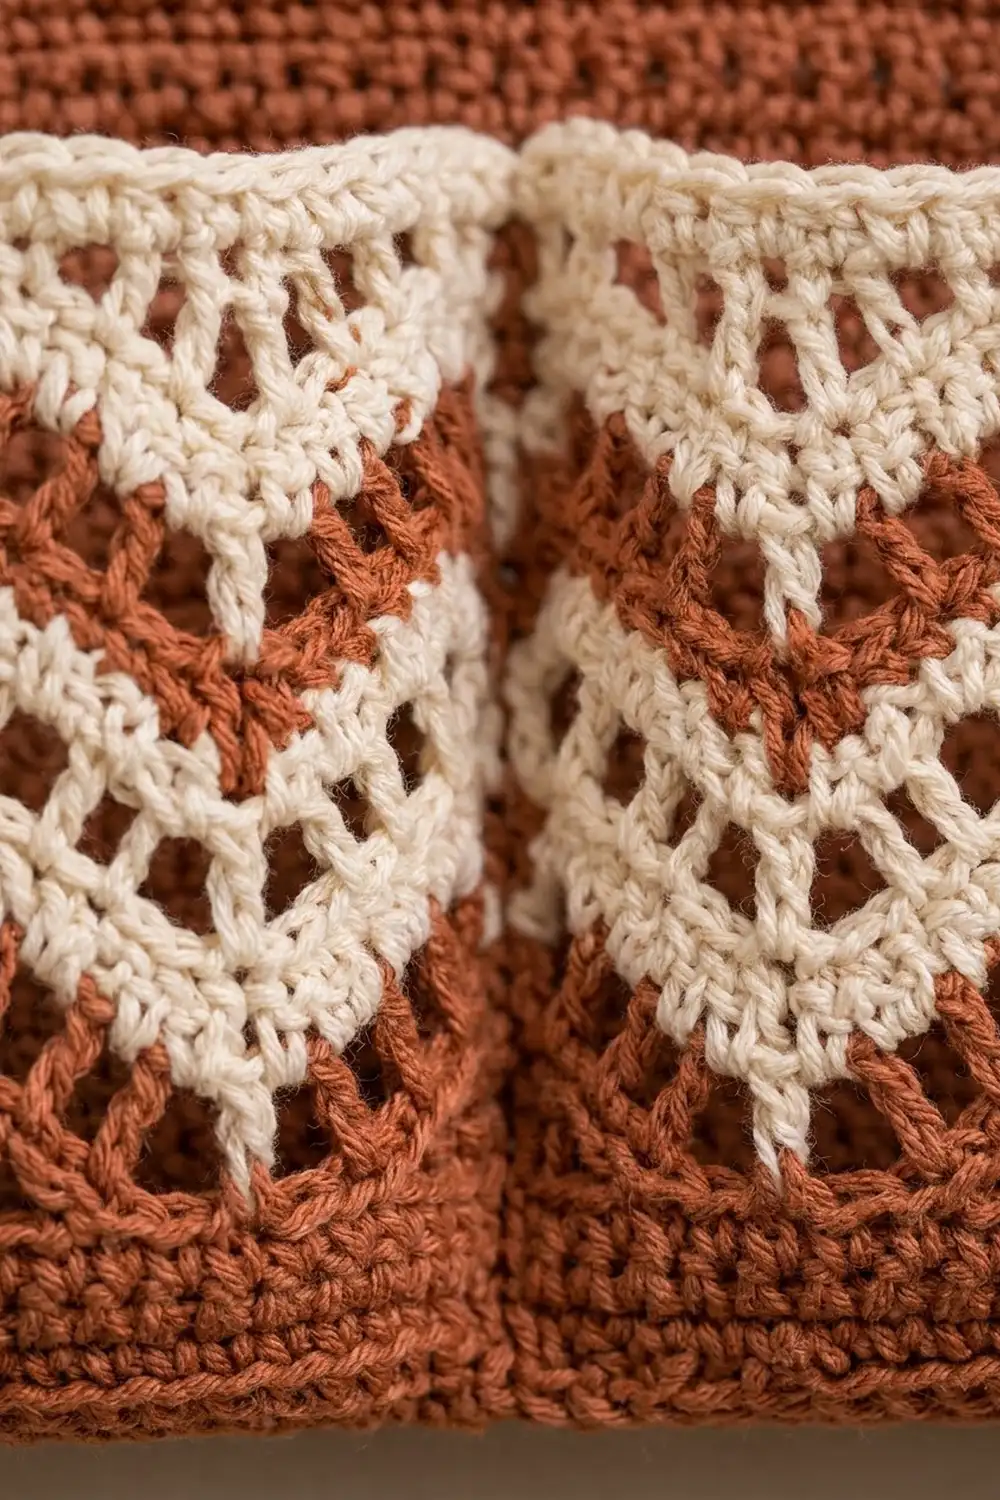
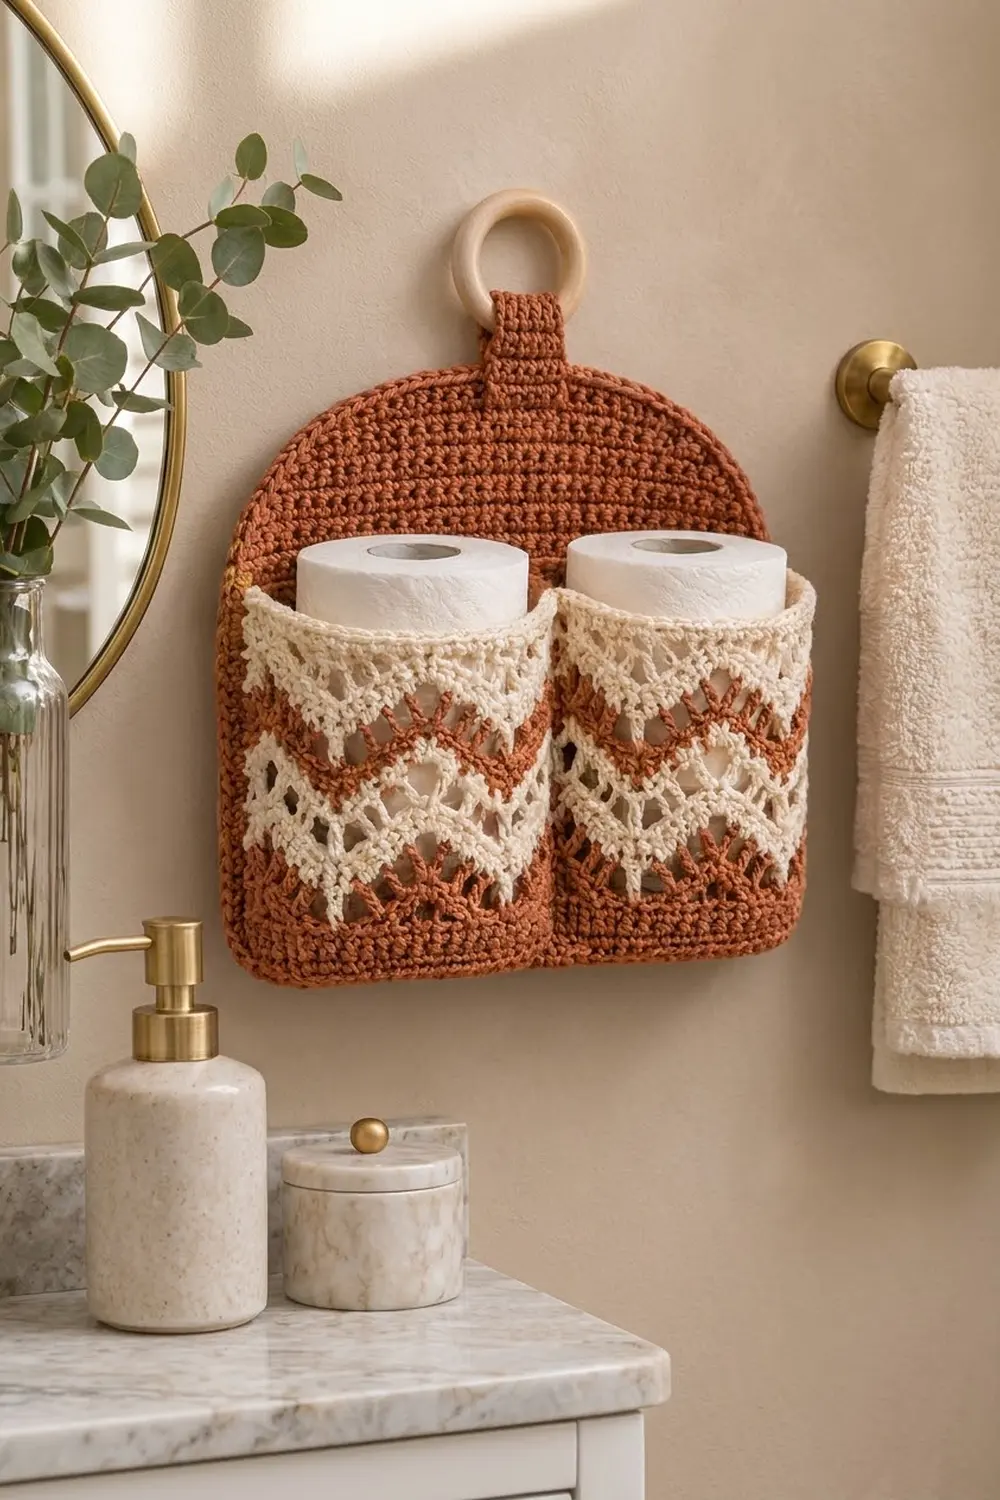
This wall-hanging holder keeps two spare rolls in a warm chevron pocket. The back panel is solid terracotta with a rounded dome top. The front pocket has cream and terracotta lace ripples, and a short tab loops through a wooden ring for hanging.
It uses only two colors, terracotta (rust) and cream. The back is dense half double crochet. The pocket alternates open lace chevrons with solid bands, which adds texture without making the piece busy.
The pattern uses US crochet terms. The finished holder is 14 in (35.6 cm) wide by 13 in (33.0 cm) tall. With the ring it is about 16 in (40.6 cm) tall.
You crochet three parts: the back panel, a pocket panel that is wider than the back, and a hanging tab. The pocket is sewn down the center and pleated at the bottom. A two-round border then joins everything, and the tab and ring go on last.
Finished Size and Construction
- Finished size: 14 in (35.6 cm) x 13 in (33.0 cm); 16 in (40.6 cm) tall with ring
- Skill level: Intermediate
- Terminology: US
- Yarn weight: Worsted (#4) cotton or cotton blend
- Hook: 5.0 mm (H-8)
- Number of pieces: 3 crocheted parts plus 1 wooden ring
- Layout: pocket covers the lower 7 in (17.8 cm) of the back and is divided into 2 compartments
- Back panel before border: 13 in (33.0 cm) x 12 in (30.5 cm)
- Pocket panel, flat: 21.25 in (54.0 cm) x 7 in (17.8 cm)
- Border depth: 0.5 in (1.3 cm), 2 rounds
Materials
Use a smooth worsted cotton or cotton blend of about 180 m per 100 g. Cotton keeps its shape in a humid bathroom and shows the lace clearly.
- Terracotta (rust): 170 g, about 306 m (335 yd)
- Cream: 60 g, about 108 m (118 yd)
Tools:
- 5.0 mm (H-8) crochet hook
- Wooden ring, 2.75 in (7.0 cm) outer diameter
- Tapestry needle
- At least 6 stitch markers
- Rust-proof pins, blocking mats, measuring tape, scissors
The quantities include a margin of about 15% for the gauge swatch and seaming.
Abbreviations (US Terms)
- ch – chain
- sk – skip
- sl st – slip stitch
- sc – single crochet
- hdc – half double crochet
- dc – double crochet
- tr – treble crochet
- st(s) – stitch(es)
- sp – space
- RS / WS – right side / wrong side
- hdc2tog – (yo, insert hook in next st, yo, pull up a loop) twice, yo, pull through all 5 loops
- dc3tog – (yo, insert hook in next st, yo, pull up a loop, yo, pull through 2 loops) 3 times, yo, pull through all 4 loops
Counting the lace ripple: in the pocket, every dc and every ch-1 sp counts as one stitch. A 3-dc peak is worked into one stitch, and a dc3tog valley uses three.
Gauge and Checkpoints
- Hdc: 16 sts and 12 rows = 4 in (10.2 cm)
- Sc: 16 sts and 18 rows = 4 in (10.2 cm)
- Lace ripple: one 12-st repeat = 3 in (7.6 cm) wide; 4 rows = 2 in (5.1 cm) tall
Swatch the ripple first. Ch 28 and work Row 1 of the pocket over 25 sts (edge, one full repeat, final repeat). The swatch should be 6.25 in (15.9 cm) wide. Next, make the back panel, which also serves as your hdc gauge check.
Checkpoints:
- Back after Row 21: 13 in (33.0 cm) x 7 in (17.8 cm)
- Back after Row 36: 12 in (30.5 cm) tall, with a 4.5 in (11.4 cm) flat top
- Pocket after Row 9: about 4.5 in (11.4 cm) of ripple
- Finished pocket: 21.25 in (54.0 cm) x 7 in (17.8 cm)
If your piece is too big, go down 0.5 mm. If it is too small, go up 0.5 mm. Rip back early, because every later measurement depends on these numbers.
Back Panel
Work in terracotta. The ch 2 at the start of each row does not count as a stitch.
Row 1 (RS): Ch 54, hdc in 3rd ch from hook and in each ch across. (52 hdc)
Rows 2–21: Ch 2, turn, hdc in each st across. (52 hdc)
Checkpoint: 13 in (33.0 cm) x 7 in (17.8 cm). This straight section sits behind the pocket.
Shape the dome by decreasing at both ends, using three row types:
- Single decrease row: ch 2, turn, hdc2tog, hdc across to last 2 sts, hdc2tog.
- Double decrease row: ch 2, turn, hdc2tog twice, hdc across to last 4 sts, hdc2tog twice.
- Even row: ch 2, turn, hdc in each st.
Work the dome rows in this order:
- Row 22: single decrease. (50 hdc)
- Row 23: even. (50 hdc)
- Row 24: single decrease. (48 hdc)
- Row 25: even. (48 hdc)
- Row 26: single decrease. (46 hdc)
- Row 27: single decrease. (44 hdc)
- Row 28: single decrease. (42 hdc)
- Row 29: single decrease. (40 hdc)
- Row 30: single decrease. (38 hdc)
- Row 31: single decrease. (36 hdc)
- Row 32: double decrease. (32 hdc)
- Row 33: double decrease. (28 hdc)
- Row 34: double decrease. (24 hdc)
- Row 35: double decrease. (20 hdc)
- Row 36: single decrease. (18 hdc)
Fasten off. That makes 17 decreases per side, so 52 − 34 = 18 stitches remain. The panel is 12 in (30.5 cm) tall with a 4.5 in (11.4 cm) flat top, which the border rounds off.
Pocket Panel
Work the ripple rows first. Then level the top and bottom with graded stitches so the outer edges come out straight.
Foundation: With terracotta, ch 88.
Row 1 (RS, terracotta): Dc in 4th ch from hook (the skipped ch count as a dc; this makes the edge peak), *[ch 1, sk next ch, dc in next ch] twice, dc3tog over next 3 ch, [dc in next ch, ch 1, sk next ch] twice, 3 dc in next ch; rep from * 5 more times, [ch 1, sk next ch, dc in next ch] twice, dc3tog over next 3 ch, [dc in next ch, ch 1, sk next ch] twice, 2 dc in last ch. (85 sts: 7 valleys, 6 full peaks, 2 edge peaks)
Count check: the edge uses 1 ch and the 7 repeats use 12 ch each, for 85. On the output side, each repeat makes 12 sts, and the edge peaks make 2 each instead of 3 and 1, so the row is again 85 sts.
Rows 2–9: Ch 3 (counts as dc), turn, dc in first st. Repeat the Row 1 sequence, working into each dc and ch-1 sp, and end with 2 dc in the top of the turning ch. Center each dc3tog on the previous valley, and work each 3-dc peak into the center dc of the previous peak. (85 sts every row)
Colors: Rows 2–3 cream, Row 4 terracotta, Rows 5–6 cream, Row 7 terracotta, Rows 8–9 cream. Change color on the last yo of the row before.
Checkpoint: 21.25 in (54.0 cm) wide.
Row 10 (cream, top leveling): Ch 1, turn, sc in first st, *hdc in next 2 sts, dc in next 2 sts, tr in next 3 sts, dc in next 2 sts, hdc in next 2 sts, sc in next st; rep from * 6 more times. (85 sts: 1 + 7 x 12)
The trebles fill the valleys and the sc sit on the peaks, so the top edge comes out straight.
Row 11 (cream): Ch 1, turn, sc in each st. (85 sc) Fasten off.
Row B1 (terracotta, bottom leveling): With RS facing, join terracotta in the free loop of the first foundation ch. Ch 4 (counts as tr), *dc in next 2 ch, hdc in next 2 ch, sc in next 3 ch, hdc in next 2 ch, dc in next 2 ch, tr in next ch; rep from * 6 more times. (85 sts: 1 + 7 x 12)
Along the bottom edge the peaks leave notches, so the trebles go under the peaks and the sc go under the valleys.
Rows B2–B3: Ch 1, turn, sc in each st. (85 sc) Fasten off.
Checkpoint: a straight-edged rectangle of 21.25 in (54.0 cm) x 7 in (17.8 cm). The center valley is st 43. Mark it on Rows 11 and B3.
Hanging Tab
With terracotta, ch 9.
Row 1: Sc in 2nd ch from hook and in each ch across. (8 sc)
Rows 2–22: Ch 1, turn, sc in each st. (8 sc)
Fasten off and leave a 16 in (40.6 cm) tail. The tab is 2 in (5.1 cm) x about 5 in (12.7 cm).
Make All Pieces
- Back panel: terracotta, make 1
- Pocket panel: terracotta and cream, make 1
- Hanging tab: terracotta, make 1
- Wooden ring: 1
Layout (RS view):
          [ ring ]
          [ tab  ]
     (  dome, back panel  )
     |  back panel, plain |
     | pocket A | pocket B|
     |__pleat___|__pleat__|
Joining
Center seam. Lay the back panel RS up. Mark the center, between sts 26 and 27, on Row 1 and Row 21. Lay the pocket RS up on top with the bottom edges aligned and st 43 over the center line. With terracotta, whipstitch the st 43 column to the back from the bottom of the pocket to the top, one stitch per pocket row. Keep the tension firm but flat so the back doesn’t pucker.
Bottom pleats. Each pocket half has 42 sts lying over 26 back sts, so 16 sts per half need to be folded away at the bottom. Left half: fold sts 14–29 into an inverted box pleat so that st 13 and st 30 meet at the center front. Each side folds 8 sts behind, which makes a 1 in (2.5 cm) deep fold. Right half: fold sts 57–72 the same way. Pin only the bottom 1 in (2.5 cm). Above that, the extra width bulges out to hold a roll.
Visible bottom count: 13 + 13 + 1 (st 43) + 13 + 13 = 53 sts over 52 back sts. Ease the one extra stitch in at the center seam.
Sides. Pin each pocket side edge to the back side edge along rows 1–21. Border Round 1 joins these edges.
Checkpoint: the back still lies flat at 13 in (33.0 cm). Each compartment has about 4 in (10.2 cm) of extra width at the top.
Border
Border gauge: 4 sc per 1 in (2.5 cm), which matches the hdc stitch width.
Round 1 (terracotta): With RS facing, join at the bottom right corner. Where the pocket overlaps the back, work through both layers.
- Bottom edge: 3 sc in corner st, sc in next 50 sts, 3 sc in corner st. (50 sc + 2 corner groups of 3)
- Straight side, rows 1–21: [sc in next 2 row-ends, 2 sc in next row-end] 7 times. (28 sc)
- Shoulder, rows 22–36: 1 sc in each of rows 22–23, 2 sc in each of rows 24–36. (2 + 26 = 28 sc)
- Top edge: sc in each of the 18 sts. (18 sc)
- Second shoulder: 2 sc in each of rows 36–24, 1 sc in each of rows 23–22. (28 sc)
- Second straight side: [sc in next 2 row-ends, 2 sc in next row-end] 7 times. (28 sc)
Sl st to first sc. Total: 50 + 6 + 28 + 28 + 18 + 28 + 28 = 186 sc.
Round 2: Ch 1, sc in each sc, working 3 sc in the center sc of each bottom corner group. Sl st to first sc. (186 − 2 + 6 = 190 sc) Fasten off.
Why the math works:
- The 52 bottom sts at 4 per inch make 13 in (33.0 cm).
- Hdc rows run 3 per inch, so 4 sc per 3 row-ends keeps each 7 in (17.8 cm) side flat.
- Each shoulder curve is about 7 in (17.8 cm) long, so it takes 28 sc. The doubled stitches on the steeper rows round the dome.
- The two rounds add 0.5 in (1.3 cm) on every side, for 14 in (35.6 cm) x 13 in (33.0 cm).
Attach the tab. Slide the tab through the ring and fold it in half. Center it on the top edge with one layer on the RS and one on the WS, each overlapping the panel by 1 in (2.5 cm). Sew around all edges through every layer.
Final Blocking
- Weave in all ends through stitches of the same color.
- Soak the holder in cool water for 10 minutes, then roll it in a towel to press the water out. Don’t wring it.
- Pin the back flat to 14 in (35.6 cm) x 13 in (33.0 cm), easing the dome into a smooth curve.
- Fill each pocket with a rolled dry towel about 4.5 in (11.4 cm) across.
- Open the lace with your fingers so the peaks are crisp.
- Let it dry completely, about 24 hours.
Final Quality-Control Checklist
- The back measures 14 in (35.6 cm) x 13 in (33.0 cm) with a smooth dome.
- The pocket top is straight and the bottom band is level.
- The center seam is vertical and on the center line.
- Both pleats are hidden and the same size.
- The border lies flat without ruffling.
- The holder hangs level from the ring.
Troubleshooting
- Pocket too wide: go down a hook size for the pocket only.
- Chevrons lean: check that each dc3tog is centered on the previous valley.
- Wavy top edge: redo Row 10 and make sure the trebles sit over the valleys.
- Border ruffles: work one fewer sc per shoulder in Round 1.
- Rolls fall out: fold each pleat 1 st deeper per side.
Care
Hand wash in cool water and lay flat to dry, reshaping the pockets while damp. Remove the ring first if you can.
Final Notes
Everything follows from gauge, 16 sts per 4 in (10.2 cm):
- The 52-st back is 13 in (33.0 cm) wide.
- The 85-st pocket is 21.25 in (54.0 cm) wide.
- The pleats bring the pocket bottom back down to fit the 52-st back.
- The border goes from 186 to 190 sts.
- The finished holder is 14 in (35.6 cm) x 13 in (33.0 cm).
Check each stage as you go and the finished piece will match.
Happy crocheting!