

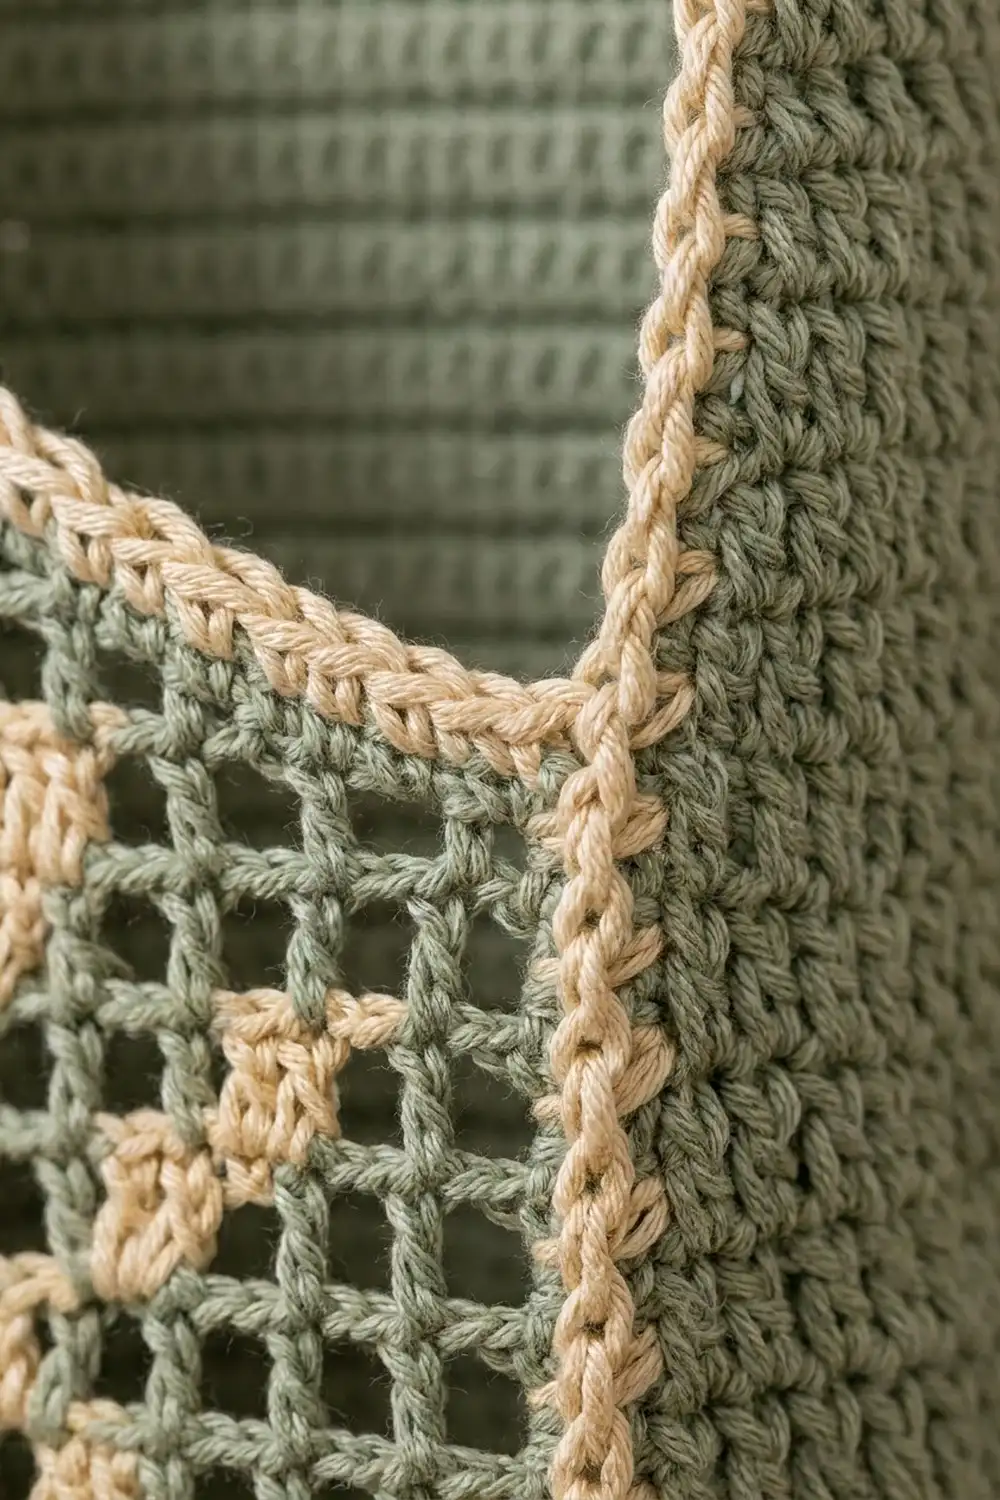
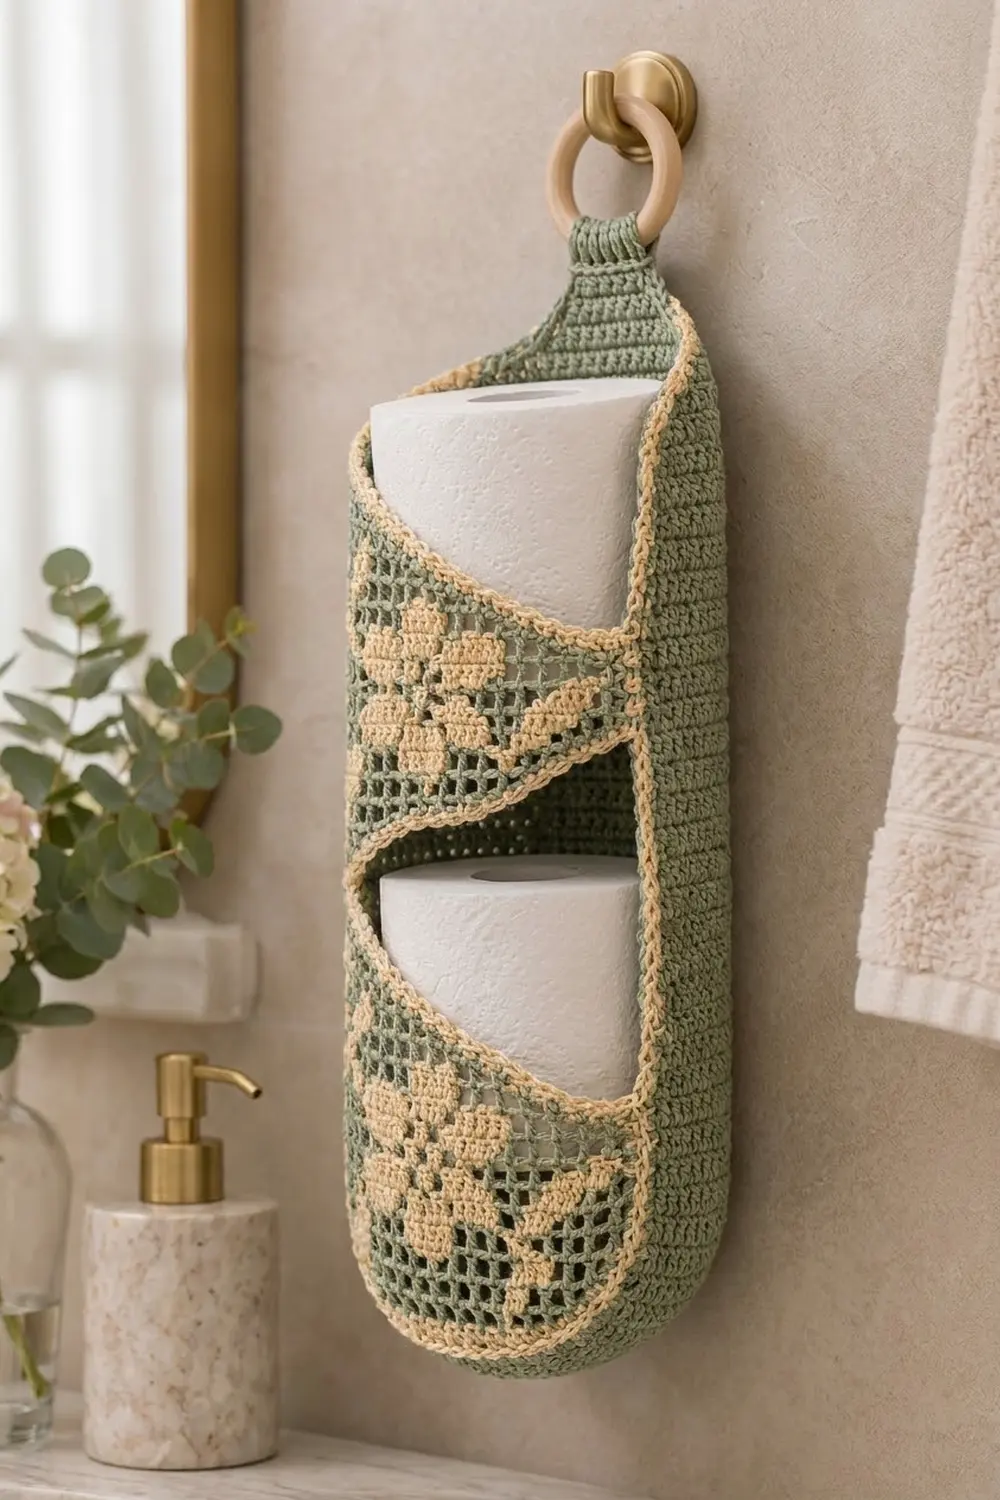
This hanging toilet paper holder has a solid sage green back panel and two angled filet mesh pockets. Each pocket shows a cream five-petal flower with small leaves, and a twisted cream reverse single crochet edge outlines every opening. The holder hangs from a natural wooden ring and holds two standard rolls, one above the other.
The colors are soft and calm. Sage green forms the structure and the mesh, and warm cream picks out the flowers and the edging. The holder fits a neutral bathroom with brass or wood accents. It also makes a useful handmade housewarming gift.
The pattern uses US crochet terms. The finished holder is about 6.8 in (17.3 cm) wide and 21.3 in (54.1 cm) long, measured from the fold of the tab and not counting the ring.
The construction is simple. First you crochet one back panel in rows of double crochet that taper into a hanging tab. Next you crochet two identical filet pockets with a diagonal top edge and trim each slope. Then you sew both pockets onto the back and finish with a two-row edging around the outside.
Finished Size and Construction
- Finished size: 6.8 in x 21.3 in (17.3 cm x 54.1 cm), not counting the ring
- Skill level: Intermediate (filet colorwork and seaming)
- Terminology: US
- Yarn weight: DK (light worsted, #3) cotton
- Hook: 4.0 mm (G-6)
- Number of pieces: 3 (1 back panel, 2 pockets)
- Layout: two pockets stacked vertically on one back panel
- Back panel: 6 in (15.2 cm) wide; the body is 16 in (40.6 cm) long before the taper
- Pocket: 7.75 in (19.7 cm) wide; 7.1 in (18.0 cm) tall at the tall side and 2.7 in (6.9 cm) at the short side
- Size before border: 6 in x 20.9 in (15.2 cm x 53.1 cm)
- Border depth: 0.4 in (1.0 cm)
Materials
Use a smooth mercerized or matte cotton in DK weight. Cotton holds the pocket shape, shows the filet blocks clearly, and stands up to bathroom humidity. Avoid fuzzy or brushed yarns because they blur the mesh.
- Sage green (Color A): 150 g, about 330 m
- Cream (Color B): 50 g, about 110 m
Tools:
- 4.0 mm (G-6) crochet hook
- Wooden ring, 2.75 in (7.0 cm) outer diameter
- Tapestry needle
- 6 locking stitch markers
- Scissors, tape measure, and rust-proof pins
The yarn amounts include a margin of about 15 percent to cover a gauge check and seaming.
Abbreviations (US Terms)
- ch – chain
- sl st – slip stitch
- sc – single crochet
- dc – double crochet
- dc2tog – double crochet 2 together
- rev sc – reverse single crochet (crab stitch)
- sk – skip
- st(s) – stitch(es)
- sp – space
- RS / WS – right side / wrong side
Mesh: ch 1, sk next st, dc in next st. One mesh is 2 sts wide.
Block: dc in next st (the ch-1 sp or the dc), dc in next st. A block is also 2 sts wide, so meshes and blocks always share their boundary dc.
Reverse sc: work from left to right. Insert the hook in the next st to the right, pull up a loop, yarn over, and draw through both loops. This makes the twisted cord edge.
Color change: work the last yarn over of the final dc before the change in the new color. Carry the unused color along the top of the row below and work over it so it stays hidden inside the stitches.
Gauge and Checkpoints
Gauge is 16 dc and 9 rows = 4 in (10.2 cm) in Color A. In filet, that equals 8 meshes and 9 rows = 4 in (10.2 cm). Each mesh is 0.5 in (1.3 cm) wide and 0.44 in (1.1 cm) tall.
Make the back panel first and use it as your test piece. Measure at each of these points:
- Back, after Row 10: 6 in (15.2 cm) wide and 4.4 in (11.2 cm) tall
- Back, after Row 36: 16 in (40.6 cm) tall
- Pocket, after Row 6: 7.75 in (19.7 cm) wide and 2.7 in (6.9 cm) tall
- Finished pocket: 7.1 in (18.0 cm) at the tall side
If your piece is too big, go down 0.5 mm in hook size. If it is too small, go up 0.5 mm. Row height matters as much as width here, because each pocket row is sewn to one back row.
Back Panel
With Color A, ch 26.
Row 1 (RS): Dc in 4th ch from hook (the skipped 3 ch count as the first dc) and in each ch across. Turn. (24 sts)
Rows 2–36: Ch 3 (counts as dc), dc in each st across. Turn. (24 sts)
Check: the panel is 6 in (15.2 cm) wide and 16 in (40.6 cm) tall.
The taper forms the sloping shoulder above the top pocket.
Row 37: Ch 2 (does not count), dc2tog, dc in each st to the last 2 sts, dc2tog. Turn. (22 sts)
Rows 38–44: Repeat Row 37. Counts: Row 38 (20 sts), Row 39 (18 sts), Row 40 (16 sts), Row 41 (14 sts), Row 42 (12 sts), Row 43 (10 sts), Row 44 (8 sts).
The taper is 3.6 in (9.1 cm) tall.
Rows 45–50 (tab): Ch 3 (counts as dc), dc in each st across. Turn. (8 sts)
The tab is 2.7 in (6.9 cm) long. Fasten off and leave a 12 in (30.5 cm) tail.
Pass the tab through the wooden ring from front to back. Fold it so that Rows 48–50 lie against Rows 45–47 on the WS. Whipstitch the top of Row 50 to the top of Row 44. The hanging length is now 47 rows, about 20.9 in (53.1 cm).
Pockets (Make 2)
Each pocket is a filet panel 15 meshes wide. Rows 1–6 are full width. Rows 7–16 drop one mesh at the short edge in every row, which forms the diagonal top.
Odd rows start at the tall edge, and even rows start at the short edge. The block positions below are always counted from the tall edge, so position 1 is the mesh at the tall edge. On even rows, read the positions in reverse.
Work the meshes in Color A and the blocks in Color B, and carry both colors through Row 11.
With Color A, ch 33.
Row 1: Dc in 4th ch from hook and in each ch across. Turn. (31 sts)
This solid row gives the pocket bottom a firm edge for seaming.
Row 2: Ch 4 (counts as dc and ch 1), sk next st, dc in next st. Work meshes across, with blocks at positions 12–13. Turn. (15 meshes, 31 sts)
Rows 3–6: Ch 4 (counts as dc and ch 1) and work 15 meshes, placing blocks as listed. Turn. (31 sts each)
- Row 3: blocks 5–6, 8–9, 12–14
- Row 4: blocks 4–6, 8–10, 13–14
- Row 5: blocks 2–3, 5–9, 11–12
- Row 6: blocks 2–6, 8–12
Check: the pocket is 7.75 in (19.7 cm) wide and 2.7 in (6.9 cm) tall.
Odd decrease rows (7, 9, 11, 13, 15): Ch 4 and work across in pattern, stopping 1 mesh short of the short edge. Leave the last 2 sts unworked. Turn.
Even decrease rows (8, 10, 12, 14, 16): Sl st in next 2 sts, ch 4 (counts as dc and ch 1), sk next st, dc in next st. Work in pattern across. Turn.
Blocks and stitch counts:
- Row 7: blocks 3–6, 8–11 (14 meshes, 29 sts)
- Row 8: blocks 4–10 (13 meshes, 27 sts)
- Row 9: blocks 2–3, 5–9 (12 meshes, 25 sts)
- Row 10: blocks 1–2, 6–8 (11 meshes, 23 sts)
- Row 11: block 7 (10 meshes, 21 sts)
- Row 12: all mesh (9 meshes, 19 sts)
- Row 13: all mesh (8 meshes, 17 sts)
- Row 14: all mesh (7 meshes, 15 sts)
- Row 15: all mesh (6 meshes, 13 sts)
- Row 16: all mesh (5 meshes, 11 sts)
The open mesh at position 7 in Row 7 is the flower center. Positions 12–14 in Rows 2–4 form the lower leaf, and positions 1–3 in Rows 9–10 form the upper leaf. Cut Color B after Row 11.
Filet colorwork tip: work every cream block a little more firmly than the green mesh. The carried strand adds bulk, and firm blocks keep the flower the same height as the mesh around it.
Check: the tall side measures 7.1 in (18.0 cm).
Slope Trim
Row 1: With RS facing, join Color A at the top of Row 6 on the short edge. Work 3 sc into each of the 10 stepped row ends (Rows 7–16), then 1 sc in each st of Row 16. (30 + 11 = 41 sc) Do not turn.
Row 2: Change to Color B. Rev sc in each sc back across. (41 rev sc) Fasten off.
Each step is 0.5 in (1.3 cm) wide and 0.44 in (1.1 cm) tall, so its diagonal is about 0.67 in (1.7 cm). At the edge gauge of 18 sc = 4 in (10.2 cm), 3 sc cover that length, so the slope lies flat without ruffling.
Make All Pieces
- Back panel: make 1 in Color A
- Pockets: make 2, with Color A mesh and Color B flowers, plus a green-and-cream slope trim
Layout (back rows, bottom to top):
Rows 45-50  | tab (folded over ring)
Rows 37-44  | taper
Rows 21-36  | TOP POCKET (tall edge left)
Rows 17-20  | open back
Rows 1-16   | BOTTOM POCKET (tall edge left)
Joining
Filet mesh looks the same on both faces. Place each pocket with its neater face out and the tall edge on the left, so that the diagonal falls from left to right on both pockets.
Sew with Color A using a whipstitch, catching the outer loops of each edge.
Bottom pocket: Pin pocket Row 1 to back Row 1. Sew the tall edge (16 rows) to back Rows 1–16 on the left side, one row to one row. Sew the short edge (6 rows) to back Rows 1–6 on the right side.
Next, sew the pocket’s foundation edge to the back’s foundation edge. The pocket has 31 sts and the back has 24. Join them one to one, except at back sts 3, 6, 9, 12, 15, 18, and 21, where you take 2 pocket sts. That eases in 7 extra sts: 24 + 7 = 31.
Top pocket: Pin pocket Row 1 against back Row 21. Sew the tall edge to back Rows 21–36 on the left and the short edge to back Rows 21–26 on the right. Sew the foundation edge across the back at the base of Row 21, easing it in the same way. This seam is the shelf that holds the upper roll.
Keep your tension relaxed. Tight seams pull the pocket flat and leave less room for the roll.
Size checkpoint: the back still measures 6 in (15.2 cm) wide at every seam, and each pocket bows out about 2 in (5.1 cm) at its center.
Border
Border gauge: 18 sc = 4 in (10.2 cm) along the edges. Work 2 sc per dc row end and 1 sc per st.
The border is worked as a single row. It starts at the base of the tab on the right, runs down the right side, across the bottom, and up to the base of the tab on the left. Wherever a pocket is seamed, work through both layers.
Row 1 (Color A): Join at the right end of Row 44.
- Right taper (Rows 44–37): 2 sc per row end (16 sc)
- Right side (Rows 36–1): 2 sc per row end (72 sc)
- Bottom: 3 sc in first st, 1 sc in each of next 22 sts, 3 sc in last st (28 sc)
- Left side (Rows 1–36): 2 sc per row end (72 sc)
- Left taper (Rows 37–44): 2 sc per row end (16 sc)
Total: 16 + 72 + 28 + 72 + 16 = 204 sc. Do not turn.
Row 2 (Color B): Rev sc in each sc back to the start. (204 rev sc) Fasten off.
Why the math works: 9 dc rows measure 4 in (10.2 cm), and 18 sc also measure 4 in (10.2 cm), so 2 sc per row matches the edge exactly. The bottom keeps all 24 foundation sts and adds 2 extra sc at each corner (24 + 4 = 28), so the corners turn cleanly without cupping. The two border rows add 0.4 in (1.0 cm) on each side and at the bottom, which brings the holder to 6.8 in x 21.3 in (17.3 cm x 54.1 cm).
Final Blocking
- Weave in all ends through stitches of the same color.
- Soak the holder in cool water for 10 minutes, then roll it in a towel to press out the water.
- Lay it flat and pin the back to 6.8 in x 21.3 in (17.3 cm x 54.1 cm).
- Square each mesh with your fingertips to sharpen the flower outlines.
- Push a rolled towel about 4.5 in (11.4 cm) across into each pocket to set the curve.
- Let it dry completely, then remove the pins and towels.
Final Quality-Control Checklist
- The back is 24 sts wide through Row 36 and 8 sts wide at the tab
- Each pocket starts at 31 sts and ends at 11 sts
- The flower center mesh is open in both pockets
- Each slope trim has 41 sts
- Both pocket bottoms are eased evenly and fully closed
- Each border row has 204 sts
- The ring sits centered, and the tab seam is hidden on the WS
Troubleshooting
- Pocket too tight for the roll: loosen the side seams, or add one mesh at each side of the pocket (35 sts) and shift the block positions by 1.
- Green showing through the cream blocks: the carried yarn is showing. Keep it on top of the previous row and tug it gently every few stitches.
- Slope ruffles: work 5 sc per 2 steps instead of 3 sc per step.
- Border waves along the sides: work 3 sc per 2 rows on the long sides.
- Holder twists on the wall: re-sew the tab so it sits centered on the ring.
Care
Hand wash in cool water with mild soap and dry flat. Reshape the pockets while the holder is damp.
Final Notes
The measurement chain is short. A gauge of 16 dc and 9 rows = 4 in (10.2 cm) gives a 6 in (15.2 cm) back and 7.75 in (19.7 cm) pockets. Because the rows match, the pockets sew on one row to one row, and easing fits 31 pocket sts onto 24 back sts. The 204-st border brings the holder to 6.8 in x 21.3 in (17.3 cm x 54.1 cm), ready for two rolls.
Happy crocheting!