

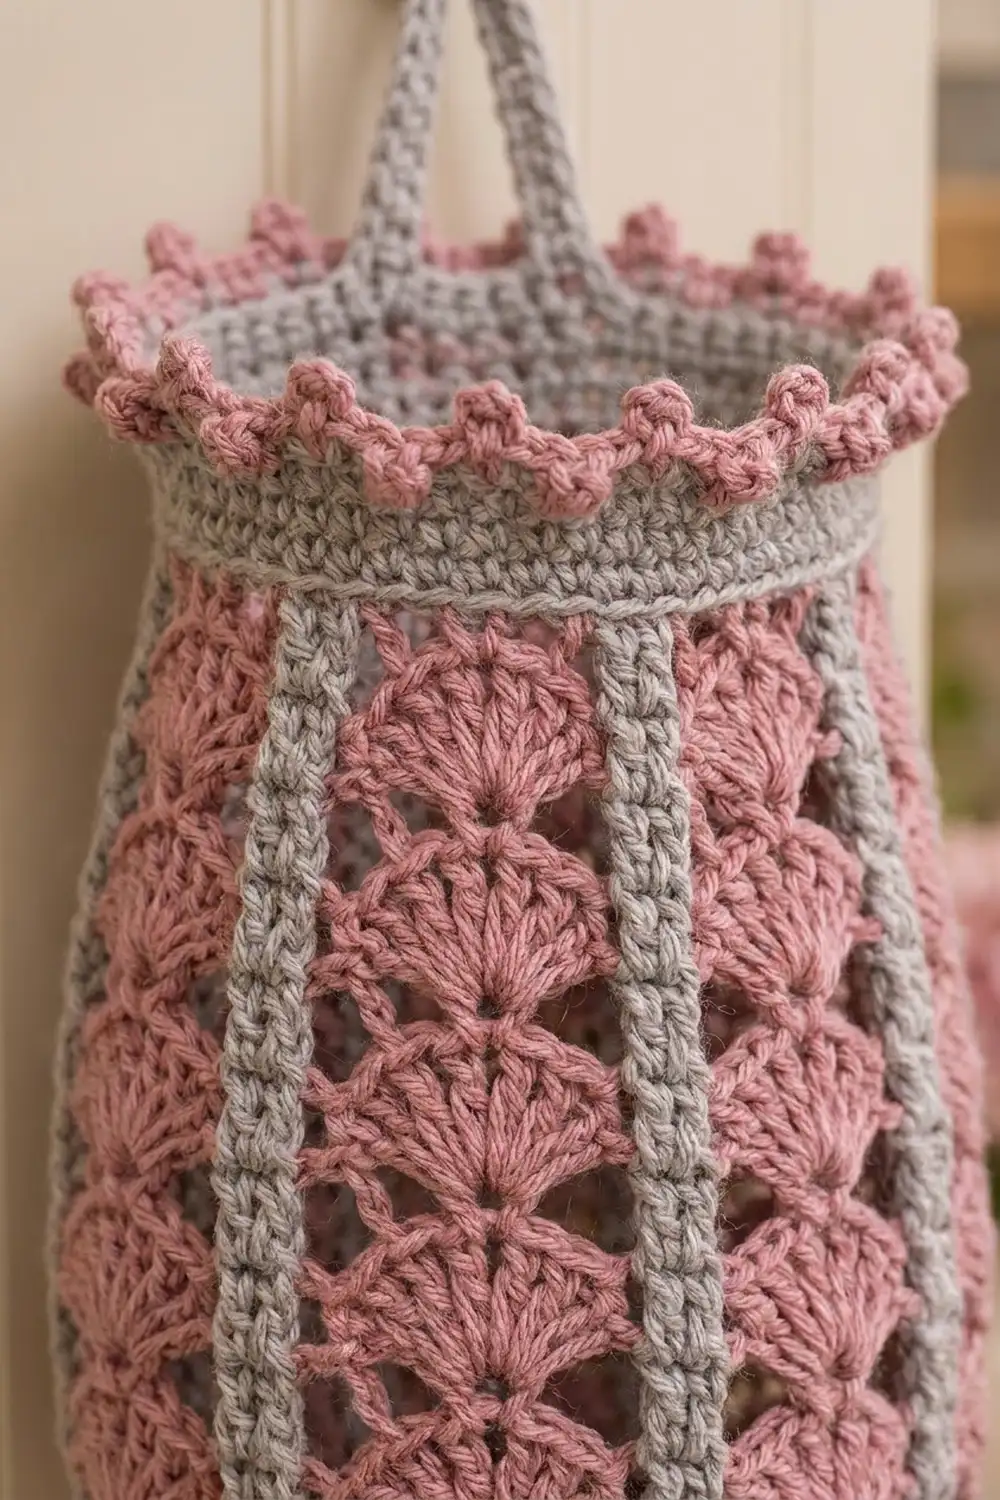
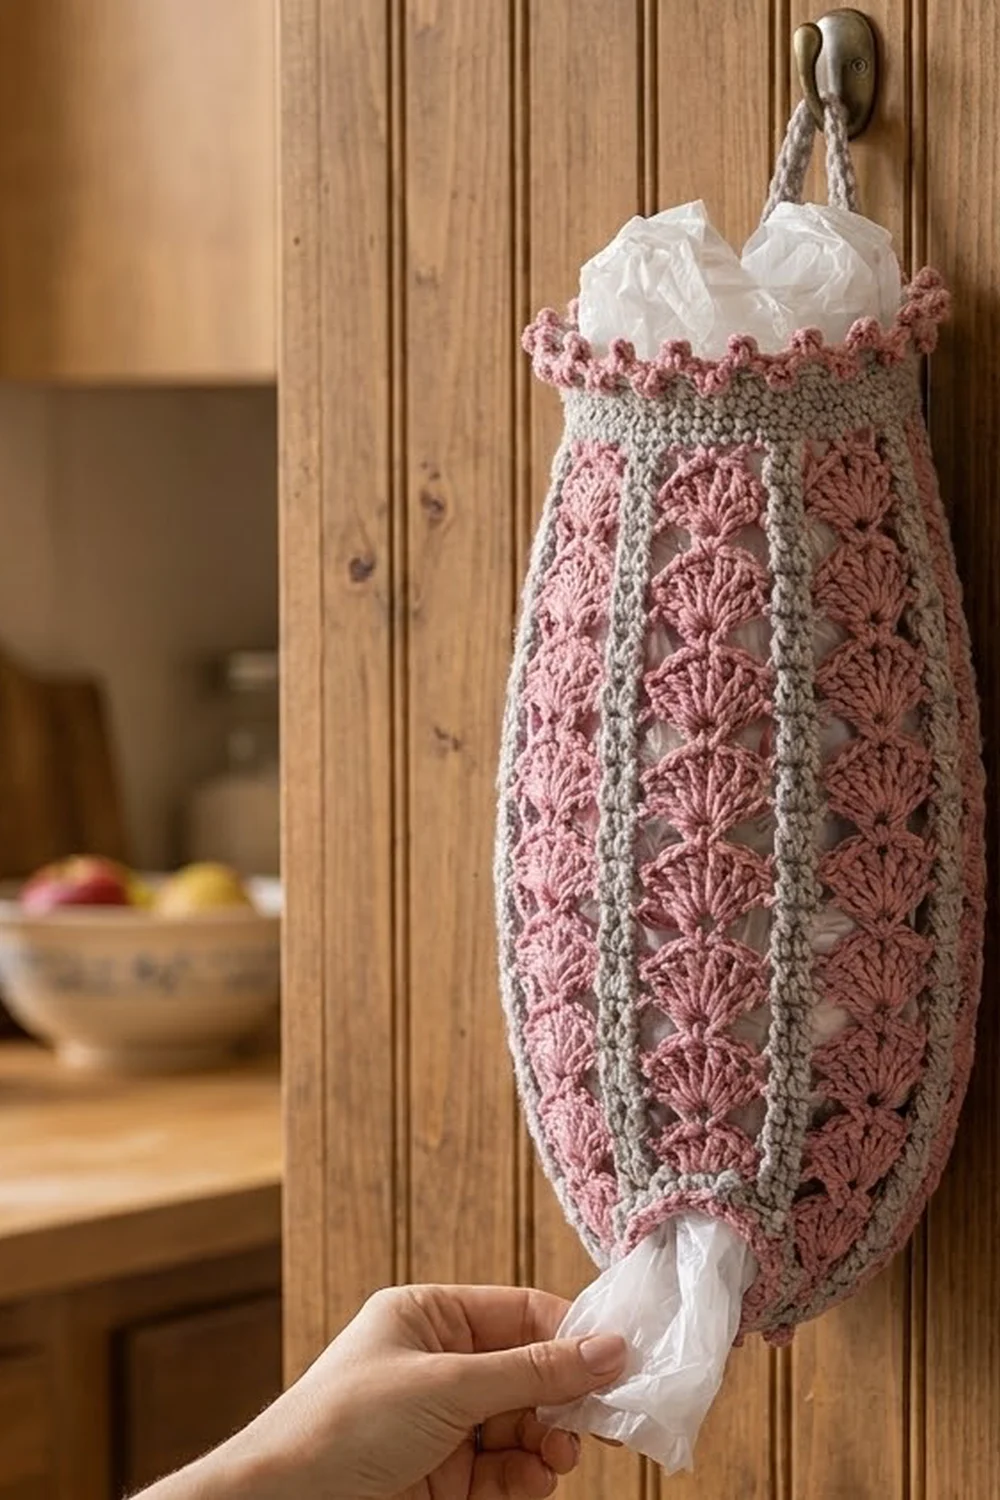
This plastic bag holder brings a little vintage charm to a kitchen wall. Columns of dusty rose lace fans stack neatly from top to bottom. Soft gray ribs divide the fans into six panels, and both openings end in a ring of round pink picots.
The colors are calm and easy to live with: dusty rose for the lace and soft gray for the ribs, bands and strap. The style is cottage-kitchen but still practical. You push bags in at the top and pull them out one at a time at the bottom.
The pattern uses US crochet terms. The finished holder is about 15.5 in (39.4 cm) long including the picot edges, and about 6.75 in (17.1 cm) wide laid flat at its widest. It also has a hanging loop that rises about 4.5 in (11.4 cm) above the rim.
You work the whole holder from the top down in joined rounds: first a gray single crochet band, then the pink fan body, then a gray band that narrows at the bottom. After that, you add gray surface slip stitch lines to the ribs, work a pink picot edging around both openings, and attach the strap.
Finished Size and Construction
- Finished size: 15.5 in (39.4 cm) long × 6.75 in (17.1 cm) wide flat at widest
- Skill level: Intermediate
- Terminology: US
- Yarn weight: #4 worsted, cotton or cotton blend
- Hook: 4.5 mm (US 7)
- Number of pieces: 1 (worked as one seamless tube)
- Layout: 6 fan panels alternating with 6 ribs around the tube
- Top band: 5.25 in (13.3 cm) wide flat
- Size before edging: 15 in (38.1 cm) long
- Edging depth: about 0.25 in (0.6 cm) at each opening
Materials
Yarn: Use a smooth worsted-weight cotton or cotton blend. Cotton keeps the fans crisp and doesn’t stretch out of shape when the holder is full of bags. Avoid fuzzy yarns, because they blur the lace.
- Color A, Dusty Rose: 110 g, about 187 m (205 yd)
- Color B, Soft Gray: 50 g, about 85 m (93 yd)
These quantities include a margin of about 15% for your gauge swatch and small tension differences.
Tools:
– 4.5 mm (US 7) crochet hook
– Tapestry needle
– 4 stitch markers
– Scissors
– Rustproof pins and a blocking mat
– A rolled towel or a 6 in (15.2 cm) tube for shaping
Abbreviations (US Terms)
- ch – chain
- sl st – slip stitch
- sc – single crochet
- sc2tog – single crochet 2 together
- dc – double crochet
- sk – skip
- sp – space
- st(s) – stitch(es)
- rep – repeat
- rnd(s) – round(s)
Special stitches:
– Rib: dc in each of the next 2 dc. The ribs line up vertically in every round.
– 5-fan / 7-fan / 3-fan: work 5, 7 or 3 dc into the same stitch.
– Picot: ch 3, sl st in the 3rd ch from the hook.
– Surface slip stitch: hold the yarn behind the work, insert the hook from front to back, pull up a loop, and pull it through the loop on the hook.
Gauge and Checkpoints
- Double crochet: 16 dc and 8 rnds = 4 in (10.2 cm)
- Single crochet: 16 sc and 16 rnds = 4 in (10.2 cm)
- Pattern gauge: one repeat (rib plus 7-fan panel) = 2.25 in (5.7 cm) wide
Test first. Treat the top band and the first 3 body rounds as your swatch. If the band measures 5.25 in (13.3 cm) flat, keep going. If it doesn’t, rip it out and change hooks before you go further.
Checkpoints, measured from the top edge:
– After the top band: 1 in (2.5 cm) tall, 5.25 in (13.3 cm) wide flat
– After body Rnd 2: 2 in (5.1 cm)
– After body Rnd 14: 8 in (20.3 cm); width flat 6.75 in (17.1 cm)
– After body Rnd 24: 13 in (33.0 cm)
– After body Rnd 26: 14 in (35.6 cm)
– After the bottom band: 15 in (38.1 cm); bottom width flat 3 in (7.6 cm)
If your piece is too big: go down a half size to 4 mm, or work the fans more firmly. If your piece is too small: go up to 5 mm. Change hooks for the whole holder, not just one section, so the bands and body stay in proportion.
Top Band (Color B, Gray)
Ch 42 and join with a sl st into the first ch. Make sure the chain isn’t twisted.
Rnd 1: Ch 1, sc in each ch around, then join with a sl st to the first sc. (42 sc)
Rnds 2–4: Ch 1, sc in each st around, then join. (42 sc)
The band should be 1 in (2.5 cm) tall and 10.5 in (26.7 cm) around, which is 5.25 in (13.3 cm) flat. Fasten off Color B.
Body (Color A, Dusty Rose)
Each round has 6 repeats. A ch 3 at the start of a round counts as the first dc of the first rib. Join every round with a sl st to the top of the beginning ch-3. Don’t turn.
Rnd 1 (setup): Join Color A in any sc of Rnd 4. Ch 3, dc in the next st (first rib). Ch 1, sk 2 sts, 5-fan in the next st, ch 1, sk 2 sts.
Rib in the next 2 sts, ch 1, sk 2 sts, 5-fan in the next st, ch 1, sk 2 sts. Rep from * 4 more times, then join.
Each repeat uses 7 band stitches, and 6 × 7 = 42. (42 dc: 12 rib dc + 30 fan dc; 12 ch-1 sps)
Place a marker in each rib. The 6 markers will help you keep the ribs straight.
Rnd 2 (growth): Ch 3, dc in the next dc. Ch 2, sk the ch-1 sp and 2 dc, 7-fan in the center (3rd) dc of the 5-fan, ch 2, sk 2 dc and the ch-1 sp.
Rib, ch 2, sk the ch-1 sp and 2 dc, 7-fan in the center dc, ch 2, sk 2 dc and the ch-1 sp. Rep from * 4 more times, then join.
(54 dc: 12 rib dc + 42 fan dc; 12 ch-2 sps)
Rnds 3–24: Ch 3, dc in the next dc. Ch 2, sk the ch-2 sp and 3 dc, 7-fan in the center (4th) dc of the 7-fan, ch 2, sk 3 dc and the ch-2 sp.
Rib, ch 2, sk the ch-2 sp and 3 dc, 7-fan in the center dc, ch 2, sk 3 dc and the ch-2 sp. Rep from * 4 more times, then join.
(54 dc; 12 ch-2 sps in every round)
This gives you 22 straight rounds of stacked fans. Each new fan sits exactly on the center stitch of the fan below it, which is what makes the vertical fan columns.
Rnd 25 (decrease): Ch 3, dc in the next dc. Ch 1, sk the ch-2 sp and 3 dc, 5-fan in the center dc, ch 1, sk 3 dc and the ch-2 sp. Rep this pattern around, then join.
(42 dc: 12 rib dc + 30 fan dc; 12 ch-1 sps)
Rnd 26 (decrease): Ch 3, dc in the next dc. Ch 1, sk the ch-1 sp and 2 dc, 3-fan in the center dc, ch 1, sk 2 dc and the ch-1 sp. Rep this pattern around, then join.
(30 dc: 12 rib dc + 18 fan dc; 12 ch-1 sps)
Fasten off Color A.
Bottom Band (Color B, Gray)
Rnd 27 (conversion): Join Color B in any rib dc. Ch 1, sc in each dc around and skip every ch-1 sp, then join.
(30 sc worked 1 per dc + 0 in ch-sps = 30 sc)
Rnd 28: Ch 1, sc in the next 3 sts, sc2tog. Rep from * 5 more times, then join. (24 sc)
Rnds 29–30: Ch 1, sc in each st around, then join. (24 sc)
The bottom band is 1 in (2.5 cm) tall and 6 in (15.2 cm) around, which leaves an opening about 1.9 in (4.8 cm) across. That’s tight enough to hold bags in but loose enough to pull them out. Fasten off.
Gray Rib Lines
With the outside of the tube facing you, join Color B at the base of one rib column, just above the bottom band. Work surface slip stitch straight up that dc column, about 2 sl sts per round, so about 52 sl sts in total. Stop at the top band. Fasten off on the inside.
Repeat for the second dc column of the same rib, then do the same for every rib. That’s 12 lines in total, 2 per rib.
The two gray lines cover the pink rib stitches completely. Together they make a solid gray rib about 0.5 in (1.3 cm) wide that joins the top and bottom bands. Keep your tension even: tight lines will pucker the lace, and loose lines will sag.
Edging and Hanging Loop
Edging gauge: 4 sc = 1 in (2.5 cm). A picot every 3 stitches puts the picots 0.75 in (1.9 cm) apart.
Top edging (Color A): Join Color A in any free loop on the foundation chain.
Ch 1, sc in the next 2 sts, picot, sc in the next st. Rep from * 13 more times, then join.
(42 sc + 14 picots)
Bottom edging (Color A): Join Color A in any sc of Rnd 30.
Ch 1, sc in the next 2 sts, picot, sc in the next st. Rep from * 7 more times, then join.
(24 sc + 8 picots)
Why the math works: Each edging repeat uses exactly 3 stitches. Both 42 and 24 divide evenly by 3, so the picots are spaced evenly all the way around with no leftover stitches. The edging adds about 0.25 in (0.6 cm) to each end, which brings the holder from 15 in (38.1 cm) to 15.5 in (39.4 cm).
Hanging loop (Color B): Choose the center back of the holder.
1. On the inside, join Color B with a sl st around the post of a Rnd 2 sc in the top band.
2. Ch 40, sk 5 sts, and sl st around the post of the next Rnd 2 sc. The two ends are now 1.5 in (3.8 cm) apart.
3. Ch 1, turn, and sc in each ch across. (40 sc)
4. Sl st around the post of the starting stitch, then fasten off.
The 10 in (25.4 cm) strap forms a loop about 4.5 in (11.4 cm) tall. Weave in all ends along the gray ribs, where they won’t show through the lace.
Final Blocking
- Soak the holder in cool water for 10 minutes.
- Press the water out gently. Don’t wring it.
- Roll it in a towel to remove the extra moisture.
- Slide a rolled towel or tube inside to fill out the body.
- Lay it flat. Shape it to 6.75 in (17.1 cm) wide at the widest point and 15.5 in (39.4 cm) long.
- Straighten each rib with your fingers, and open up the fans so they spread evenly.
- Pin each picot so it stands out from the edge.
- Let it dry completely before you hang it.
Final Quality-Control Checklist
- There are 6 ribs, each in a straight vertical line with no spiral.
- Every fan sits centered over the fan below it.
- The top band measures 5.25 in (13.3 cm) flat.
- The widest point measures 6.75 in (17.1 cm) flat.
- The bottom opening is about 1.9 in (4.8 cm) across.
- The top edging has 14 picots and the bottom edging has 8.
- The strap ends are 1.5 in (3.8 cm) apart and securely anchored.
- All ends are woven in along the gray areas.
Troubleshooting
- The ribs spiral: You missed the beginning ch-3 when you joined. Always join to the top of the ch-3, and move the rib markers up every few rounds.
- The fans drift to one side: You worked into the wrong dc. Count to the 4th dc of each 7-fan.
- The body flares too much: Your chains are loose. Make the ch-2 spaces snugger or go down a hook size.
- The bottom opening is too tight: Skip Rnd 28’s decreases and keep 30 sc. You’ll need 10 picot repeats in the bottom edging instead of 8.
- The lace puckers at the ribs: Your surface slip stitches are too tight. Pull them out and redo them with a slightly larger hook.
- The picots look flat: Pin them out while blocking and let them dry fully.
Care
Hand wash in cool water with mild soap, then reshape and dry flat. Don’t put it in the tumble dryer, because heat can shrink the cotton and distort the fans.
Final Notes
Here’s the measurement chain: a 42-stitch gray band that is 5.25 in (13.3 cm) flat, a body that grows to 54 dc and 6.75 in (17.1 cm) flat, a narrowing to 30 dc and then 24 sc, and a bottom opening of about 1.9 in (4.8 cm). Twenty-six body rounds plus two 1 in (2.5 cm) bands give 15 in (38.1 cm), and the picot edgings bring it to 15.5 in (39.4 cm). If you check your gauge at each checkpoint, your holder will match these numbers. For a fresh look, try sage green with cream.
Happy crocheting!