

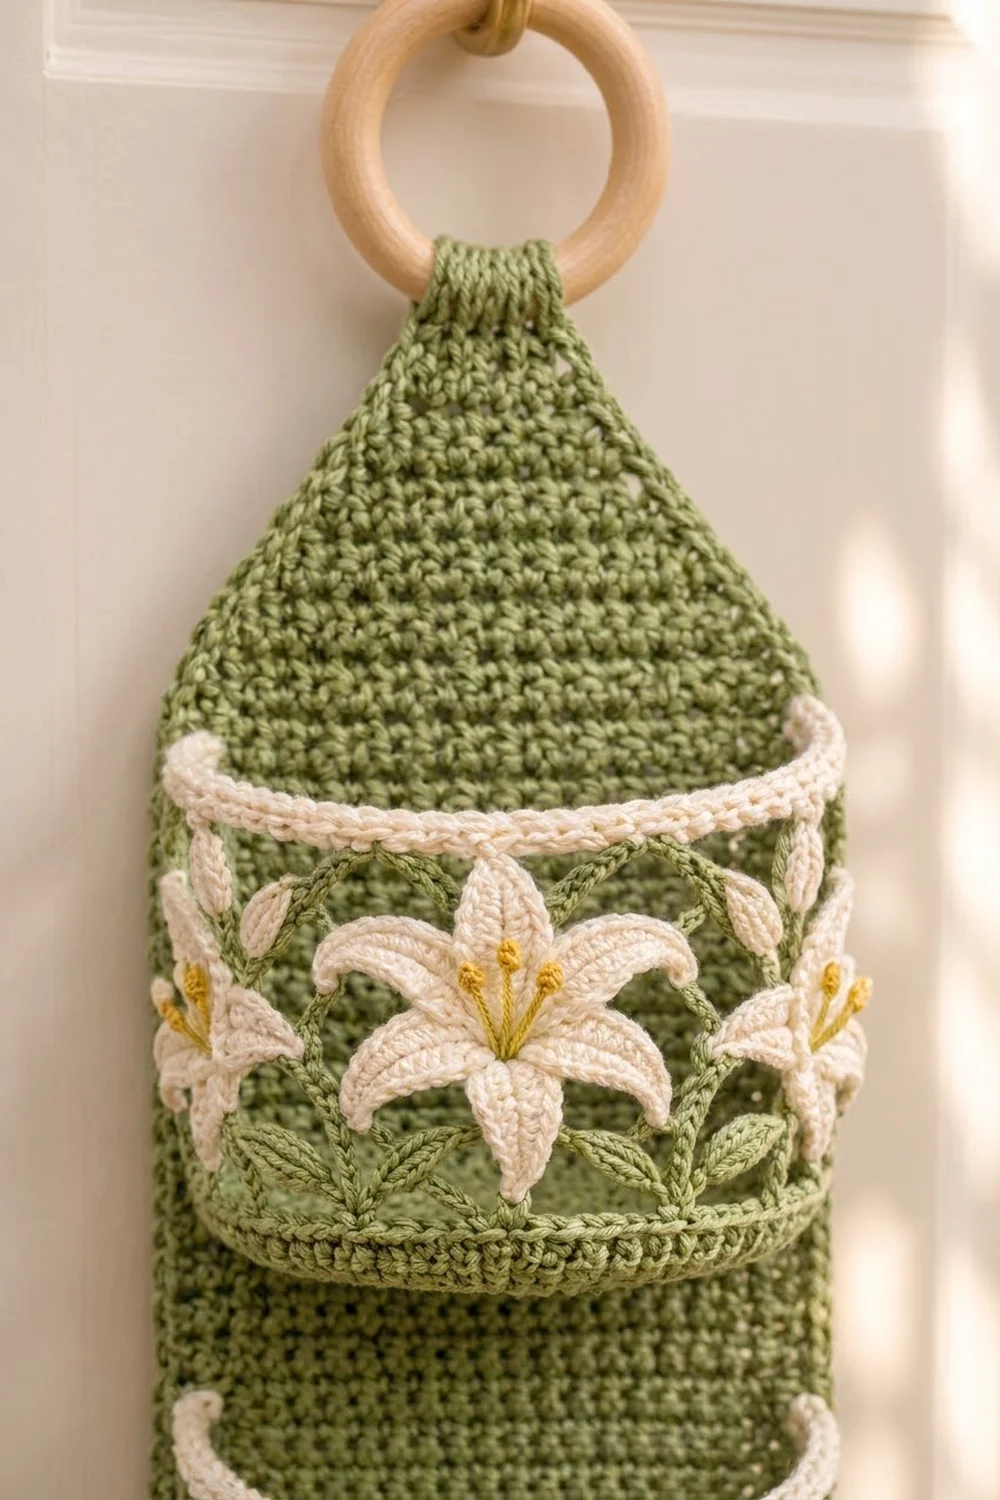
The Lily Garden holder is a tall hanging organizer for three toilet paper rolls. A long sage-green back panel hangs from a wooden ring. Three shallow pockets are sewn down its front, and each one holds a single upright roll.
Each pocket has a solid green base, a band of open chain arches and a cream rim with a corded crab-stitch edge. The front of every pocket has a little garden on it: one large cream lily, a smaller lily at each corner, two buds, green leaves, chain stems and yellow embroidered stamens. The colors are soft and natural, which suits a calm bathroom or guest room.
The pattern uses US crochet terms. With the border, the panel measures 6.5 in (16.5 cm) wide and about 27.5 in (69.9 cm) long. The whole holder is about 31 in (78.7 cm) long to the top of the ring. Each pocket is 5.5 in (14.0 cm) wide, 4 in (10.2 cm) deep and about 3.5 in (8.9 cm) tall.
The construction is simple and modular:
– Crochet the back panel in rows.
– Crochet three pockets, each starting from a flat rectangular base and worked upward in rounds.
– Make the lily appliqués.
– Sew everything together.
– Finish the panel with a single crochet border.
Finished Size and Construction
- Finished size: 6.5 in (16.5 cm) wide x 27.5 in (69.9 cm) long, plus the ring
- Skill level: Intermediate
- Terminology: US crochet terms
- Yarn weight: Worsted (#4), cotton or cotton blend
- Hook: 5.0 mm (H-8)
- Number of pieces: 4 main pieces (1 panel, 3 pockets) plus appliqués
- Layout: 3 pockets stacked in a single vertical column
- Pocket size: 5.5 in (14.0 cm) wide x 4 in (10.2 cm) deep x 3.5 in (8.9 cm) tall
- Panel size before border: 6 in (15.2 cm) wide x 27.2 in (69.1 cm) long, not counting the strap
- Border depth: 0.25 in (0.6 cm), one round
Materials
Choose a smooth, firm worsted cotton. Cotton keeps the pockets in shape, doesn’t stretch much under the weight of the rolls, and washes well. Avoid very soft acrylic, because it lets the long panel sag.
- Sage green: 220 g, about 374 m (409 yd)
- Cream: 60 g, about 102 m (112 yd)
- Golden yellow: 10 g, about 17 m (19 yd)
These amounts assume a yarn of about 170 m per 100 g and include a margin of about 15 percent.
Tools:
– 5.0 mm (H-8) crochet hook
– Wooden ring, 2.5 in (6.4 cm) outer diameter
– Yarn needle
– Stitch markers
– Rustproof pins
– Scissors and tape measure
Abbreviations (US Terms)
- ch – chain
- sl st – slip stitch
- sc – single crochet
- hdc – half double crochet
- dc – double crochet
- hdc2tog – half double crochet 2 together
- BLO – back loop only
- sk – skip
- st(s) – stitch(es)
- rev sc – reverse single crochet (crab stitch)
Reverse single crochet: If you are right-handed, work from left to right. Insert the hook into the next stitch to the right, yarn over and pull up a loop, then yarn over and pull through both loops. This makes the twisted, rope-like rim.
Gauge and Checkpoints
- Hdc gauge: 14 sts and 10 rows = 4 in (10.2 cm)
- Sc gauge: 16 sts and 18 rows = 4 in (10.2 cm)
Make one pocket first. It uses both gauges, and it is the quickest way to check that a roll fits.
Checkpoints:
– Pocket base after Row 18: 5.5 in (14.0 cm) x 4 in (10.2 cm)
– Pocket after Round 6: about 2.75 in (7.0 cm) tall
– Finished pocket: about 3.5 in (8.9 cm) tall
– Panel after Row 10: 6 in (15.2 cm) wide and 4 in (10.2 cm) long
– Panel after Row 60: 24 in (61.0 cm) long
If your pieces are too big, go down 0.5 mm in hook size. If they are too small, or a roll won’t drop in, go up 0.5 mm. Get the gauge right before you make the other pieces.
Back Panel
With sage green, ch 23.
Row 1: Hdc in 3rd ch from hook and in each ch across, turn. (21 hdc)
Rows 2–60: Ch 2 (does not count as a stitch), hdc in each st across, turn. (21 hdc)
Checkpoint: 6 in (15.2 cm) wide and 24 in (61.0 cm) long.
Taper
Each taper row decreases one stitch at each end.
Row 61: Ch 2, hdc2tog, hdc in each st to last 2 sts, hdc2tog, turn. (19 hdc)
Row 62: Repeat Row 61. (17 hdc)
Row 63: Repeat Row 61. (15 hdc)
Row 64: Repeat Row 61. (13 hdc)
Row 65: Repeat Row 61. (11 hdc)
Row 66: Repeat Row 61. (9 hdc)
Row 67: Repeat Row 61. (7 hdc)
Row 68: Repeat Row 61. (5 hdc)
The taper adds 3.2 in (8.1 cm), so the panel is now 27.2 in (69.1 cm) long.
Hanging Strap
Rows 69–76: Ch 2, hdc in each st across, turn. (5 hdc)
The strap is 3.2 in (8.1 cm) long. Fasten off and leave a 12 in (30.5 cm) tail. You will attach the ring at the end.
Pocket (Make 3)
Base
With sage green, ch 23.
Row 1: Sc in 2nd ch from hook and in each ch across, turn. (22 sc)
Rows 2–18: Ch 1, sc in each st across, turn. (22 sc)
Checkpoint: 5.5 in (14.0 cm) x 4 in (10.2 cm). Do not fasten off.
Walls
From here, work in joined rounds without turning. Mark the first stitch of each round.
Round 1: Ch 1 and rotate the work. Work 16 sc evenly along the first side’s row ends, skipping 2 row ends spaced out along the side. Work 22 sc along the other side of the foundation chain, 16 sc along the second side’s row ends, and 22 sc across Row 18. Sl st to first sc. (76 sc)
At sc gauge, 16 row-end stitches measure 4 in (10.2 cm), so the base stays flat.
Round 2: Ch 1, sc in BLO of each st around; sl st to first sc. (76 sc)
This round turns the wall upward and leaves a ridge of unused front loops around the base.
Round 3: Ch 1, sc in each st around; sl st to first sc. (76 sc)
Openwork Arches
Round 4: Ch 1, sc in first st, ch 5, sk 3 sts, sc in next st; repeat from * 17 more times, ch 5, sk 3 sts, sl st to first sc. (19 ch-5 arches)
The math: each arch uses 4 stitches (1 sc plus 3 skipped), and 76 ÷ 4 = 19 arches.
Round 5: Sl st in each of the first 3 ch of the first arch. Ch 1, sc in same arch, ch 5, sc in next arch; repeat from * 17 more times, ch 5, sl st to first sc. (19 ch-5 arches)
Round 6: Repeat Round 5. (19 ch-5 arches)
Checkpoint: about 2.75 in (7.0 cm) tall. Fasten off green.
Cream Rim
Round 7 (conversion round): Join cream in any ch-5 arch. Ch 1, work 4 sc in each arch around; sl st to first sc. (19 arches x 4 sc = 76 sc)
Round 8: Ch 1, sc in each st around; sl st to first sc. (76 sc)
Round 9: Ch 1, rev sc in each st around; sl st to first st. (76 rev sc)
Fasten off and weave in the ends. The pocket is now about 3.5 in (8.9 cm) tall.
Lily Appliqués
Large Lily (Make 3, Cream)
Round 1: Make a magic ring and work 6 sc in it; sl st to first sc. Pull the ring closed. (6 sc)
Round 2: Ch 7. Starting in 2nd ch from hook, work sl st, sc, hdc, dc, hdc, sc (6 sts along the chain). Sl st in next sc of Round 1; repeat from * 5 more times. (6 petals)
Each petal starts at a sharp tip and is widest in the middle. Petals are about 1.5 in (3.8 cm) long, so the lily is about 3.25 in (8.3 cm) across.
Small Lily (Make 6, Cream)
Round 1: Make a magic ring and work 6 sc in it; sl st to first sc. (6 sc)
Round 2: Ch 5. Starting in 2nd ch from hook, work sl st, sc, hdc, sc (4 sts along the chain). Sl st in next sc; repeat from * 5 more times. (6 petals)
The small lily is about 2.25 in (5.7 cm) across.
Bud (Make 6, Cream)
Ch 5. Starting in 2nd ch from hook, work sc, hdc, dc, sc. (4 sts) Fasten off. Fold the piece lengthwise and sew it closed to make a slim, pointed bud.
Leaf (Make 12, Green)
Ch 7. Starting in 2nd ch from hook, work sc, hdc, dc, dc, hdc, sc (6 sts). Ch 1, rotate, and work along the other side of the chain: sc, hdc, dc, dc, hdc, sc (6 sts). Sl st into the skipped tip chain. (12 sts) Each leaf is about 1.5 in (3.8 cm) long with a pointed tip.
Stems (Green)
For each pocket, make one ch 12 for the large lily, two ch 8 for the small lilies, and two ch 6 for the buds. Fasten off each chain and leave a 6 in (15.2 cm) tail.
Stamens (Yellow)
On each large lily, embroider 6 straight stitches out from the center. On each small lily, embroider 4. Finish each straight stitch with a French knot.
Arranging the Appliqués
Pick one 22-stitch long side of each pocket to be the front. Sew the large lily in the center of the front so it overlaps the arches and the lower edge of the cream rim. Sew a small lily at each front corner, wrapping it slightly onto the short sides. Run the stems from Round 3 up to each flower. Add a bud on its stem between the lilies, and sew 4 leaves along the stems near the base.
Make All Pieces
- Sage green: 1 back panel, 3 pocket bases and walls (Rounds 1–6), 12 leaves, 15 stem chains
- Cream: 3 pocket rims (Rounds 7–9), 3 large lilies, 6 small lilies, 6 buds
- Yellow: stamens on all 9 lilies
Layout (front view):
     [ring]
       /\
      /  \
     |    |
     | P3 |   base on Row 41
     |    |
     | P2 |   base on Row 22
     |    |
     | P1 |   base on Row 3
     |____|
Joining
Lay the panel right side up. Before the border, the panel is 6 in (15.2 cm) wide and each pocket is 5.5 in (14.0 cm) wide. Pin each pocket so it starts 1 hdc in from each panel edge. That leaves 19 panel stitches behind each pocket.
Placement: Sew the pocket bases along the top of Row 3, Row 22 and Row 41. These rows sit 1.2 in (3.0 cm), 8.8 in (22.4 cm) and 16.4 in (41.7 cm) above the bottom edge of the panel. This leaves about 4 in (10.2 cm) between pockets, so each roll can stand about 0.5 in (1.3 cm) above its rim.
Base seam: On the back side of the pocket, use the 22 front loops left over from Round 2. Whipstitch each loop to the panel across the 19 panel stitches. Sew into 3 evenly spaced panel stitches twice, so 22 loops = 19 + 3.
Rim seam: Hold the back wall of the pocket flat against the panel. Whipstitch the 22 back stitches of Round 8 to the panel the same way: 19 panel stitches, with 3 of them used twice.
Side seams: Sew both back corners from the base up to the rim.
Tension: Pull each stitch only until the pieces just touch. Tight seams make the panel pucker, and loose seams let the pockets droop.
Checkpoint: The panel should still measure 6 in (15.2 cm) wide and lie flat between the pockets.
Border
The border goes around the panel only, not around the strap or the pockets. Work 3 sc for every 2 hdc rows along the sides and 1 sc per stitch along the bottom.
Border Round: With sage green and the right side facing you, join at the base of the strap on the left side. Then work:
– Left taper edge: 12 sc along 8 row ends
– Left long edge: 90 sc along 60 row ends
– Bottom edge: 3 sc in first st, 1 sc in each of next 19 sts, 3 sc in last st (25 sc, including the corners)
– Right long edge: 90 sc along 60 row ends
– Right taper edge: 12 sc along 8 row ends
Fasten off at the base of the strap. (229 sc total)
Why the math works:
– Bottom: The bottom edge has 21 stitches. Working 3 sc into each corner stitch adds 2 stitches per corner, which gives 25 and turns the corners without cupping.
– Sides: 3 sc per 2 rows works out to 3.75 sc per inch, compared with a sc gauge of 4 per inch. That is slightly snug on purpose, so the long edges won’t ripple under the weight of the rolls.
– Size: The border adds 0.25 in (0.6 cm) on each side. That brings the panel to 6.5 in (16.5 cm) wide and about 27.5 in (69.9 cm) long.
Attaching the Ring
Pass the strap through the wooden ring from front to back. Fold it down 1.6 in (4.1 cm) behind the taper. Use the tail to whipstitch the strap end and sides down firmly.
Final Blocking
- Lay the holder face down on a towel or blocking mat.
- Pin the panel to 6.5 in (16.5 cm) x 27.5 in (69.9 cm).
- Mist the panel lightly with water.
- Turn it face up and shape each lily, pinning the petal tips outward.
- Put a toilet roll or a folded towel in each pocket so the walls dry upright.
- Let it dry completely, then remove the pins.
Final Quality-Control Checklist
- Panel is 6.5 in (16.5 cm) wide with straight edges
- Border counts are 12, 90, 25, 90, 12
- Each pocket rim has 76 rev sc
- Each pocket has 19 arches per round
- Pockets are centered and level, about 4 in (10.2 cm) apart
- Stamens are secure and all ends are woven in
- Ring strap is sewn on firmly
Troubleshooting
Pocket base curls: Your tension is too tight. Go up a hook size for the base only.
Roll won’t fit: Measure the base. It must be at least 4 in (10.2 cm) deep.
Arches look uneven: Make sure you skip exactly 3 sts in Round 4. In Rounds 5–6, work into the chain space, not into the chains themselves.
Rim flares: Work Round 9 with a smaller hook.
Panel sags: Use cotton yarn and keep the border snug.
Lily petals curl: Pin and steam the petals flat before you sew them on.
Care
Hand wash in cool water with mild soap and lay flat to dry. Reshape the pockets while they are still damp.
Final Notes
Here is the measurement chain. The 21-stitch panel is 6 in (15.2 cm) wide, and 60 rows make it 24 in (61.0 cm) long. Each 22-stitch pocket base fits on the panel and gives 76 stitches around, then 19 arches, then 76 cream stitches again. The 229-stitch border brings the panel to 6.5 in (16.5 cm) wide. Check each measurement as you go, and your holder will hang straight and hold three rolls neatly.
Happy crocheting!