

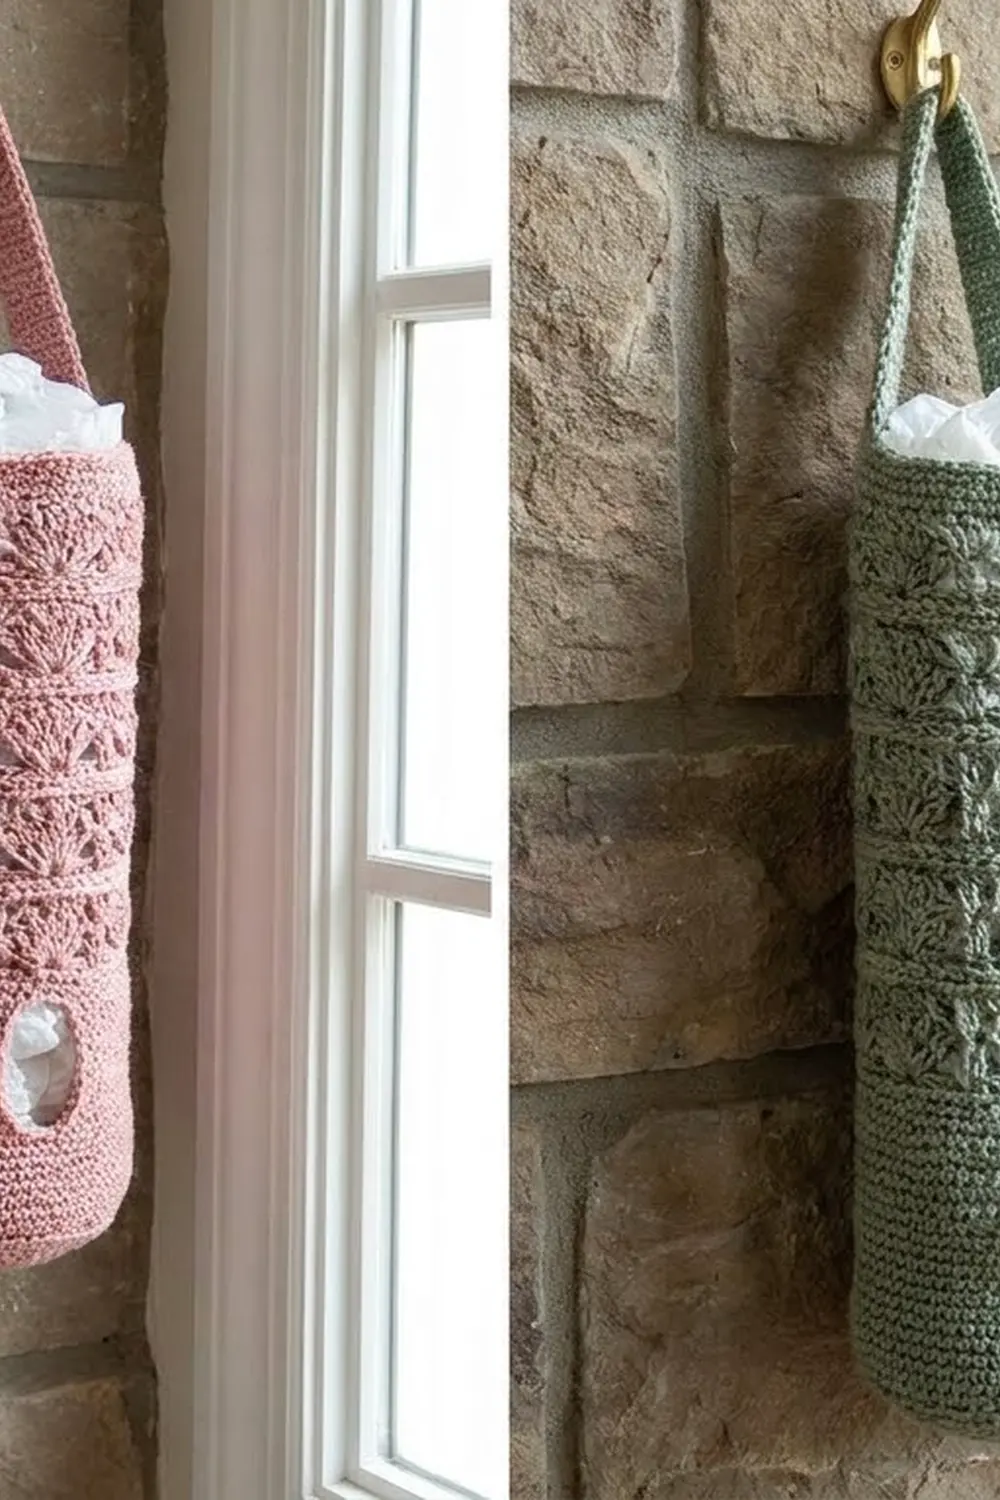
The Sage Lily Fan Bag Holder is a long crocheted tube that hangs from a wall hook and keeps plastic grocery bags tidy. You push used bags in through the open top and pull them out one at a time through an oval hole near the bottom on the front.
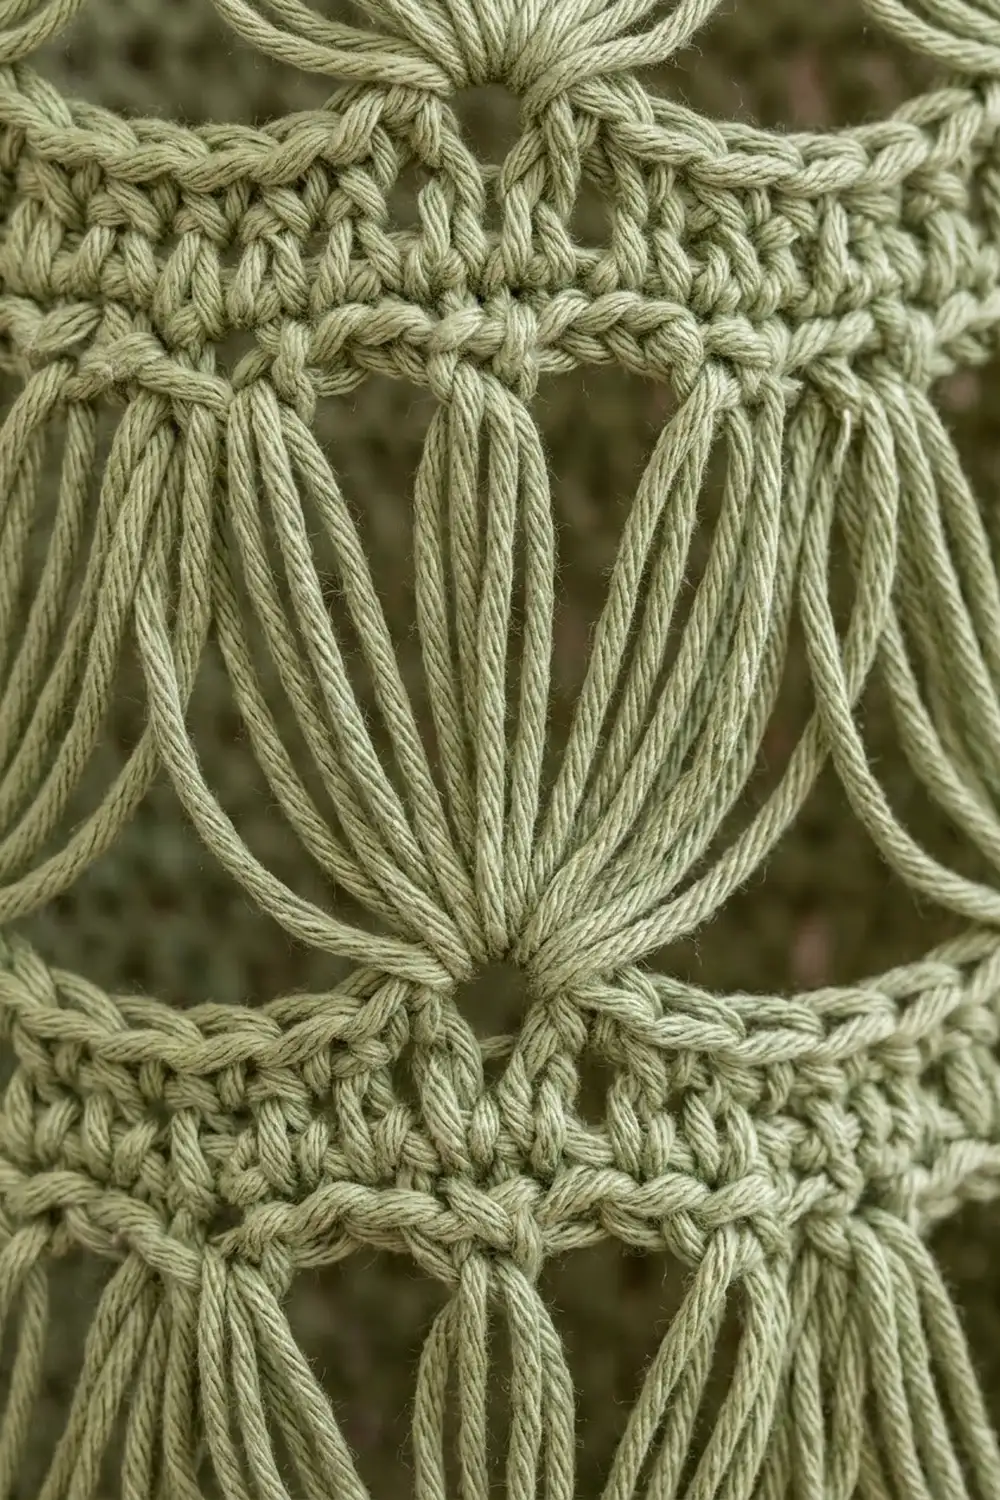
The look comes from seven stacked bands of open lily fans. Each fan is a spray of seven double treble stitches worked into a single stitch, so long strands spread up from one point. The edges of neighboring fans curve into soft arches. Narrow single crochet bands separate the fans, and a solid base, a solid top rim, and a strap frame the piece. The sample is sage green, and a dusty pink version made from the same instructions looks just as good.
This pattern uses US crochet terms. Laid flat, the finished holder is 6 in (15.2 cm) wide and 16.5 in (41.9 cm) long, not counting the strap. The strap adds a hanging loop about 3 in (7.6 cm) tall.
You crochet the tube in one piece from the bottom up, in this order: an oval base, a solid lower section with the dispenser hole worked in rows, seven fan bands, and a top rim. Last, you crochet the strap onto the back of the rim and sew it into a loop. There is no seaming and no joining of separate pieces.
Finished Size and Construction
- Finished size (flat): 6 in (15.2 cm) wide x 16.5 in (41.9 cm) long, plus a 3 in (7.6 cm) hanging loop
- Circumference: 12 in (30.5 cm)
- Skill level: Easy-Intermediate
- Terminology: US
- Yarn weight: Worsted (#4) cotton
- Hook: 5.0 mm (H-8)
- Number of pieces: 1 (the tube and strap are crocheted as one piece)
- Layout: One vertical tube, with the hole centered on the front and the strap centered on the back
- Piece size before rim: 6 in (15.2 cm) wide x 15.75 in (40.0 cm) long
- Rim depth: 0.75 in (1.9 cm)
Materials
Use a smooth worsted-weight cotton or cotton blend. Cotton holds its shape when the holder is full, and the long fan strands look crisp in it. Acrylic also works, but the tube will stretch more as you fill it.
- Sage green worsted cotton: 150 g, about 255 m (279 yd)
- Optional dusty pink version: the same amount, 150 g, about 255 m (279 yd)
Tools:
- 5.0 mm (H-8) crochet hook
- 2 locking stitch markers
- Tapestry needle
- Scissors
- Tape measure
- Spray bottle and a rolled towel for blocking
These amounts include about 20 percent extra for gauge differences.
Abbreviations (US Terms)
- ch – chain
- sl st – slip stitch
- sc – single crochet
- dtr – double treble crochet: yarn over 3 times, insert hook into the stitch, pull up a loop (5 loops on hook), then [yarn over, pull through 2 loops] 4 times
- sk – skip
- st(s) – stitch(es)
- Rnd – round
- RS / WS – right side / wrong side
Special stitch – Fan: Work 7 dtr into the same stitch. The 7 strands spread up and out from one point to form the lily shape.
Gauge and Checkpoints
Gauge: 16 sc and 16 sc rounds = 4 in (10.2 cm). Each sc round is 0.25 in (0.6 cm) tall. Each dtr is about 1 in (2.5 cm) tall.
You don’t need a separate swatch. The first 15 rounds of the holder are your test piece. Check these measurements as you work:
- After Rnd 2: a flat oval about 5.5 in (14.0 cm) long and 1 in (2.5 cm) wide
- After Rnd 5: a tube 12 in (30.5 cm) around, or 6 in (15.2 cm) wide when flattened
- After Rnd 15: 3.5 in (8.9 cm) tall from the bottom fold
- After each fan band: 1.75 in (4.4 cm) taller
If your tube is wider than 6 in (15.2 cm) flat, go down half a millimeter in hook size. If it is narrower, go up half a millimeter. Don’t change the stitch count, because the fan repeat needs exactly 48 stitches.
If your fans are taller than 1 in (2.5 cm), snug each loop before you yarn over. If they are shorter, pull the first loop up to the height of the ch-4.
Pattern
Join every round with a sl st to the first stitch of that round. Don’t turn between rounds. The beginning ch 1 does not count as a stitch. The beginning ch 4 in Rnd B counts as 1 dtr.
Base (Rnds 1–5)
Ch 21.
Rnd 1: Sc in 2nd ch from hook and in next 18 ch, 3 sc in last ch. Rotate the work and continue along the other side of the foundation chain: sc in next 18 ch, 2 sc in the same ch as the first sc. Join. (42 sc: 18 per long side + 3 at each end)
Rnd 2: Ch 1, 2 sc in first st, sc in next 18 sts, 2 sc in each of next 3 sts, sc in next 18 sts, 2 sc in each of last 2 sts. Join. (48 sc: 2 + 18 + 6 + 18 + 4)
Rnds 3–5: Ch 1, sc in each st around. Join. (48 sc)
Flatten the tube so the long sides of the oval lie front and back. Counting from the join, place a marker in the 7th stitch of Rnd 5 and another in the 16th stitch. Stitches 7 through 16 are the 10 center stitches of the front, and they become the bottom edge of the hole. Fasten off.
Dispenser Hole (Rows 6–12)
Now you work in rows over 38 stitches and leave the 10 marked front stitches unworked. This makes an opening 10 stitches wide and 7 rows tall: 2.5 in (6.4 cm) wide and 1.75 in (4.4 cm) tall.
Row 6 (RS): With RS facing, join yarn with a sc in the 17th st of Rnd 5. Sc in each st across the back and on through the 6th st. Turn. (38 sc)
Rows 7–12: Ch 1, sc in each st across. Turn at the end of every row except Row 12. (38 sc)
Row 12 is a RS row. It ends at the hole edge on the 6th-stitch side.
Turning rows look a little different from rounds, but the difference is hard to see in sc.
Close the Ring (Rnds 13–15)
Rnd 13: At the end of Row 12, ch 10 without twisting the chain. Join with a sl st to the first sc of Row 12. Ch 1, sc in the same st and in each of the next 37 sc, then sc in each of the 10 ch. Join. (48 sc: 38 + 10)
From here on, each round starts at the side edge of the hole.
Rnds 14–15: Ch 1, sc in each st around. Join. (48 sc)
Checkpoint: 3.5 in (8.9 cm) from the bottom fold, and 6 in (15.2 cm) wide flat.
Lily Fan Bands (Rnds 16–43)
Each band is 4 rounds and 1.75 in (4.4 cm) tall. You will make 7 bands.
Rnd A (fan round): Ch 1, sc in first st, sk 3 sts, Fan in next st, sk 3 sts, sc in next st. Repeat from * 4 more times, then sk 3 sts, Fan in next st, sk 3 sts. Join to the first sc. (48 sts: 6 Fans x 7 dtr + 6 sc)
Each repeat uses exactly 8 base stitches: the sc stitch, 3 skipped stitches, the Fan stitch, and 3 more skipped stitches. Six repeats x 8 stitches = 48.
Rnd B (leveling round): Ch 4 (counts as dtr). This fills the dip above the sc. Sc in each of the next 7 dtr of the Fan, dtr in next sc. Repeat from * 4 more times, then sc in each of the last 7 dtr. Join to the top of the ch-4. (48 sts: 6 dtr + 42 sc)
Each dtr fills the V between two Fans, so the next round starts level.
Rnd C: Ch 1, sc in each st around. Join. (48 sc)
Rnd D: Ch 1, sc in each st around. Join. (48 sc)
Work Rnds A–D a total of 7 times. Total length after each band:
- Band 1 (Rnds 16–19): 5.25 in (13.3 cm)
- Band 2 (Rnds 20–23): 7 in (17.8 cm)
- Band 3 (Rnds 24–27): 8.75 in (22.2 cm)
- Band 4 (Rnds 28–31): 10.5 in (26.7 cm)
- Band 5 (Rnds 32–35): 12.25 in (31.1 cm)
- Band 6 (Rnds 36–39): 14 in (35.6 cm)
- Band 7 (Rnds 40–43): 15.75 in (40.0 cm)
Always start Rnd A with the sc in the first stitch. That way each Fan sits directly above the Fan in the band below, and you get straight columns of lilies.
Tension tip: For each dtr, pull the first loop up to the same height before you work it off. Even strands give every fan the same open spray.
Border: Top Rim, Hole Edging, and Strap
Rim gauge: Same as the body, 4 sc per inch and 4 rounds per inch.
Rnds 44–46: Ch 1, sc in each st around. Join. (48 sc: 24 on the front and 24 on the back when flattened) Fasten off.
Why the math works: 48 sc ÷ 4 sc per inch = 12 in (30.5 cm) around, which is 6 in (15.2 cm) per flat face. The rim has the same count as every body round, so the opening doesn’t flare or pull in. Three rounds at 0.25 in (0.6 cm) each make a 0.75 in (1.9 cm) rim, which brings the total length to 16.5 in (41.9 cm).
Hole edging: With RS facing, join yarn at the bottom right corner of the hole. Work around the hole:
- 10 sc into the 10 unworked sts of Rnd 5
- 7 sc up the row ends of Rows 6–12
- 10 sc into the back loops of the ch-10
- 7 sc down the row ends on the other side
Join. (34 sc) Work 1 sc per row on the sides. An sc row is about as tall as an sc stitch is wide, so the edging lies flat. Fasten off.
Strap: Flatten the holder with the hole centered on the front. On the back half of Rnd 46, mark the 4 center stitches (stitches 11–14 of the 24 back stitches). Join yarn in the first marked stitch.
- Row 1: Ch 1, sc in the 4 marked sts. Turn. (4 sc)
- Rows 2–24: Ch 1, sc in each st across. Turn. (4 sc)
The strap is 1 in (2.5 cm) wide and 6 in (15.2 cm) long. Fold it over toward the inside of the holder. Sew the last row to the inside of Rnd 44, directly below the base of the strap. This makes a loop about 3 in (7.6 cm) tall. Weave in all ends on the inside.
Final Blocking
- Mist the holder until it is evenly damp. Don’t soak it.
- Slide a rolled towel inside the tube so the holder measures 6 in (15.2 cm) wide flat.
- Lay it down with the hole centered on the front.
- Pat each Fan into an even spray, with its center point lined up in its column.
- Ease the length to 16.5 in (41.9 cm).
- Shape the hole into a smooth oval 2.5 in (6.4 cm) wide.
- Let it dry completely before you take out the towel.
Final Quality-Control Checklist
- Every round has 48 stitches.
- Every Fan has exactly 7 dtr.
- The 7 fan bands line up in straight columns.
- The holder measures 6 in (15.2 cm) by 16.5 in (41.9 cm).
- The hole is 2.5 in (6.4 cm) wide, centered on the front, with 34 edging sc.
- The strap is centered on the back and firmly sewn.
- All ends are woven in on the inside.
Troubleshooting
- Fans lean or spiral: Join every round in the same place, and don’t turn between rounds.
- Wrong count after Rnd A: Recount your skips. Each repeat uses 8 base stitches.
- Bumpy leveling round: Make sure each dtr goes into the sc between two Fans.
- Hole gapes or sags: Work the ch-10 snugly and keep the 34-stitch edging firm.
- Tube widens as it grows: Use a hook half a millimeter smaller for the fan rounds only.
- Hole is off-center: Re-flatten the holder before marking the strap so the strap sits opposite the hole.
- Strap stretches: Use a smaller hook for the strap, or slip stitch along both long edges.
Care
Hand wash in cool water and dry flat over a rolled towel. Don’t hang it while wet, or the cotton will stretch.
Final Notes
Every measurement in this pattern comes from the 48-stitch circumference set in the base: 12 in (30.5 cm) around and 6 in (15.2 cm) flat, the same in every round. The lower section reaches 3.5 in (8.9 cm) and includes a hole 2.5 in (6.4 cm) wide and 1.75 in (4.4 cm) tall. Seven fan bands of 1.75 in (4.4 cm) each bring the holder to 15.75 in (40.0 cm). The 0.75 in (1.9 cm) rim finishes it at 16.5 in (41.9 cm), and the 3 in (7.6 cm) strap loop hangs it. Check each measurement as you reach it and your holder will come out the same size as the sample.
Happy crocheting!