

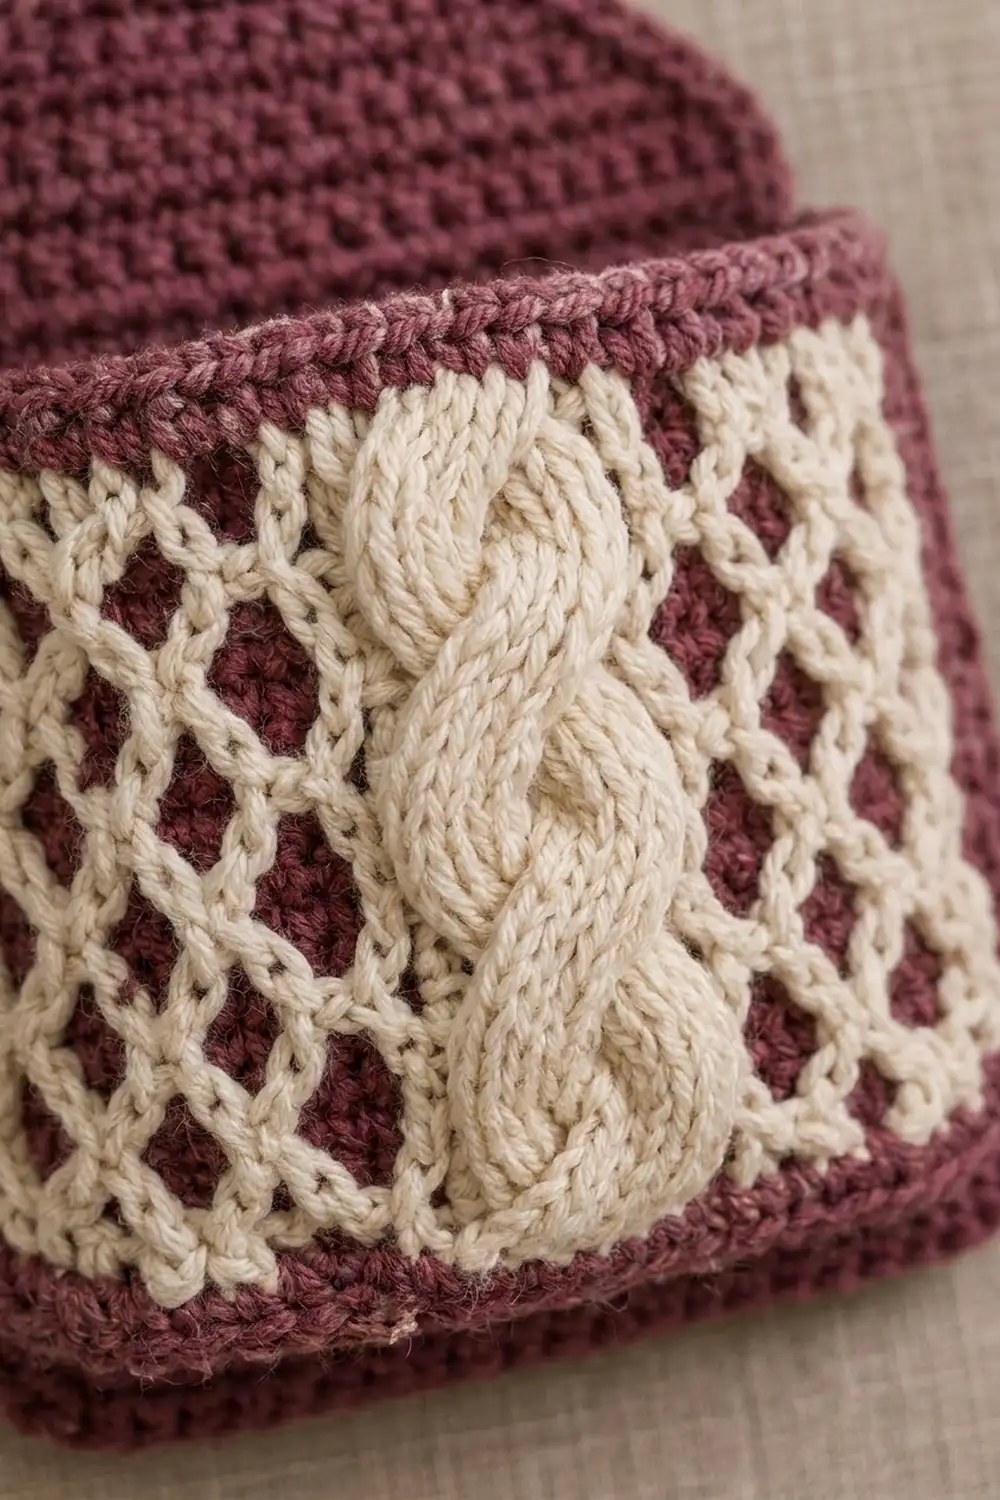
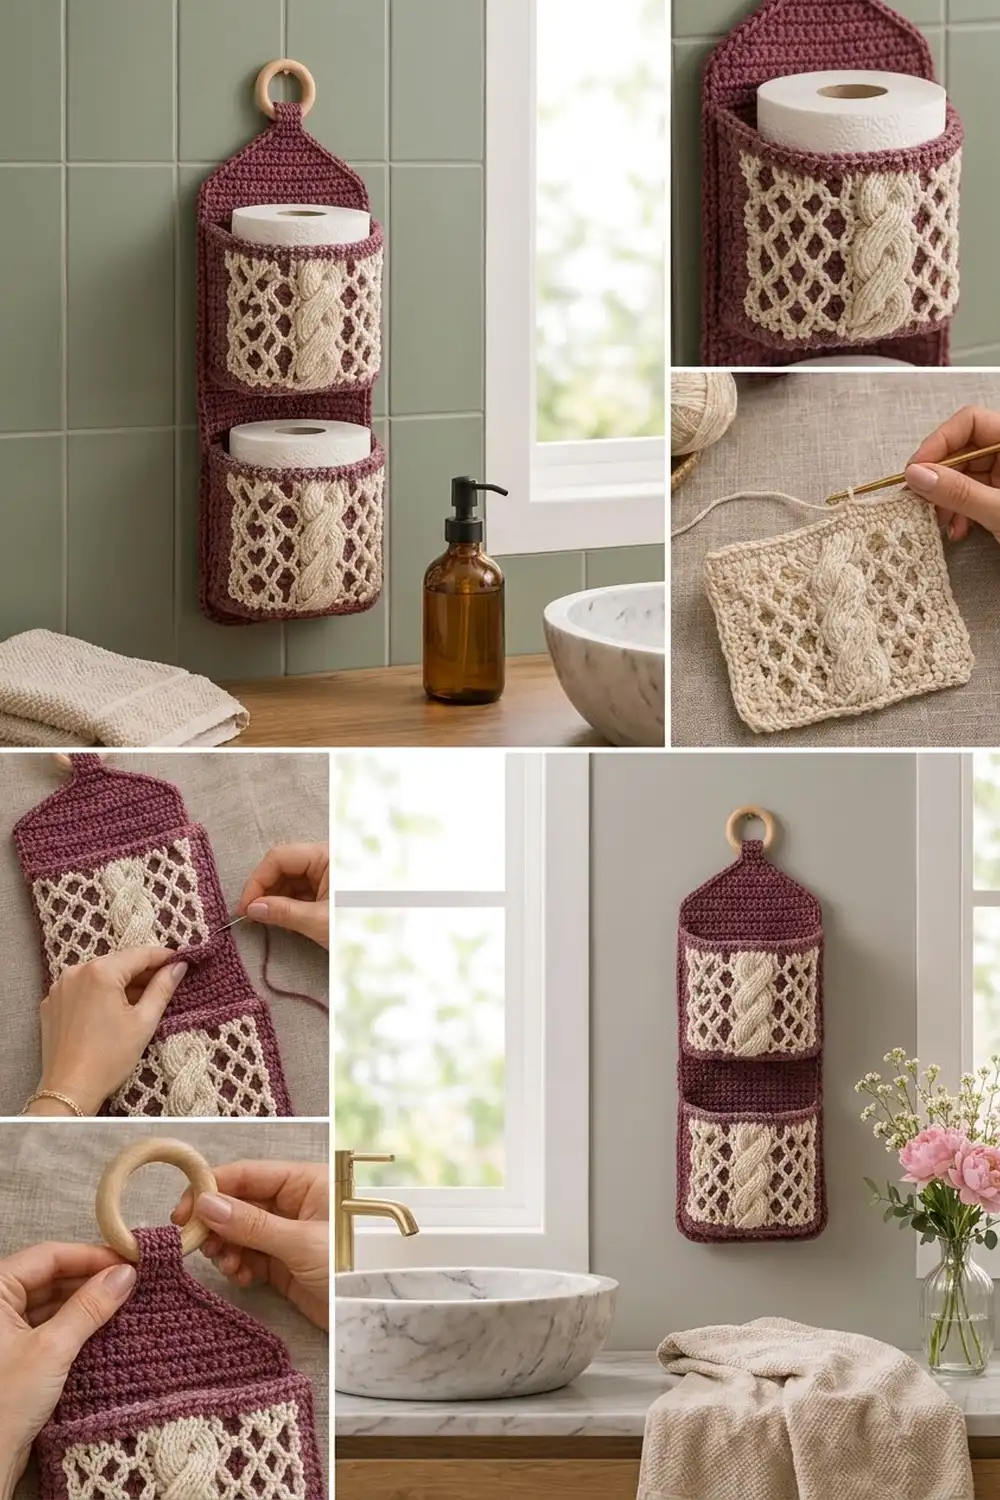
The Mulberry Trellis holder is a wall-hanging organizer that holds two spare rolls in deep, rounded pockets. A plain burgundy back panel keeps the look calm. The pockets get all the detail: a cream diamond lattice on burgundy, with a raised plaited cable up the middle of each front.
The palette is just deep mulberry and warm cream, so the holder suits a neutral bathroom without looking busy. The wooden ring at the top hangs on a hook, a towel bar or a cabinet knob.
This pattern uses US crochet terms. The finished holder measures 6.4 in (16.3 cm) wide and 18 in (45.7 cm) long when laid flat. With the tab folded over the ring, it hangs about 17 in (43.2 cm) tall, not counting the ring.
You’ll work the back panel in single crochet rows, narrowing it at the top into a tab. Each pocket starts as a flat circle, then turns upward into a cup. The cup walls use tapestry crochet for the lattice and front-post trebles for the cable. Once both pockets are sewn on, you’ll add a two-round border and fold the tab over the ring.
Finished Size and Construction
- Finished size: 6.4 x 18 in (16.3 x 45.7 cm) flat; about 17 in (43.2 cm) hanging
- Skill level: Intermediate
- Terminology: US
- Yarn weight: #4 worsted
- Hook: 4.5 mm (US 7)
- Number of pieces: 3 (1 back panel, 2 pockets)
- Layout: Pockets stacked vertically and centered on the panel
- Back panel before border: 5.5 x 17.1 in (14.0 x 43.4 cm)
- Pocket: base 4.75 in (12.1 cm) across; wall 3.75 in (9.5 cm) tall
- Size before border: 5.5 x 17.1 in (14.0 x 43.4 cm)
- Border depth: about 0.45 in (1.1 cm), 2 rounds
Materials
Use a smooth worsted cotton or cotton blend. Cotton holds the pockets’ shape, stands up to bathroom humidity, and shows the lattice and cable clearly. The amounts below assume about 200 m per 100 g.
- Burgundy (mulberry/plum): 140 g, about 280 m (306 yd)
- Cream: 45 g, about 90 m (98 yd)
These quantities include a margin of about 15–20% for your gauge swatch and the tapestry carry.
Tools:
– 4.5 mm (US 7) crochet hook
– Wooden ring, 2.5 in (6.4 cm) across
– Tapestry needle
– Stitch markers (at least 4)
– Scissors and a tape measure
– Pins, plus a standard toilet roll or a jar 4.5 in (11.4 cm) across for blocking
Abbreviations (US Terms)
- ch – chain
- sc – single crochet
- sc2tog – single crochet 2 together
- sl st – slip stitch
- BLO – back loop only
- st(s) – stitch(es)
- B / C – burgundy / cream
- FPtr – front post treble crochet
Special stitch – FPtr: Yarn over twice, insert the hook from front to back to front around the post of the stitch two rounds below, pull up a loop, then [yarn over, pull through 2 loops] 3 times. Always skip the stitch hidden behind each FPtr.
Tapestry color change: Work the last yarn-over of the stitch before the change in the new color. Lay the unused strand along the tops of the stitches and work over it so it stays hidden.
Gauge and Checkpoints
Gauge: 16 sc and 18 rows = 4 in (10.2 cm) in sc worked flat. That’s 4 sts and 4.5 rows per inch.
Make one pocket first, since it’s the strictest test of your gauge. Tapestry stitches tend to come out slightly wider than plain sc, so check the pocket before you start the panel.
Checkpoints:
– Pocket base after Round 10: 4.75 in (12.1 cm) across
– Pocket wall circumference: 15 in (38.1 cm), or 7.5 in (19.1 cm) when flattened
– Pocket wall height after Round 27: 3.75 in (9.5 cm)
– Panel after Row 54: 5.5 x 12 in (14.0 x 30.5 cm)
– Panel after Row 77: 5.5 x 17.1 in (14.0 x 43.4 cm)
If your piece comes out too big, switch to a hook 0.5 mm smaller. If it comes out too small, go up 0.5 mm. If only the tapestry rounds are too big, keep the same hook and tug the carried strand gently every few stitches.
Pocket (Make 2)
Base
Work in joined rounds with B. Ch 1 at the start of each round doesn’t count as a stitch. Join each round with a sl st to the first sc.
Round 1: Make a magic ring and work 6 sc into it. (6)
Round 2: 2 sc in each st. (12)
Round 3: [Sc 1, 2 sc in next] 6 times. (18)
Round 4: [Sc 2, 2 sc in next] 6 times. (24)
Round 5: [Sc 3, 2 sc in next] 6 times. (30)
Round 6: [Sc 4, 2 sc in next] 6 times. (36)
Round 7: [Sc 5, 2 sc in next] 6 times. (42)
Round 8: [Sc 6, 2 sc in next] 6 times. (48)
Round 9: [Sc 7, 2 sc in next] 6 times. (54)
Round 10: [Sc 8, 2 sc in next] 6 times. (60)
Checkpoint: the base should lie flat and measure 4.75 in (12.1 cm) across.
Wall
Round 11 (turning round): Sc BLO in each st. (60 = 60 worked 1 per st + 0 added) The unworked front loops leave a ridge, and that ridge makes the base edge.
Number the stitches of Round 11 from 1 to 60, starting at the join:
– Sts 1–30: front
– Sts 31–60: back
– Front layout: B edge (sts 1–3), lattice (sts 4–12), cable (sts 13–18), lattice (sts 19–27), B edge (sts 28–30)
Place markers at sts 13 and 18. Then mark sts 36 and 55 as sewing guides.
Round 12: Sc in each st. (60)
Lattice Chart (9 sts, read left to right)
- L1: C B B B C B B B C
- L2: B C B C B C B C B
- L3: B B C B B B C B B
- L4: B C B C B C B C B
Wherever two C sts sit diagonally next to each other, they form a cream line. Together these lines make closed burgundy diamonds.
Pattern Rounds
Join C at the start of Round 13. Carry the unused color through every sc. Behind the cable, let B float loosely on the inside of the pocket.
Each pattern round is worked like this:
– Sts 1–3: sc B
– Sts 4–12: lattice row
– Sts 13–18: cable sts in C
– Sts 19–27: lattice row
– Sts 28–30: sc B
– Sts 31–60: sc B
Every round has 60 sts.
Cable sts by round type:
– Set-up: FPtr around each of the 6 sts two rounds below.
– Plain: Sc in C in each of the 6 sts.
– Cross A: Skip 2 FPtr, FPtr around the next 2, then FPtr around the 2 skipped ones, working in front of the 2 you just made. FPtr around the last 2.
– Cross B: FPtr around the first 2. Skip 2, FPtr around the next 2, then FPtr around the 2 skipped ones, working behind.
– Close: FPtr around each of the 6 FPtr, with no cross.
Work the rounds in this order:
| Round | Lattice | Cable |
|---|---|---|
| 13 | L1 | Set-up (around Round 11) |
| 14 | L2 | Plain |
| 15 | L3 | Cross A |
| 16 | L4 | Plain |
| 17 | L1 | Cross B |
| 18 | L2 | Plain |
| 19 | L3 | Cross A |
| 20 | L4 | Plain |
| 21 | L1 | Cross B |
| 22 | L2 | Plain |
| 23 | L3 | Cross A |
| 24 | L4 | Plain |
| 25 | L1 | Close |
Alternating Cross A and Cross B twists the three 2-stitch strands into a plait. Each 4-round lattice repeat is about 0.89 in (2.3 cm) tall, and you’ll work 3 repeats plus a closing L1 row.
Cut C after Round 25, leaving a 6 in (15.2 cm) tail.
Rounds 26–27: With B, sc in each st. (60) Fasten off and weave in the ends.
Checkpoint: the wall should be 3.75 in (9.5 cm) tall (17 rounds), with a 15 in (38.1 cm) circumference.
Back Panel
Work in rows with B. Ch 1 at the start of each row doesn’t count as a stitch. Odd-numbered rows are right side (RS) rows.
Row 1 (RS): Ch 23, sc in 2nd ch from hook and in each ch across. (22)
Rows 2–54: Ch 1, turn, sc in each st. (22)
Checkpoint: 5.5 x 12 in (14.0 x 30.5 cm).
Shaping the top:
– Row 55: Ch 1, turn, sc2tog, sc 18, sc2tog. (20)
– Row 56 and every even row through Row 68: Ch 1, turn, sc in each st. (Same count as the row before.)
– Row 57: Sc2tog, sc 16, sc2tog. (18)
– Row 59: Sc2tog, sc 14, sc2tog. (16)
– Row 61: Sc2tog, sc 12, sc2tog. (14)
– Row 63: Sc2tog, sc 10, sc2tog. (12)
– Row 65: Sc2tog, sc 8, sc2tog. (10)
– Row 67: Sc2tog, sc 6, sc2tog. (8)
Tab, Rows 69–77: Ch 1, turn, sc in each st. (8)
Don’t fasten off. Leave the loop on a marker for the border.
Checkpoint: 5.5 x 17.1 in (14.0 x 43.4 cm). The shaped section is 3.1 in (7.9 cm) tall, and the tab is 2 x 2 in (5.1 x 5.1 cm).
Make All Pieces
- Pockets: 2. Each uses about 45 g B and 20 g C.
- Back panel: 1. Uses about 45 g B, including the border.
Layout (as seen from the front):
        [ tab + ring ]
       /  shaped top  \
  |  rows 47-54: plain  |
  |  rows 30-46: POCKET |
  |  rows 21-29: plain  |
  |  rows 4-20:  POCKET |
  |  rows 1-3:   plain  |
Joining
Pin each pocket to the panel with the cable centered at the front. The back of the pocket (sts 36–55) lies flat against the panel, and the rest of the wall curves forward into a deep D shape.
The sewing outline is a rectangle that matches 1 to 1, because the panel and the pocket share the same gauge:
– Bottom: the 20 front-loop ridge sts of Round 11 (sts 36–55) to panel sts 2–21 of the bottom row
– Sides: st 36 and st 55 of each wall round (Rounds 11–27, 17 rounds) to panel sts 2 and 21 of 17 rows
– Top: the 20 sts of Round 27 to panel sts 2–21 of the top row
Lower pocket: Sew the base edge along Row 4 and the rim along Row 20.
Upper pocket: Sew the base edge along Row 30 and the rim along Row 46.
Whipstitch with a long B tail through both layers. Pull each stitch snug, but stop before the panel puckers. Check that the panel still measures 5.5 in (14.0 cm) wide across the pocket rows.
Border
Border gauge: 8 sc per 9 row ends along straight edges and tab edges, and 1 sc per row end along the shaped diagonals.
Round 1: With the loop from Row 77, ch 1. Corner groups are 3 sc in a single st, and the counts listed are between corner groups:
– Tab top: 3 sc in the first st, sc 6, 3 sc in the last st.
– Each long side:
– 8 sc over the 9 tab row ends
– 14 sc over the 14 diagonal row ends
– 48 sc over the 54 straight row ends
– Total: 70 sc
– Bottom: working in the free loops of the foundation ch, 3 sc in the first loop, sc 20, 3 sc in the last loop.
– Join with a sl st.
Total: 12 corner sts + 6 + 20 + 70 + 70 = 178.
Round 2: Ch 1, sc in each st, working 3 sc in the center st of each corner group. (186 = 178 worked 1 per st + 8 added)
Counts between corner centers:
– Tab top: 8
– Bottom: 22
– Each long side: 72
Fasten off.
Why the math works: At 4 sts and 4.5 rows per inch, 9 row ends measure the same as 8 sc. The straight sides are 54 rows, or 12 in, and 48 sc also equals 12 in (30.5 cm). The tab sides are 9 rows, or 2 in, and 8 sc equals 2 in. Each diagonal measures about 3.5 in (8.9 cm), so 14 sc fits it. The bottom has 22 sts, which equals the panel’s 5.5 in.
Final Blocking
- Wet the finished holder, gently squeeze out the water and roll it in a towel.
- Lay it face up and pin it to 6.4 x 18 in (16.3 x 45.7 cm).
- Slide a roll or a 4.5 in (11.4 cm) jar into each pocket so the cups dry round.
- Straighten the lattice lines and the cable so they run vertically.
- Let it dry completely.
- Fold the top 1 in (2.5 cm) of the tab to the back around the ring, and whipstitch it in place.
Final Quality-Control Checklist
- Panel is 6.4 x 18 in (16.3 x 45.7 cm) flat and hangs about 17 in (43.2 cm)
- Each pocket wall has 60 sts and is 3.75 in (9.5 cm) tall
- The lattice diamonds are closed and symmetrical on both sides of the cable
- The cables cross in alternating directions and lie flat
- No carried strands show on the outside
- Pockets are centered, level and firmly sewn
- The ring is secure, and the tab seam is invisible from the front
Troubleshooting
- Pocket too wide: Your tapestry tension is loose. Tug the carried strand more often, or go down a hook size.
- Cable puckers the wall: Loosen up on your FPtr, and make sure you skip the sc behind each one.
- Carried yarn peeks through: Tilt the hook so the carried strand sits on top of the stitch before you work over it.
- Panel edges ripple: Re-check the 8-in-9 spacing on Border Round 1.
- Pocket sags forward: Add a second line of whipstitch along the base ridge.
Care
Hand wash in cool water and lay flat to dry, reshaping the pockets over a roll. Don’t tumble dry.
Final Notes
Everything in this pattern follows from one measurement chain. At gauge (4 sts and 4.5 rows per inch), the pocket base is 4.75 in (12.1 cm) across and each wall is 3.75 in (9.5 cm) tall. The panel measures 5.5 x 17.1 in (14.0 x 43.4 cm) before the border and 6.4 x 18 in (16.3 x 45.7 cm) after it. Once the tab is folded, the holder hangs about 17 in (43.2 cm). Check each number as you reach it, and the finished holder will come out as planned.
Happy crocheting!