

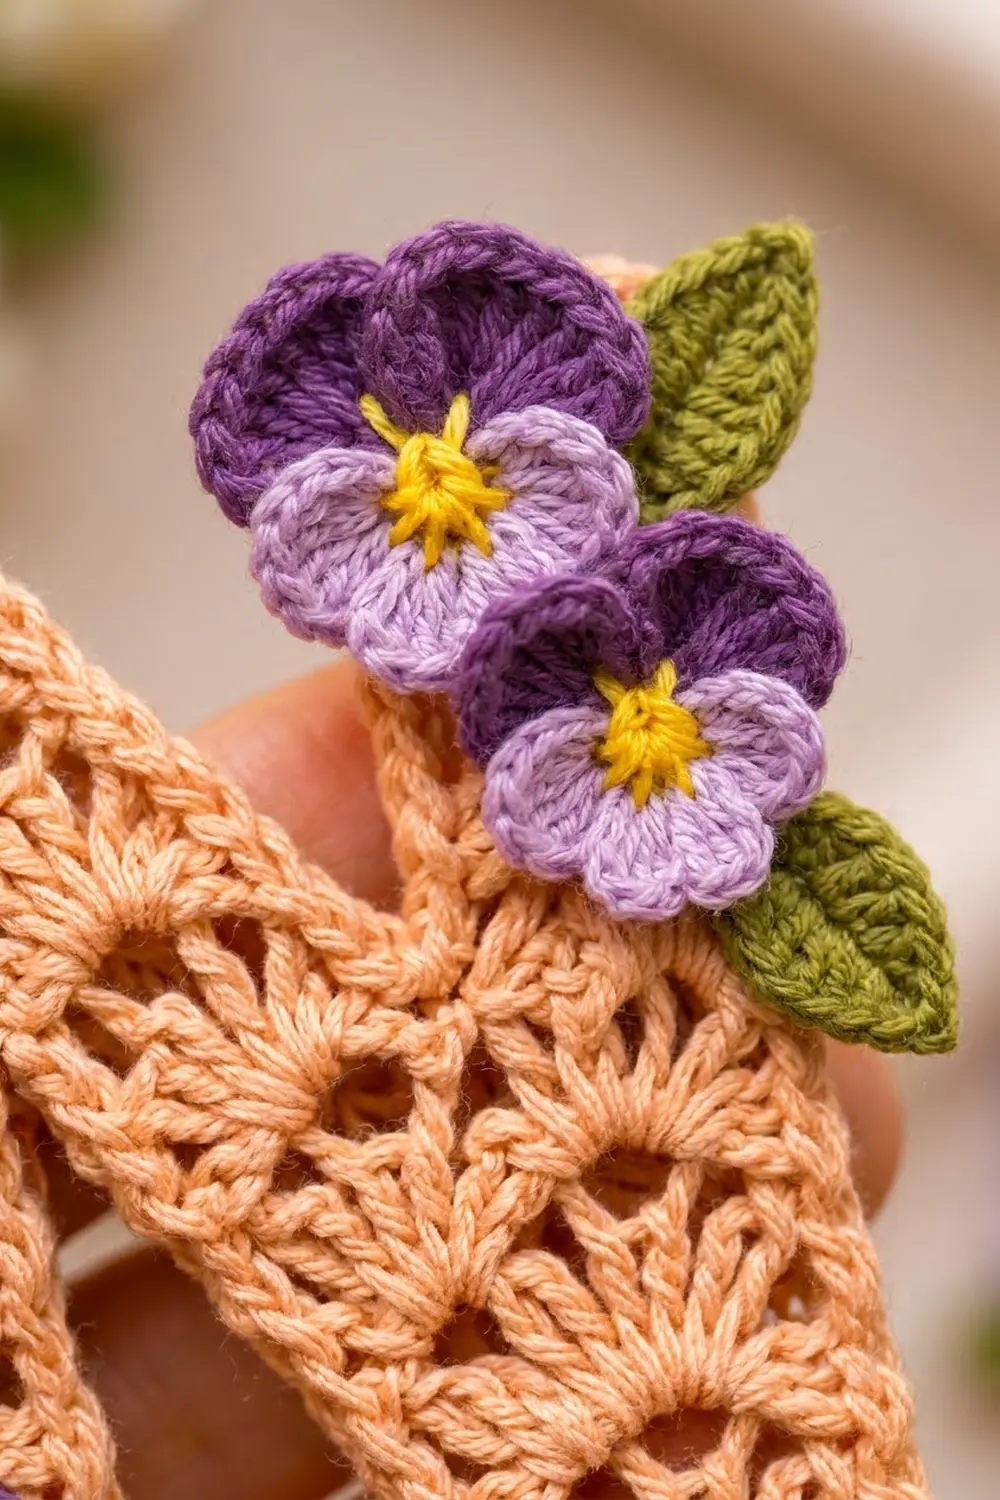
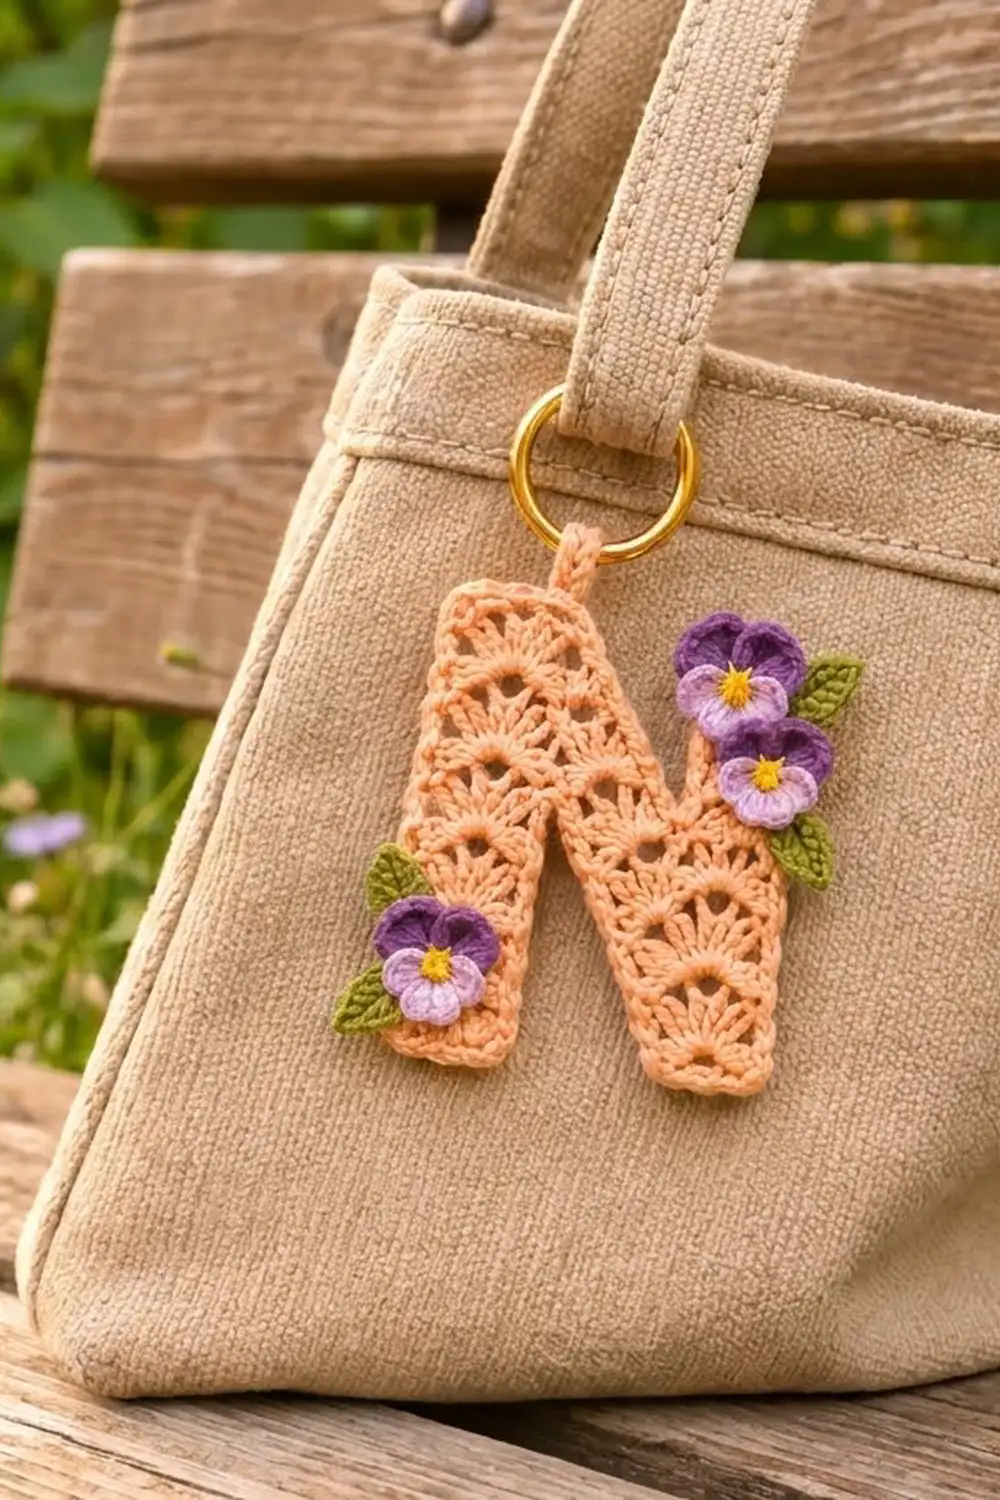
This little letter N is made for clipping onto a tote, backpack or key set. The letter is lacy peach shell stitch with a crisp single-crochet edge, and three small pansies in deep purple, soft lavender and sunny yellow sit on top with olive-green leaves.
The look is light and feminine. The open fans let the bag color show through, while the solid edge keeps the letter shape sharp. The pansies give it a cottage-garden feel without hiding the lace.
This pattern uses US crochet terms. The finished letter measures 3.75 in (9.5 cm) wide by 4.25 in (10.8 cm) tall, not counting the ring.
Construction is simple. You make three identical shell-stitch strips: two stems and one diagonal. The diagonal sits behind the stems at an angle and is sewn in place. One round of single crochet then goes around the whole N outline. Last, you add the hanging loop, ring, pansies and leaves.
Finished Size and Construction
- Finished size: 3.75 in × 4.25 in (9.5 cm × 10.8 cm)
- Skill level: Easy-intermediate
- Terminology: US
- Yarn weight: Sport / light #2 cotton
- Hook: 3.0 mm for the letter; 2.5 mm for the flowers and leaves
- Number of pieces: 3 strips, 3 pansies, 3 leaves
- Layout: Left stem, diagonal, right stem
- Piece size (one strip): 1.25 in × 4.0 in (3.2 cm × 10.2 cm)
- Size before border: 3.5 in × 4.0 in (8.9 cm × 10.2 cm)
- Border depth: 0.125 in (0.3 cm) on every side
Materials
Use a smooth mercerized cotton or a cotton blend in sport weight, about 150 m per 50 g. Cotton keeps the shell fans crisp and holds its shape on a bag.
- Peach (A): 15 g, about 45 m
- Dark purple (B): 3 g, about 9 m
- Lavender (C): 3 g, about 9 m
- Yellow (D): 1 g, about 3 m
- Olive green (E): 2 g, about 6 m
These quantities include a safety margin of roughly 25 percent.
Tools:
– 3.0 mm and 2.5 mm crochet hooks
– Tapestry needle
– Gold metal key ring, 1.25 in (3.2 cm) across
– 4 stitch markers
– Rustproof pins
– Foam blocking mat
– Small scissors
– Spray bottle
Abbreviations (US Terms)
- ch – chain
- sl st – slip stitch
- sc – single crochet
- hdc – half double crochet
- dc – double crochet
- tr – treble crochet
- sc2tog – single crochet 2 together
- sk – skip
- st(s) – stitch(es)
- MR – magic ring
- RS – right side
Shell: 5 dc worked into the same stitch.
Half shell: 3 dc worked into the same stitch. At the start of a row, the first half shell is ch 3 plus 2 dc.
Gauge and Checkpoints
Make one stem strip first and measure it before you go on. It is your gauge swatch.
- Width: 7 sts = 1.25 in (3.2 cm)
- After Row 2: 0.75 in (1.9 cm) tall
- After Row 6: 2.25 in (5.7 cm) tall
- After Row 10: 3.75 in (9.5 cm) tall
- After Row 11: 4.0 in (10.2 cm) tall
If your strip comes out too big, go down 0.25 mm in hook size. If it comes out too small, go up 0.25 mm. Getting the height right matters most, because the diagonal only fits when all three strips match.
Strips (Make 3)
Use Color A and the 3.0 mm hook. All three strips are worked the same way.
Foundation: Ch 8.
Row 1 (RS, Row A): Sc in 2nd ch from hook, sk 2 ch, shell in next ch, sk 2 ch, sc in last ch, turn. (7 sts: 2 sc, 5 dc)
Row 2 (Row B): Ch 3 (counts as dc), 2 dc in first sc, sk 2 dc, sc in center dc of shell, sk 2 dc, 3 dc in last sc, turn. (7 sts: 6 dc, 1 sc)
Row 3 (Row A): Ch 1, sc in first dc, sk 2 dc, shell in sc, sk 2 dc, sc in top of turning ch, turn. (7 sts)
Rows 4–10: Repeat Rows 2 and 3 three more times, then work Row 2 once more. The strip now has 10 rows and 7 sts. Odd rows have a full shell in the center, and even rows have half shells at both edges. The fans all open upward.
Row 11 (trim row): Ch 1, sc in each of the 7 sts across, working the last sc into the top of the turning ch. (7 sc)
Fasten off with a 6 in (15.2 cm) tail. Each strip measures 1.25 in × 4.0 in (3.2 cm × 10.2 cm).
Pansies (Make 3)
Use the 2.5 mm hook.
Center (Color D): Make a MR, ch 1, work 5 sc into the ring, then sl st to the first sc. (5 sc) Pull the ring closed and fasten off.
Lower petals (Color C): Join in any sc. Work (sl st, ch 2, 4 dc, ch 2, sl st) into that sc and into each of the next 2 sc. (3 petals) Fasten off.
Upper petals (Color B): Join in the 4th sc. Work (ch 3, 6 tr, ch 3, sl st) into the 4th sc and again into the 5th sc. (2 petals) Fasten off with a 8 in (20.3 cm) tail for sewing.
Each pansy measures about 1 in (2.5 cm) across.
Leaves (Make 3)
Use Color E and the 2.5 mm hook.
- Ch 6.
- Working along one side of the chain: sc in 2nd ch from hook, then hdc, dc, hdc, sc in the next 4 ch. (5 sts)
- In the last ch, work ch 2 and sl st to form the tip.
- Working along the other side of the chain: sc, hdc, dc, hdc, sc. (5 sts)
- Sl st to the first sc.
Fasten off with a tail. Each leaf is about 0.75 in (1.9 cm) long.
Make All Pieces
- Color A: 3 strips
- Colors B, C and D: 3 pansies
- Color E: 3 leaves
Layout, seen from the RS (L = left stem, D = diagonal, R = right stem, . = open space):
L L D . . R R
L L . D . R R
L L . D D R R
L L D D . R R
L L . D . R R
L L . . D R R
Joining
Method: Overlap the pieces and whipstitch them together with the Color A tails.
- Place the two stems RS up and parallel, 1.0 in (2.5 cm) apart. Line up their foundation edges at the bottom.
- Slide the diagonal underneath, also RS up. Its top outer corner should sit exactly under the left stem’s top inner corner. Its bottom outer corner should sit exactly under the right stem’s bottom inner corner.
- Each end of the diagonal is now hidden behind a stem. The angle is about 31 degrees from vertical. Pin it in place.
Stitch-to-stitch logic: Each stem row-end gets sewn to the diagonal underneath.
- Left stem: Whipstitch the row-ends of Rows 5–11 on its inner edge to the diagonal, one stitch per row-end.
- Right stem: Do the same along the row-ends of Rows 1–7 on its inner edge.
- Hidden ends: From the back, tack the diagonal’s hidden ends to the backs of the stems with 4–5 small stitches each.
Tension: Snug each stitch, but don’t pull tight. Pulling causes puckers along the stem edges.
Size checkpoint: The joined letter should measure 3.5 in × 4.0 in (8.9 cm × 10.2 cm). Weave in the joining tails.
Border
Border gauge:
– Long edges: 2 sc per dc row-end and 1 sc per sc row-end. That is about 5.3 sc per inch (2.1 per cm).
– Short edges: 1 sc per stitch, about 5.6 sc per inch (2.2 per cm).
Corner rule: At each outer corner, work 3 sc into one stitch. The middle sc is the corner stitch. The “per side” counts below already include both corner stitches. The 2 extra sc at each corner are counted separately.
Round 1 (Color A, 3.0 mm hook, RS facing): Join in the bottom-left corner of the left stem and ch 1. Work counterclockwise:
- Left stem bottom: 3 sc in the corner foundation st, sc in the next 5 sts, 3 sc in the last st. (7 per side)
- Left stem inner edge: 8 sc up the row-ends of Rows 1–4.
- Inner junction: Sc2tog, with one leg in the row 5 row-end and one leg in the diagonal edge.
- Diagonal lower edge: 10 sc across about 2 in (5.1 cm), down to the right stem’s bottom-left corner.
- Right stem bottom: 3 sc in the corner st, sc in the next 5 sts, 3 sc in the last st. (7 per side)
- Right stem outer edge: 21 sc up the row-ends (20 for Rows 1–10, 1 for Row 11), then 3 sc in the corner. (23 per side, including both corners)
- Right stem top: Sc in the next 5 sts, 3 sc in the corner st. (7 per side)
- Right stem inner edge: 8 sc down the row-ends of Rows 11–7.
- Inner junction: Sc2tog.
- Diagonal upper edge: 10 sc up to the left stem’s top-right corner.
- Left stem top: 3 sc in the corner st, sc in the next 5 sts, 3 sc in the last st. (7 per side)
- Left stem outer edge: 21 sc down the row-ends. (23 per side, including both corners)
Sl st to the first sc. (124 sts)
Why the math works:
- Each short side is worked over exactly 7 strip sts: 5 plain sc plus 2 corner stitches.
- Each long outer side follows the row-end gauge: 10 dc rows × 2 + 1 sc row = 21, plus 2 corners = 23.
- Total: 100 plain stitches plus 8 corners × 3 sc = 124 sts.
- Each strip makes up exactly one side of the outline, so nothing is added at the seams.
- The sc2tog at each inner junction stops the edge from rippling.
Hanging loop:
- Join Color A in the center (3rd plain) sc of the left stem top.
- Ch 12, then sl st into the same st.
- Ch 1 and work 16 sc into the loop, then sl st into the same st again.
- Fasten off. The loop stands about 0.75 in (1.9 cm) tall.
- Thread the gold ring through the loop.
Final Blocking
- Mist the letter until it is evenly damp.
- Lay it RS up on the blocking mat.
- Pin the 8 outer corners until the letter measures 3.75 in × 4.25 in (9.5 cm × 10.8 cm).
- Pin the 2 inner junctions so the open triangles stay crisp.
- Gently open each shell fan with your fingertips.
- Let it dry completely, at least 4 hours.
- Remove the pins, then sew on the flowers and leaves (see below).
Appliqués:
- Top right: Stack two pansies at the top-right corner of the right stem. They may overlap the outer edge by up to 0.5 in (1.3 cm). Tuck one leaf above the top pansy and one leaf below the lower pansy, both angled outward.
- Bottom left: Sew one pansy at the lower-left corner of the left stem, with a leaf above and to its left.
- Sewing: Stitch through the flower centers and petal bases only, so the petal tips stay loose.
Final Quality-Control Checklist
- [ ] Letter is 3.75 in × 4.25 in (9.5 cm × 10.8 cm)
- [ ] All three strips are the same height
- [ ] The diagonal lines up with both inner corners
- [ ] No diagonal edges peek above or below the stems
- [ ] Border count is 124 sts, and the corners are sharp
- [ ] Inner junctions lie flat
- [ ] Loop is centered on the left stem and the ring moves freely
- [ ] Pansies are firmly attached and all tails are hidden
Troubleshooting
- Strips are different heights: Re-block the shorter strip, or redo Row 11 with a looser tension.
- Diagonal corner shows above the top edge: Slide the diagonal down slightly and re-pin before you sew.
- Border ripples: You have too many sc. Work 2 sc per dc row-end, never 3.
- Border pulls or cups: Go up a hook size for the border only.
- Inner corners gap open: Pull the sc2tog firmly and add a hidden stitch on the back.
- Petals curl: Steam them lightly and pin them flat while they dry.
Care
Hand wash in cool water and press out the water in a towel. Lay flat to dry, reshaping the corners. Don’t wring or tumble dry.
Final Notes
The measurement chain is short and reliable:
- Each 7-st strip measures 1.25 in × 4.0 in (3.2 cm × 10.2 cm).
- Two stems plus a 1.0 in (2.5 cm) gap make 3.5 in × 4.0 in (8.9 cm × 10.2 cm).
- One 0.125 in (0.3 cm) sc border brings the letter to 3.75 in × 4.25 in (9.5 cm × 10.8 cm).
If you check the first strip carefully, everything after it falls into place.
Happy crocheting!